How to Securely Erase External Hard Drive: 4 Best Ways
On this page, we'll show you 4 ways to securely erase your external hard drive before selling or donation, without worrying about your personal data being compromised.
By Jonna Updated on March 6, 2025
Securely erasing an external hard drive is crucial to protect sensitive information from unauthorized access. Whether you are selling, donating, or recycling your drive, ensuring that your data is unrecoverable is a vital step. When it comes to disk erasure, there are two options - Secure Erase and Wipe. What's the difference between the two? How do you securely erase an external hard drive? We'll answer them for you in the following.
What is the Difference between Secure Erase and Wipe?
Many people confuse "secure erase" with "wipe," but they function differently and serve distinct purposes.
- Secure Erase is a command embedded within the firmware of storage devices, particularly for SSD erasing. This command instructs the drive to internally erase all stored data, effectively restoring the device to its original factory state. It accounts for the unique architecture of flash memory, ensuring that all data blocks, including those not currently mapped to active files, are thoroughly erased.
- Wiping refers to the process of overwriting the entire storage medium with new data, typically patterns of zeros, ones, or random data. This method ensures that previous data is irretrievable by replacing it entirely. However, it's worth noting that wiping may be less efficient on SSDs due to their wear-leveling algorithms, which can cause overwriting processes to be less predictable.
Best 4 Ways to Securely Erase External Hard Drive
If you need to permanently delete sensitive data, here are the 4 best and most secure methods for wiping external hard drive.
Way 1. Use Reliable Disk Wipe Software
One of the easiest and most effective ways to securely wipe an external hard drive is by using dedicated disk wipe software. AOMEI Backupper Professional is a powerful and user-friendly tool that ensures data is completely wiped beyond recovery.

-
It allows you to wipe an entire disk or wipe partitions or unallocated space as necessary, without recovery.
-
It supports wiping all internal or external storage devices, including HDDs, SSDs, USB drives, SD cards, etc.
-
It offers 4 wiping methods - Fill sectors with Zero, Fill sectors with random data, DoD 5220.22-M, and Gutmann for different security needs.
-
It is widely compatible with Windows 11, 10, 8.1, 8, 7, Vista, XP systems and offers a Server version for all server systems.
You could download and try the wiping process following the guide below in the trial version. To conduct the operation, please upgrade to the full version.
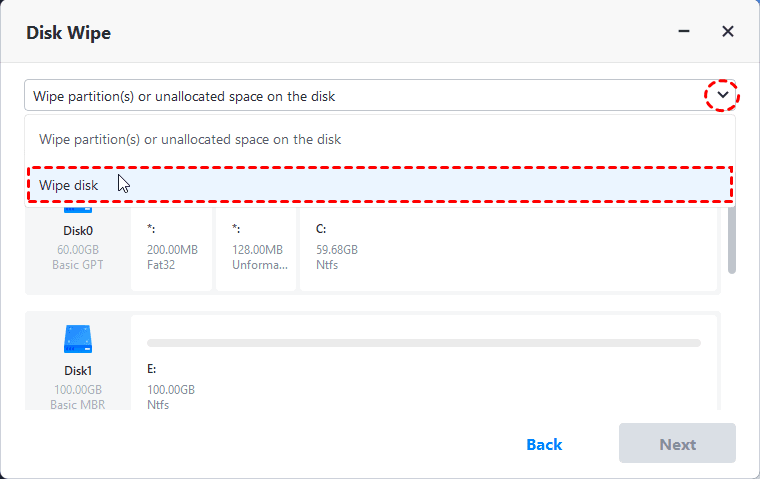
Step 1. Run this tool, click Tools from the left tab, and select Disk Wipe.

Step 2. Choose the wiping type as needed. To securely erase external hard drive on Windows 10/11, choose Wipe disk and hit Next.
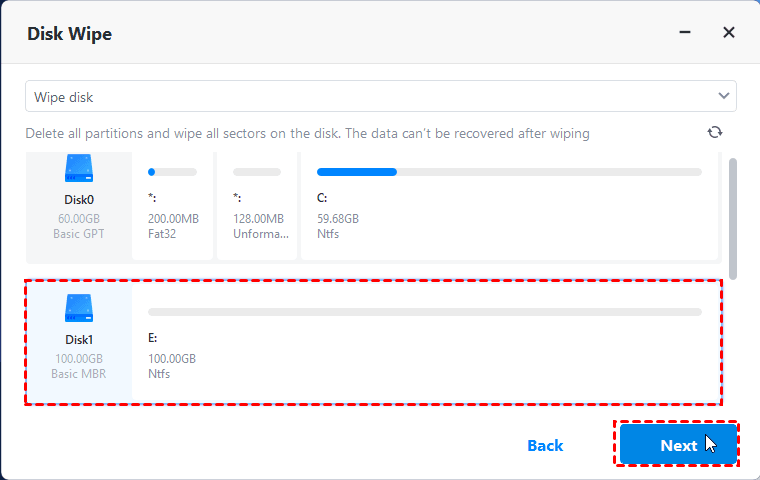
Step 3. Select the connected external drive that you want to erase and click Next.
Step 4. Choose your target wiping method and click Start to securely erase your external hard drive.

Way 2. Securely Erase External Drive with DBAN
DBAN, Darik's Boot and Nuke, is a free, open-source utility designed to securely wipe hard drives by overwriting all data, rendering it irretrievable. However, using DBAN to erase an external drive requires careful steps to ensure effectiveness and prevent accidental data loss.
Step 1. Visit the official DBAN website, download and write the DBAN ISO file to a USB flash drive.
Step 2. Boot from the DBAN USB drive. Then, You will go to Darik's Boot and Nuke blue screen.
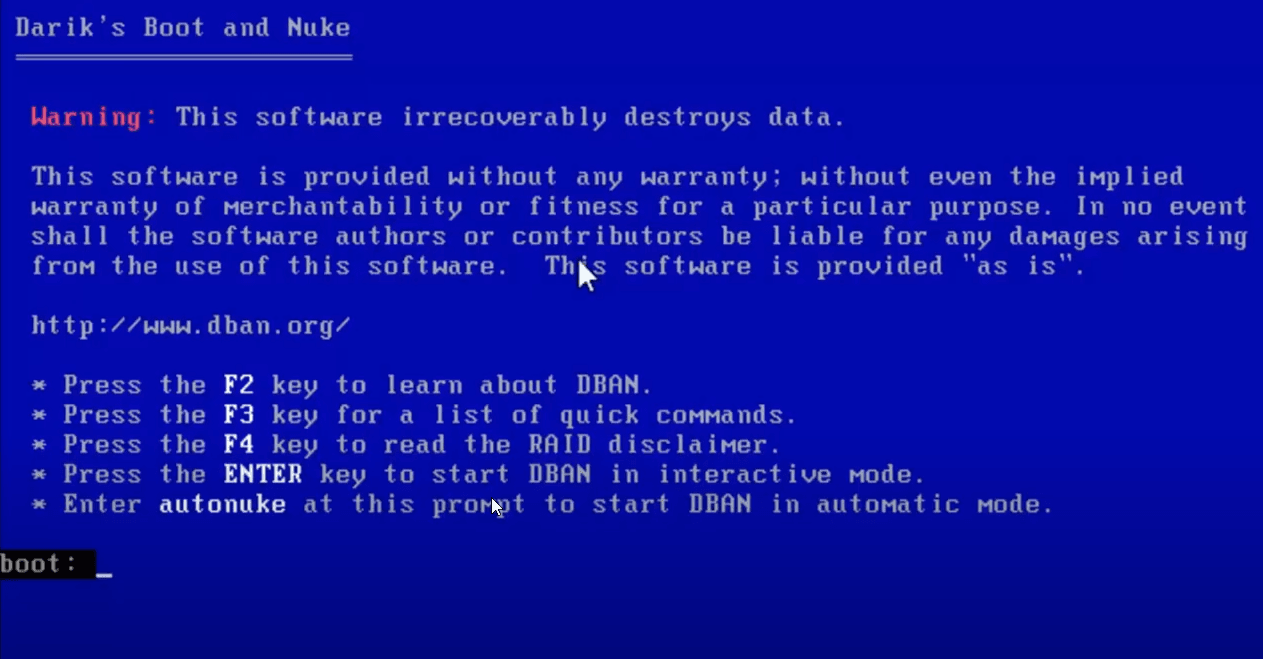
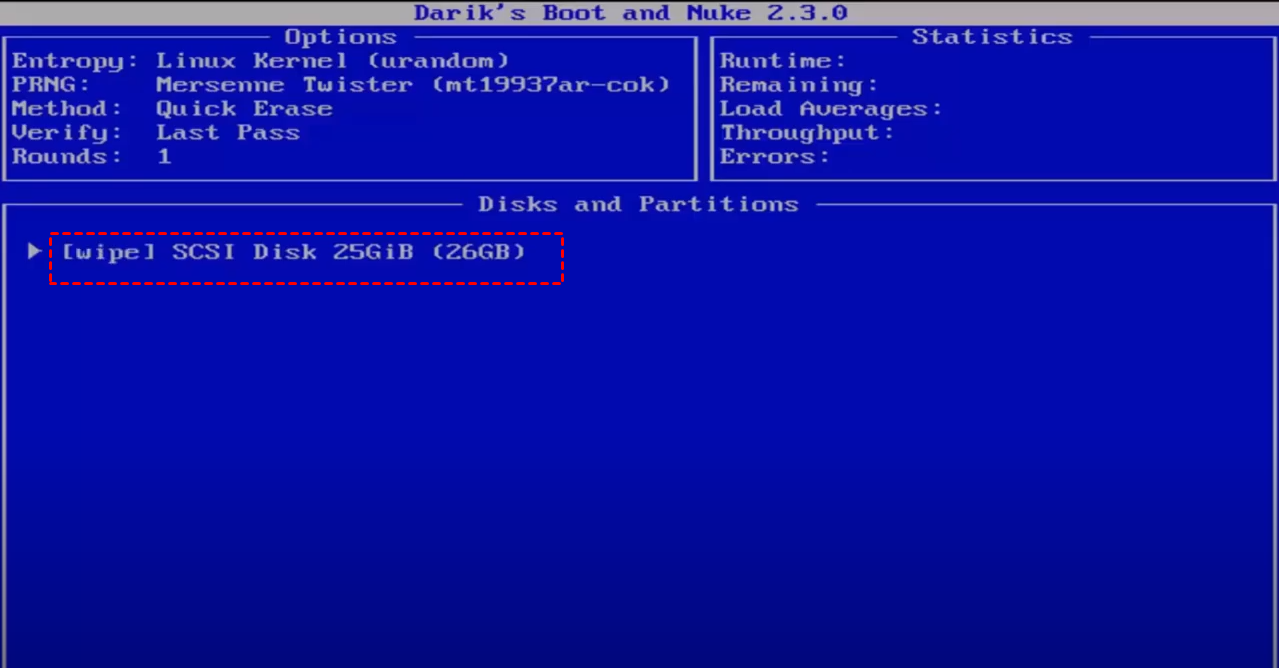
Step 3. Press Enter to start interactive mode. From here, you can see all your detected storage devices.
Step 4. Select the external drive you wish to erase. You can type M to learn about the disk wiping method.

Step 5. Use the J and K keys to move up and down, then press the space bar to select the drive, which will then display "wipe" next to the drive.
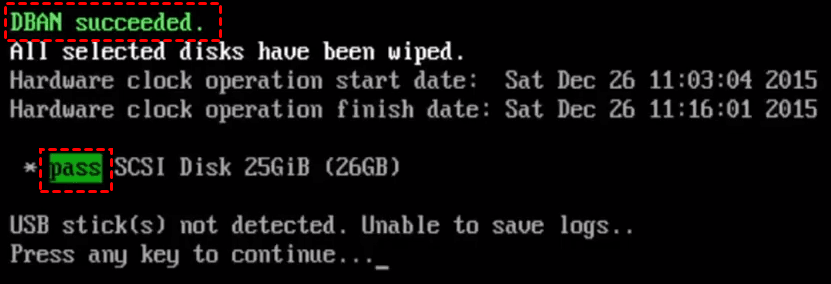
Step 6. Hit F10 to initiate the process. When it's complete, DBAN will show you "DBAN succeeded," which states that it has successfully wiped external SSD or HDD.
Way 3. Reset PC to Securely Erase External Hard Drive
If you don't want to use third-party software, you can use Windows's built-in factory reset to wipe the external drive.
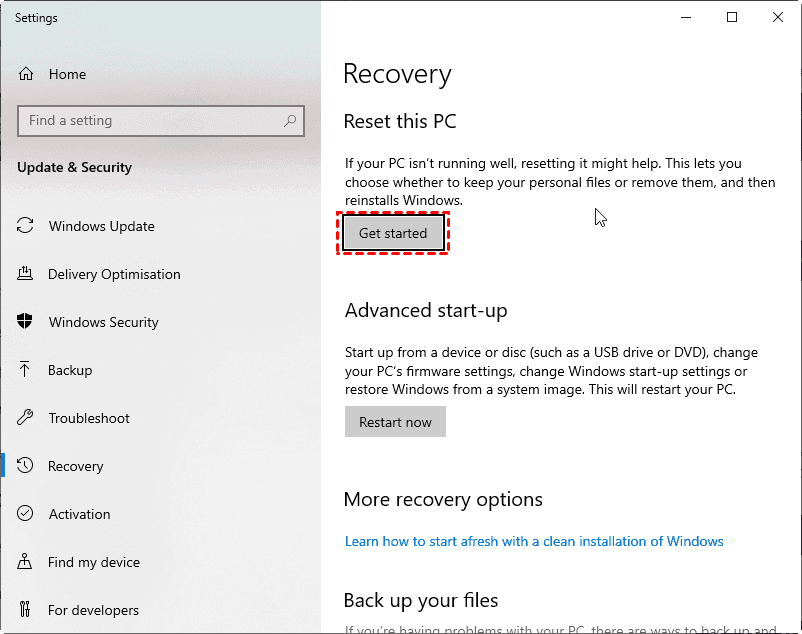
Step 1. Press Windows + I to open Windows Settings, and navigate to System > Recovery.
Step 2. Click on Get Started under Reset this PC.
Step 3. Choose Remove everything on the pop-up screen.

Step 4. Then, click on Change settings, enable Clean data, and tap on Confirm.
Way 4. Securely Erase External Hard Drive via Command Prompt
For tech-savvy users, Command Prompt offers a powerful way to securely erase hard drive on Windows 11/10, either for external SSD or HDD.
Step 1. Type CMD in the Windows search bar and select Run as administrator.
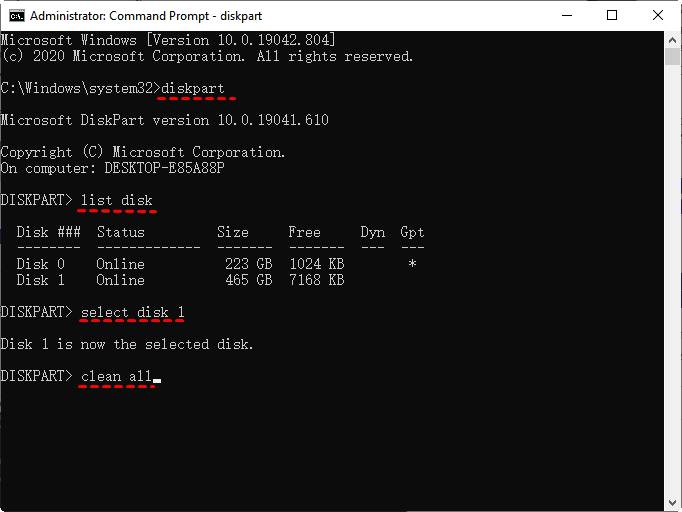
Step 2. Type diskpart in Command Prompt and enter list disk to check all the available disks on your device.
Step 3. Type select disk X (replace X with the correct drive number), then type clean all, and press Enter to securely erase external SSD or HDD.
FAQs about Securely Erasing External Hard Drive
#1. How to completely wipe a hard drive including OS?
#2. What is the most secure way to wipe a hard drive so it can be reused?
The most secure way is to use military-grade wipe methods like DoD 5220.22-M or Gutmann (35-pass overwrite). These methods overwrite data multiple times, ensuring it is unrecoverable. Disk wiping software like AOMEI Backupper provides these options.
#3. Can an external hard drive be erased?
#4. Does secure erase delete everything?
Conclusion
Simply deleting files from an external hard disk before repurposing, selling, or donating it, is not safe enough. It is essential to securely erase external hard drives properly, and AOMEI Backupper provides you with a simple and effective solution to achieve this. Get this tool and try it now!