Easily Perform A MSI Laptop System Restore: Complete Guide
How to system restore a MSI laptop? In this easy-to-follow guide, we’ll show you how to quickly restore your MSI laptop to its previous, error-free state. Find a method that works for you, and get your laptop back in top shape in no time!
By Rosie Updated on January 3, 2025
A system restore is one of the most effective ways to resolve technical issues on your MSI laptop, whether it’s facing slow performance, software glitches, or even crashes. This powerful feature allows you to roll back your laptop’s operating system to a previous state where everything was functioning well.
In this guide, we’ll walk you through the MSI laptop system restore process, including 3 effective step-by-step methods to assist you, whether you're a beginner or a seasoned tech user, this guide will help you restore your MSI laptop to optimal performance.

Pre-Restore Preparations for MSI Laptop System Recovery
Before initiating an MSI laptop system restore, it's crucial to take some precautionary steps to ensure everything goes smoothly:
Backup Your System & Important Files
Before you begin the system recovery on your MSI laptop, make sure to back up your files or system. Although a system restore typically keeps your data intact, it’s always safer to back up your important documents, photos, and videos. Tools like AOMEI Backupper make it easy to create a full backup of your files, giving you peace of mind during the restoration process.
Best free MSI laptop system and file backup software for personal use.
Keep Your MSI Laptop Charged
A system restore can take some time, and you don’t want your laptop to run out of battery during the process. Always make sure your MSI laptop is plugged into a reliable power source before starting the restore.
Disable Third-Party Antivirus Programs
Some antivirus software may interfere with the restoration process. It's a good idea to temporarily disable or uninstall any third-party antivirus programs to ensure the MSI laptop restore process is uninterrupted.
These simple preparations will ensure a smooth recovery process and prevent data loss or interruptions.
Step-by-Step Guide to MSI Laptop Restore
How to do a system restore on MSI laptops? You can restore your MSI laptop to a previous, stable state in a few different ways. Below are the three most effective methods to initiate the MSI laptop system restoration:
Method 1. Using the MSI Laptop Recovery Partition
Your MSI laptop’s recovery partition is a built-in tool that allows you to restore your system without needing external software. Follow these steps to use it:
1. Connect your laptop to a power source and press the power button to turn it on. When the MSI logo appears, press the F3 key repeatedly to enter the system recovery screen.
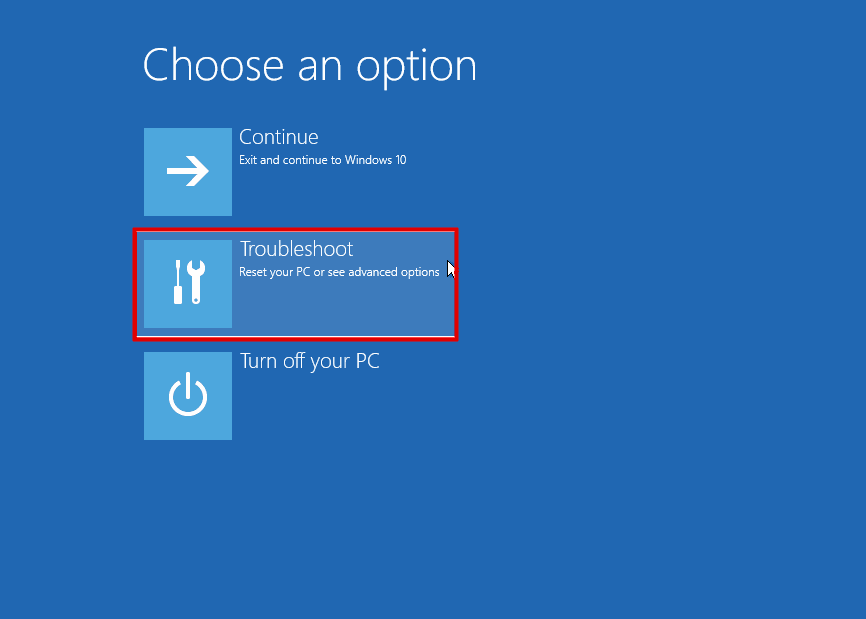
2. Once on the recovery screen, select “Troubleshoot” to proceed.
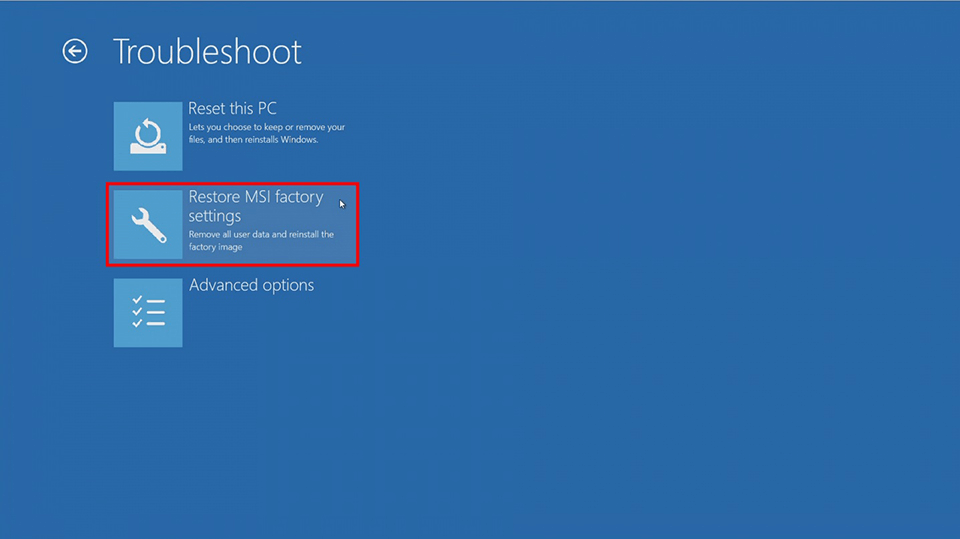
3. From the options, choose “Restore MSI factory settings.”
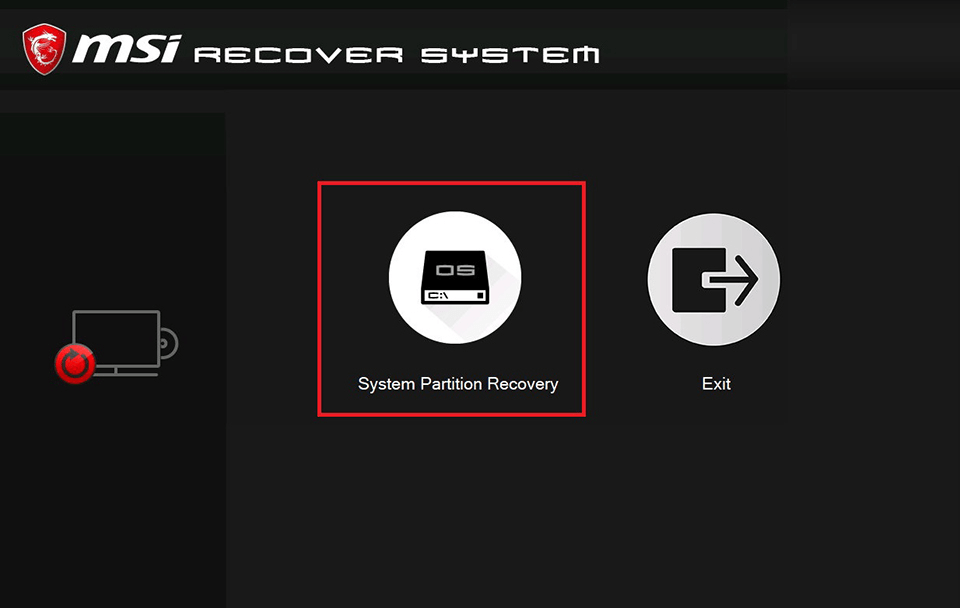
4. Select “System Partition Recovery” to continue.
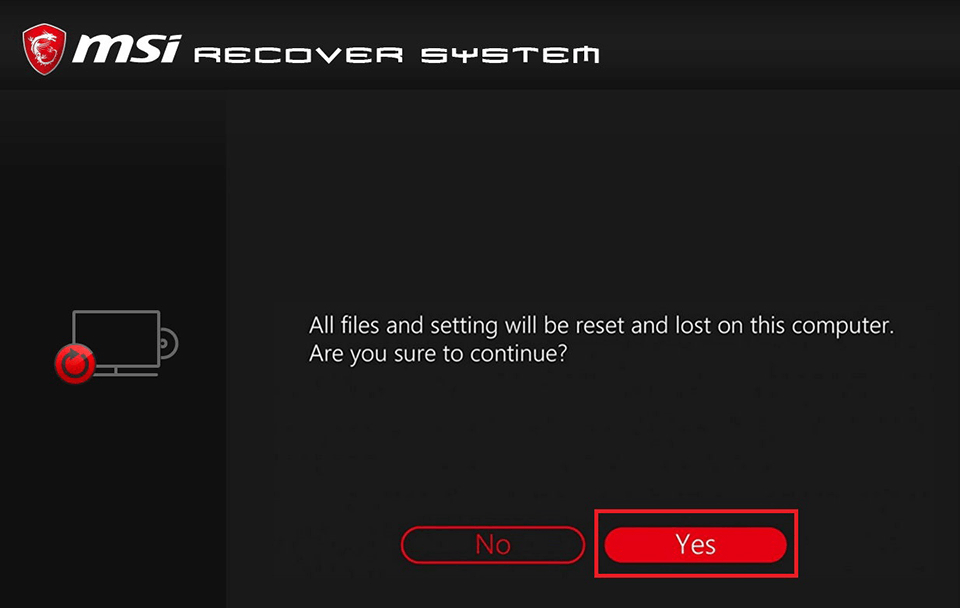
5. The system will notify you that all settings and data will be formatted. Confirm by pressing “Yes” to proceed.
6. The system will begin the recovery process. Wait patiently as the countdown finishes. Once completed, press “OK,” then select “Continue.” Your laptop will restart and be restored to its default factory settings.
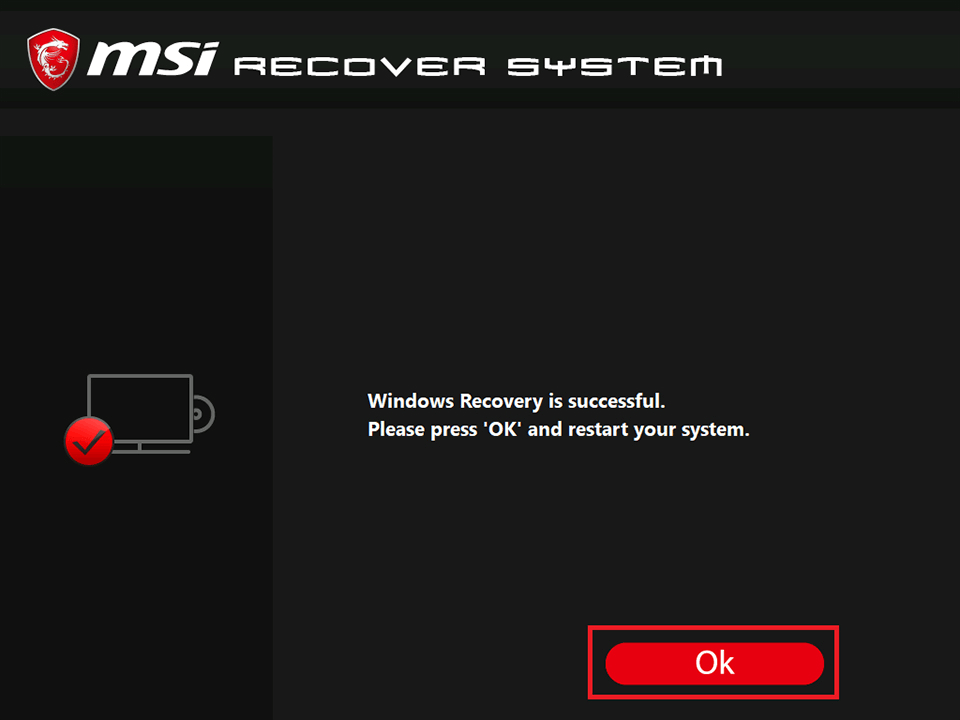
This method is to restore an MSI laptop to the factory system and settings so that all your settings and data will be formatted. Please make sure you back up all important data before doing this.
If you do not want all data to be erased, please refer to the following system restore method.
Method 2. Using AOMEI Backupper for MSI Laptop Restore
For users who prefer a more flexible approach to restoring the system while keeping all their data and settings, AOMEI Backupper Standard offers a reliable system restore option. This method is ideal if you've previously created a backup using AOMEI Backupper or want a more customizable recovery option.

-
Efficient System Restore: AOMEI Backupper makes system restore easy and fast, allowing you to quickly restore a system image file with minimal effort.
-
Automatic Restart Mode: During the system restores, AOMEI Backupper prompts you to restart your computer for the operation to take effect, making the process seamless and automated.
-
Bootable Media Support: If your operating system can't boot, you can use its bootable media to restore your system. This ensures recovery even when the system fails to load normally.
-
Network Boot Option: AOMEI offers the PXE feature, allowing you to boot your system from another working computer over the same network, making recovery more flexible.
If you’ve already created a system image, here’s how to restore your system using this tool:
Step 1: Click on the "Restore" button and then choose the "Select Task" option to pick the system backup task you created earlier. Alternatively, you can select the system backup file (with the .adi extension) by clicking on "Select Image File".

Step 2: Choose "Restore this system backup" and click "Next" to proceed.

Step 3: Review the listed operations. If everything looks correct, click "Start Restore" to begin the restoration process.
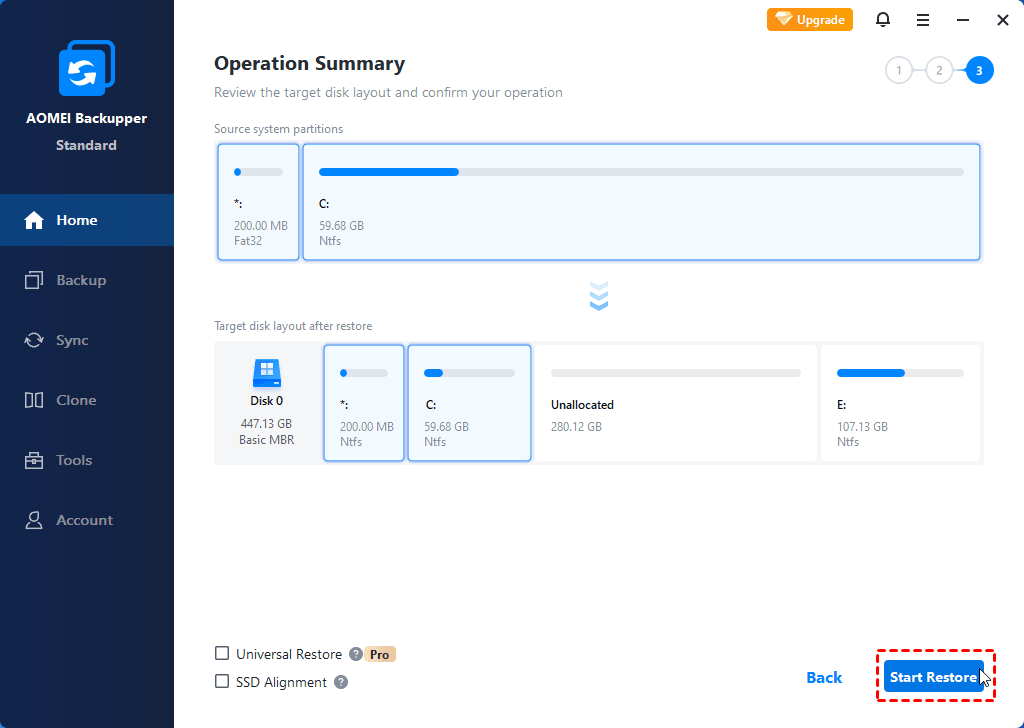
Once the process is complete, your MSI laptop system will be successfully restored and ready for normal use.
Method 3. Using Windows Recovery Options for MSI Laptop Restore
Windows offers built-in recovery options that can help restore your MSI laptop system. Here's how to use them:
Step 1: Open the Start menu and type Recovery in the search bar.
Step 2: Under Advanced Startup, click on Restart Now.
Step 3: Once your laptop restarts, select Troubleshoot > Advanced options > System Restore.
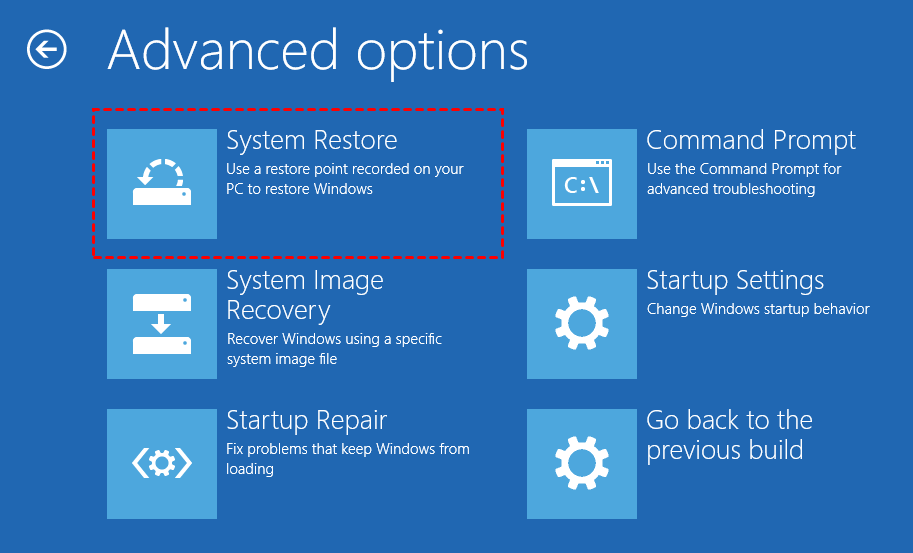
Step 4: Follow the prompts to choose a restore point and start the process.
This method leverages Windows’ built-in recovery tools, making it easy to perform a system restore on your MSI laptop using familiar interfaces.
After the MSI Laptop System Restore: What to Expect
Once your MSI laptop restore is complete, here’s what you can expect and the actions you should take next:
Restored Settings and Software Updates
After the MSI laptop system recovery, the system will revert to the state of the selected restore point, meaning some settings or updates may need to be reapplied.
It’s a good idea to check for Windows updates after a restore to ensure everything is up-to-date and secure.
Update Drivers and Reinstall Applications
Following the restoration, check for any missing drivers by using Device Manager or MSI’s Dragon Center. It’s also essential to reinstall any applications you need for work or personal use.
Re-enable Antivirus Software
If you disabled any antivirus software before starting the restore, be sure to re-enable it after the process is complete to keep your laptop secure.
By following these steps, your MSI laptop system restore will be complete, and your laptop should be running smoothly once again.
Conclusion
Performing an MSI laptop system restore is an excellent way to address software-related issues without losing personal data. Whether you use the MSI recovery partition, reliable free tools like AOMEI Backupper, or built-in Windows recovery options, this guide covers all the essential steps to help you restore your MSI laptop effectively.
Always remember to back up your data with AOMEI Backupper first, which keeps your MSI laptop in top condition, and ready for all your tasks and entertainment.