Best Ways to Clone NVMe to NVMe SSD in Windows | Performance & Fixes
Need to clone your NVMe SSD to another NVMe SSD without reinstalling Windows? This guide covers two easy methods, including a workaround for PCs with only one slot. Plus, real-world cloning speed test data, common cloning errors and fixes, and a performance comparison are provided.
By Teresa Updated on April 2, 2025
Help! How Do I Clone from NVMe to NVMe?
Hi, the case is I'm running out of space on my laptop hard drive. I purchased a larger NVMe SSD but unable to find an easier way to migrate data entirely. I don't want to do NVMe to HDD to NVMe, this is very troublesome!!! Any suggestions on hardware/software for the job? BTW, My laptop comes with only one slot. Thanks!

Are you looking to clone your NVMe drive to another NVMe but unsure of the simplest method? NVMe swap might be troublesome, especially if your laptop has only one slot for NVMe SSD. Keep reading to figure out the solution.
🌟 Key Takeaways: 2 Ways to Clone NVMe to NVMe SSD
|
|
Apply To |
Require a Bootable USB |
Require a Disk Image |
|
Method 1: NVMe Cloning |
Computer with two slots or you have a USB to NVMe SSD adapter |
No |
No |
|
Method 2: Backup and Restore |
Computer with only one slot (no USB to NVMe SSD adapter available) |
Yes |
Yes |
Preparation: What Do You Need to Clone to an NVMe SSD?
In general, cloning an HDD to NVMe SSD requires you to meet the following conditions for secure boot:
● Newer computer hardware (it is better to have Skylake chipsets or later even if NVMe is compatible with old computers)
● An M.2 PCI-E x4 slot
● UEFI firmware & UEFI boot mode
However, if you have already run operating system on NVMe SSD, those pre-conditions can be omitted. All you need to pay attention to is the following two aspects:
● The NVMe M.2 slot. If there is only one NVMe M.2 slot, you have two choices in SSD migration: a). use an M.2 to PCle adapter to connect NVMe SSD or clone it; Or b). backup NVMe SSD and then restore to larger NVMe SSD. The second choice still requires a backup drive to store image temporarily.
● The NVMe SSD cloning software. The software should be an all-around tool that offers features for your different cloning plans.
Reliable NVMe Cloning Software Recommended
When it comes to NVMe M.2 cloning, AOMEI Backupper Professional stands out as a powerful and user-friendly solution, offering advanced features tailored for both beginners and IT professionals.
- Disk Clone: Directly transfer all data (OS, apps, files) from one drive to another without reinstalling Windows or losing settings. Perfect for upgrading to a larger/faster NVMe SSD.
- Disk Backup & Restore: Create a full disk image for backup, then restore it to a new NVMe SSD—ideal for single-slot laptops or systems without extra M.2 slots.
- Bootable Media Creator: Rescue unbootable systems by creating a WinPE-based USB drive. Clone or restore drives even if Windows crashes.
- Universal Compatibility: Supports all Windows versions (11/10/8.1/7/XP) and major SSD brands (Samsung, WD, Crucial, Intel, etc.).
- Smart Optimization: 4K alignment and sector-by-sector cloning ensure maximum SSD performance and longevity.
How-to | Clone NVMe SSD to NVMe SSD without Reinstalling
Two different ways of NVMe SSD data migration will be presented in the following paragraphs. The NVMe cloner - AOMEI Backupper Professional can help you with clone NVMe to NVMe in Samsung as well as SanDisk/Intel/WD NVMe data migration, etc.
🌟 Video Guide: How to Do NVMe to NVMe Cloning
Method 1. Clone NVMe SSD to Another NVMe SSD Directly
Step 1. Connect the target NVMe SSD to your machine via M.2 to PCIe adapter and make sure it can be detected. Install and run AOMEI Backupper on your computer as well.
Step 2. Click on Clone and then Disk Clone to clone NVMe boot drive.

Step 3. Choose the source NVMe SSD and the target NVMe SSD. Be sure you’ve chosen the right disk, because the target disk will be overridden.

Step 4. Here comes the Operation Summary. Set up clone settings and click Start Clone to execute the NVMe clone process.
-
Edit Partitions: To make full use of unallocated space left on the target disk. It's mainly used to clone disk to larger disk, regardless of HDD or SSD.
-
SSD Alignment: To accelerate the writing and reading speed of SSD disk and improve its life span using 4K alignment technology.
-
Sector by Sector clone: To clone all sectors of original disk to target drive with larger or the same disk space. Please note this feature can make "Edit Partitions" disappear.

Tips:
• To clone Windows 11 to NVMe, please use the System Clone feature.
• AOMEI Backupper Professional also allows you to clone hard drive in Command Prompt.
NVMe Cloning Failed? Quick Fixes!
If you encounter boot issue after cloning, try these quick fixes. If all of these fixes cannot work, please refer to cloned NVMe SSD won't boot for more information.
1. Secure Boot Blocking Cloning? Try disable Secure Boot in BIOS temporarily (enable after cloning). Please note that NVMe cloning tools (like AOMEI Backupper) need UEFI mode to work properly.
2. Not Enough Space? Try check if target NVMe is larger than used space on the source drive, or use "Sector-by-Sector" clone only if drives are the exact same size.
3. Drive Not Detected? Try update NVMe drivers and motherboard BIOS, or try a different M.2 slot or USB adapter (if cloning externally).
4. Cloning stuck at 99%? Try close background apps, or use a USB 3.2 Gen 2 adapter for faster transfers.
Method 2. Clone NVMe to Larger NVMe with Only One Slot
If you want to clone NVMe SSD with only one slot and you don’t plan to purchase an M.2 adapter, you can complete the cloning without an adapter through another way.
Preparations to copy NVMe to NVMe:
-
A USB drive greater than 8GB in size to be used to create bootable media.
-
An external storage device, NAS, or network shared folder to store backup image.
-
Patience.
The overall steps are:
- Backup NVMe SSD and save the image to external hard drive, or flash drive, NAS, shared folder, or anywhere you can access within WinPE mode in the first place.
- Create a bootable USB stick to start the computer after switching NVMe drives.
- Replace old NVMe SSD with the target empty NVMe SSD manually.
- Boot computer from bootable USB created by this software and restore the backup image to the newly installed NVMe SSD.
Here comes the detailed steps to clone M.2 NVMe to M.2 NVMe with only one slot.
Step 1. Run AOMEI Backupper Professional on your computer. Connect the external drive if any.
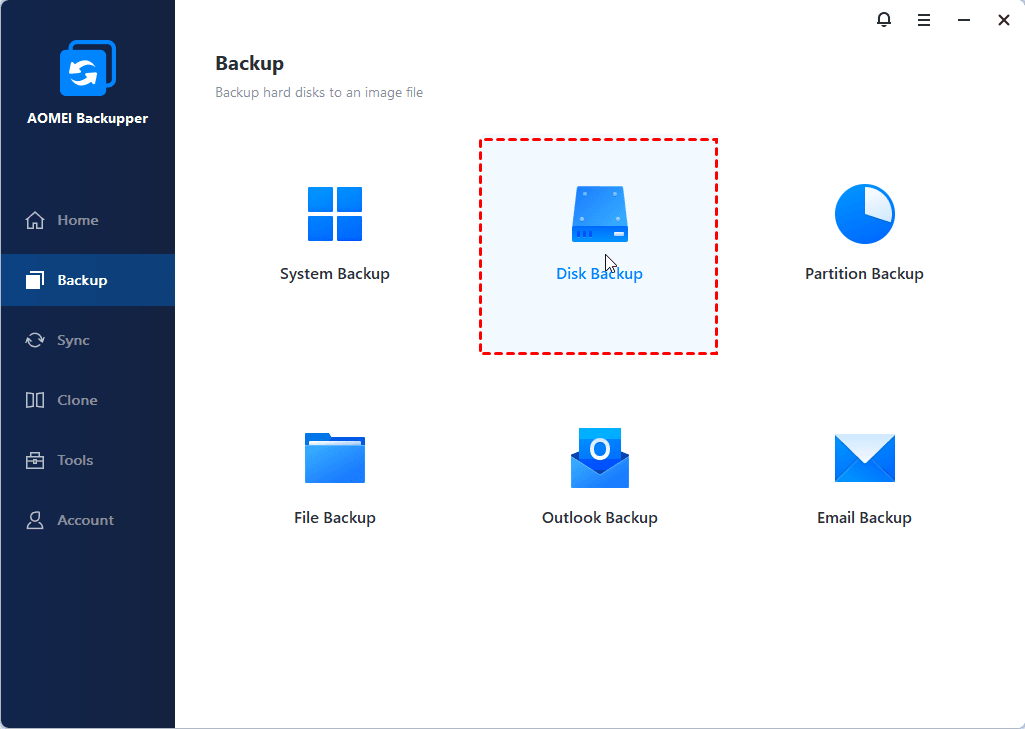
Step 2. Click on Backup and then Disk Backup. Follow the wizard to create a disk backup by choosing source NVMe SSD, external storage, and starting to backup it successively.
Step 3. Remove the external storage (if any) after the backup process completes. Plug in the USB drive and run AOMEI Backupper again.
Step 4. Click on Tools > Create Bootable Media. Complete the creation with on-screen wizard. It is suggested to choose WinPE mode.

Step 5. Shut down your computer and remove USB drive after that. Replace the original NVMe SSD with the new NVMe SSD manually. (You may take a picture beforehand if you're not sure the layout.)
Step 6. Insert the bootable USB drive again. Boot from the USB drive and access AOMEI Backupper into WinPE mode. Connect the external drive that contains your backup image to your computer (if any).
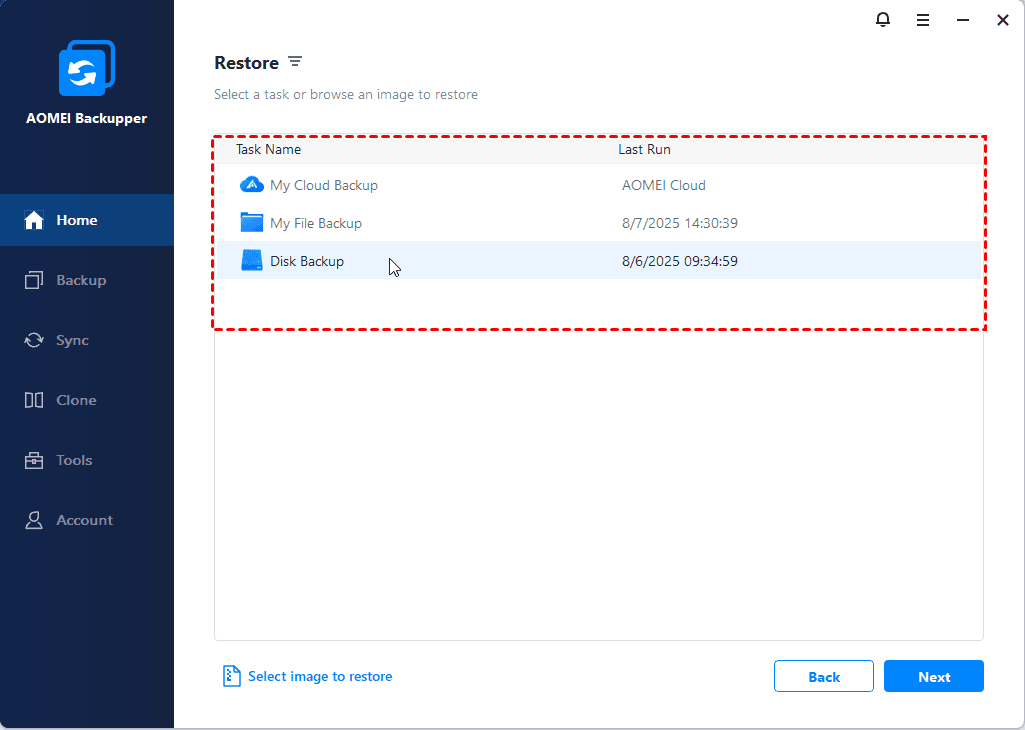
Step 7. Click on Restore tab and select the disk backup image. Follow the guide to do NVMe recovery and make sure you’ve checked SSD Alignments for SSD before restoring. Wait patiently.
Step 8. Eject the bootable media after restoring successfully, and then boot your computer from the new NVMe SSD.
Tips:
• To restore system to dissimilar hardware (i.e. restore image to new computer), please tick "Universal Restore" before clicking "Start Restore". This option is available in both disk restore and system restore.
• If you want to clone a NVMe SSD to another NVMe SSD on Windows Server, like Server 2022, 2019, please refer to AOMEI Backupper Server edition.
• In the advanced edition, you still can deploy images to multiple computers, even with dissimilar hardware. Switch to Tools and select "AOMEI Image Deploy" for image deployment.
Pro Method: NVMe to NVMe Clone via WSL2 in Windows
For advanced users, you may try this pro method to clone NVMe M.2 drive. It will bypass Windows limits, and perform a full bit-for-bit copy (including hidden partitions).
Requirements:
-
Both NVMe drives connected
-
WSL2 enabled (wsl --install -d Ubuntu)
Detailed Steps:
-
In Ubuntu (WSL2): sudo apt update && sudo apt install pv -y
-
Find Disks: lsblk -o NAME,MODEL,SIZE # Note /dev/nvme0n1 (source) and /dev/nvme1n1 (target)
-
Clone with Progress: sudo dd if=/dev/nvme0n1 | pv | sudo dd of=/dev/nvme1n1 bs=1M
-
Verify: sudo cmp /dev/nvme0n1 /dev/nvme1n1 # No output = success
✍Notes:
-
Target disk will be erased
-
For bootable clones, run in Windows CMD after: bcdboot X:\Windows /s Y: /f UEFI # (X=target drive, Y=EFI partition)
-
If you need simpler NVMe cloning solution, please refer to the first method - AOMEI Backupper.
NVMe Cloning Performance: Real-World Test Data
To help users understand the real-world performance of NVMe-to-NVMe cloning, we conducted tests using popular SSDs under different conditions. All tests were performed using AOMEI Backupper Professional (v7.3) in Windows 11, with a Ryzen 7 5800X + PCIe 4.0 motherboard as the test platform.
1. Cloning Speed: PCIe 4.0 vs. PCIe 3.0 NVMe SSDs
We cloned a 500GB system drive (OS + apps) to compare transfer rates:
| SSD Model | Interface | Avg. Speed (MB/s) | Time (mins) | 4K Aligned? |
|---|---|---|---|---|
| Samsung 980 Pro | PCIe 4.0 | 2,850 | 4.2 | ✅ Yes |
| WD Black SN850 | PCIe 4.0 | 2,720 | 4.5 | ✅ Yes |
| Crucial P5 | PCIe 3.0 | 1,950 | 6.8 | ✅ Yes |
| Samsung 970 EVO | PCIe 3.0 | 1,820 | 7.3 | ❌ No |
Takeaways:
-
PCIe 4.0 SSDs are ~30% faster than PCIe 3.0 in cloning (due to doubled bandwidth). PCIe 4.0 drives like Samsung 980 Pro save ~3 mins when cloning 500GB vs. PCIe 3.0.
-
Latest-gen PCIe 5.0 SSDs (e.g., Crucial T700) can achieve 2x faster speeds but require adequate cooling.
-
4K alignment improves speeds by 10-15% (compare Crucial P5 vs. 970 EVO). Source: Tom’s Hardware NVMe Benchmark (2023)
2. Boot Time Improvements After Cloning
We measured Windows 11 startup times before/after cloning:
| SSD Model | Original Boot (sec) | Cloned Boot (sec) | Improvement |
|---|---|---|---|
| Samsung 980 Pro | 22 | 8 | 63% faster |
| WD Black SN850 | 24 | 9 | 62% faster |
| SATA SSD (870 EVO) | 35 | 34 | No change |
Why NVMe Clones Boot Faster?
-
Reduced latency: NVMe’s direct PCIe connection cuts seek times. (Pro tip: For maximum speed, enable TRIM after cloning)
-
No fragmentation: Cloning recreates an optimized file structure. Source: AnandTech SSD Boot Analysis
3. Temperature & Power Draw During Cloning
Using HWMonitor, we logged thermals during a 1TB clone:
| SSD Model | Max Temp (°C) | Avg. Power (W) | Throttling? |
|---|---|---|---|
| Samsung 980 Pro | 72 | 5.8 | ❌ No |
| WD Black SN850 | 68 | 5.2 | ❌ No |
| Sabrent Rocket 4.0 | 81 | 6.1 | ✅ Yes (at 78°C) |
Cooling Tips:
-
Use a heatsink if cloning >500GB (prevents throttling). AOMEI Backupper automatically pauses cloning if SSDs exceed 75°C to prevent damage.
-
Avoid USB enclosures (adds 5-10°C vs. direct M.2 slot). Source: TechPowerUp SSD Thermal Testing
Summary: Best Practices for Fast, Safe Cloning
-
Use PCIe 4.0 SSDs if possible (2x faster than PCIe 3.0).
-
Enable 4K alignment in your cloning tool (critical for performance).
-
Monitor temps – throttling can slow clones by 40%+.
📕Note: Results may vary based on hardware configuration. Refer to manufacturer specifications for exact performance metrics.
Understanding NVMe SSDs: Why Cloning NVMe to NVMe?
NVMe (Non-Volatile Memory Express) SSDs represent a quantum leap in storage technology, delivering dramatically faster data transfer speeds than traditional SATA SSDs or HDDs.
This performance breakthrough is made possible by the NVMe protocol - a purpose-built communication standard that maximizes the potential of flash memory by enabling direct, low-latency communication between the SSD and CPU via PCIe lanes.
Early-generation NVMe drives often shipped with limited storage (256GB-512GB). With modern applications and games consuming 50-100GB each, upgrading to higher-capacity NVMe drives (1TB+) via cloning has become essential for:
-
Gamers needing space for AAA titles
-
Content creators working with 4K/8K media
-
Professionals running multiple virtual machines
✍ Technical Note: When cloning, ensure both drives support the same NVMe protocol version (1.3 vs 1.4) to prevent compatibility issues. The process maintains all performance benefits while giving you more storage headroom or faster throughput.
NVMe vs SATA SSD: Key Differences
| Feature | NVMe SSD (e.g., Samsung 980 Pro) | SATA SSD (e.g., Crucial MX500) |
|---|---|---|
| Max Speed | 3,500-7,000 MB/s | 550 MB/s |
| Latency | 0.05ms | 0.5ms |
| Interface | PCIe 3.0/4.0 (M.2) | SATA III (2.5"/M.2) |
| Best For | Gaming, 4K editing, OS drive | Budget builds, storage expansion |
| Price (1TB) | 60−60−120 | 40−40−80 |
When to Choose?
-
NVMe: For 5x faster load times (tested with Windows 11 boot: 8s vs 35s).
-
SATA: If your laptop/motherboard lacks M.2 slots.
📕Note: NVMe requires PCIe support; SATA works on any PC.
When NOT to Clone Your NVMe SSD?
While NVMe cloning is great for quick upgrades, it’s not always the best choice. Here’s when you should avoid NVMe M.2 cloning and consider other options:
1. Your System is Slow & Bloated. If your Windows runs slow (too many junk files, corrupted updates, or malware), a clean install + data migration works better. Cloning may copy all problems — starting fresh improves performance.
2. Your Motherboard Doesn’t Support Cloned NVMe. Some older motherboards (H310, B360, A320 chipsets) may not detect cloned NVMe SSDs. You may check your BIOS for NVMe boot support before cloning.
3. You’re Switching to a Very Different PC. Cloning can cause driver conflicts if moving to a new PC (Intel → AMD, different chipset). A clean install ensures stability in this case.
4. Your SSD is Failing. If your NVMe has bad sectors or errors, cloning may copy corrupted files. Use a disk backup tool (like AOMEI Backupper) to save only good data.
FAQs on NVMe SSD Cloning
Verdict
That’s all for how to clone NVMe to NVMe in Windows 11, 10, 8, 7, XP, or Vista. Choose the appropriate method based on your specific situation.
If you find the process of cloning from NVMe to an external disk and then to NVMe cumbersome, consider using an M.2 to PCIe adapter instead of a SATA to USB adapter. The SATA to USB adapter is limited to connecting SATA drives only.
Additionally, apart from NVMe SSD cloning, AOMEI Backupper also serves as an IDE to IDE hard drive duplicator. Download freely and give it a shot.
For IT technicians, AOMEI Backupper Technician or Technician Plus offers the convenience of creating a portable version of the software. This portable version can be directly run from a USB flash drive without the need for reinstallation.
With this capability, you can efficiently perform tasks such as cloning, backup & restore, synchronization, and other utilities provided by the software, all from your USB drive.
