How to Transfer All Files from One SSD to Another | Easy & Secure
Want to move all files from one SSD to another without losing data or reinstalling Windows? This guide covers two easy and secure methods to transfer everything, whether you're upgrading your SSD or migrating your system.
By Lily Updated on March 31, 2025
User Case: Tranfer SSD to Larger SSD
"Recently, I got a new computer but immediately filled up the SSD with files and programs. Now I'm low on disk space. I intend to replace the current SSD with a larger one. But I want to keep the files, games and the OS on the SSD. I'm wondering how to transfer everything from one SSD to another."
YES, you can transfer data from one SSD to another without reinstalling operating system and applications. Here are 2 common ways to easily move files from one SSD to another, suitable for beginners and advanced users.
2 Simple Ways: Transfer Data from SSD to SSD on Windows
Transferring data from one SSD to another can be achieved using methods that best suit your needs. When it comes to a full system migration—including moving Windows—a more robust approach is required.
Way 1. Transfer files to another drive via SSD cloning
Disk cloning creates an exact replica of your current SSD, eliminating the need to reinstall Windows or reformat your drive. This seamless process copies every aspect of your system so that your new SSD is ready to use immediately.
Way 2. Move files to another drive via backup & restore
Alternatively, you can create a system backup and restore it to the new SSD. Although this method may involve extra steps, it’s ideal if you can’t connect both SSDs at the same time (i.e. transfer data from one SSD to another with only one slot) or need to migrate data across different hardware platforms.
Both approaches are supported by AOMEI Backupper Professional—a trusted migration tool designed to handle all types of HDD and SSD transfers recognized by Windows. This software not only transfers your files, applications, and operating system without reinstallation, but it also offers advanced features such as:
| ✅ Transfer Everything | Complete data transfer for programs, games, and the OS, no reinstalling |
| ✅ Intelligent Cloning | Copy only used sectors to target drive, best for migrating to a smaller SSD |
| ✅ SSD Alignment | 1-click to optimize performance and prolong lifespan |
| ✅ MBR/GPT Cloning | Clone SSDs between MBR and GPT partition style |
| ✅ Flexible Cloning | Clone only system drives to another SSD with System Clone feature |
| ✅ Securely Boot | Hassle-free system startup after cloning |
Download this SSD cloning software and discover how easy SSD migration can be. If you are a Server user, try the Server edition instead.
Way 1. How to Transfer Data from SSD to SSD via Disk Clone
In this part, you can learn how to transfer SSD to SSD easily and securely in 4 steps.
Step 1. Prepare for transferring all data to another SSD
Before moving files and OS to another SSD, you need to do some preparations:
-
Install the target SSD to your computer alongside the old SSD. If there's no extra port, you may need a SATA-USB cable or SSD enclosure to connect it.
-
Install and launch AOMEI Backupper.
-
The cloning will overwrite everything on the target SSD. Be sure to make a backup if there's any important data.

Step 2. Launch AOMEI Backupper to set up the cloning task
In the main interface, navigate to "Clone" tab and select "Disk Clone". It will move everything from one SSD to another.
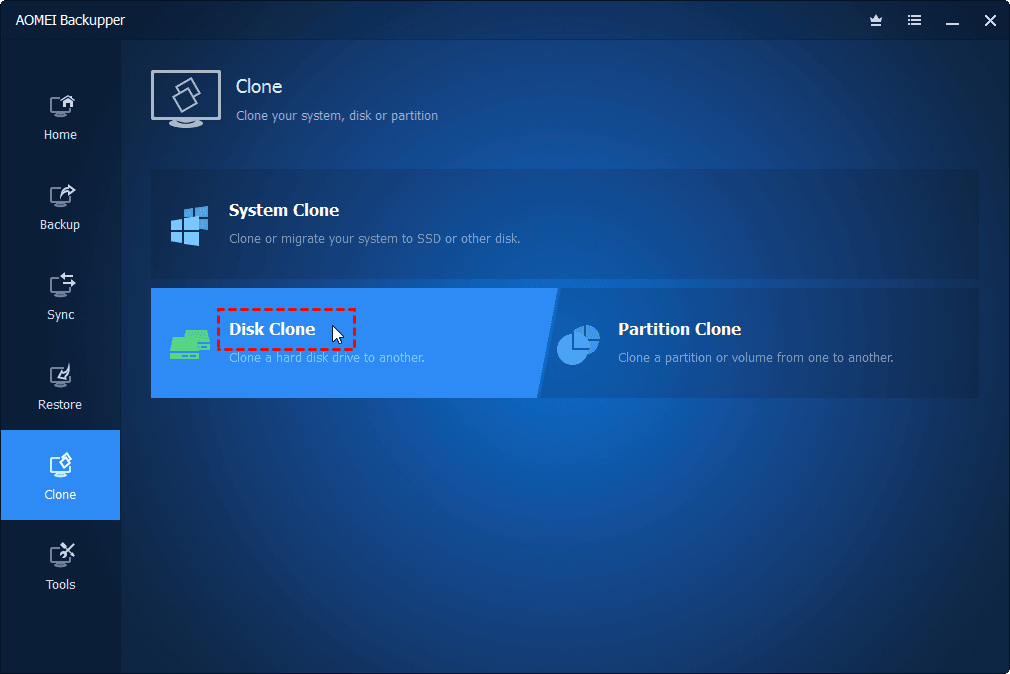
✍Tip: The trial version allows you to preview the cloning process but does not execute the operation. To clone your system disk, please upgrade to unlock full feature.
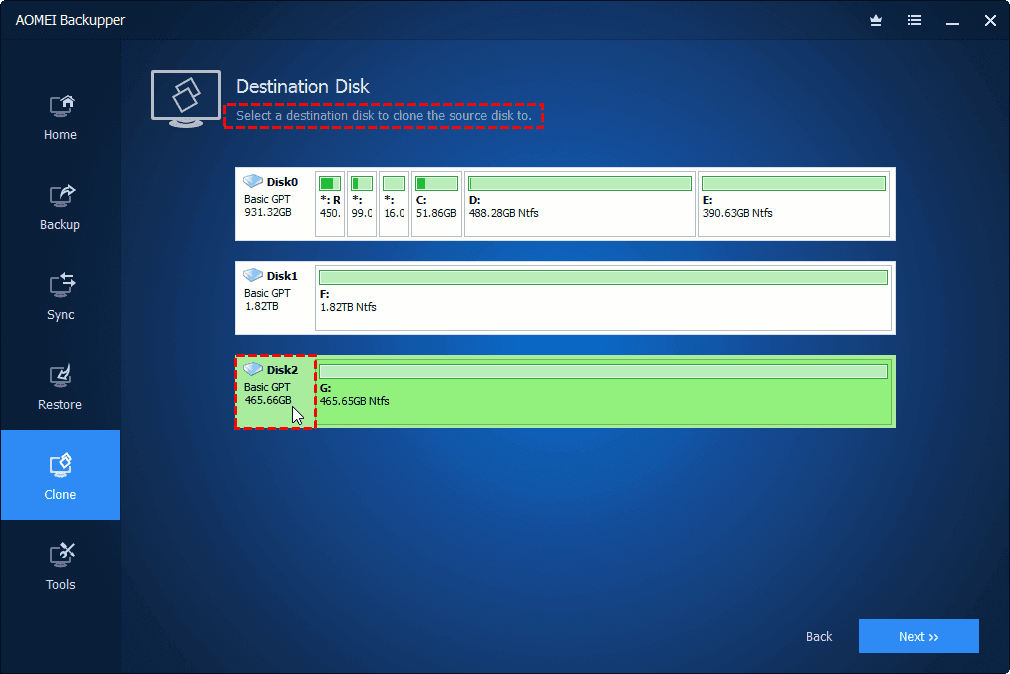
Step 3. Select the source SSD and the target SSD sequentially
Select the original SSD that you want to clone as the source disk, and then click on "Next".

Choose the new SSD that you want move files to as the destination disk, and then click on "Next".
Step 4. Start moving files to the target SSD
Tick “SSD Alignment” to optmize SSD performance. Then, click "Start Clone" to begin cloning one SSD to another.

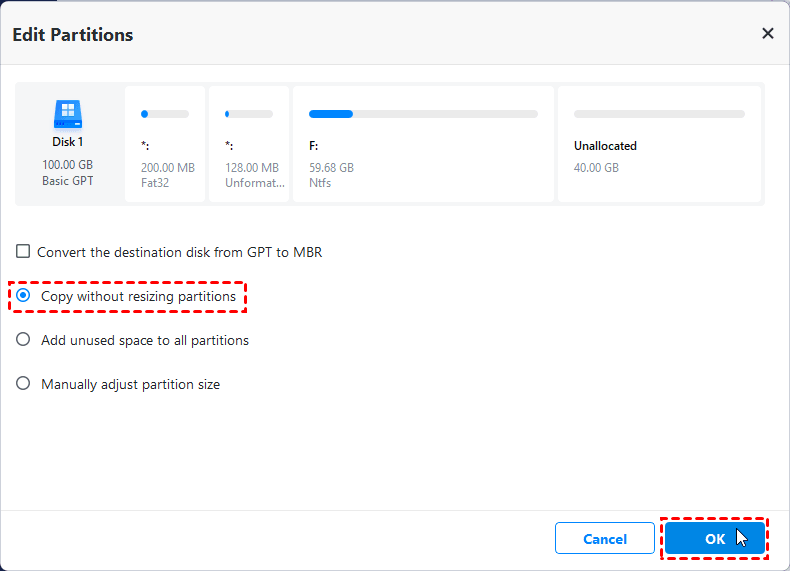
📕Tips on disk space management and disk partition styles:
You can use the "Edit Partitions" feature to resize partitions with different options and convert the disk type.
- Copy without resizing partitions: It's the default option and will not resize the partition size.
- Add unused space to all partitions: It will add unallocated space to all partitions automatically.
- Manually adjust partition size: Extend unallocated space manually by selecting a partition and drag the unallocated space to left or right side.
- Convert the destination disk from MBR to GPT: Convert the partition style of the target disk to make it the same as the source disk. You can either convert from MBR to GPT or GPT to MBR.
📕 Choose the right cloning mode
When transferring data, this software uses Intelligent Sector Mode by default. This means it copies only the used sectors, automatically skipping unused sectors and logically bad sectors to optimize speed and storage efficiency.
If your target drive has less capacity than the source drive, keeping this default mode ensures a smooth transfer without exceeding available space.
However, if your target drive is equal to or larger than the source drive, you have the option to enable Sector-by-Sector Cloning. This method copies all sectors, including unused ones, ensuring an exact 1:1 clone. It is particularly useful when migrating a hidden recovery partition, as it preserves its functionality on the new drive.
Way 2. How to Move Files to Another SSD via Backup and Restore
If you want to transfer data from one SSD to new SSD without losing data completely for free, you can also turn to the powerful backup and restore features that are included in AOMEI Backupper Standard (the free edition).
As a free backup and restore tool, it can help you transfer all data including OS from SSD to SSD by backing up the old disk and restoring it on new drive. Follow the steps below to create and restore the backup image of your SSD.
✍Tip: If you plan to install the cloned SSD on a new computer with different hardware, please use the Universal Restore feature available in the advanced edition. This ensures system compatibility by adapting the cloned OS to the new hardware environment.
Step 1. Install AOMEI Backupper and connect the target SSD
Connect the target SSD to your computer and ensure it is properly detected. Then, install and launch AOMEI Backupper.
📌 If you cannot connect the SSD directly, create a bootable disk to start your computer in a WinPE (Windows Preinstallation Environment). After that, replace the old SSD with the new one and perform a system recovery using the bootable drive.
Step 2. Back up your source SSD
Before proceeding, create a complete image of your source SSD using the Disk Backup or System Backup feature. If you only need to back up certain files or partitions, choose File Backup or Partition Backup accordingly.
💡 For maximum data security, it’s recommended to save the backup image on an external USB drive or a network location.
Step 3. Choose the backup image to restore
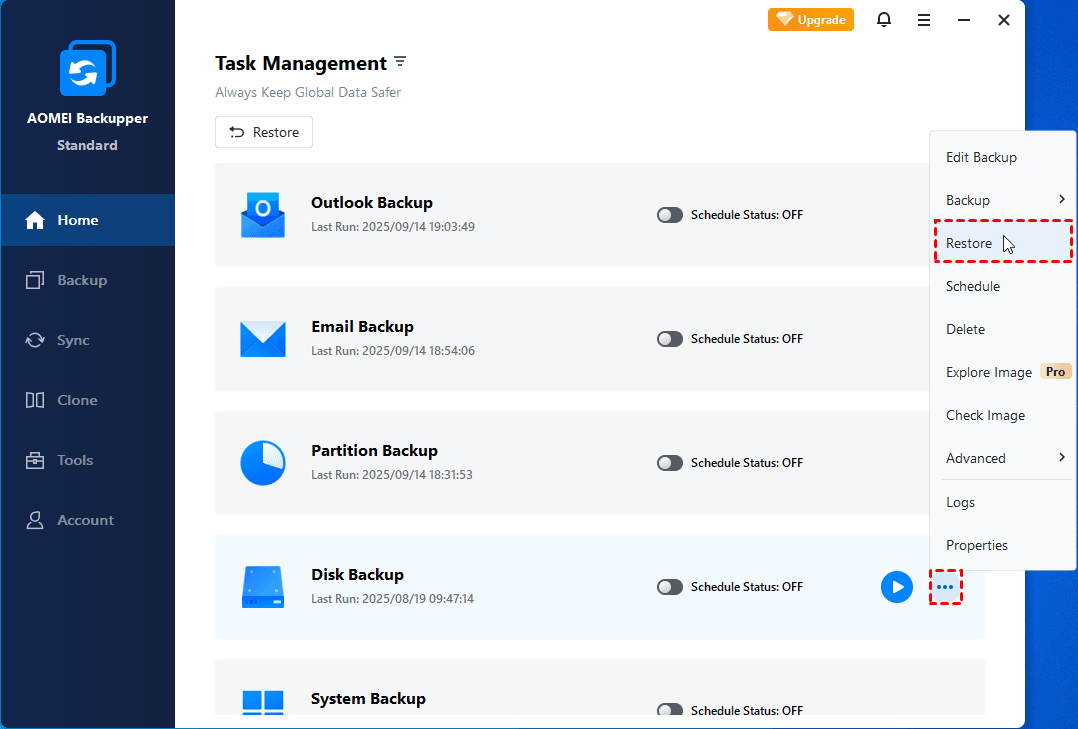
In the "Home" tab, select disk backup task and click "Restore" option.
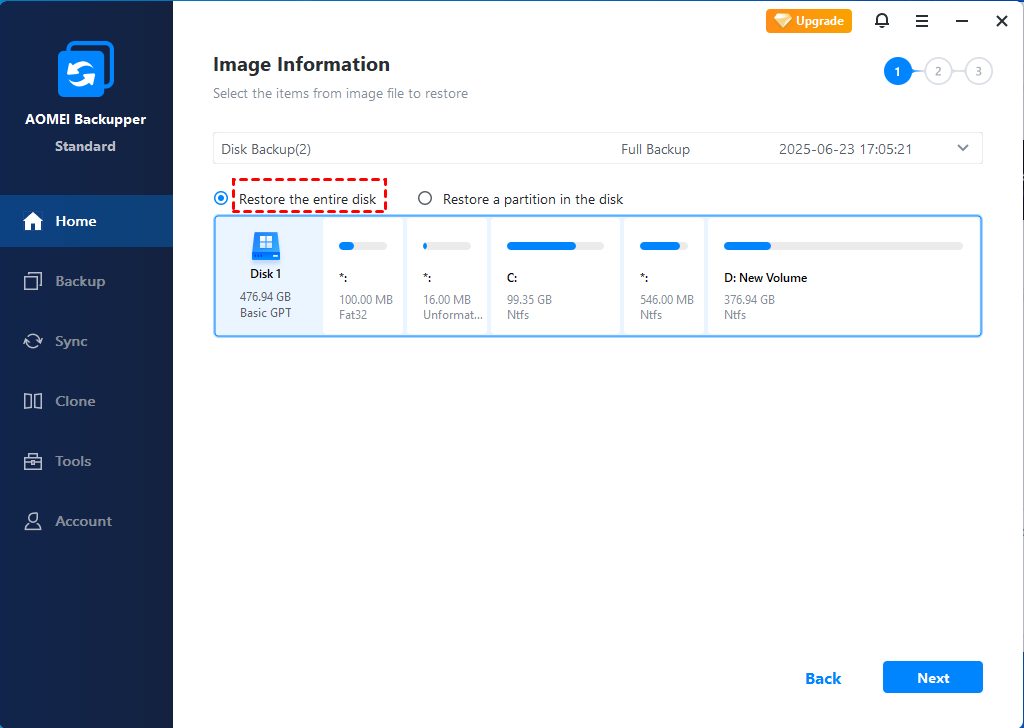
You can choose to restore entire disk or a partition in the disk, and click "Next".
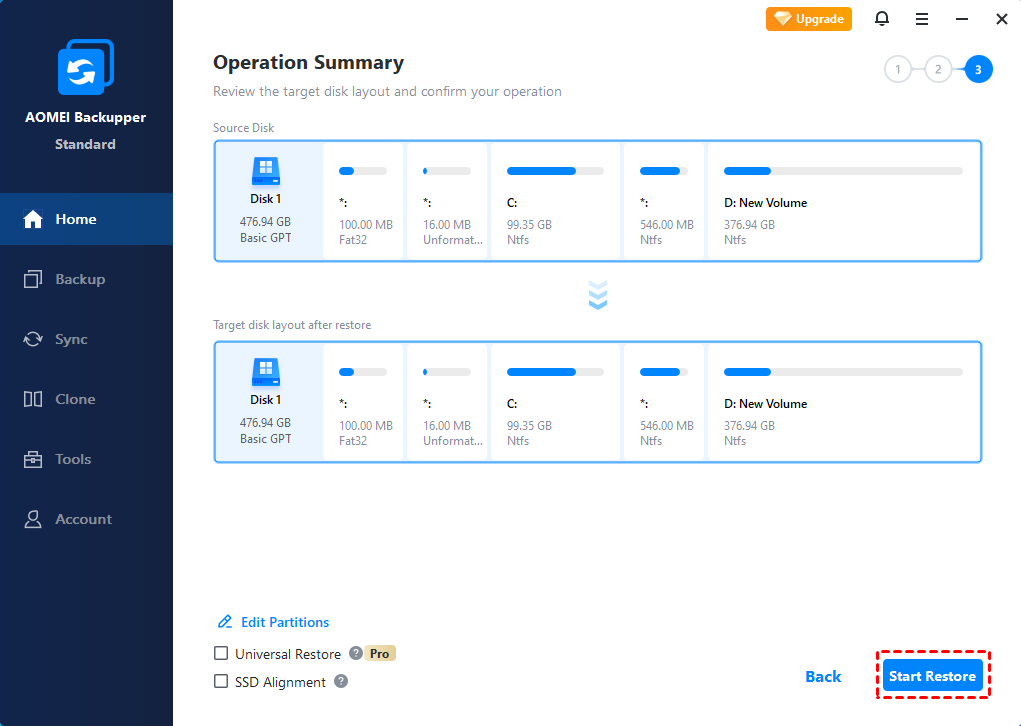
Step 4. Choose the target SSD to restore data to
Select connected SSD as the destination disk. Confirm the operations and click "Start Restore".
📢Note: This method applies to encrypted SSD data migration and complex RAIDs transferring as well.
Advanced Transfer: RAID Disk and Encrypted SSD Migration
RAID (Redundant Array of Independent Disks) improves performance or data redundancy, but migrating it requires extra care.
1. RAID SSD Transferring (RAID 0/1 & Complex RAIDs)
1. Rebuild RAID after cloning (Recommended for RAID 0/1)
-
Break the RAID array temporarily in BIOS/UEFI or RAID controller settings.
-
Clone each SSD individually using tools like AOMEI Backupper.
-
Reassemble the RAID with the new SSDs using the same controller.
-
Verify data integrity before deleting the old array.
⚠️ Warning:
-
RAID 5/6 requires rebuilding parity, which is riskier—consult your RAID controller manual.
-
Some hardware RAID setups may not support direct cloning—check manufacturer guidelines.
2. Backup & Restore (Safer for Complex RAIDs)
-
Create a full backup of the RAID volume.
-
Replace the SSDs and reconfigure RAID in BIOS.
-
Restore the backup to the new array.
✍Tip: If using software RAID (Windows Storage Spaces), use its built-in "Remove Disk" and "Add Disk" functions to migrate safely.
2. Encrypted SSDs Transferring (BitLocker)
Encrypted SSDs cannot be cloned directly without decryption. You can transfer files from BitLocker SSDs in Windows with these methods:
✅ Option A: Decrypt → Clone → Re-encrypt
-
Suspend BitLocker (Control Panel → BitLocker → "Suspend Protection").
-
Clone the SSD using AOMEI Backupper.
-
Re-enable BitLocker on the new SSD.
✅ Option B: Backup & Restore (No Decryption Needed)
-
Create a BitLocker recovery key (if you don’t have one).
-
Back up the drive using AOMEI Backupper (supports encrypted backups).
-
Restore to the new SSD and enter the recovery key when prompted.
⚠️ Critical Note:
-
Never clone an encrypted SSD while locked—this can corrupt data or make it unrecoverable.
-
TPM-bound encryption (like BitLocker with TPM 2.0) may require reactivation on the new SSD.
Important Takeaways:
✔ RAID Migration: Break the array before cloning, or use backup/restore for safety.
✔ Encrypted SSDs: Always decrypt first (or use backup tools that support encryption backup).
✔ Verify Data: After migration, check file integrity before deleting the original drive.
Transfer Files Between SSDs Using Windows Built-in Tools
If you don’t want to install third-party software, Windows provides built-in tools to help you move files between SSDs. Here are two simple methods:
1. Use File Explorer (For Manual File Transfer)
-
Connect the new SSD to your PC.
-
Open File Explorer and locate your current SSD.
-
Select the files/folders you want to transfer, right-click, and choose Copy.
-
Navigate to the new SSD, right-click, and select Paste.
-
Repeat until all necessary files are transferred.

💡 The transfer speed depends on file size and SSD performance.
2. Use Backup and Restore (For System & Large Data Transfer)
-
Open Control Panel > Backup and Restore (Windows 7).
-
Click Create a system image and choose the SSD as the destination.
-
Follow the on-screen instructions to back up your data.
-
After installing the new SSD, restore the backup to complete the transfer.
While these methods work for basic file transfers, they may not be ideal for migrating system files or applications. If you need a full disk transfer, using an SSD cloning tool is recommended.
FAQs about Transferring from One SSD to Another
1. Why would I want to transfer data from one SSD to another?
2. What tools or software do I need to transfer data between SSDs?
3. Can I transfer the entire contents of my SSD, including the operating system?
4. Will transferring data between SSDs affect the performance or lifespan of the SSDs?
5. Do I need to format the destination SSD before transferring data to it?
6. Can I transfer files from SSD to SSD without cloning?
7. Does Windows 11 have a built-in SSD migration tool?
Verdict
Many users wonder how to move files and OS from one SSD to another in Windows 11/10, one of the easiest way is using professional program such as AOMEI Backupper. It helps you transfer data from SSD to SSD effortlessly, whether you want to clone drive to smaller SSD or larger SSD.
In addition, AOMEI Backupper applies to clone all kinds of SSDs, such as clone HDD to Samsung SSD, clone HDD to Seagate SSHD, clone NVMe to another NVMe, etc.