Fix System Reserved Partition on Wrong Drive – Full Guide
Find the System Reserved partition on a wrong drive after installing Windows? Learn how to move the System Reserved partition to the desired drive easily in this article.
By Lily Updated on March 18, 2025
The issue: System Reserved partition on a wrong drive
The System Reserved partition holds the Boot Configuration Database, Boot Manager Code, Windows Recovery Environment and reserves space for the startup files which may be required by BitLocker.
You can only see the System Reserved partition in Disk Management or partition software because it has no drive letter. Usually it locates before the system partition (normally the C: drive).
However, some users find the System Reserved partition is on a wrong drive. It happens when they install Windows with more than one hard drive attached to the computer.
How to resolve System Reserved partition is on another drive?
If you encounter the System Reserved partition is on another drive, you can move it to the drive you want with two methods described below:
Method 1: move the System Reserved partition using Disk Management
By “move” here I mean to create a new System Reserved partition and then delete the old one. Since the System Reserved partition contains boot files, you may suffer from boot failure after moving it. To get prepared for potential boot error, you can create a system repair disc in advance. Then, follow the instructions below:
- Press the Win+R keys to open Run, type diskmgmt.msc in Run, and click on OK to open Disk Management.
- Find the disk where you want to have the System Reserved partition. Right click on the unallocated space on the disk and select New Simple Volume. If there is no unallocated space, you can get some by deleting an existing partition or shrinking it.
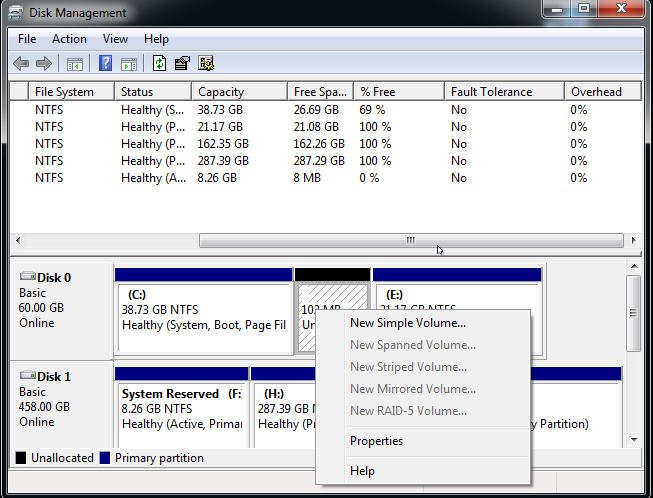
- Follow New Simple Volume Wizard to specify volume size, assign drive letter or path and format partition step by step.
Tips:
● The size of the System Reserved partition is 100 MB on Windows 7, 350 MB on Windows 8, and 500 MB on Windows 10.
● You can label the new partition “System Reserved” when formatting the partition.
- Assign a drive letter to the original System Reserved partition to make it shown in File Explorer. Copy everything from the old System Reserved partition to the newly created partition. It should include Boot folder, bootmgr and BOOTSECT.BAK.
- Remove the drive letter from the new System Reserved partition and then make the partition bootable.
- Restart your computer to see if it can boot successfully. If it boots successfully, you can safely remove the old System Reserved partition; if not, you can use the Windows system repair disc you prepared to perform Startup Repair.
As you see, it takes a lot of efforts to create a new System Reserved partition, especially for those who are unfamiliar with Disk Management. Is there a simpler way to move the System Reserved partition to the desired drive? Please read on.
Method 2: move the System Reserved partition via a handy utility🏆
Instead of creating a new System Reserved partition, I’ll tell you how to copy the original System Reserved partition to the drive you want here. What you need is the best disk cloning software AOMEI Backupper.
✭ It enables you to clone the entire disk or copy partition to another drive. You can also clone OS only via System Clone.
✭ It allows you to create image backups for the system, disk, partition, or files. You can even restore system to another computer with different hardware via dissimilar hardware restore.
✭ All Windows PC operating systems like Windows 11/10/8.1/8/7/Vista/XP are supported.
Download AOMEI Backupper now to try it out!
Easiest hard drive clone software for Windows PC.
Follow the steps below to copy the old System Reserved partition to another drive via AOMEI Backupper:
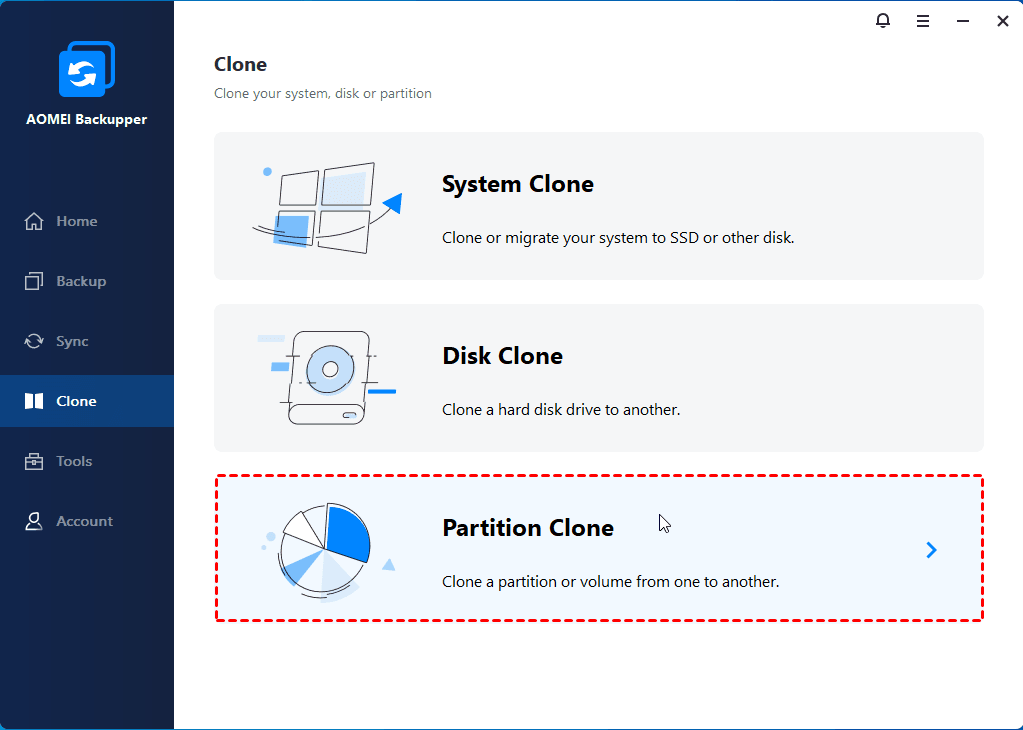
Step 1. Install and launch AOMEI Backupper. Click “Clone” on the left pane and select “Partition Clone”.
Step 2. Select the old System Reserved partition as the source partition and click “Next”.

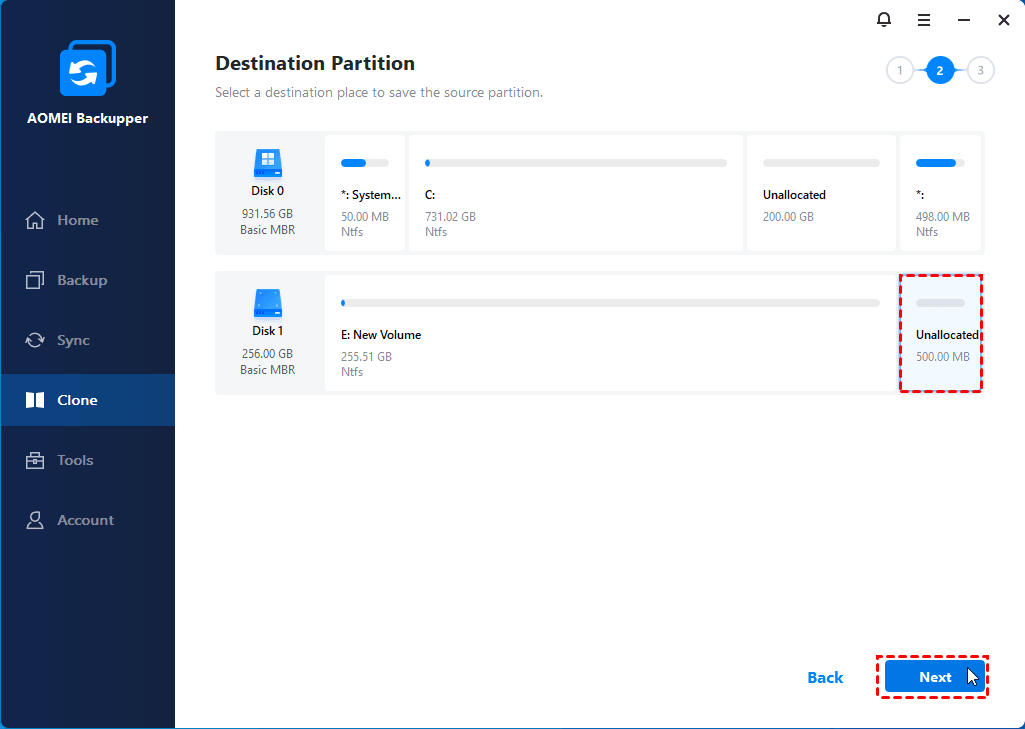
Step 3. Select the unallocated space on this disk which you want to move the System Reserved partition to and click “Next”.
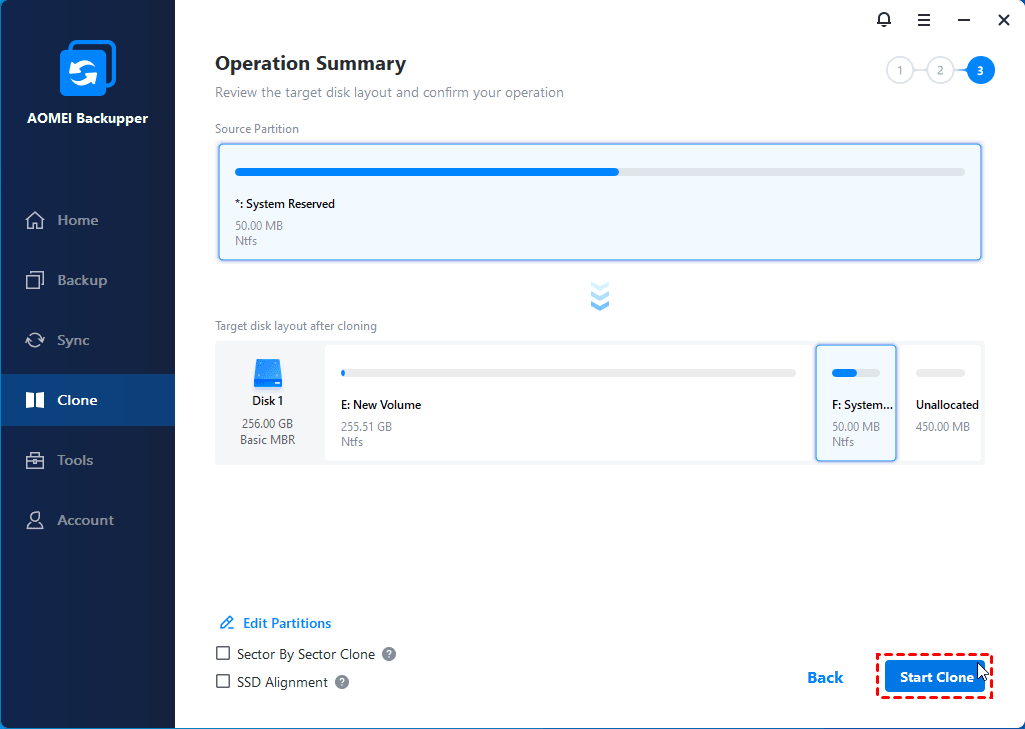
Step 4. In the Operation Summary page, click “Edit Partition”. In the pop-up window, the destination partition is set as “Primary Partition” by default so as to make it bootable later. Set the drive letter as “None” and adjust the partition size based on your need. Then, click “OK” to save your settings.

Step 5. Confirm the operation and click “Start Clone”.
Notes:
● Sector by sector clone: it will clone every sector on the source partition no matter it is used or not, thus costing more time. It requires the destination partition to be equal to or larger than the source partition.
● SSD Alignment: it will improve the performance of the destination SSD. You should check this option if you are moving the System Reserved partition to an SSD.
Step 6. After the cloning process is finished, open Disk Management, right click on the new System Reserved partition and select Properties. Name it “System Reserved” under the General tab.
Step 7. Set the new System Reserved partition as active and restart the computer to check if it can boot successfully as mentioned in Method 1. Delete the old System Reserved partition if there’s no problem occurring.
Beisde moving system reserved partition, this software also applies to migrate Windows 10 to M.2 SSD, clone M.2 SSD to M.2 SSD, clone SSD to larger SSD, etc.
FAQs on Windows System Reserved Partition
1. What is the System Reserved Partition, and why is it important?
The System Reserved Partition is a small partition (usually 100-500 MB) created during Windows installation. It contains boot files, BitLocker encryption data, and other critical system files. If it’s on the wrong drive, your system may fail to boot.
2. Can I delete the System Reserved Partition if it’s on the wrong drive?
No, deleting the System Reserved Partition can render your system unbootable. Instead, you should move it to the correct drive or recreate it during a Windows reinstallation.
3. Can I merge the System Reserved Partition with another partition?
No, the System Reserved Partition cannot be merged with other partitions. It must remain separate to store critical boot files. Attempting to merge it can cause boot failures.
4. Can I fix the System Reserved Partition without reinstalling Windows?
Yes, you can fix it without reinstalling Windows by:
- Moving the partition to the correct drive using software like AOMEI Backupper.
- Rebuilding the boot files using the Windows Recovery Environment (WinRE).
5. How can I prevent the System Reserved Partition from being created on the wrong drive during installation?
To prevent this issue:
- Disconnect all secondary drives before Windows installation.
- Ensure the primary drive is the only one connected when installing Windows.
- Verify the partition layout before completing the installation.
6. What should I do if my system won’t boot after moving the System Reserved Partition?
If your system won’t boot:
- Boot into WinRE using a Windows installation USB.
- Use the Command Prompt to repair the boot files with commands like bootrec /fixmbr, bootrec /fixboot, and bcdboot.
Summary
When you find the System Reserved partition is on a wrong drive, you can move it to the drive you want with two methods provided in this article. Apart from Partition Clone function, AOMEI Backupper can also help you clone hard drive from Command Prompt and run DoD hard drive wipe. Don’t hesitate to give it a try and share this article with your friends if you think it's helpful!