How to Fix 0 Bytes Drives and Recover Data?
Learn to fix 0 bytes drives and recover 0 byte files via the respective fixes on this page. Moreover, you can also the most practical data loss prevention measure.
By Penny / Updated on December 11, 2024
What does 0 bytes mean?
Bytes serve as a crucial unit of measurement, revealing the size of a file or the space occupied on a drive. A reading of 0 bytes signifies an absence of data – an empty file or an empty drive.
Nevertheless, a 0-byte reading doesn't always equate to true emptiness. It could be a misleading reading caused by a drive-related problem. When a folder displays 0 bytes despite containing data you know is there, it's a clear indicator of an underlying issue.
Possible reasons for a 0 bytes drive
Multiple factors can cause a hard drive to show 0 bytes. Please get an overview of the following common reasons.
📮 No space: A disk may read 0 bytes remaining when there's insufficient storage space to accommodate additional data. In such instances, a straightforward solution involves deleting unnecessary data or upgrading your storage capacity.
🧨Corrupted file systems or bad sectors: The corruption of a file system has the potential to disrupt your computer’s boot process and result in a drive displaying 0 bytes.
🎆 Viruses or malware: In such scenarios, the presence of a 0-byte virus may have infiltrated your computer, causing your files, folders, or disk to exhibit a 0-byte reading. Thankfully, this issue can often be resolved by conducting a thorough antivirus scan on your system.
💻 Improper shutdown: Abruptly shutting down your computer before it completes a critical operation can result in both data and file system corruption.
How to recover data from a 0 bytes drive?
Before embarking on the task of rectifying a 0-byte hard drive, it’s imperative to prioritize data recovery, especially if the drive is correctly recognized in Disk Management with its appropriate size. This precautionary step ensures the safety of your data in case any repair attempts go awry and potentially wipe the drive.
So you’re supposed to make file backups via the free AOMEI Backupper Standard before performing data recovery.
Part 1. Make file backups via AOMEI Backupper Standard
As the title suggests, this section aims to extract all the existing SD card data by creating file copies via AOMEI Backupper Standard.
This free Windows backup software is good at backing up files, folders, partitions, disks, or systems to internal or external hard drives, USBs, Networks, or Cloud drives.
-
AOMEI Backupper Standard supports Windows 11, 10, 8.1, 8, 7, XP, and Vista PC. It recognizes different types of SD cards such as SD, SDHC, SDXC, Micro SD, Micro SDHC, and Micro SDXC.
-
It offers daily incremental backups and differential backup options as you prefer.
Step 1. Install and run AOMEI Backupper Standard on your Windows > click Backup > select File Backup.

Step 2. Click “Add File/Folder” to add the SD card files or folders you want to back up.

Step 3. Select “Daily, Weekly, Monthly, Event triggers, or USB plug in” to enable the backup period. Then click the “Start Backup” button.

Part 2. Recover deleted/missing files from hard drives without backups
At the moment, your existing data on the 0 byte drive is safe. Supported by its advanced scanning method and high data recovery rate, AOMEI FastRecovery is good at recovering deleted and missing files from Windows PCs and other local drives.
💚 Please stop loading new files to your Windows to prevent data coverage. After data erasure, it can decrease its Windows data recovery rate.
💚 After Recycle Bin data recovery, please save your recovered missing files in another drive instead of the original C drive.
💚 Upgrading AOMEI FastRecovery is a more cost-effective choice for those users who prefer to recover plenty of deleted or missing files.
-
Recover 200+ types of files: images, audio, videos, MS Office files, WPS files, folders, compressed files, websites, etc.
-
Combined scanning method: AOMEI FastRecovery can automatically run Quick Scan and Deep Scan to detect all the recoverable files on your selected local drive.
-
Easy-to-find: After recovery, AOMEI FastRecovery can keep the original format, filename, path, and size for the deleted files.
-
Excellent compatibility: Support Windows 11, 10, 8, 7, or Server PC and 4 file systems (NTFS, FAT32, exFAT, and ReFS).
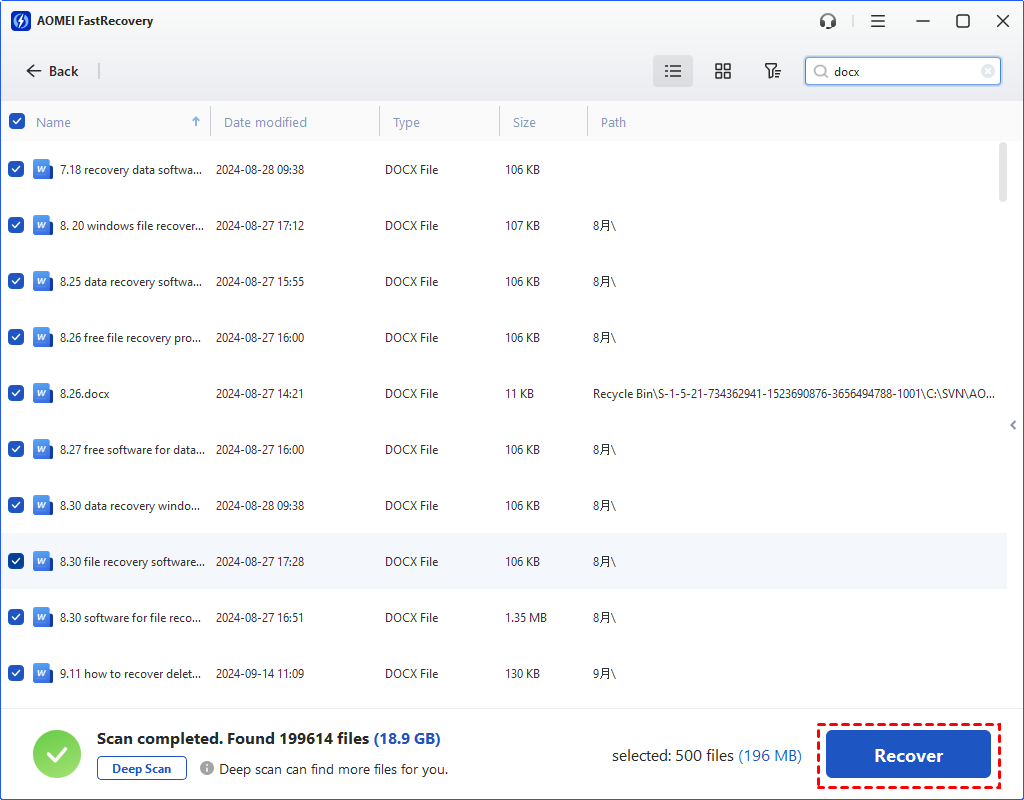
Step 1. Install and run AOMEI FastRecovery on your Windows > select the C drive > click Start Scan.

Step 2. After clicking Start Scan, AOMEI FastRecovery can automatically run Quick Scan and Deep Scan to detect all the recoverable files.
During scanning, you can filter/preview your desired files according to Filename, Document Type, Path, Size, Date, etc.
- Name: Enter the filename of your wanted USB files to narrow the search area.
- Date modified: Set the date (today, yesterday, last 7/30 days, etc.)
- Size: Filter file size (<128KB, 128KB~1MB, 1MB~512MB, etc.)

Step 3. Under the Recycle Bin folder, select the files you plan to recover > click Recover x files.
How to fix 0 bytes hard drive?
Let’s perform how to fix 0 bytes hard drive via the following methods.
Fix 1. Run CHKDSK to fix 0 bytes drive
For those who are familiar with CMD and willing to delve into a more hands-on approach, CHKDSK presents itself as a valuable utility to scrutinize and flag potential issues. To guarantee a thorough error correction process, it's prudent to invoke CHKDSK with parameters such as /f, /r, /x, or /b, as it extends its scope beyond mere file system examination and tackles any identified volume errors for a more comprehensive resolution.
If you encounter a 100 disk usage problem, you can also follow this way to fix 100 disk usage.
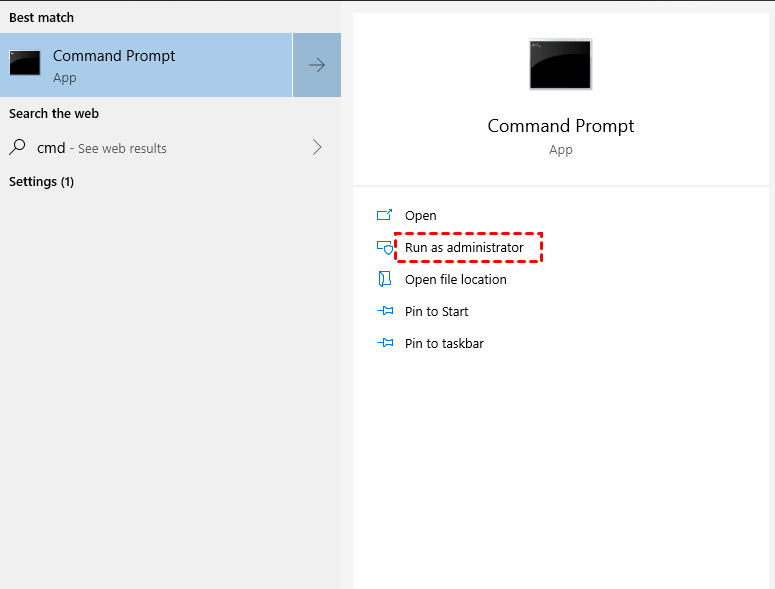
Step 1. Type cmd in the search bar and click Run as administrator to open the command prompt window.
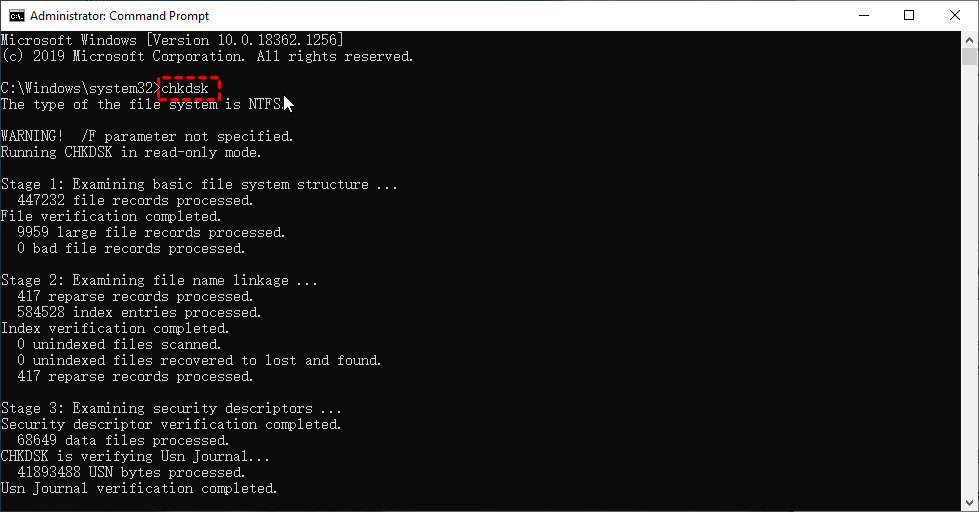
Step 2. Type chkdsk in the command prompt window.
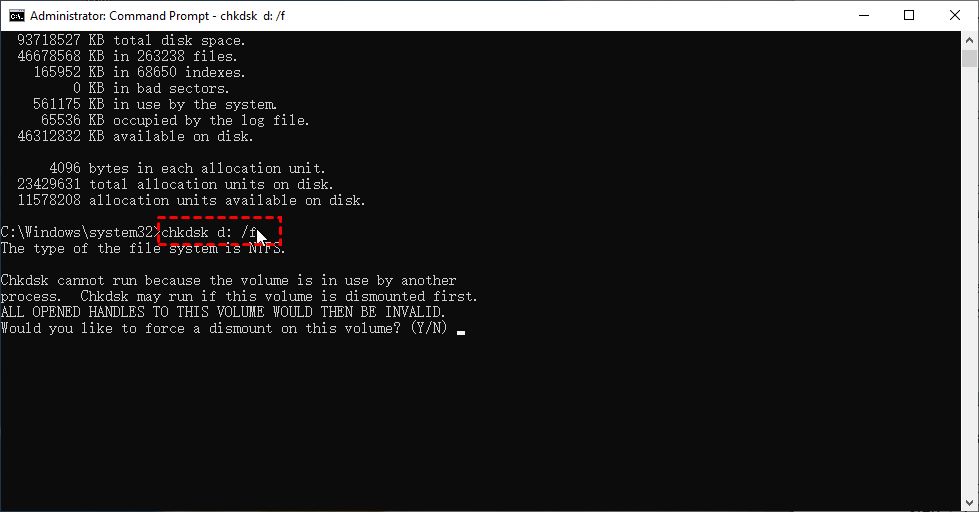
Step 3. Type chkdsk d: /f or chkdsk d: /r in the window according to your situation.
Fix 2. Format your 0 bytes drive via Disk Management
Disk formatting is another way that can help you fix your 0 bytes drive. But please note that disk formatting can erase all the existing data on your selected drive. The following steps depict how to format your 0 bytes drive via Disk Management.
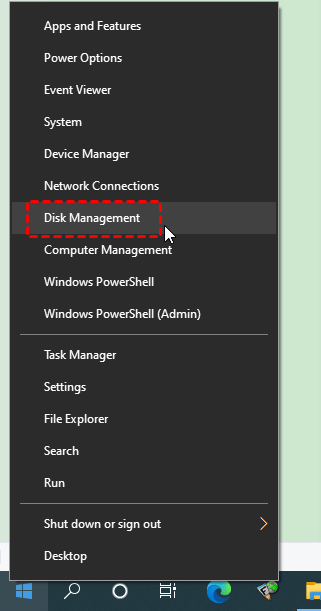
Step 1. Connect your SD card to the Windows. Then press “Win + X” and select “Disk Management” to open this utility.
Step 2. Right-click on your drive and click the “Format” button.
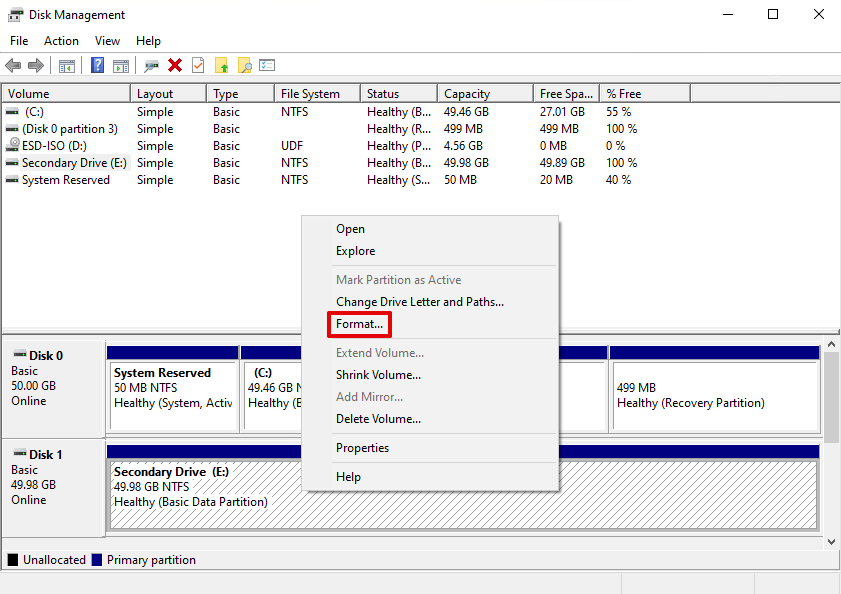
Step 3. Select the NTFS file system and click “OK” to save your changes.

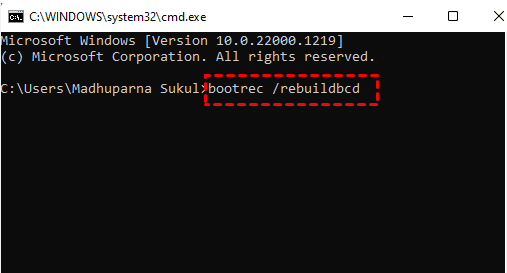
Fix 3. Rebuild BCD to fix your 0 bytes drive
A malfunctioning MBR (Master Boot Record) could very well be the culprit behind the incorrect display of your hard drive space. By mending it, you ensure that the boot record holds accurate information pertaining to your drive.
To rectify a damaged MBR, you'll require either a Windows installation DVD or a bootable recovery USB. Here’s a step-by-step guide on how to fix your 0 bytes drive.
Step 1. Connect your Windows installation media or bootable USB media to the Windows > restart your Windows OS > press the BIOS key (F2, F11, etc.) on the initial screen
Step 2. Change the boot priority to your connected Windows installation media or bootable USB media.
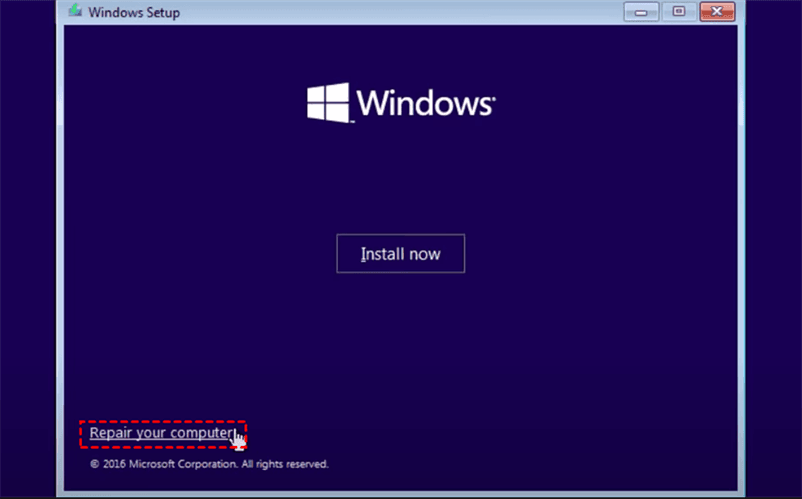
Step 3. In the recovery environment, click Next until you see Repair your computer > click Repair your computer.
Step 4. Click Troubleshoot > Advanced options > Command Prompt.
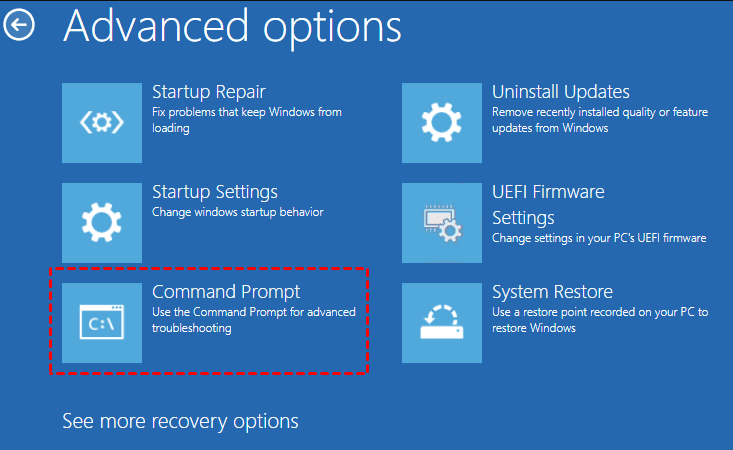
Step 5. Type cmd in the search bar > click Run as administrator to open the prompt command window > type bootrec /rebuild bcd in the window > hit Enter or press OK.
In conclusion
What does 0 bytes mean? How to fix 0 bytes hard drive? How to recover 0 byte files? After reading this passage, you may find the right answer. Moreover, if you’re unwilling to suffer data loss, you’re advised to make regular file backups using this free backup software for Windows, AOMEI Backupper.