How to Convert MBR to GPT without Data Loss?
Learn to convert MBR to GPT without data loss via several efficient methods on this page. You can also recover lost data after disk conversion and get relevant tips.
By Penny / Updated on March 3, 2025
Is it possible to convert MBR to GPT without data loss?
Hi! I got a problem when tried to update Windows 10 to Windows 11, I don’t see UEFI settings in the Advanced Options menu. My system disk partition has MBR, and I desire to change it to GPT. I’ve tried to find out how to do it, but I found only info with full data loss and reinstall Windows, I would like to keep my data on my PC and just update Win 10 to 11. So is it possible to convert MBR to GPT without data loss? Thanks.
- A user from the Microsoft Community

Microsoft’s announcement states that upgrading from Windows 10 to Windows 11 will require UEFI and GPT. This has contributed to an increase in the need to convert MBR to GPT for Windows 11 update. And it’s possible to convert MBR to GPT without data loss.
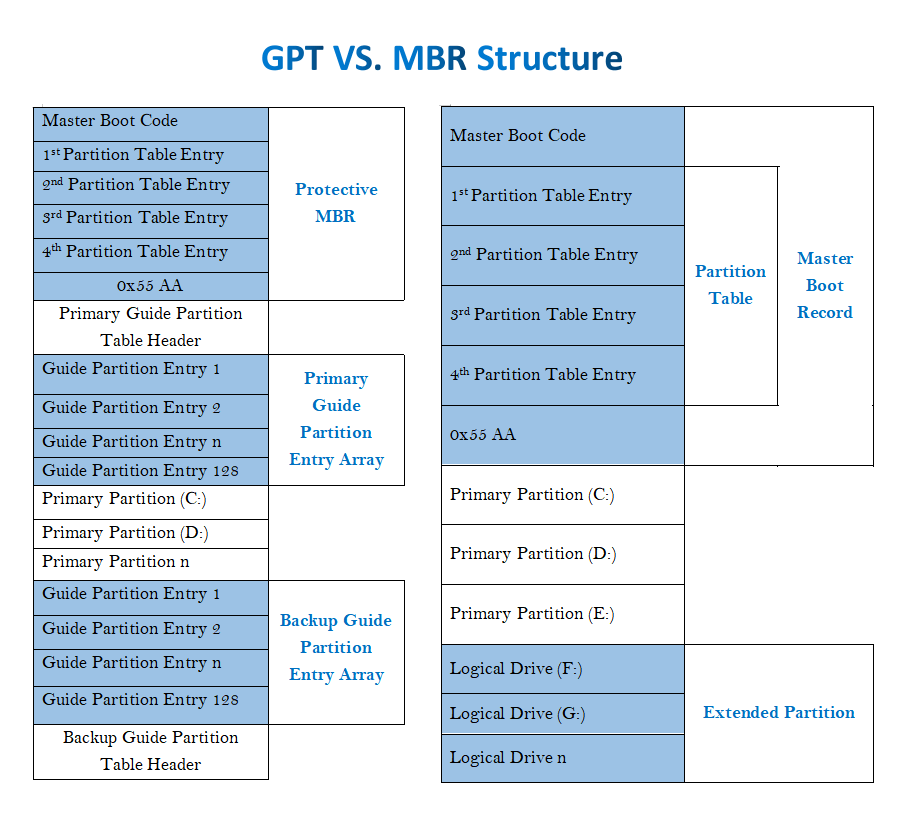
Before converting a disk from MBR to GPT, let’s get an overview of MBR and GPT.
|
|
Master Boot Record (MBR) |
GUID Partition Table (GPT) |
|
Maximum supported drive size |
2TB |
18 exabytes |
|
Number of partitions |
Up to 4 partitions |
Unlimited partitions |
|
Partition size |
Up to 2 TB |
Up to 18 exabytes |
|
BIOS requirements |
Only works with legacy BIOS |
Work with legacy and UEFI BIOS |
|
System architecture |
Works on 32-bit and 64-bit systems |
Only works on 64-bit systems |
|
Compatible OS |
Works with older versions of Windows such as Windows 7 and XP. |
Works with MacOS and later versions of Windows such as Windows 10 and 11. |
|
Data recovery rate |
It’s more difficult to perform MBR data recovery. |
It’s relatively easy to recover data from GPT drives. |
As you can see, the differences between MBR and GPT explain why individuals seek to convert MBR to GPT with data loss.
🟢 While MBR is limited to accommodating a maximum of 2TB, the GPT format can effectively handle a much larger 256TB storage capacity.
🟢 On MBR disks, people can create up to 4 primary partitions or 3 primary and 1 extended partition. On the contrary, GPT can handle as many as 128 primary partitions.
🟢 Some booting mainboards cannot support MBR as their system drives like MAC.
Three solutions to convert MBR to GPT without data loss
Does converting MBR to GPT lose data?
Actually, the answer depends on the way you pick. Some solutions need you to delete the current partition and saved data before converting MBR to GPT, but not all methods require this step.
There are three feasible solutions for you to convert drive from MBR to GPT. If you’re unwilling to suffer data loss after conversion, it is best to take the methods in order.
Way 1. Use AOMEI Partition Assistant convert MBR to GPT without data loss
Though Diskpart and the Disk Management utility can convert MBR to GPT, it requires you to erase all partitions on the designated disk and all the data saved on them.
Furthermore, these tools cannot perform the conversion between MBR and GPT for the system disk within the Windows environment. This is due to the restriction that prevents the deletion of the system partition while operating within Windows.
In this scenario, you’re advised to use AOMEI Partition Assistant convert MBR to GPT without data loss. There’s no need to delete partitions with their saved data via this tool.
If your Windows operating system can boot up successfully, this software can facilitate the straightforward conversion of both the system disk and data disk from MBR to GPT within the Windows environment.
- ★Tips:
- Please ensure your motherboard supports EFI and UEFI mode before conversion. If not, incompatibility could result in an unsuccessful system boot post-conversion.
- It’s recommended to create a file/disk backup to prevent your important files from being lost due to unexpected data loss scenarios.
- AOMEI Partition Assistant works with Windows 11, 10, 8, XP, Vista, and Windows 7.
Let’s begin with its free demo edition to convert MBR to GPT.
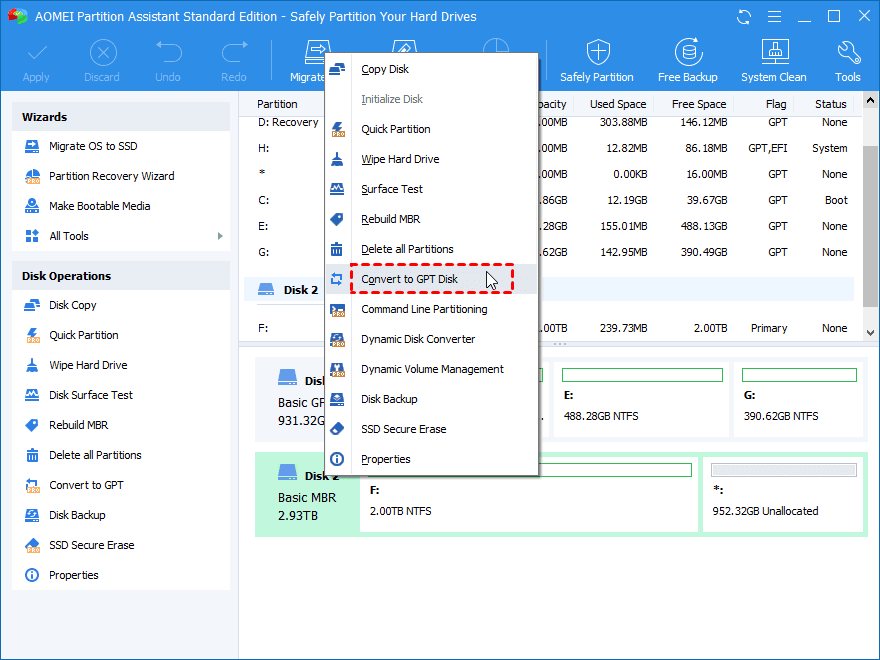
Step 1. Launch AOMEI Partition Assistant on your Windows > right-click on the MBR disk you want to convert > select Convert to GPT Disk.
Step 2. Click “OK” after seeing this prompt.

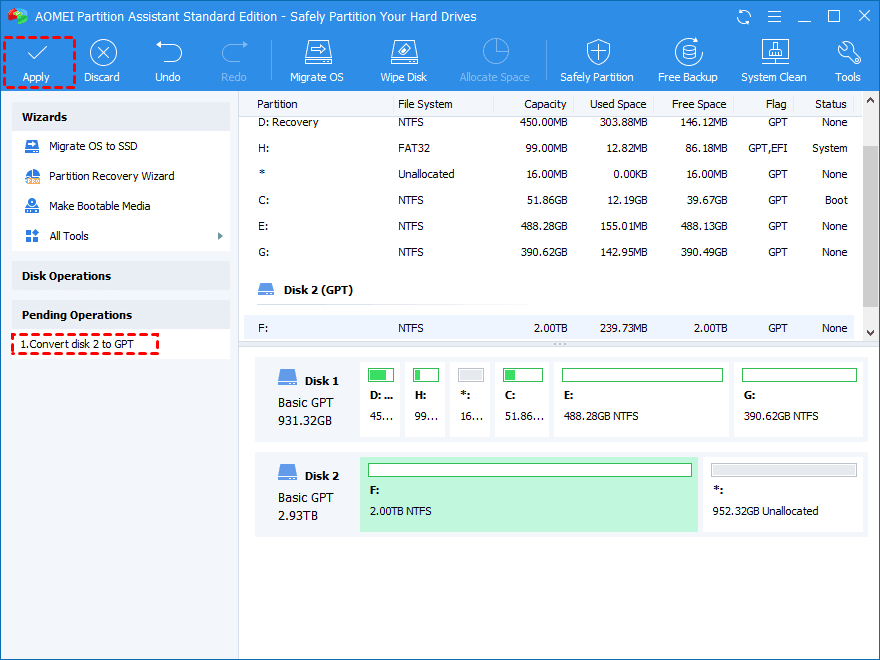
Step 3. Click “Apply” to begin the conversion process.
Way 2. Convert MBR to GPT via Diskpart
Since converting MBR to GPT via Diskpart/Disk Management automatically can delete partitions and the saved data on them, you can make a backup to prevent data loss before disk conversion.
Thus, this method contains two parts: create a file backup and convert MBR to GPT.
Part 1. Create a disk backup via AOMEI Backupper Standard
Free AOMEI Backupper Standard can help you back up everything on your hard disk, such as the operating system, system settings, system reserved partition or EFI partition, installed programs, and personal data.
This tool also offers daily incremental backups and differential backups as you prefer.
Step 1. Install and run AOMEI Backupper Standard on your Windows > select Backup > Disk Backup.

Step 2. Click “Add Disk” to select the disk you want to back up.

Step 3. Click the folder-shaped button and locate a destination path to save your disk backup.

Part 2. Use Diskpart to convert MBR to GPT
With prepared backups, you’re ready to convert MBR to GPT using Diskpart.
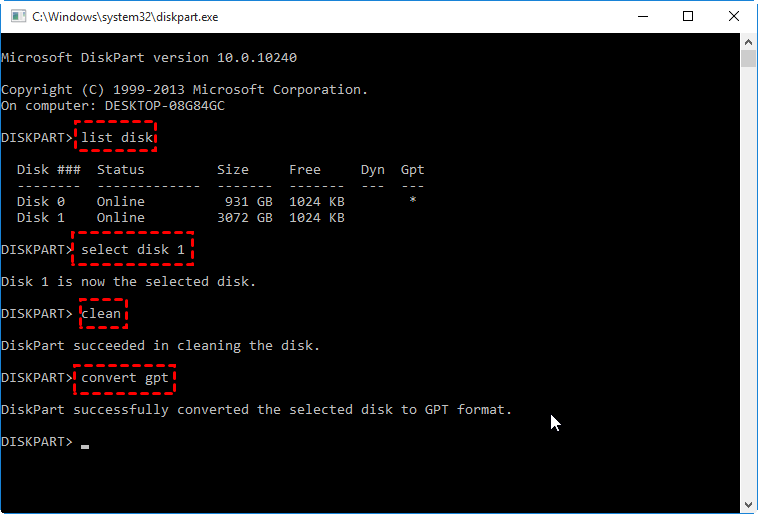
Step 1. Press Win + R to open the Run box and type diskpart in the box. Then hit “Enter” or click “OK” to open it.
Step 2. Type “list disk” to show all your disks connected to your PC.
Step 3. Type “select disk n” (n is the number of your MBR disk).
Step 4. Type “clean” to delete all the existing partitions on the target disk.
Step 5. Type “convert gpt” to begin the disk conversion process.
Way 3. Convert MBR to GPT without data loss via MBR2GPT.exe
MBR2GPT.exe is an impressive utility allowing the conversion of Windows 10 system drives from MBR to GPT format without losing data. Please note this utility exclusively operates on system drives.
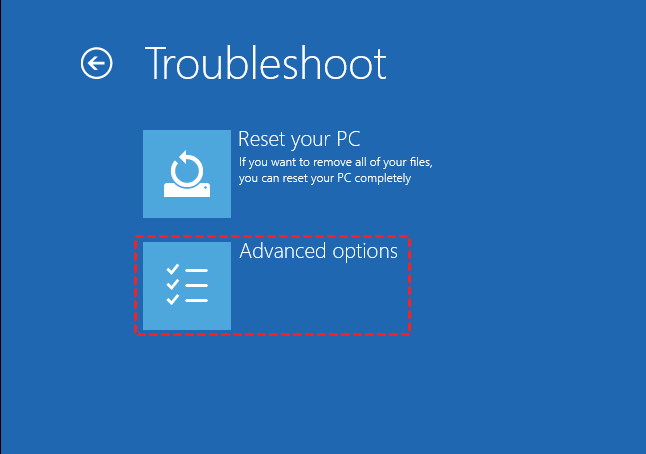
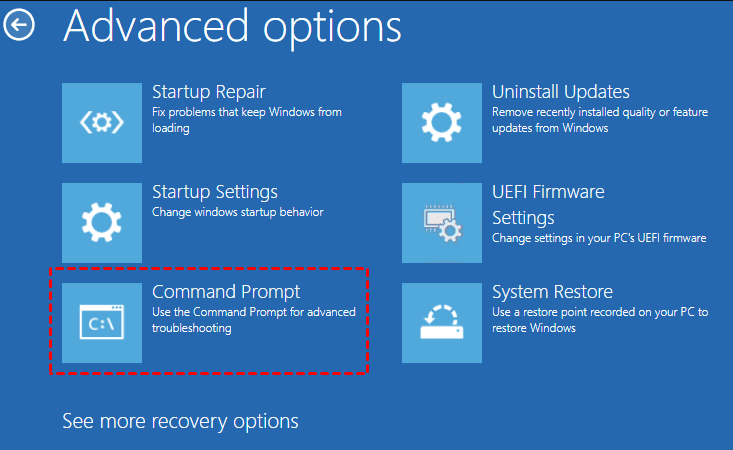
Step 1. Press Win + I to open Windows Settings > click Update & Security> Recovery > Restart now.

Step 2. After rebooting your PC, click Troubleshoot > Advanced options.
Step 3. Select Command Prompt.
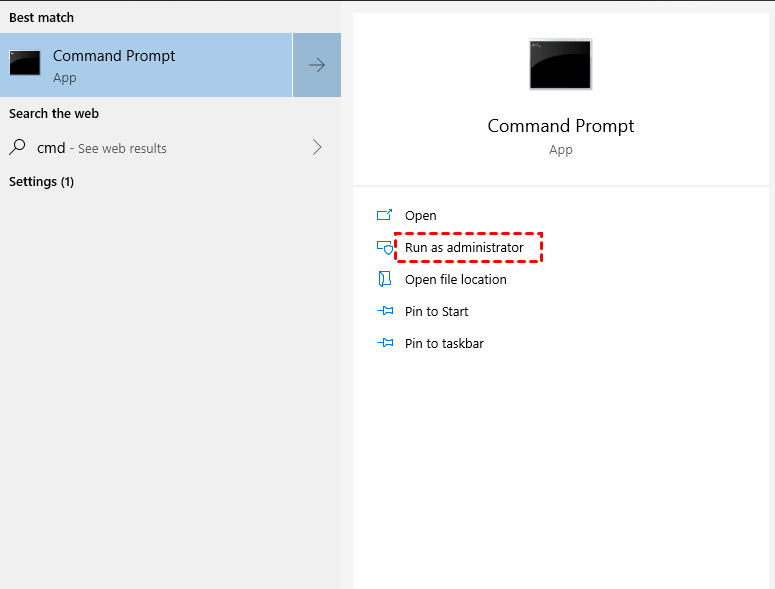
Step 4. Type “cmd” in the search bar and choose “Run as administrator” to open the command prompt window.
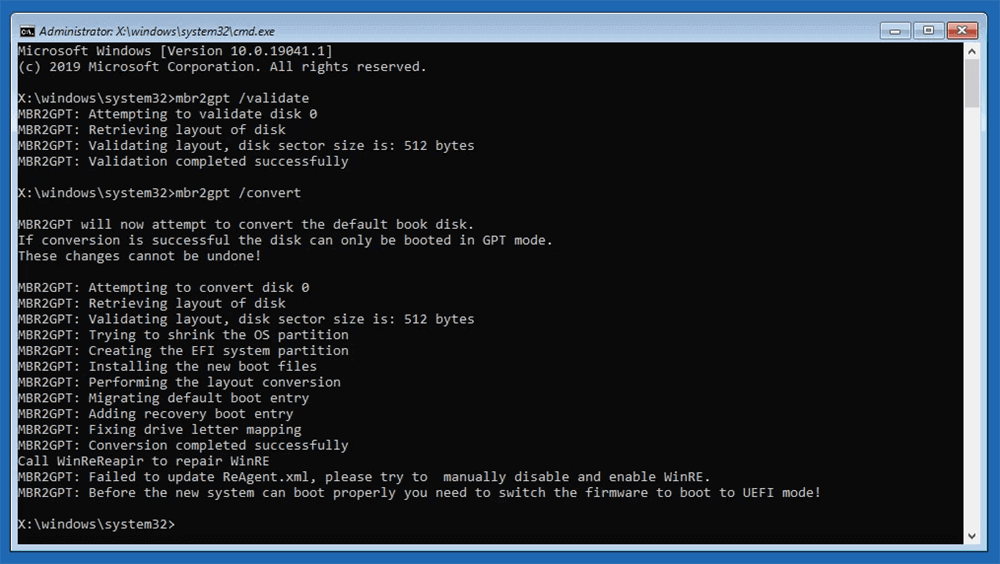
Step 5. Type the following command lines in the window and hit “Enter” to go on.
- mbr2gpt /validate
- mbr2gpt /convert
How to recover lost data after Disk MBR to GPT conversion?
If you’ve converted MBR to GPT directly without prepared backups, you might have no choice but to recover lost data via powerful third-party tools.
Supported by its advanced scanning method and high data recovery rate, AOMEI FastRecovery is designed to recover deleted and missing files from computer hard drives and other local drives.
- After the data recovery process, please save your recovered missing files in another drive instead of the original local drive.
- Upgrading AOMEI FastRecovery is a more cost-effective choice for those users who prefer to recover plenty of deleted or missing files.
- ★Key features of AOMEI FastRecovery:
- Recover 200+ types of files: images, audio, videos, MS Office files, WPS files, folders, compressed files, websites, etc.
- Combined scanning method: AOMEI FastRecovery can automatically run Quick Scan and Deep Scan to detect all the recoverable files on your selected local drive.
- Easy-to-find: After recovery, AOMEI FastRecovery can keep the original format, filename, path, and size for the deleted files.
- Excellent compatibility: Support Windows 11, 10, 8, 7, or Server PC and 4 file systems (NTFS, FAT32, exFAT, and ReFS).
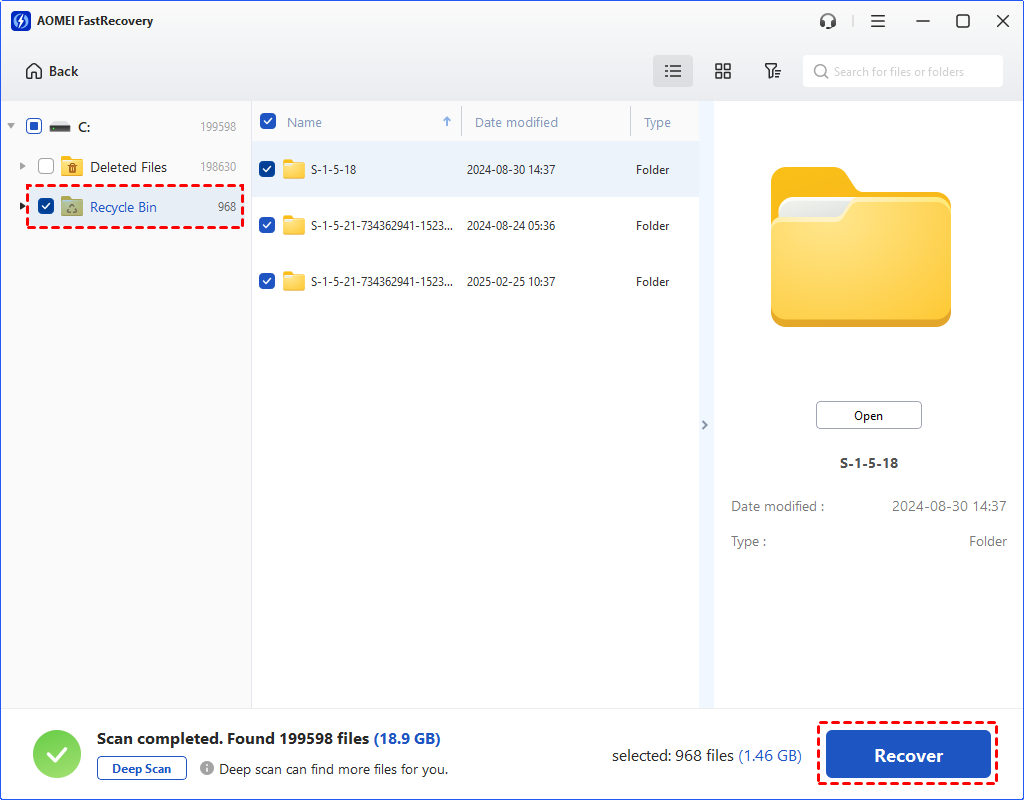
Step 1. Install and run AOMEI FastRecovery on your Windows > find the drive that saves your desired files before data loss > click Scan.

Step 2. After clicking Start Scan, AOMEI FastRecovery can automatically run Quick Scan to detect all the recoverable files on your selected GPT disk.
During scanning, you can filter/preview your desired files according to Filename, Document Type, Path, Size, Date, etc.
- Name: Enter the filename of your wanted USB files to narrow the search area.
- Size: Filter file size (<128KB, 128KB~1MB, 1MB~512MB, etc.)

Step 3. Under the Deleted Files/Recycle Bin folder, select the deleted files you need to recover > click Recover.
Related Q&A about MBR/GPT data recovery
Is it possible to convert MBR to GPT without data loss? How to convert MBR to GPT without data loss? Please find three feasible solutions from the above part to finish disk conversion. Besides, there are some related tips about MBR and GPT for your reference.
Is it good to convert MBR to GPT?
Yes, it is because GPT (GUID Partition Table) makes good use of UEFI BIOS to support various storage devices larger than 2TB and allows you to set up partitions as many as possible (Microsoft Windows supports up to 128 partitions on a GPT drive).
Can you convert MBR to GPT without erasing data CMD?
Of course, you can. To prevent data loss, it’s time for you to create a disk backup before disk conversion. While the MBR2GPT command is handy for converting MBR to GPT without data loss, it exclusively works on system disks.
If you don’t want to be restricted by these conditions, you can employ AOMEI Partition Assistant convert MBR to GPT without data loss.
How to recover lost data after disk MBR to GPT conversion?
The most efficient and time-saving way is to seek help from professional data recovery software.
Please launch AOMEI FastRecovery on your Windows > select the drive that saves your wanted files before data loss > click Start Scan > choose your desired files > click Recover x files.