4 Quick Ways | Create Windows 11 Bootable USB from ISO
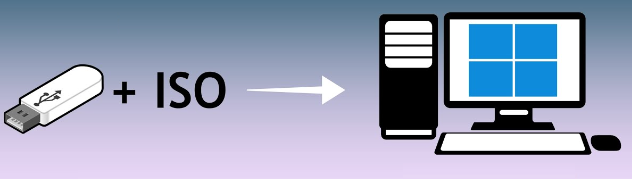
How to create Windows 11 bootable USB from ISO? This article helps you easily create bootable USB from ISO Windows 11 using Windows Media Creation Tool, Rufus, AOMEI FastRecovery and Command Prompt.
By Lori / Updated on October 23, 2024
Have you ever found yourself scratching your head wondering how to create Windows 11 bootable USB from ISO? Have no fear, whether you are installing Windows or repairing broken Windows, this comprehensive tutorial will provide you with 4 ways to create a bootable USB drive.
Also, if your data is lost or deleted, you can also dive into how AOMEI FastRecovery recover your data. Let's come to the details.
Why You Need to Create Bootable USB from ISO Windows 11?
Windows 11 has quickly become the OS of choice thanks to its reliability, enhanced user interface, powerful security features, and more. Many people have either updated or bought new devices running Windows 11. Others may choose to use a Windows 11 ISO file for a fresh setup.
Creating a bootable USB for Windows 11 not only enhances your setup experience but is also an essential tool for maintaining and operating your device efficiently. This approach brings several major benefits:
Install Windows 11 easily: First and foremost, bootable USB is a practical solution for installing or booting Windows operating system when you don’t have an optical drive. It's especially useful for setting up Windows on a new or repaired computer.
Quick troubleshooting: For computers experiencing serious problems, bootable USB is a lifesaver. It helps to quickly restore or replace the system operating system and solve serious problems that simple solutions cannot solve.
Simplified multi-device setup: For studios and businesses looking to install Windows 11 on multiple devices, a bootable USB drive simplifies the deployment process by eliminating the need to download ISO files multiple times.
Top 4 Methods to Create Windows 11 Bootable USB from ISO
Creating a bootable USB drive for Windows 11 doesn’t have to be a headache. Here are 4 proven solutions that can help simplify this process. Keep reading!
- USB drive with at least 8 GB of storage space.
- Download the latest version from Microsoft to keep your ISO files updated.
- Double-check your BIOS/UEFI settings to ensure compatibility with booting from a USB device.
- The process of creating a bootable USB flash drive will format all data on the USB flash drive. So, please always back up your data on the USB drive, you can try AOMEI Backupper Standard for free whole disk backup.
Method 1. Create Bootable USB via Windows Media Creation Tool
The first solution involves utilizing the Windows Media Creation Tool, a free utility offered by Microsoft. It also allows to create an ISO image from a hard drive or an existing operating system. To create bootable Windows 11 installation media from an ISO, follow these steps:
Step 1. Visit the official Microsoft website and download the Windows Media Creation Tool. Administrator rights may be required to run this tool. Should you agree to the license terms, click Accept.
Step 2. Select the language and edition for Windows 11. And, ensure your USB drive is plugged in.
Step 3. Tap Create installation media (USB flash drive, DVD, or ISO file) for another PC. Click Next.
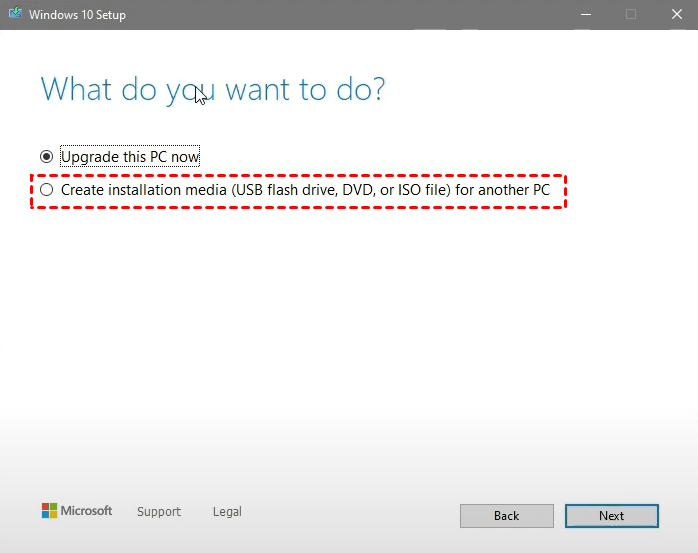
Step 4. Choose your option like USB flash drive and click Next.
Step 5. Make sure your connected USB drive is listed and click Next. When the Your USB flash drive is ready message appears, click Finish.
Method 2. Create Windows 11 Bootable USB Using Rufus
Rufus is another media creation tool that offers flexibility in creating bootable USB drives from ISO Windows 11. Follow the steps below to burn an ISO file to a USB drive Windows 11 using Rufus.
Step 1. Download Rufus from its official site. Insert your USB drive and open Rufus.
Step 2. In Rufus, select your USB drive under Device. Then click on the Select button to choose your Windows 11 ISO file.
Step 3. Ensure the Partition scheme is set to GPT and the Target system to UEFI (non-CSM) for Windows 11 compatibility.
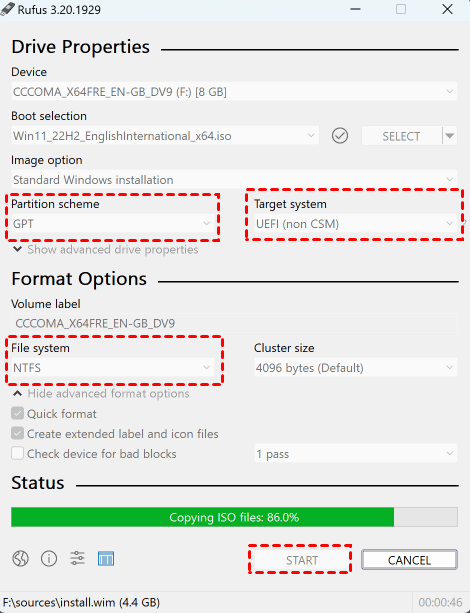
Step 4. Click Start and wait for Rufus to complete the process.
Method 3. Create Windows 11 Bootable USB from ISO Using AOMEI FastRecovery (Hot!)
AOMEI FastRecovery stands out as a top-tier Windows media creation tool, compatible with Windows 11/10/8/7. This tool excels at creating bootable USB drives, with or without an ISO file, allowing for hassle-free Windows installation without necessitating a Microsoft account. It simplifies the process of creating a recovery drive for Windows 10/11.

- User-friendly design: Features an intuitive interface to quickly create a bootable Windows 11 USB directly from ISO.
- In addition to USB flash drives, you can also choose CDs and DVDs as boot media.
- Data recovery feature: In addition to creating a USB bootable from Windows 11 ISO, it can also help you recover lost or deleted files.
- Supports NTFS, FAT32, exFAT and ReFS file systems in Windows 11, 10, 8, 7 or Windows Server PCs.
Here’s a step-by-step guide on using AOMEI FastRecovery to create Windows 11 bootable USB from ISO.
Step 1. Download and install AOMEI FastRecovery
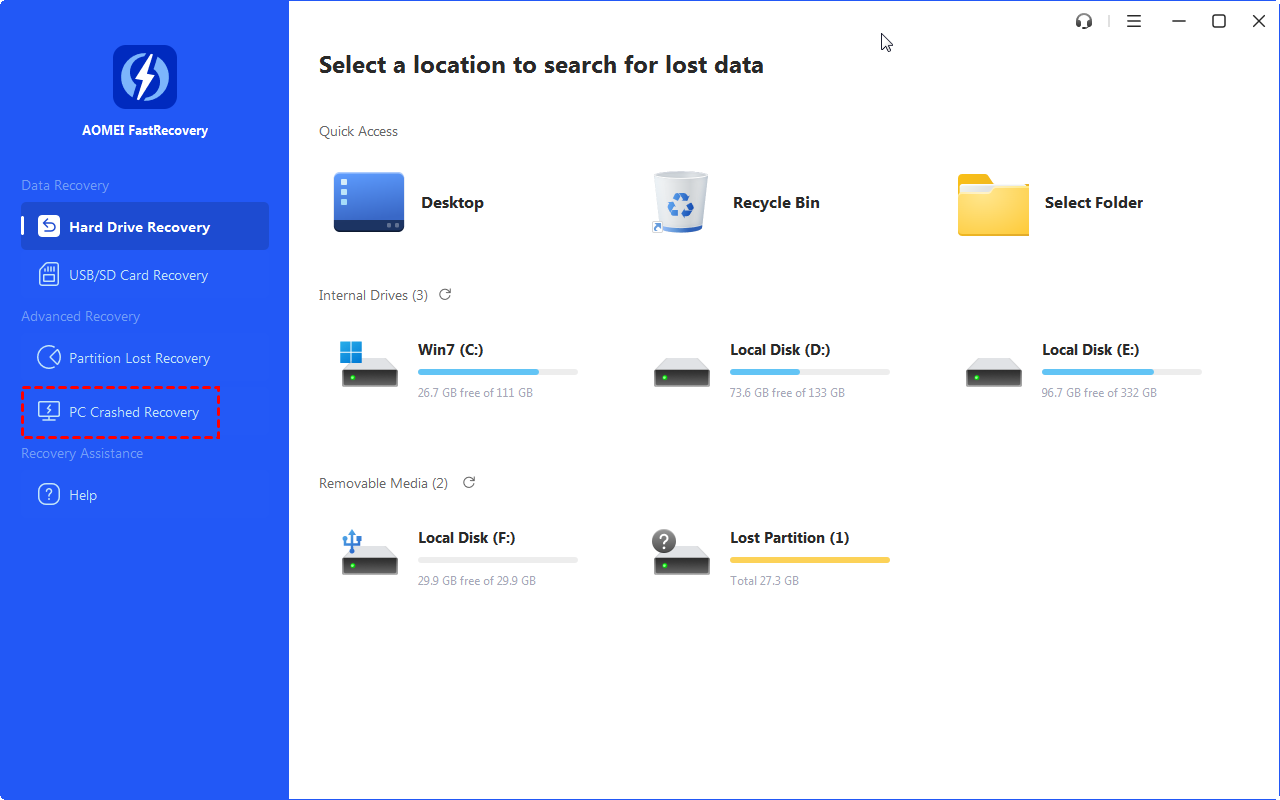
Launch AOMEI FastRecovery and click "Crashed PC Recovery". Connect a sufficiently large USB drive.
Step 2. Select a path to execute
Select the USB drive to create the bootable disk according to your needs and click "Execute".
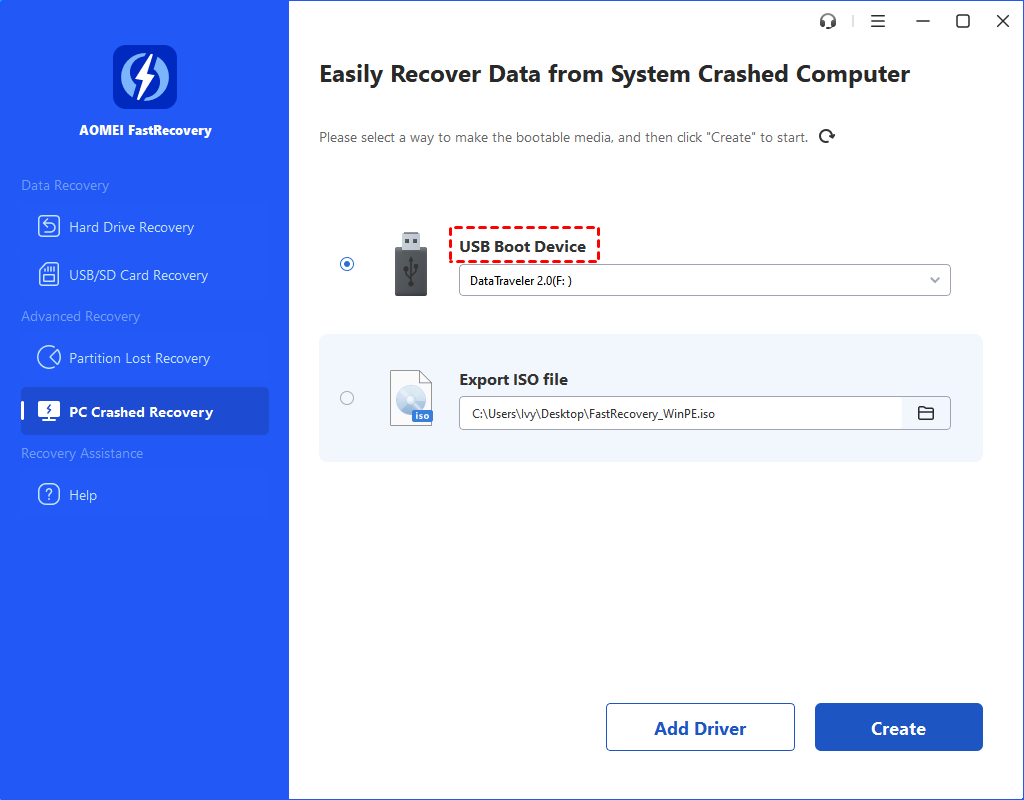
- USB boot device: Create a bootable USB.
- Export ISO file: Use this method to make a bootable ISO file. After exporting the ISO, you need to use a third-party burning program to burn it. Or, you can use the ISO to boot some virtual machines or burn them to other devices.
- Burn to CD/DVD: Create a bootable CD/DVD.
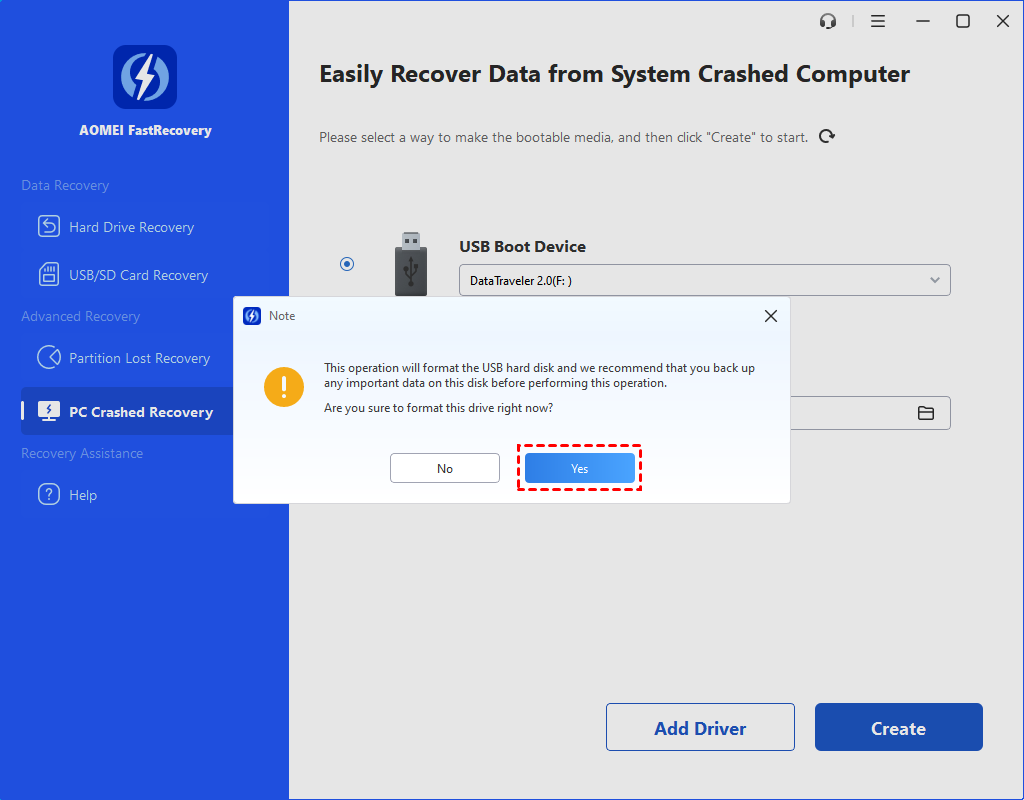
Step 3. Format the USB flash drive
Upon selecting the method, an information window will appear. You will be prompted that the USB disk will be formatted. Click "Yes" to continue creating bootable media since you have already made a file backup before.
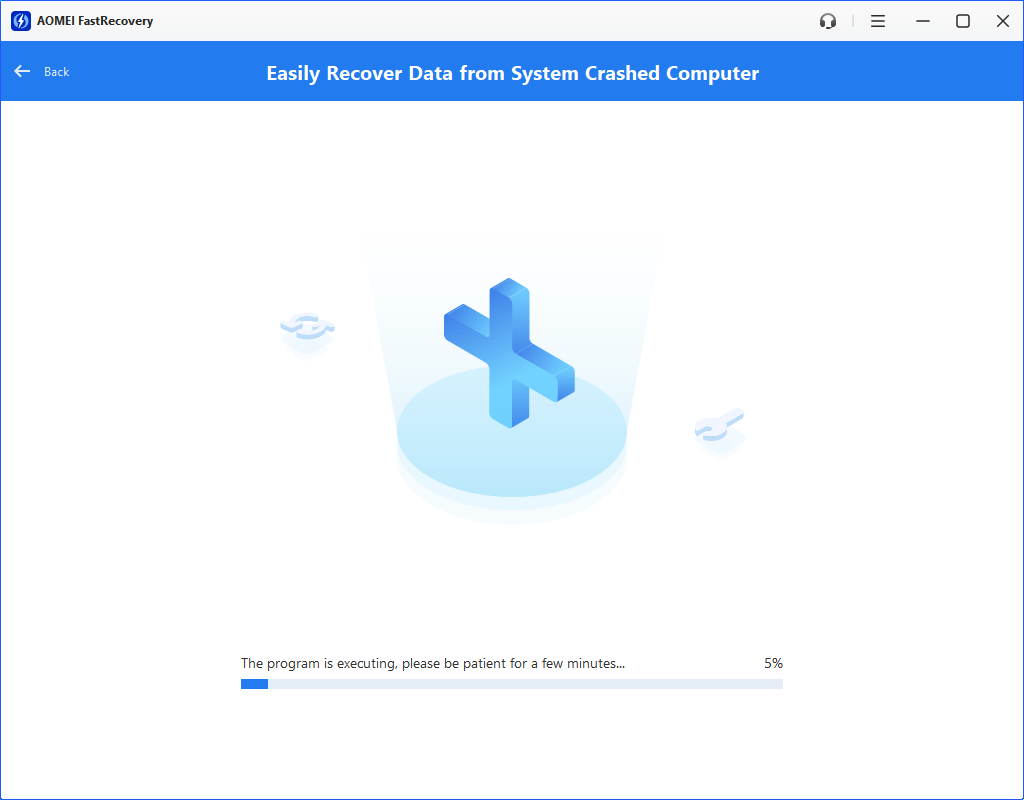
Step 4. Create a bootable USB drive
It will begin creating Windows 11 bootable USB from ISO. The duration of the download depends on your OS and internet speed.
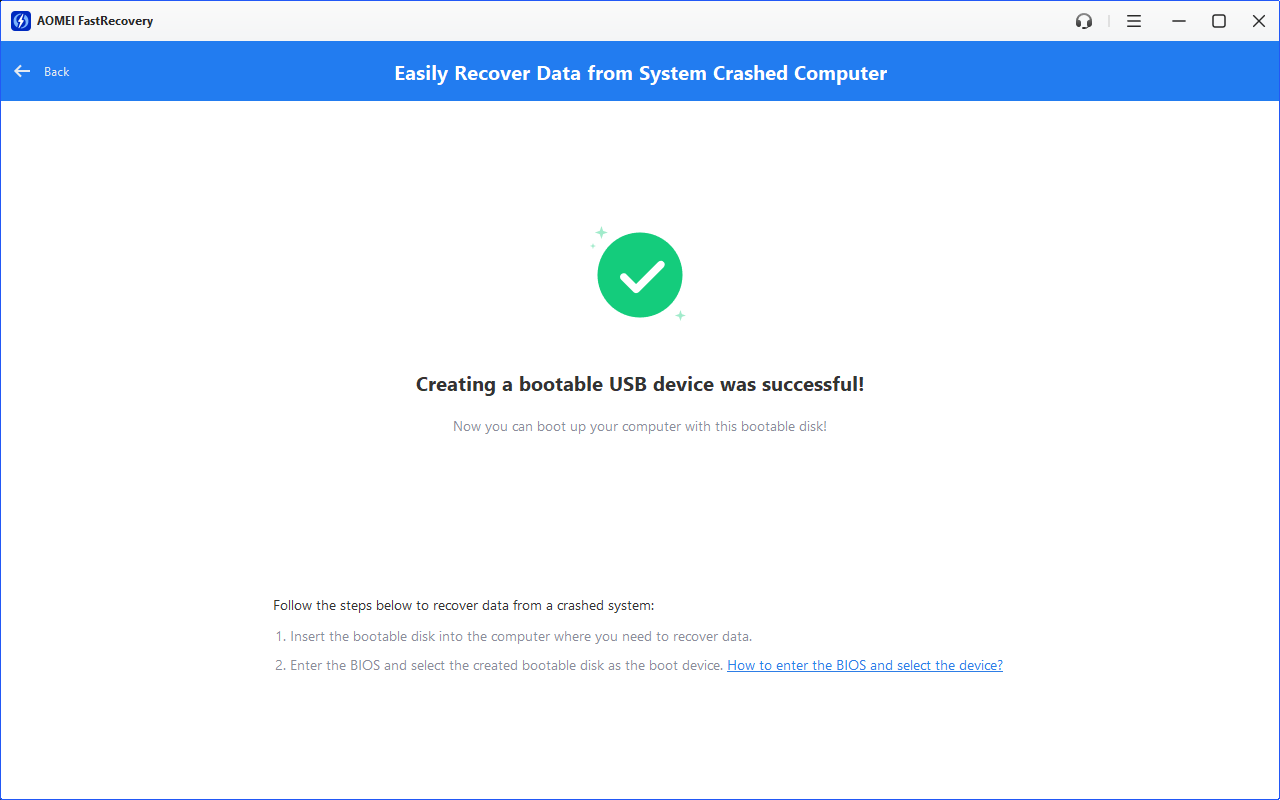
Step 5. Complete the process
Upon completed, a success message will be displayed. Also, you will be notified of the steps to boot from a bootable disk.
Method 4. Create Bootable Windows 11 USB from ISO Using Command Prompt
You can also use Command Prompt to make a bootable USB from an ISO image file. But it is not suitable for beginners because it is too complicated. Here's how to do it.
Step 1. Insert the external hard drive into your computer and make sure it can be recognized. Type cmd in the search box and right-click Command Prompt and choose Run as administrator to continue. Connect the USB to your PC. Ensure it's recognized. Search for cmd in the Start menu, right-click Command Prompt, and select Run as administrator.
Step 2. In the Command Prompt window, enter the following commands one by one and press Enter respectively.
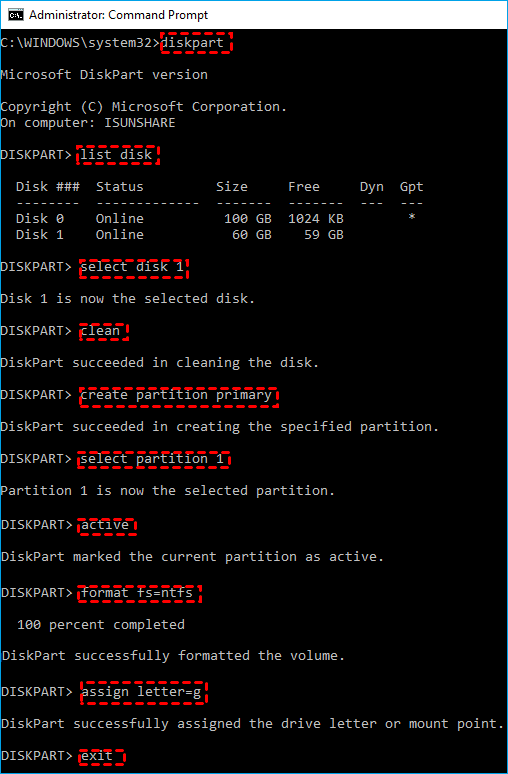
- diskpart
- list disk
- select disk 1 (take disk 1 as an example, it stands for your USB drive)
- clean (this command will clean the selected hard disk)
- create partition primary (make the disk primary)
- select partition 1
- active (boot partition)
- format fs=ntfs (makes the disk formatted as NTFS file system)
- assign letter=g (g is your drive letter for USB drive)
- exit
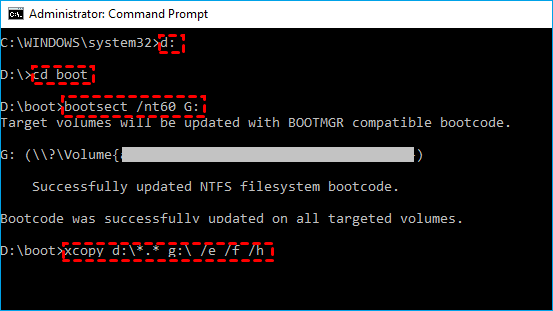
Step 3. You need to mount the ISO file and then move its contents to a USB drive with the commands below.
- d: (d is the file path of your Windows 11 ISO)
- cd boot
- bootsect /nt60 G: (replace G with the drive letter associated with your USB drive)
- Xcopy d:\* . * g:\ /e /f /h (d stands for the letter of Mounted ISO Volume and g stands for the letter of the USB hard drive)
Conclusion
You now have the knowledge to easily create Windows 11 bootable USB from ISO. This feature is critical for performing a clean installation of Windows 11 and for diagnosing and resolving unexpected system issues. For the best experience, consider powerful tool - AOMEI FastRecovery. It is not only good at creating bootable media but also offers the ability to recover deleted files in Windows 11.
FAQs
1. Can I create a Windows 11 bootable USB?
Yes, you can use similar tools like AOMEI FastRecovery to select the ISO and prepare the USB drive. However, ensure the tool supports Windows 11's requirements.
2. What should I do if my computer doesn't boot from the USB drive?
Ensure the boot order in your computer's BIOS or UEFI settings is set to prioritize booting from the USB drive. Additionally, check if the USB drive is properly formatted and the ISO is not corrupted.
3. Can I use the bootable USB to install Windows 11 on multiple computers?
Yes, a Windows 11 bootable USB can be used to install Windows on multiple computers, assuming you have the necessary licenses for each installation.
4. How can I ensure the ISO file is not corrupted?
Downloading the ISO directly from the official Microsoft website is the best way to ensure its integrity. Additionally, some tools allow you to verify the checksum of the downloaded file.
5. How to run bootable USB without BIOS?
If you can't boot from a USB because the option is disabled and you don't know the BIOS password, contact the laptop manufacturer for help. You may need to prove you own the laptop.
6. Why is my USB not booting in UEFI mode?
For a USB to boot in UEFI mode, it must be formatted as FAT32. If it's NTFS, it won't work. Make sure your USB is correctly formatted for UEFI mode.