Easy | How to Delete/Remove Disk Partition Windows 10/11
You can use Disk Management, Command Prompt, or PowerShell to delete/remove disk partitions in Windows 10/11 easily. Also, it’s easy to recover deleted data or partitions in this guide.
By Lori / Updated on December 11, 2024
Struggling with storage space on your Windows 10 PC can be frustrating, especially when it affects your system's performance and functionality. Fortunately, managing disk partitions effectively can help alleviate these issues by optimizing storage and organizing data more efficiently.
In this comprehensive guide, We’ll walk you through the steps to delete/remove disk partition in Windows 10 using Disk Management, PowerShell, and Command Prompt. Also, you can learn how to recover data from the deleted partition and how to restore accidetally deleted partition.
How to Delete a Partition in Windows 10 (3 Ways)
To delete a disk partition or volume in Windows 10, take these simple precautions to avoid data loss or problems:
- Backup Your Data: Always back up important files before deleting any partitions. Here is a free backup software for Windows you can use. This ensures you don't lose valuable information.
- Check Disk Health: Run a disk check (like CHKDSK) to make sure your disk is in good condition. This reduces the risk of issues during partition deletion.
- Consider Alternative Tools: While Windows has built-in tools for managing partitions, you can also use third-party tools like AOMEI Partition Assistant to delete/remove Windows partition with ease.
1. Delete Partition in Windows 10 Using Disk Management
Windows 10 provides a convenient built-in tool called Disk Management, which offers a user-friendly interface for managing disk partitions. Here's how you can use Disk Management to delete and remove unwanted partitions:
1. Access Disk Management: Press Win + X on your keyboard to open the Power User menu, then select "Disk Management" from the list of options.
2. Identify the Partition: In the Disk Management window, you'll see a visual representation of all available disks and partitions on your system. Locate the partition you want to delete; it will be displayed as a rectangular box with a label indicating its volume name and file system type.
3. Delete the Partition: Right-click on the partition you wish to remove and select "Delete Volume" from the context menu. A confirmation prompt will appear, asking you to confirm the deletion. Click "Yes" to proceed.
4. Complete the Process: Once you confirm the deletion, Disk Management will remove the selected partition and merge the unallocated space back into the adjacent partition (if any). The process may take a few moments to complete, depending on the size of the partition and the speed of your system.
2. Remove Partition in Windows 10 Using Command Prompt
For users who prefer a more advanced and command-line-based approach, the Command Prompt offers another method to delete disk partitions. Here's a step-by-step guide to delete partitions with diskpart:
1. Open Command Prompt: Press Win + X to open the Power User menu, then select "Command Prompt (Admin)" to launch Command Prompt with administrative privileges.
2. Access Diskpart: In the Command Prompt window, type diskpart and press Enter to launch the Diskpart utility, which allows for more granular control over disk and partition management.
3. List Volumes: Type list volume and press Enter to display a list of all volumes (partitions) on your system, along with their corresponding volume numbers and labels. Identify the volume number of the partition you want to delete.
4. Select the Volume: Type select volume X (replace X with the volume number of the partition you wish to delete) and press Enter to select the specified volume.
5. Delete the Volume: Finally, type delete volume and press Enter to initiate the deletion process. Diskpart will prompt you to confirm the action; type "Yes" and press Enter to proceed.
6. Exit Diskpart: Once the deletion is complete, type exit and press Enter to exit the Diskpart utility.
3. Delete Partition Windows 10 Using PowerShell
How to delete partitions in Windows 10? You can also delete a partition in Windows 10 using PowerShell, follow these steps:
1. Open PowerShell as Administrator: Press Windows + X and select Windows PowerShell (Admin).
2. List All Partitions:
- In the PowerShell window, type the following command and press Enter: Get-Partition.
- This command lists all the partitions on your system. Note the Disk Number and Partition Number of the partition you want to delete.
3. Delete the Partition: Use the following command to delete the specific partition. Replace X with the disk number and Y with the partition number: Remove-Partition -DiskNumber X -PartitionNumber Y
For example, to delete partition 2 on disk 0, you would type: Remove-Partition -DiskNumber 0 -PartitionNumber 2
4. Confirm the Deletion: PowerShell will prompt you to confirm the deletion. Type Y and press Enter.
How to Recover Deleted Data or Partition on Windows 10/11
In this part, you can learn how to recover data from the deleted partition and how to recover accidetally deleted partition.
1. Recover Data from Deleted Partitions with AOMEI FastRecovery
If you have not backed up the partition data before, all the data will be deleted after deleting the partition. You will not be able to access these files and cannot find them in the Recycle Bin. But these files are not completely erased. You can recover them with professional freeware - AOMEI FastRecovery.
This is the most direct and time-saving method, as it has a simple and intuitive graphic user interface and recover data from SSD/HDD/NTFS partition with a high success rate. It can recover deleted Word, PPT, Excel, Photos, Videos, Audios, Emails, Web pages, Compressed files, and other lost files.
What's more, it supports free data recovery up to 500MB. So, why not download and install it to have a try!
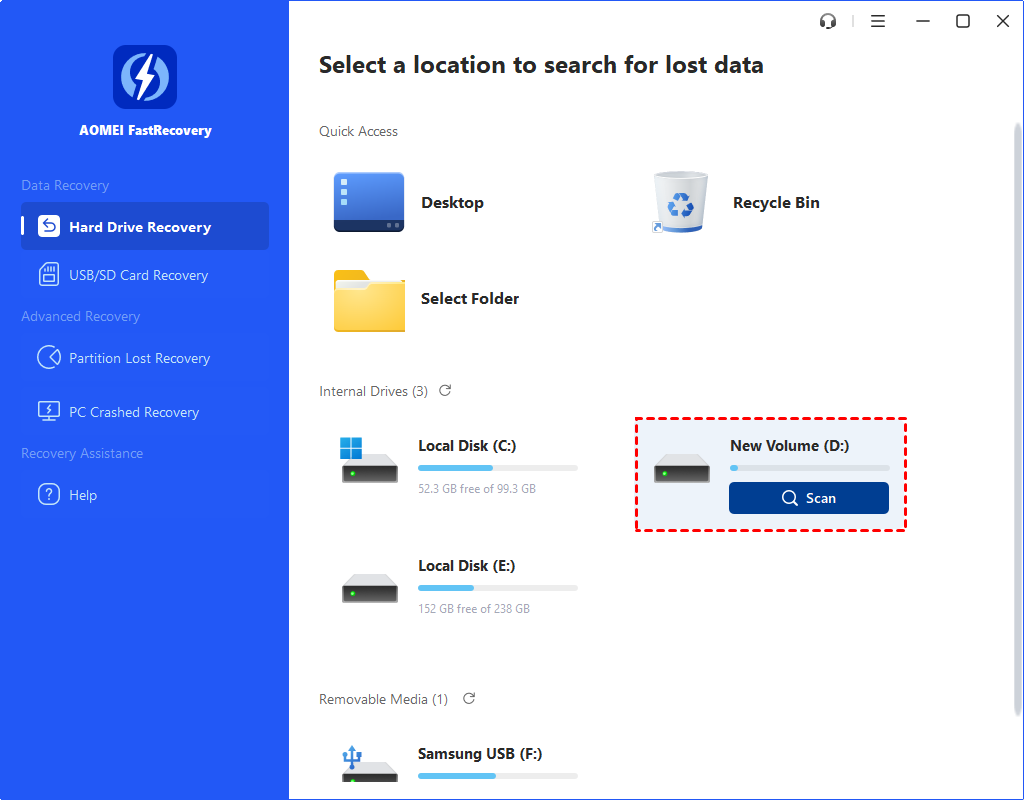
Step 1. Launch AOMEI FastRecovery. Hover over the partition saved deleted files before, and click Scan to scan.
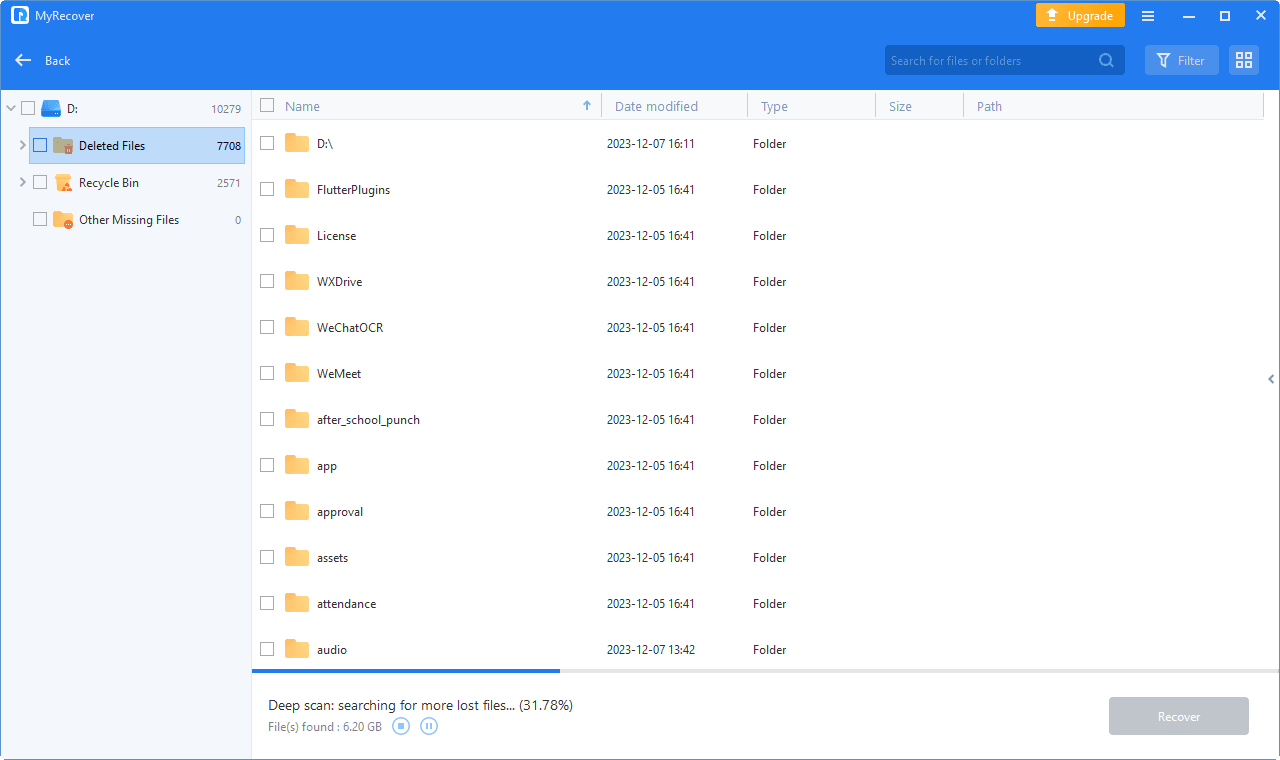
Step 2. Then the scanning process will start automatically. You don’t need to wait for the process to complete if you find the desired data.
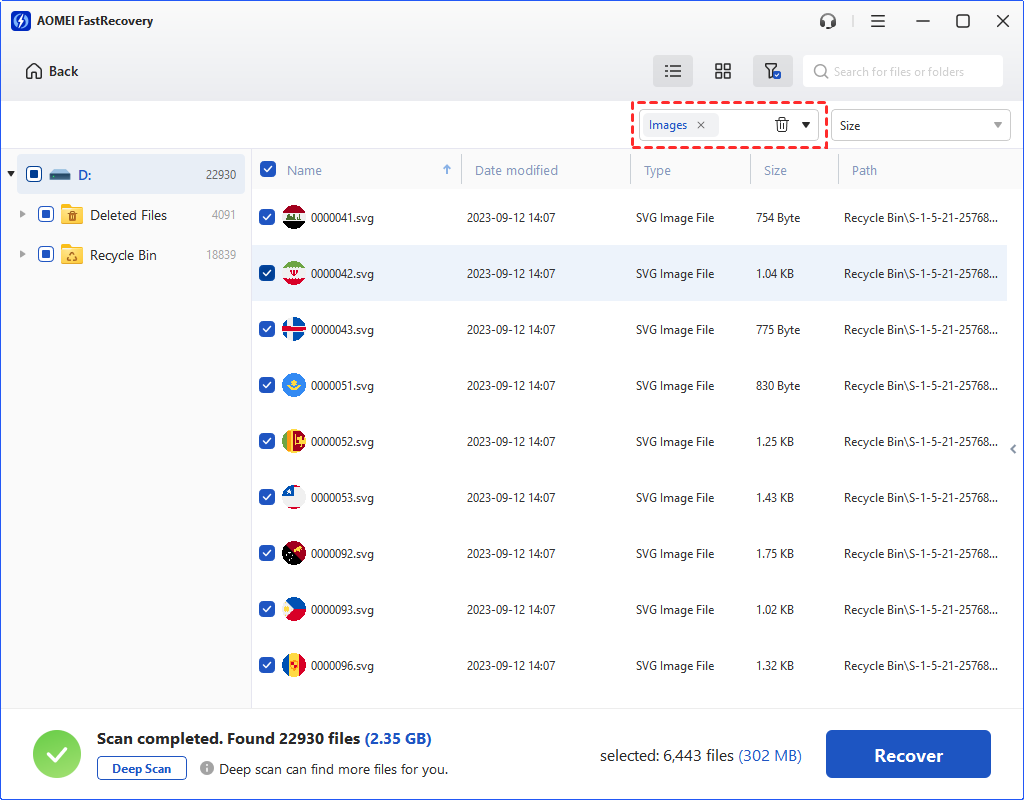
Step 3. Choose the data that you want to recover. Click Recover x files and choose a destination to save the restored data.
2. Recover Data from a Deleted Partition with AOMEI Partition Assistant
AOMEI Partition Assistant Wizard is a powerful and user-friendly program for managing your disks. It can help you recover deleted or lost partitions on Windows 11/10/8/7, as long as the deleted partition hasn't been overwritten by new data. It can also create, resize, move, merge and split partitions without data loss.
You can try out the AOMEI Partition Assistant Professional demo. Here’s how to restore deleted partitions on Windows 10 in four simple steps:
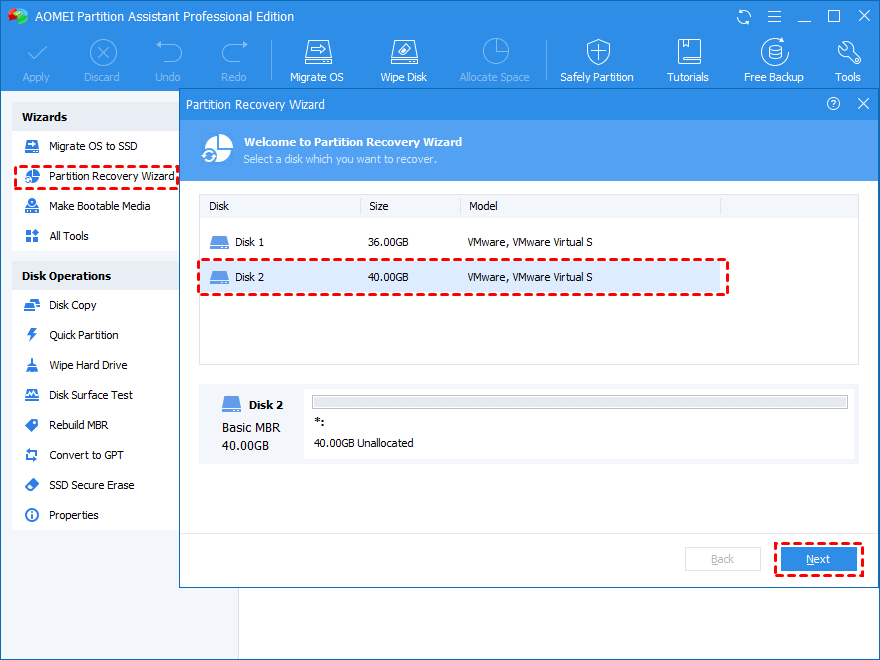
Step 1. Download and install AOMEI Partition Assistant on your PC. Open the program, click on “Partition Recovery Wizard”, select the disk that includes your deleted partition, and click “Next”.
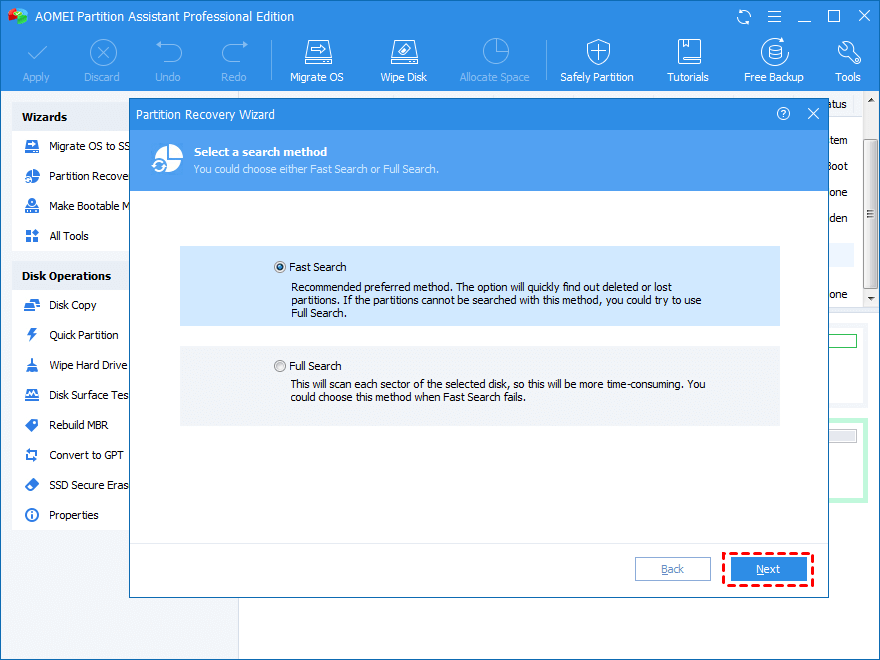
Step 2. Choose “Fast Search” to quickly find your deleted partition and then click “Next”.
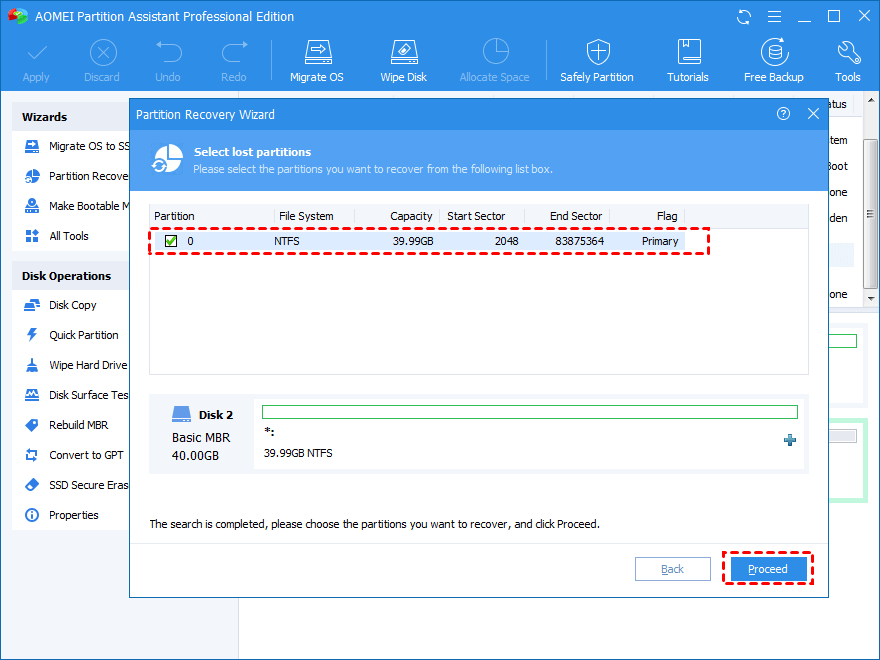
Step 3. After scanning, you’ll see all the deleted partitions on the hard disk. Select the partition you want to restore and click “Proceed”.
Step 4. Once the recovery process is complete, you’ll see a “Congratulations” message. Click “Finish to exit the window.
Understand Disk Partitions
What Are Disk Partitions?
Before diving into the deletion process, let's first understand what disk partitions are and why they matter. In simple terms, disk partitions are separate sections or divisions of a hard drive or SSD (Solid State Drive). Each partition functions as an individual unit, allowing users to organize and store their data in a more structured manner.
By dividing a single physical drive into multiple partitions, users can segregate different types of data, such as system files, personal documents, and multimedia files, thus facilitating easier management and access.
Why Manage Disk Partitions?
Managing disk partitions is essential for several reasons. Firstly, it enables users to allocate storage space according to their specific needs and preferences. By resizing, deleting, or creating new partitions, users can optimize the utilization of available disk space and prevent wastage.
Secondly, effective disk partition management can significantly improve system performance by reducing fragmentation and enhancing data organization. Additionally, it allows for better data protection and recovery, as individual partitions can be backed up and restored independently, minimizing the risk of data loss in the event of a system failure or hardware malfunction.
Conclusion
Managing disk partitions in Windows 10 is a critical aspect of maintaining system performance and optimizing storage space. By understanding the 3 methods and precautions for deleting and removing disk partitions, you can effectively streamline the process and minimize the risk of data loss or system instability.
If any important data is deleted by mistake, you can use AOMEI FastRecovery to directly and safely recover them from the deleted partition. It can also recover formatted partition in Windows 10 with ease. In addition, AOMEI Partition Assistant Wizard can help you recover deleted or lost partitions on Windows 10/11/8/7 with ease.
Delete Partition FAQs
1. How do I remove a disk partition in Windows 10?
You can delete/remove diskpartition in Windows 10 using Disk Management, PowerShell, and Command Prompt.
2. Is it safe to delete disk partitions in Windows 10?
Yes, deleting disk partitions in Windows 10 is generally safe, provided that you take necessary precautions such as backing up your data and verifying disk integrity before proceeding with the deletion.
3. Can I recover data from a deleted partition?
In some cases, it is possible to recover data from a deleted partition using specialized data recovery software like AOMEI FastRecovery. However, the success of data recovery depends on various factors such as the extent of partition damage and the effectiveness of the recovery tool used.
4. Why can't I delete a partition in Disk Management?
There are several reasons you might not be able to delete a partition in Disk Management:
- The target partition is the OS drive, and Windows doesn't allow you to delete the system drive.
- The page file contains specific information in RAM.
- The target partition has virtual memory files.
- A USB drive has a second partition that cannot be deleted.
5. How do I remove a partition from my SSD Windows 10?
Here's how to delete a partition on an SSD using Disk Management in Windows 10:
- Open Disk Management and find the partition you want to delete on the SSD.
- Back up any important files from the SSD.
- Right-click on the SSD partition and select Delete Volume.
- Click OK to confirm.