DiskDigger Review: Features, Pros&Cons, and Alternatives
In this article, you will learn a detailed DiskDigger review with its main features, pros &cons, operating steps and more. Also, provide a good DiskDigger alternative for you.
By Lori / Updated on December 11, 2024
For anyone who uses a computer, the fear of data loss is always present. Therefore, data recovery software is becoming popular in modern times. Among multiple tools, DiskDigger is a state-of-the-art tool designed to recover photos, videos, documents, and various file types from a wide range of media devices your PC can read.
In this DiskDigger review, we'll take an in-depth look at DiskDigger for Windows to understand its main feature, process and best alternative to DiskDigger for you.
Main Features of DiskDiggr Recovery Software
DiskDigger is a data recovery tool developed by Defiant Technologies for recovering lost files from hard disks, USB flash drives, memory cards, CDs, DVDs, and floppy disks.
Whether you accidentally deleted some documents or photos, reformatted your camera's memory card, or want to see what files are hidden in an old USB drive, DiskDigger can help. It's easy to use and works with Windows and Linux systems.
Let’s learn more about it in this DiskDigger recovery software review.
Main Features of DiskDigger:
1️⃣ Support a wide range of devices: such as SD cards, USB drives, internal and external HDDs as well as SSDs, and more.
2️⃣ Two modes of operation: You can select the operating mode "Dig Deep" and "Dig Deeper" whenever you scan the disk.
- Recover deleted files from FAT (FAT12, FAT16, and FAT32), NTFS, and exFAT partitions
- Recover any type of file, as well as file names
- Be good at recovering large files (videos) better. For example, you can use it to recover deleted large MKV files
- Filter recoverable files by name, size, date, and directory
- Scan the entire disk for traces of specific file types
- Be good at recovering small types of files including photos and images, documents, audio and video, compressed archives, and more
- Recover data from reformatted or damaged drives
3️⃣ Save and Restore Scan Sessions: This allows you to scan a disk once and retrieve files later without rescanning
👍 Pros:
View recoverable images, and album art from MP3 and WMA files as a list, or as thumbnail previews
Previews of files, and icons from executable files
Display a more complete file preview
Able to scan virtual disk image files
Digging deeper can start scanning from a specific location on the disk
Allow to create reports of scans
Support Windows, Linux, macOS, and Android operating systems
👎 Cons:
Can't create disk copies
Cannot change language and does not work well on monitors with high DPI
The results from the quick scan are bad
Can't find lost partitions
Preview feature only supports a small number of files
Lacks SMART analysis to show disk health status
Recovering files to a new location can be time-consuming
Can’t repair damaged files that cannot be opened after scanning
💲 Pricing:
DiskDigger personal license: $19.99 $14.99
- The free version of DiskDigger can only recover photos and videos (recovering videos requires your device to be rooted). DiskDigger Pro can recover all file types (Recovering files other than photos also requires your device to be rooted).
- Licenses purchased for DiskDigger are valid until the next version of the program. If version updates and adjustments are minor, there is no need to renew the purchased license.
How to Use DiskDigger for Windows
The process of using Glary Undelete Data Recovery is straightforward, allowing users to recover deleted or lost files via 3 simple steps:
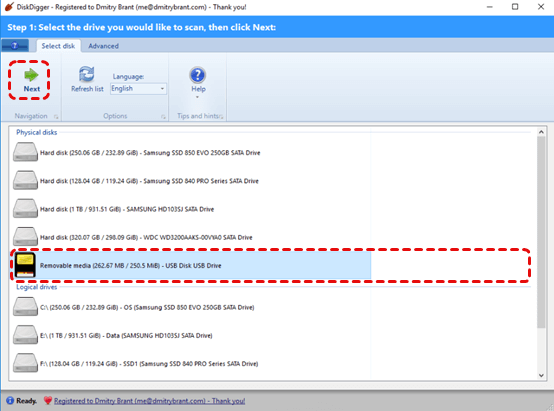
Step 1. Download DiskDigger from the official website on your PC. Install and run it. You can see your drive in the list of drives available for scanning. Select the drive and click Next.
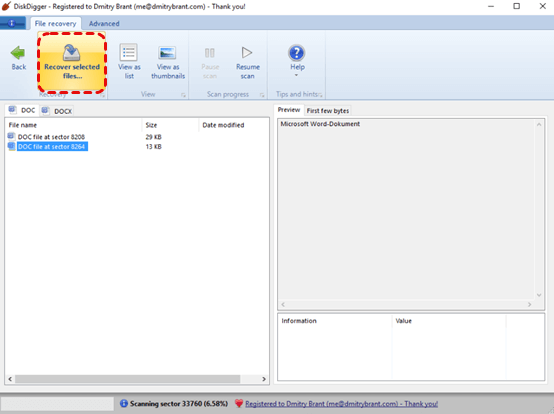
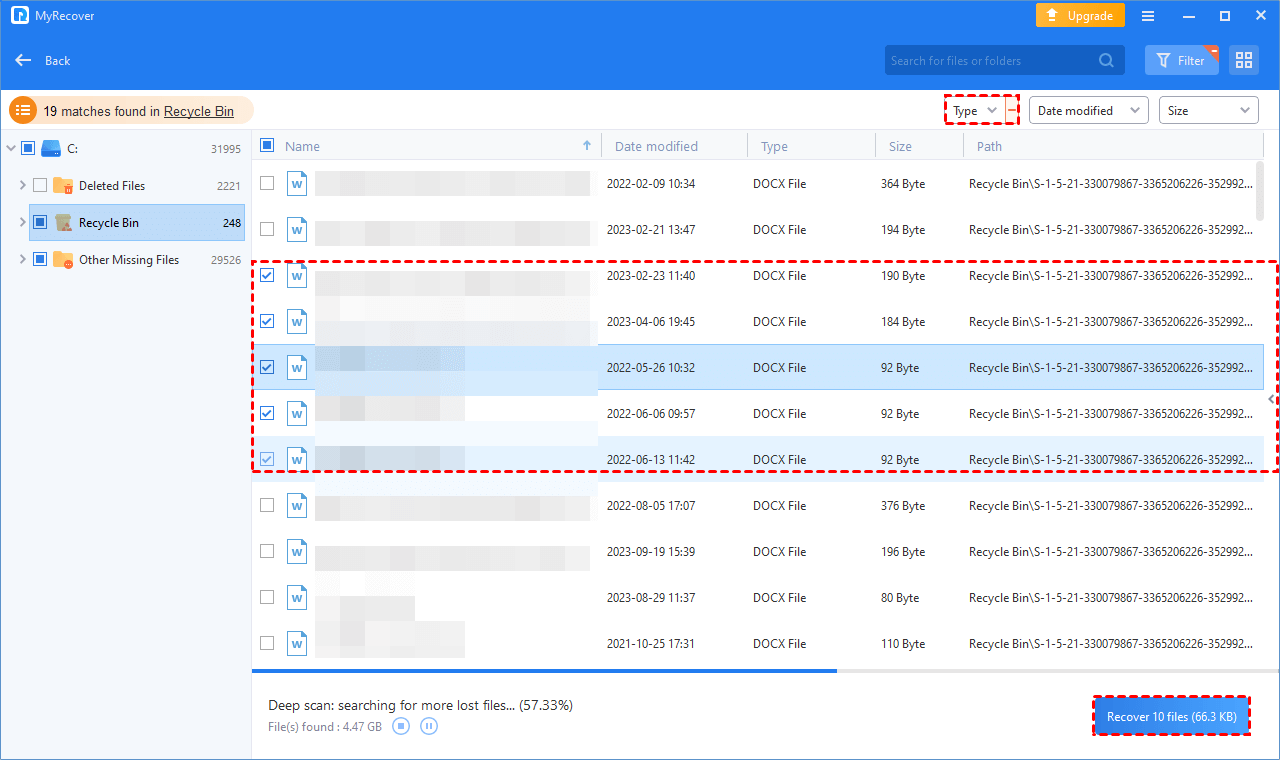
Step 2. DiskDigger will scan your drive. When it finishes, you can see a list of recoverable files. To save time, you can filter and preview the files you want to recover.

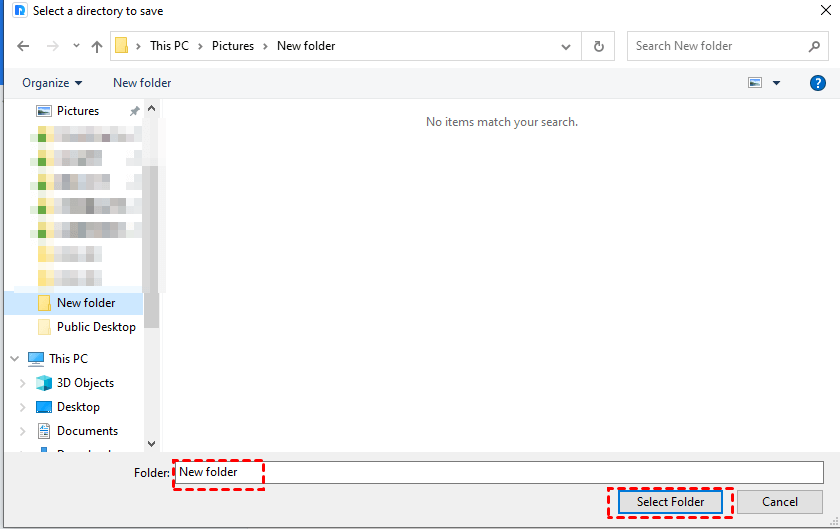
Step 3. When the files are selected, click the Recover selected files button at the top. Then, select the new location where the recovered files will be saved.
Step 4. When it finishes saving, it will automatically open the folder into which the files were saved. This folder will be called Recovered.
Alternative to DiskDigger Data Recovery
As mentioned above, DiskDigger has many unavoidable disadvantages. If you're having trouble using DiskDigger on Windows, such as it not being able to recover the files you want, or not offering your favorite additional features, it's a good idea to try one of its alternatives like AOMEI FastRecovery.
AOMEI FastRecovery allows users to recover deleted or lost data easily. It stands out primarily because of its advanced scanning methods, high data recovery rates, and intuitive user interface.
This reliable tool can recover deleted and lost files from any storage device such as HDD, SSD, USB drive, SD card, etc.

- Recover 200+ types of files: images, videos, MS Office files, WPS files, folders, ZIP, RAR, websites, etc.
- All-inclusive: Apply to a variety of data loss scenarios such as deletion, disk formatting, system crashes, virus infection, and more.
- Advanced scanning method: AOMEI FastRecovery runs Quick Scan & Deep Scan automatically to search all the recoverable files on your selected drive.
- Enabling advanced file filtering and preview by Files Type, Size, Date, etc. to save your time and effort.
👍 Pros:
- Retains the original file names, paths, and formats of deleted files
- Provide thorough results
- High success rate
- Cheap price
- 30-day money-back guarantee
- Support Windows 11, 10, 8, 7, and Windows Server
👎 Cons:
- Lacks support for Mac and Linux
Here are the steps for using AOMEI FastRecovery to recover deleted files from hard drives. Download it now!
Step 1. Install and run AOMEI FastRecovery, then hover the mouse over the drive that saved your deleted or missing files. Click Scan.

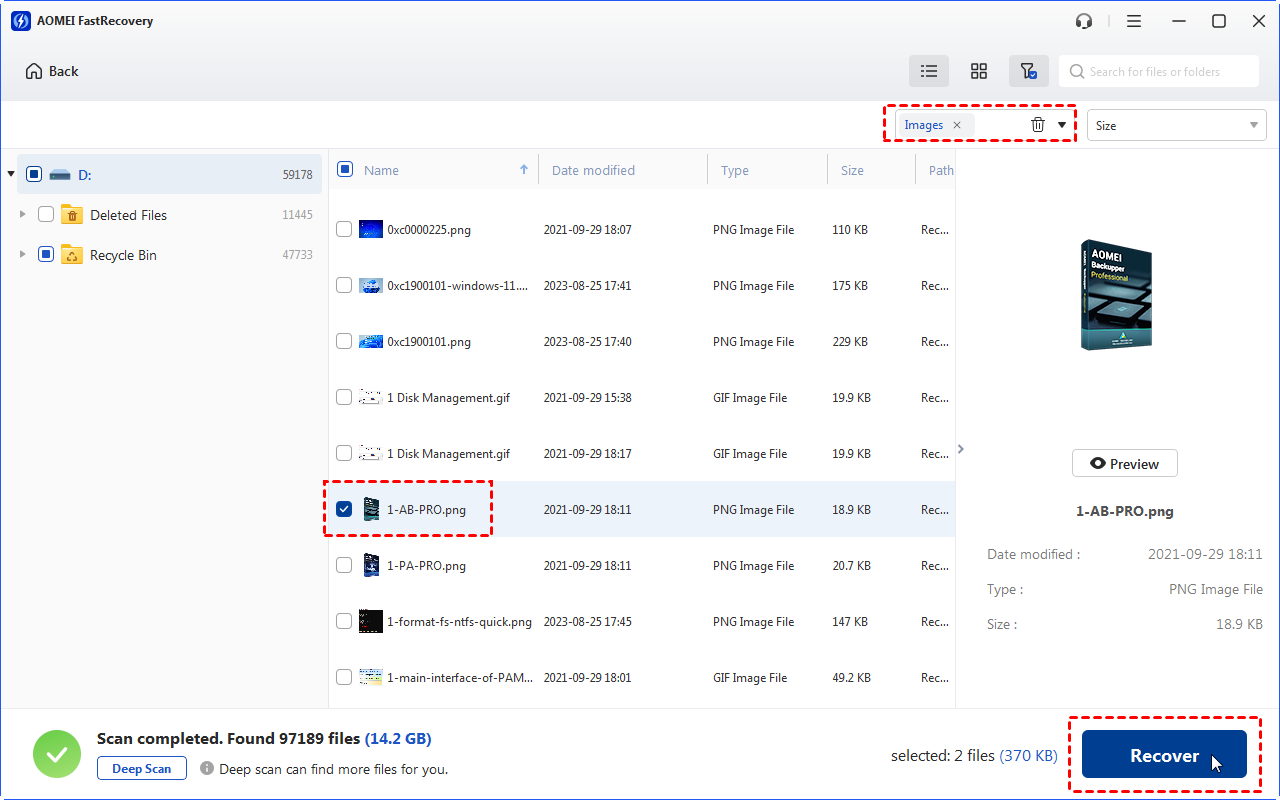
Step 2. AOMEI FastRecovery will scan your drive automatically and thoroughly to locate all the found data.

- Type: Select the file type (Documents, Images, Videos, Audios, Mails, Webpages, Compressed files, etc.)
- Date modified: Set the date (today, yesterday, last 7/30 days, etc.)
- Size: Filter the file size (<128KB, 128KB~1MB, 1MB~ 512MB, 512MB above, etc.)
Step 3. A list of data found by AOMEI FastRecovery will appear. Choose your desired files to recover, and click Recover x files.
Step 4. Select a new location to save the recovered files and click Select Folder to confirm it. Your files will be recovered in a few minutes or longer, depending on the amount of data you want to recover.
FAQs
Is DiskDigger safe to use?
Is DiskDigger free?
What versions of Windows does DiskDigger run on?
Is it possible to get a refund after purchasing DiskDigger license key?
Can DiskDigger Pro be used on multiple desktops?