How to Recover Deleted Files from Dell Laptop?
How to recover deleted files from Dell laptop? Use five solutions to restore the recently/permanently deleted files on Dell laptop.
By Penny / Updated on December 11, 2024
How can I recover my data from Dell laptop?
How do I retrieve deleted files/photos which I’ve deleted from the Recycle Bin? I know the newer computers from Dell, you can Hold Control and F11 when you restart your computer and come to the Dell Logo Screen. But on the older models like the 4550, is there any way possible to retrieve deleted files/photos?
- A user from Dell Community
Are you wondering how to recover deleted files from Dell laptop? Generally speaking, there’re two directions for hard disk data recovery.
For Windows users, Microsoft has provided several built-in features for files or folders backup. If you’ve made backups with them, you can restore deleted files from backups.
If you haven’t underutilized these features, you can use top-rated data recovery software for Windows to recover deleted files.
How to restore deleted files on Dell laptop?
Please follow this pertinent suggestion before performing data recovery.
- After deletion, you’d better not write any new data to the Dell laptop because the newly added files will overwrite the deleted/lost files on your storage devices.
Method 1. Recover recently deleted files from the Recycle Bin
If you accidentally deleted files, you can press “Ctrl + Z” to Undo Delete them at once. Then go to the original location to check them.
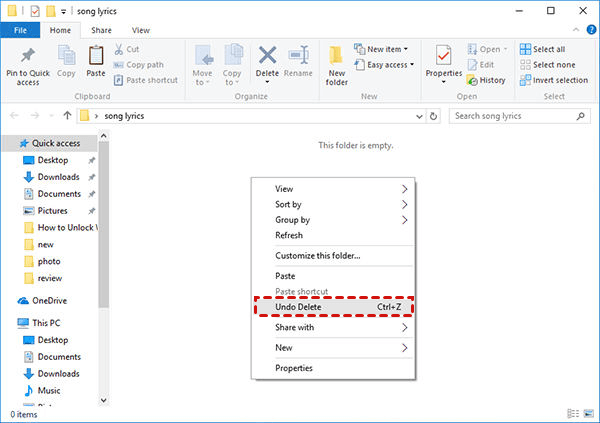
Likewise, you can go to the Recycle Bin to restore the recently deleted files if you haven’t emptied your Recycle Bin or executed “Shift + Delete” performances.
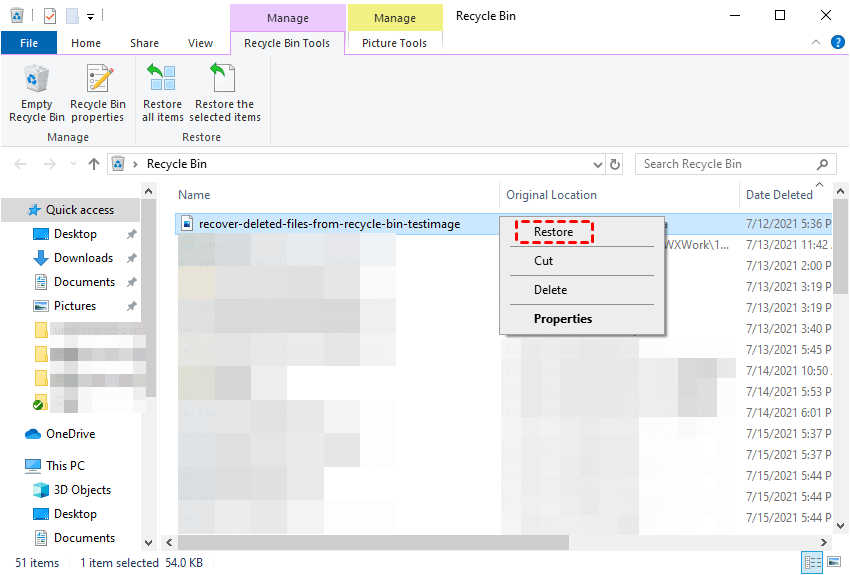
Step 1. Open the Recycle Bin on your PC, and find the files you want to restore.
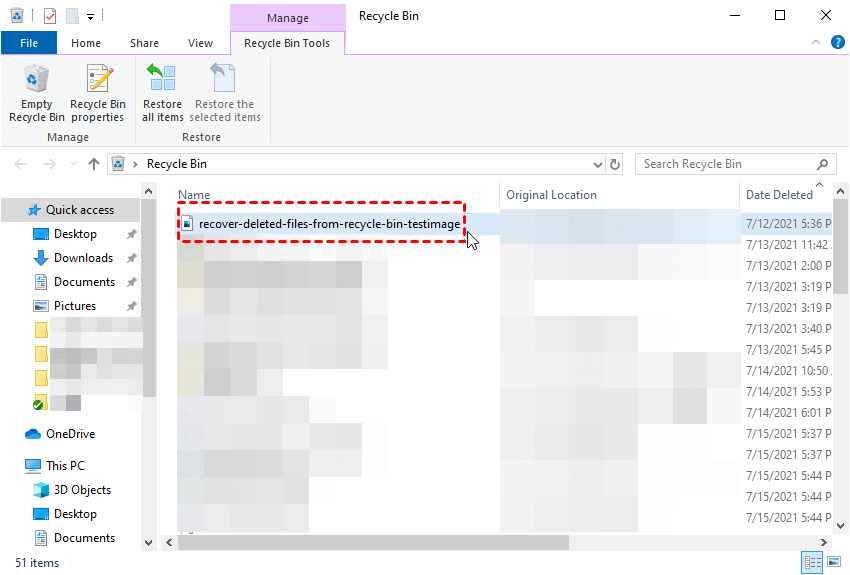
Step 2. Right-click on your selected files and “Restore” them to the original location.
Method 2. Recover permanently deleted files from Backup and Restore
Backup and Restore first appeared in the Win7 operating system. As the name suggests, a backup is a necessity for the restoration process. Let’s perform how to recover deleted files from Dell laptop via it.
Step 1. Enter “Control Panel” in the search bar and open it. Then go to System and Security and select the “Backup and Restore (Windows 7)” option.
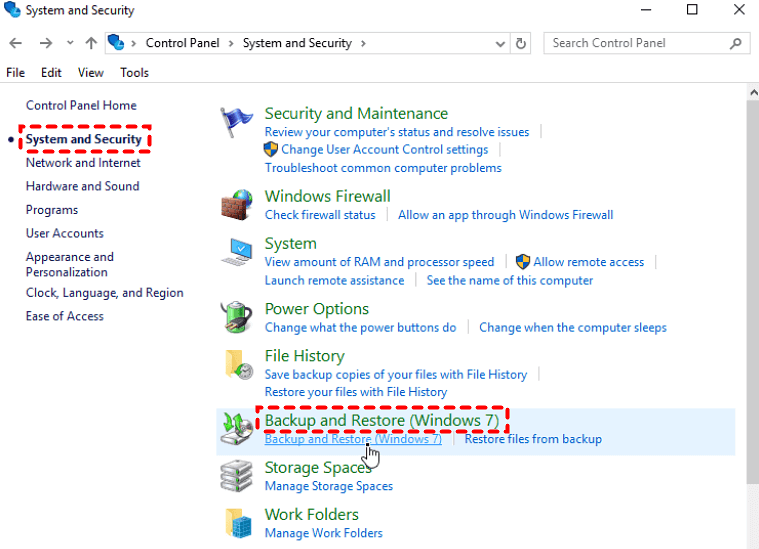
Step 2. Click the “Restore my files” button.
![]()
Step 3. Select the “Browse for files” option to locate your needed files.
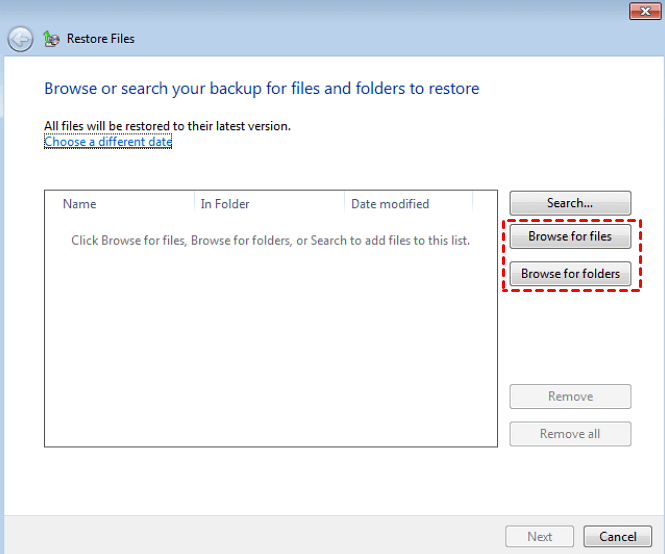
After that, you can restore them to the original location or a new location.
Method 3. Recover permanently deleted files via File History
File History is another free feature introduced in the Win8.0 OS. Please ensure you’ve activated File History or System Protection. Otherwise, you cannot enjoy the features below.
- Features:✎...
- It can make copies of files in Documents, Music, Pictures, Videos, Desktop folders, and OneDrive offline files stored on your Dell computers.
- You’re allowed to save backups on an external hard drive like a USB or cloud drive.
- With File History, you can restore the original documents even if they were deleted, lost, or damaged. If you need, you can recover overwritten Excel files by restoring previous versions of Excel files.
Let’s take photos as an example. These steps describe how to recover deleted photos on a Dell laptop.
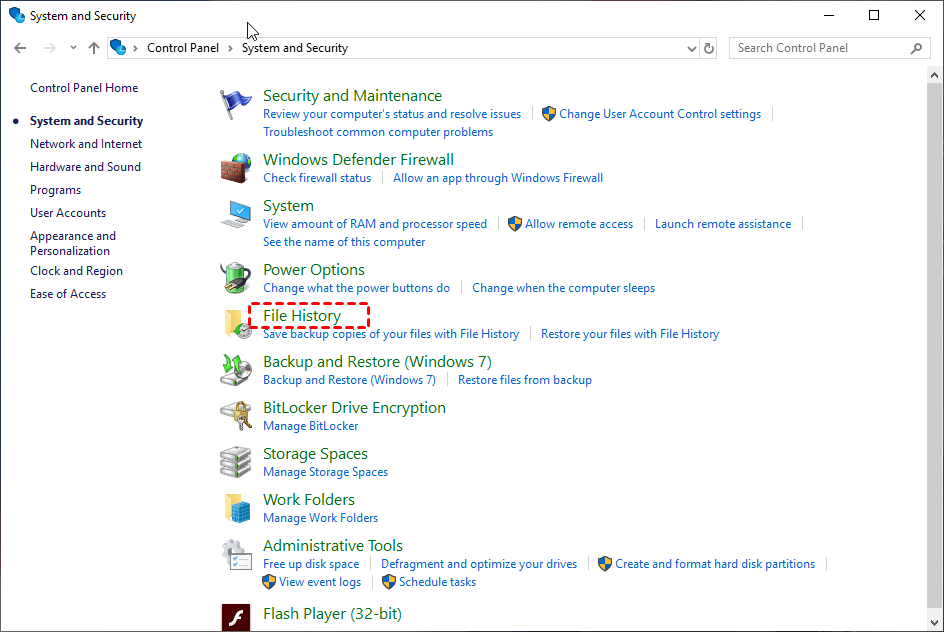
Step 1. Open “Control Panel” by entering it in the search bar. Then click the “System and Security” button.

Step 2. Click “File History” and select the “Restore your files with File History” option.
Step 3. Click the “Restore personal files” button.
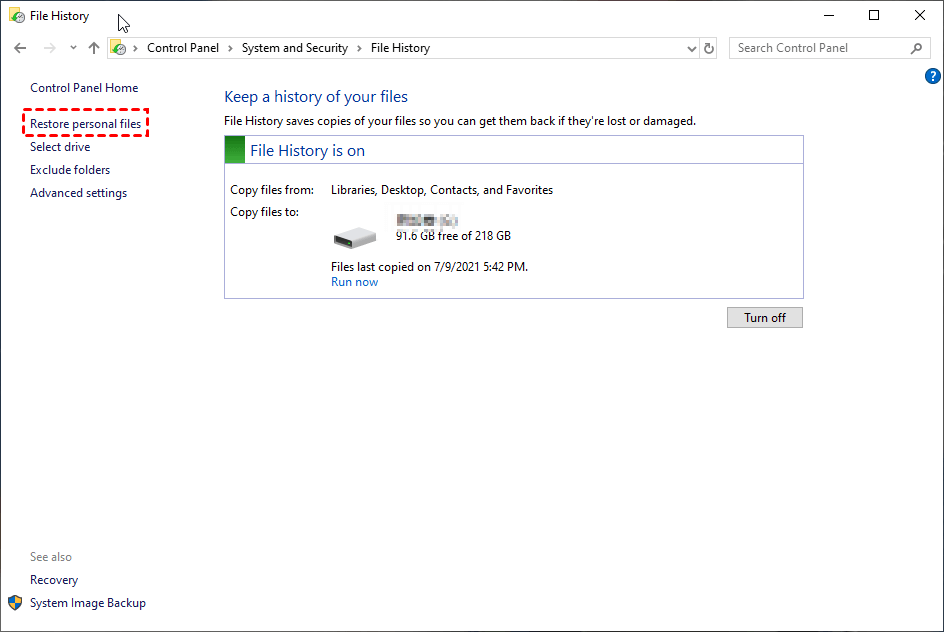
Step 4. “Restore” your selected image files to the previously saved path.
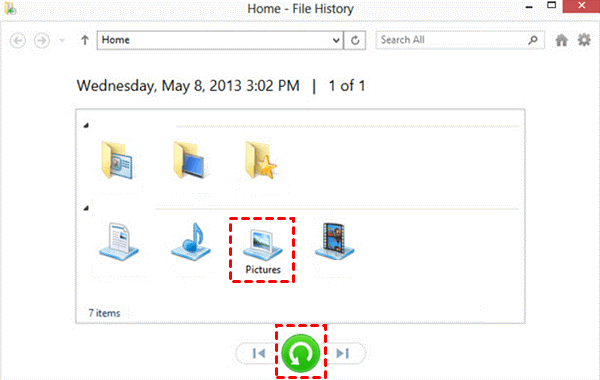
You can set a new saved path within these clicks: Right-click on “Restore” and select the “Restore to” option.
Method 4. Recover permanently deleted files using Windows File Recovery
Launched in 2020, free Windows File Recovery devotes to recovering lost files from your local storage devices (HDD, SSD, USB, and SD cards). However, recovery on cloud storage and network file shares is not supported.
If you’re going to recover some files, replace your selected mode and switches with the basic format command.
▶winfr source-drive: destination-drive: [/mode] [/switches]
- Notes:✎...
- Recover the lost Word documents, Excel, PPT, PDF, ZIP, MP3, JPG, PNG, etc.
- Windows File Recovery only works with Windows 10 build 19041 or later.
- Ensure the source drive (where to store your needed files before data loss) is not the same as the destination drive (where to store your recovered files).
- Two basic (Regular & Extensive) modes and two advanced (Segment & Signature) modes can support four (NTFS, FAT, exFAT, and ReFS) file systems in Windows.
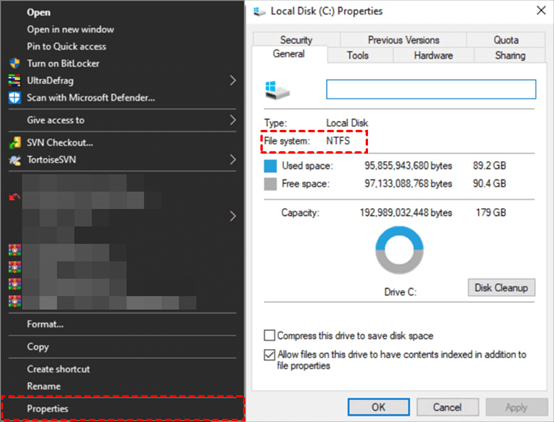
Step 1. Figure out the file system of your source drive: Open Windows File Explorer by pressing the “Win + E” keys, then click “This PC” > right-click on the source drive > click the “Properties” button.
Or the following form also can give you a hand.
|
File system |
Examples |
|
FAT and exFAT |
SD cards, flash or USB drives (< 4GB) |
|
NTFS |
Computers (HDD, SSD), external hard drives, flash or USB drives (> 4GB) |
Step 2. After checking the file system of your source drive, select the basic “Regular” or “Extensive” mode with the following form.
|
File system |
Scenarios |
mode |
|
NTFS |
Deleted recently |
Regular |
|
NTFS |
Deleted for a while |
Extensive |
|
NTFS |
Formatted disk |
Extensive |
|
NTFS |
corrupted disk |
Extensive |
|
FAT and exFAT |
Any |
Extensive |
Step 3. Select some common switches from the form below.
|
Switch |
Description |
Supported modes |
|
/y: |
Recover specific extension groups, comma-separated |
Signature |
|
/p: |
Saves a log file of the recovery operation in a different location than the default location on the recovery drive (for example, D:\logfile). |
All |
|
/a |
Overrides user prompts, which is useful in a script file. |
All |
|
/u |
Recovers undeleted files, for example, from the Recycle Bin. |
NTFS Segment |
|
/k |
Recovers system files. |
NTFS Segment |
|
/g |
Recovers files without primary data streams. |
NTFS Segment |
|
/e |
To keep your results manageable and focus on user files, some file types are filtered by default, but this switch removes that filter. |
NTFS Segment |
|
/e: |
Specifies which file types are filtered. |
NTFS Segment |
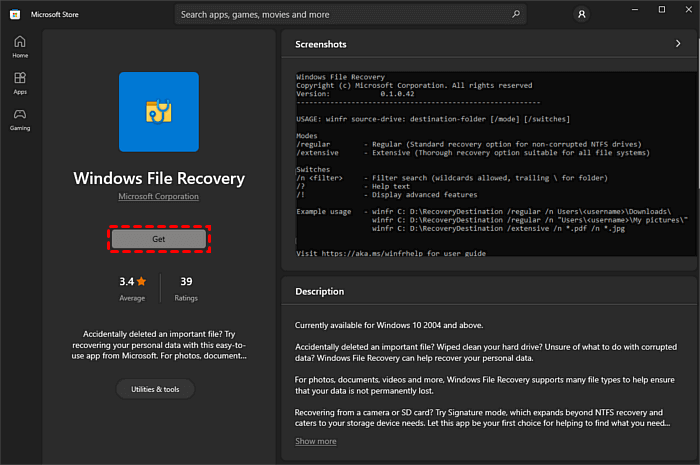
Step 4. Download Windows File Recovery from the Microsoft Store by clicking the “Get” button. After installation, “Open” it on your computer.
Step 5. If you want to recover the missing Excel files from the C drive to the E drive on your Dell laptop, you can enter “winfr C: E: /segment /n *. xlsx” in the window.
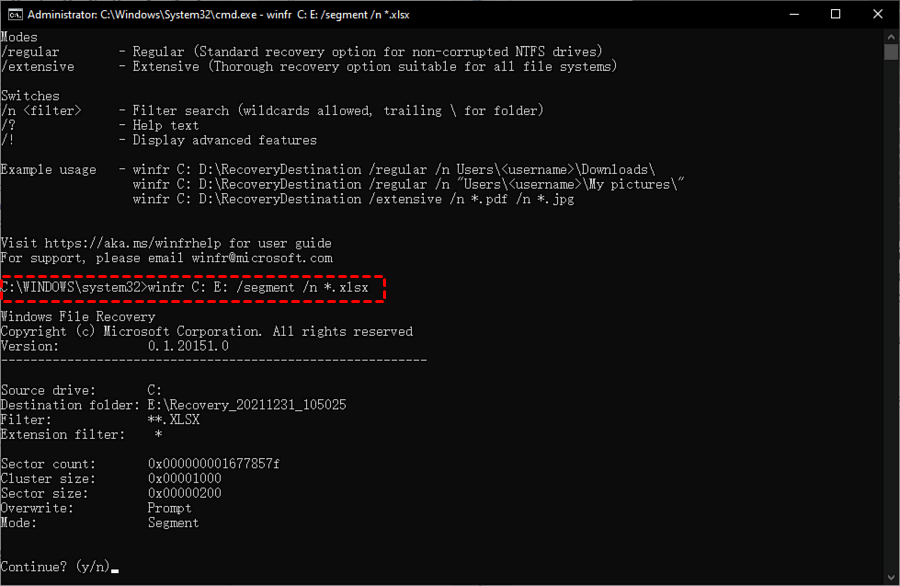
Step 6. Press “y” to go on. After the recovery process, you can go to the specified saved path to check your recovered Excel files. If you want to stop the process, press the “Ctrl + C” keys.
Method 5. Recover deleted or lost files using data recovery software
Are you wondering how to restore deleted files on Dell laptop easier? It turns out there is a better approach. AOMEI FastRecovery fills this gap.
With a GUI (graphical user interface), this user-friendly tool saves you from recovering files using CMD. You can use it to recover the deleted/lost files from HDD, USB, SD cards, and other storage devices.
- ★Other highlights:
- Recover 200+ types of data: Word, Excel, PPT, Photos, Videos, Email, Webpages, Compressed files, etc.
- Get the original path, filename, and format for the deleted files.
- During scanning, search your desired files by entering their filenames in the search bar or wait to find all the deleted and other lost files on your computers after running Quick Scan and Deep Scan automatically.
- Support NTFS, exFAT, FAT32, and ReFS file systems in Windows 11, 10, 8, 7, and Windows Server.
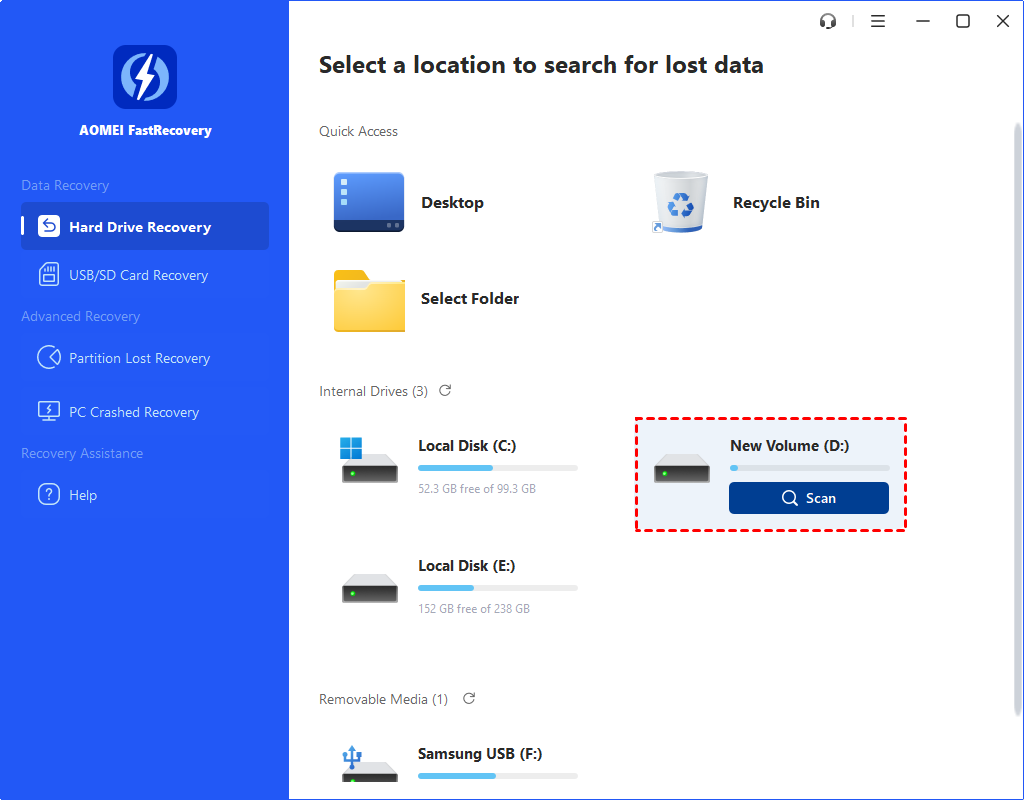
Step 1. Download and install AOMEI FastRecovery on your PC.
Step 2. After loading the disk, hover the mouse over the drive and click Scan to scan.
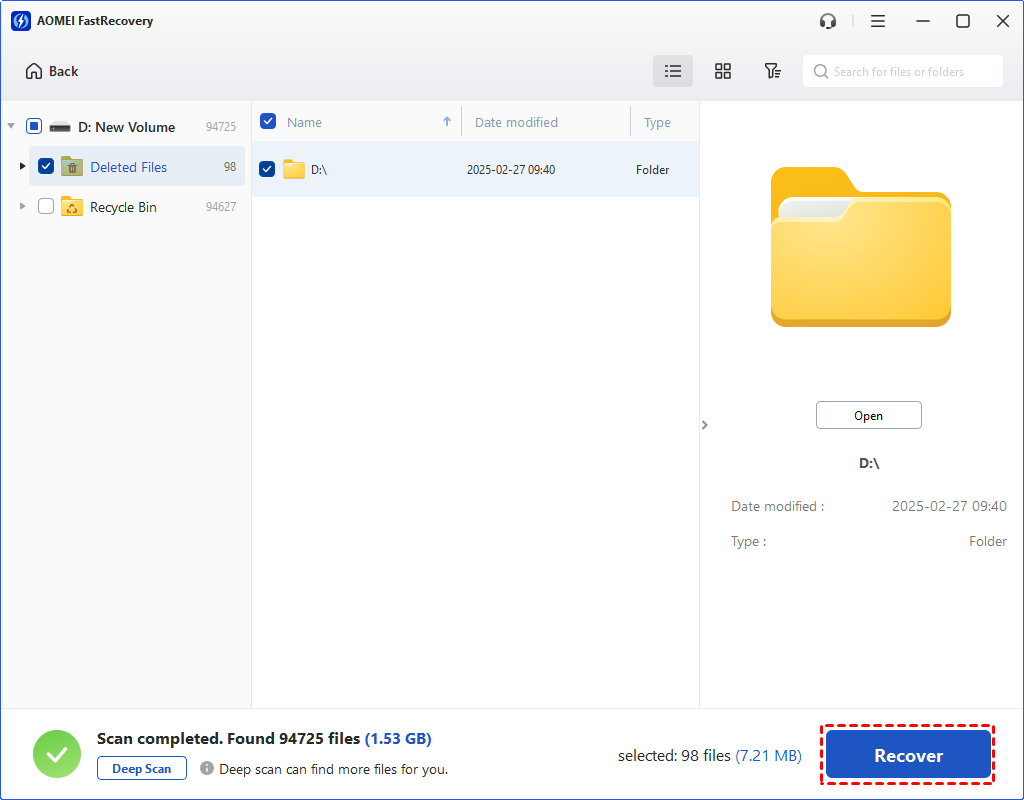
Step 3. You can search or wait to view all the deleted files and other missing files after running automatically.
Step 4. Go to the Deleted files/Other missing files folder, and select your needed files. Then click “Recover x files” and store them in a new saved path.
Bonus tips
How to recover deleted files from Dell laptop? Select a suitable approach among the above five solutions. In brief, the software recommended in the last method seems as the top choice for those users without backups.
To prevent data loss in the future, follow these tips at once!
Please think twice before permanent deletion.
Make regular backups using free Windows features such as File History or Previous Version.
Use thisfree backup software for Windows, AOMEI Backupper to backup files, folders, disks, partitions, or the system.