How to Recover Lost Data in Word Document on Windows or Mac
Meeting with data loss is painful and miserable. In this post,we mentioned 7 ways how to recover lost data in Word document on Windows or Mac respectively. By following the methods, you could succeed in recovering them.
By Ellie / Updated on December 11, 2024
Can I recover lost text from a Microsoft Word Document?
A couple of weeks ago I was working offline on a Word doc and saving it locally to my desktop. But when I opened up the file once I was back online, it seems to have reverted to a previous version. Is there anywhere else I can look?
- Question from Microsoft Community
Have you ever closed a Word document but forgot to save it? Are you being irritated that the Word document is back to the original version after taking a large amount of time working on it? Or did you finish your Word document but can’t find it? Undoubtedly, these kinds of situations almost drive us crazy. So, can we recover lost or unsaved text from a Microsoft Word document?
How to recover lost data in Word document on Windows
Luckily, it is totally available to recover unsaved Word document on Windows 11/10/8/7 and Windows Server. When we get a data loss, the first thing we need to do is check Recycle Bin to restore the lost data. And the whole recovery would be easier if you find the lost data in it. If there isn’t, here we’ll show the detailed ways how to recover lost data in Word document.
Solution 1. Find recent Word documents
By searching documents in the search bar, you could find your Word document and then choose the most recent Word document. After that, you are allowed to recover the lost data on Windows 11, 10, 8, 7. Now follow me to operate.
Step 1. Search the filename of your Word file and then open it.

Step 2. And then go to Files to find the most recent Word document.
Solution 2. Recover lost data in Word backup files
If you have ever enabled the backup feature in Word, then the recovery of the lost data in Word document on Windows 11, 10, 8, and 7 can be done from Word backup files. And the lost data will be existing as a “.wbk” extension.
First of all, select File > Options > Advanced > Save > Always create a backup copy to check whether this option is on. If you didn’t enable it before, resort to the next solution.
Step 1. Open the File Explorer.
Step 2. In the search box, input .wbk in the Search box, and then press Enter. And then you’ll see the lost data in Word document.
Step 3. Double click on it and then save it.
Solution 3. Get back the lost data in AutoRecover files
AutoSave and AutoRecover are useful features in Word that can provide a lot of relief when you lose data. If you have enabled the AutoSave feature, the lost data in a Word document can be recovered.
Before the operation: Make sure you have enabled these 2 features in Word.
Open Word > Go to Options > Save, and then check whether the options “Save AutoRecover information every x minutes” and “Keep the last autosaved version if I close without saving” are turned on. If it is, now follow me to operate. And it is recommended to enable it in case of the next data loss.
Step 1. Open Windows Explorer.
Step 2. Enter the path C:\Users\Owner\AppData\Local\Microsoft\Office\UnsavedFiles. And then you’ll see some temporary files. Choose the one you want and then save it. After that, the lost data in the Word document will be back.
If this way isn’t working for you, the steps in this part may take effect.
Step 1. In Word, click File > Manage Document > Recover Unsaved Documents.
Step 2. Check for your missing File in the dialog box. If it was a recent loss, it should appear.
Step 3. Open the recovered Word document and click the "Save As" button at the top.
Step 5. After that, your files will be back.
Solution 4. Recover Word documents via File History
If you’ve made backups via Windows features, at this point, you can recover lost data in Word documents from these backups.
Let’s take File History as an example because this feature permits Win 8 and above users to recover the deleted, lost, or damaged original files. Ensure you’ve opened Control Panel > System and Security to activate File History before following this method.
Besides Documents files, File History also can backup files in Pictures, Music, Videos, Desktop folders, and OneDrive offline files saved on your computer. With the help of this feature, you can recover the folder while organizing files you accidentally deleted.
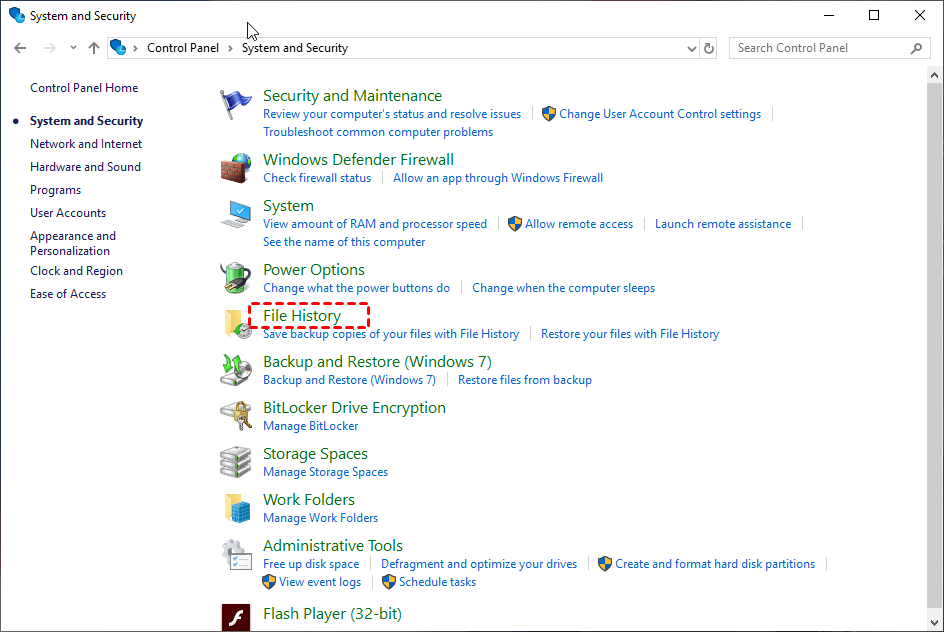
Step 1. Open Control Panel by entering it in the search bar. Then click the System and security button.

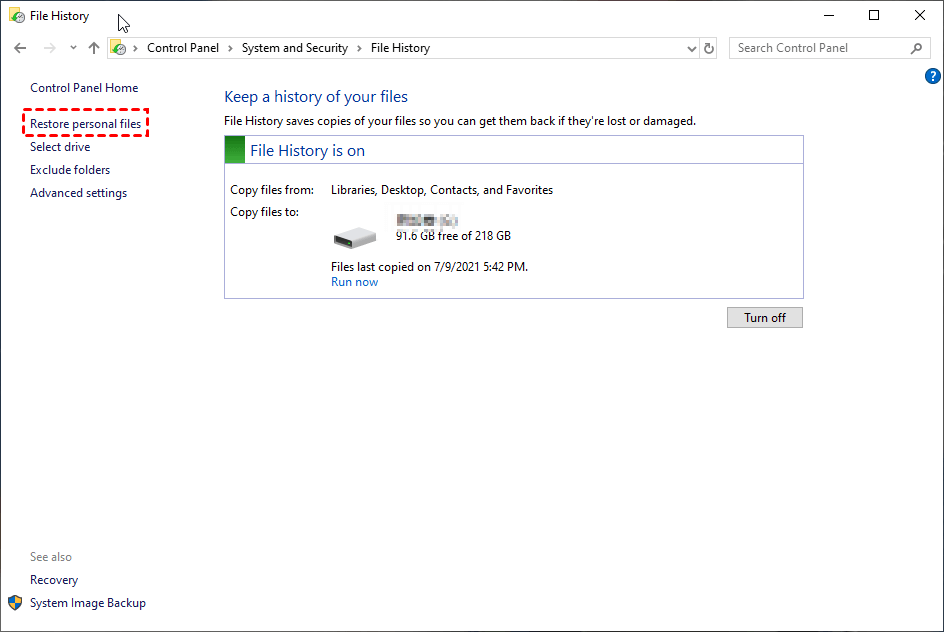
Step 2. After clicking File History, select the Restore your files with File History option.
Step 3. Click the “Restore personal files” button.
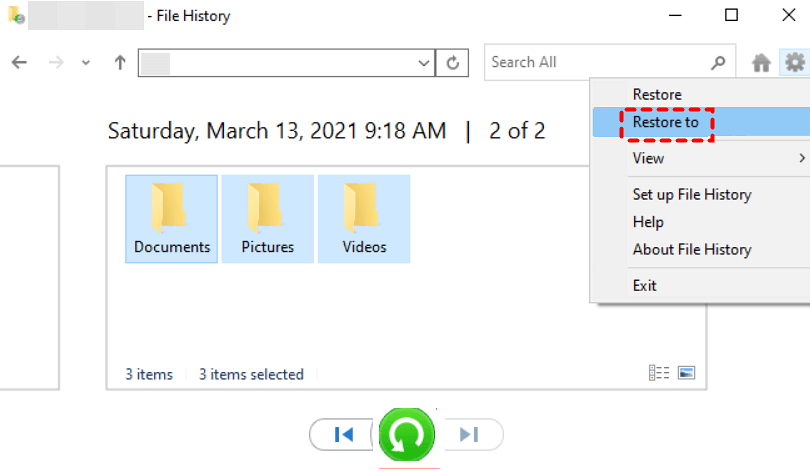
Step 4. You can Restore your selected Word documents to the original location. Please right-click Restore > Restore to if you want to set a destination saved place.
Solution 5. Get a protector of your data--- AOMEI Data Recovery
Now you must get how to recover lost data in Word document on Windows 11, 10, 8, 7, and Windows Server. However, the recovery of lost data in Word document seems hard if you didn’t enable some necessary features in the Word app. At this time, a recovery tool is more effective.
Here we strongly recommend AOMEI FastRecovery, definitely a secure and professional software that allows you to recover lost data in Word document with a few clicks. And you could benefit a lot from this tool, such as:
- ★Tips:
- Fast recovery speed and high-security rate. It is supported by a strong team that focuses on data security and speed.
- Multiple compatibilities. It is workable for multiple Windows versions, involving Windows 11/10/8/7 and Windows Server 2022/2016.
- Various data type recovery. In addition to Word documents, AOMEI Data Recovery is accessible to recover deleted videos, music, photos, PPT, PDF, and so on. With one tool, protect all of your data.
Step 1. Download and install and run AOMEI FastRecovery on the computer. Then hover the mouse over partition/disk that includes your deleted Word files, and click Scan.
Step 2. Quick Scan and Deep Scan can search all the deleted Word files and other lost files on your selected partition/disk.
Step 3. Check your scanning results and click "Recover x files". And save your recovered Word files in a new position.
How to recover lost data in Word document on Mac
Some people are accustomed to using the Word app to handle some work or study stuff, so they would download the Word app on Mac. But what if you lost data in a Word document on Mac? Now follow me to know how to recover lost data on Microsoft Word document on Mac.
Solution 1. Recover lost data from the Mac Temporary Folder
Here is a feature in Mac that allows you to recover the unsaved files-- Terminal, from which you could get the temporary document on your Mac.
Step 1. Open Terminal.
Step 2. Type in cd $TMPDIR.
Step 3. After that, keep entering ls to display the files. After that, look in the TemporaryItems subfolder for your document.
Step 4. Search for the lost file. If you find the lost data in Word document, save it to another location.
Solution 2. Repair the damaged file in Word
And some situation causing data loss like the Mac crash is also painful and miserable. And it will be worse if the Word document is damaged. Fortunately, you can attempt to force Word to try to repair a damaged file. Use the following steps to try this recovery method.
Step 1. In Word, click File > Open.
Step 2. Select the damaged file from the dialog box.
Step 3. Click the arrow on the Open button to display the submenu.
Step 4. Click the Repair or Recover Text option.
Solution 3. Recover a lost Word document by using Time Machine Backup
If you’re using Time Machine to back up your Mac, you may be able the recover your lost Word doc from the backup media. This method is useless if no backup was previously created.
Step 1. On your Mac, open Time Machine on the desktop on Mac.
Step 2. You can find the specific documents you want to restore using the onscreen up and down arrows to locate them. Then you can preview it by pressing Space Bar.
Step 3. Finally, click the Restore button, and then the lost data in Word document will be returned to its original location.
Conclusion
This post shows you how to recover lost data in Word documents on Windows and Mac. We could recover lost data from Word Backup files, AutoRecover files, and other sources on Windows 11, 10, 8, 7, and Windows Server. However, if they do not work for you, AOMEI FastRecovery is an excellent option.
In addition, Terminal, Time Machine Backup, or repairing the damaged files to recover lost data on Microsoft Word documents on Mac are also feasible. Hope one of the solutions will get you out of trouble.