
How to Fix No Boot Disk Has Been Detected (7 Easy Ways)
On this page, you can learn how to fix the “No boot disk has been detected” error. We have concluded 7 different and useful solutions. Continue reading to fix it.
By Zoey / Updated on October 24, 2024
Encountering an issue during boot-up is a common concern for HP or Acer users, as they may come across an error message indicating that no boot disk has been detected or that the disk boot failed.
This situation arises when the system is unable to locate the essential boot information required to initiate the operating system. In such instances, we will offer a comprehensive analysis of the specific cause behind this issue, presenting viable solutions to facilitate the successful booting of your computer system.
Why no boot disk has been detected?
When a computer encounters the "no boot disc has been detected" issue, it signifies a failure in the essential process of retrieving boot information from the hard drive, crucial for system startup. This problem may arise due to various reasons, including:
- Flawed or loose connection of the hard disk.
- Incorrect boot order configuration.
- Corruption in boot configuration data.
- Hard drive failure.
- HDD/SSD lacking an operating system.
Identifying these root causes sets the stage for implementing effective solutions to address the "No Boot Disk Detected" or disk failure dilemma. Discovering the intricacies of each issue equips users with the knowledge needed to troubleshoot and resolve the problem successfully.
How to fix no boot disk has been detected error?
Addressing the "no boot disk has been detected" error requires a strategic approach. Here are 6 solutions to rectify this issue.
Solution 1. Verify Hard Disk Connection
To tackle the boot error, meticulously inspect the hard drive connection to ensure it's securely attached to your computer. External factors like laptop movement may loosen wires, leading to undetected boot disk errors. Exercise caution during this process to prevent hardware damage.
Step 1. Turn off the computer, remove the battery, and extract the HDD.
Step 2. Thoroughly clean all ports and cables before reconnecting the HDD.
Solution 2. Modify Boot Order
In instances where the boot disk isn't positioned at the top of the boot order, the computer might attempt to boot from an alternative source, leading to undetected disk errors. To resolve this issue, consider adjusting the computer's boot order through the BIOS using the following steps:
Step 1. Power on your computer and access the BIOS by pressing F1/F2/F12/Del or the specified key.
Step 2. Navigate to the Boot option within the list of available choices.
Step 3. Locate the computer's boot order and utilize the arrow keys to elevate its position.
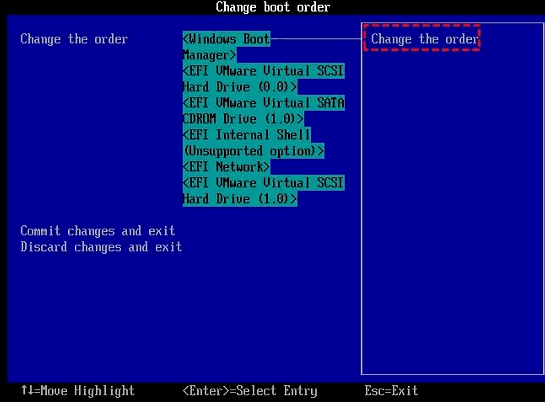
Ensure the boot disk takes precedence, facilitating the system's ability to locate valid boot information and mitigating the risk of undetected disk errors.
Solution 3. Restore the Boot Sector
Positioned at the initiation point of the bootable hard disk, the master boot record (MBR) plays a pivotal role in ensuring successful computer boot-ups. A corrupted MBR can impede the system's ability to recognize vital boot information, resulting in boot failures. Rectify this by repairing the boot sector, employing the user-friendly method.
Download and install AOMEI FastRecovery on a normal working Windows PC. Attach a USB flash drive or insert a blank CD/DVD to your computer.
Step 1. Launch AOMEI FastRecovery > click "Crashed PC Recovery".
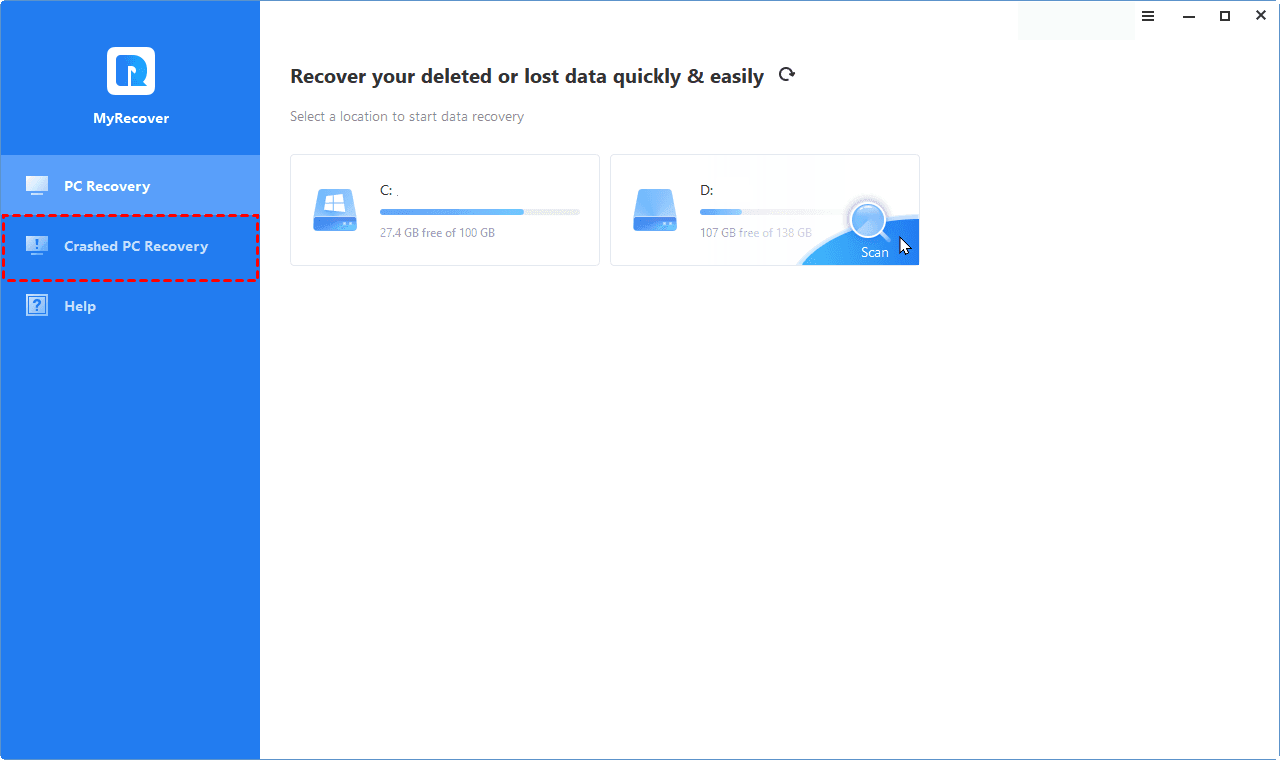
Step 2. Select a way to create the WinPE bootable disk according to your needs and click "Execute".
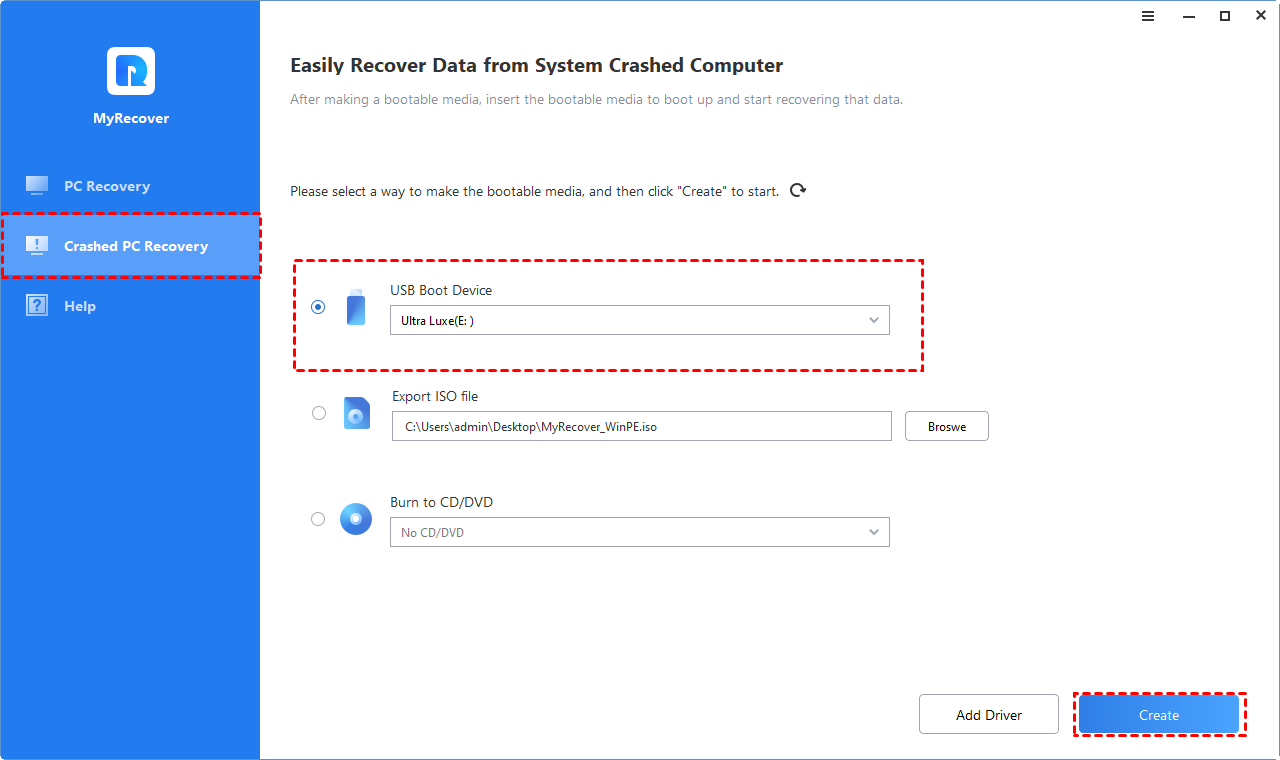
There are three ways available to create bootable disk based on Windows PE.
- USB Boot Device: To create a bootable USB Device.
- Export ISO File: Use this method to make a bootable ISO file. After the ISO is exported, you need to burn it with a third-party burning program. Or, you can use the ISO to boot some virtual machines or burn it to other devices.
- Burn to CD/DVD: To create a bootable CD/DVD. Here we take USB Boot Device for example.
Tips: "Add Drivers" allows you to manually add additional and necessary drivers into the bootable disk so that more devices will be available after you boot into WinPE.
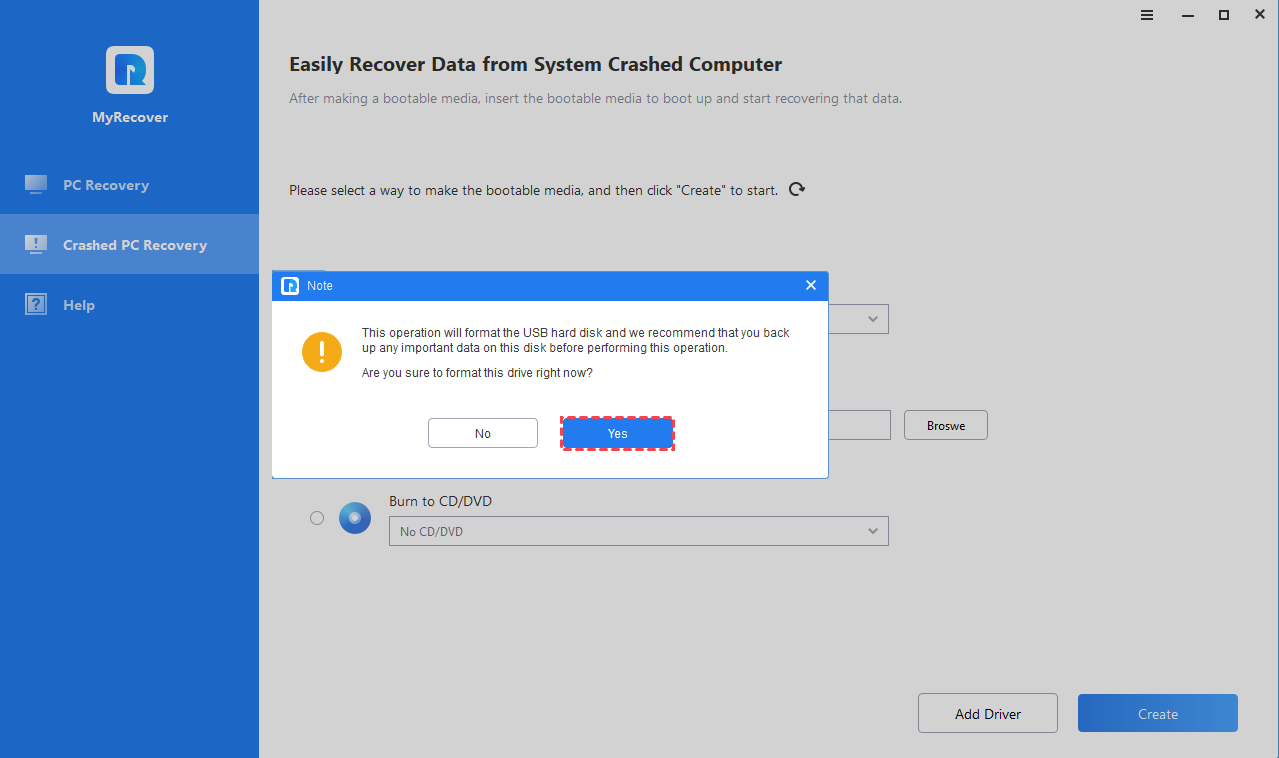
Step 3. After you select the way and proceed, there will be a pop-up information window. The USB flash drive needs to be formatted and all data on it will be lost. If there is important data on it, please first make a backup. If you confirm, please click "Yes" to continue.
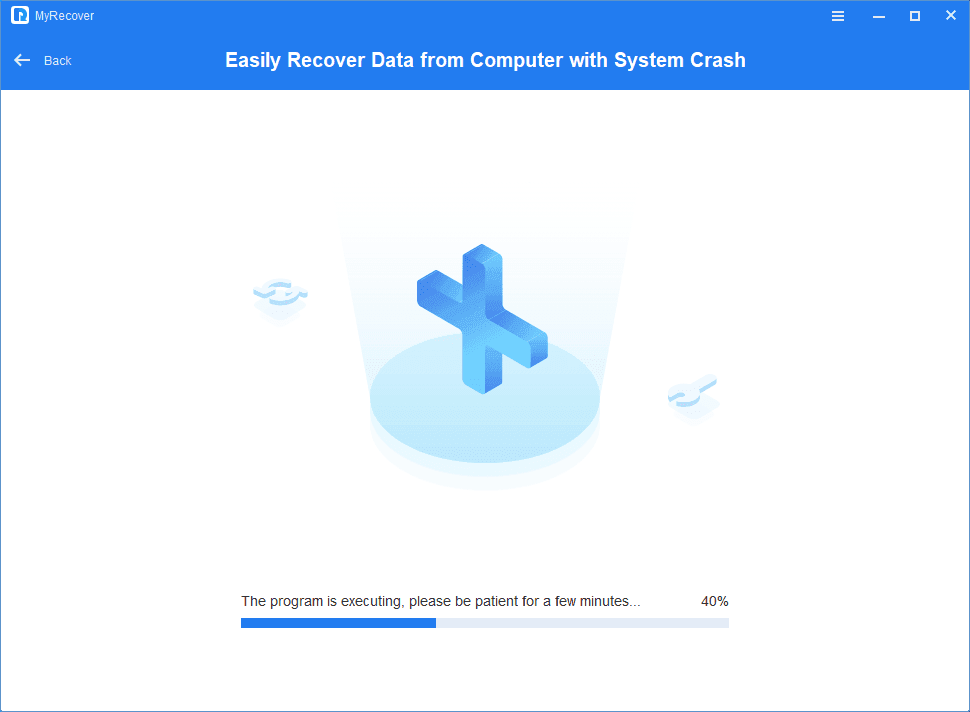
Step 4. The creation operation will start and you can check the creation process. The progress of creating a WinPE bootable USB drive will take a few minutes.
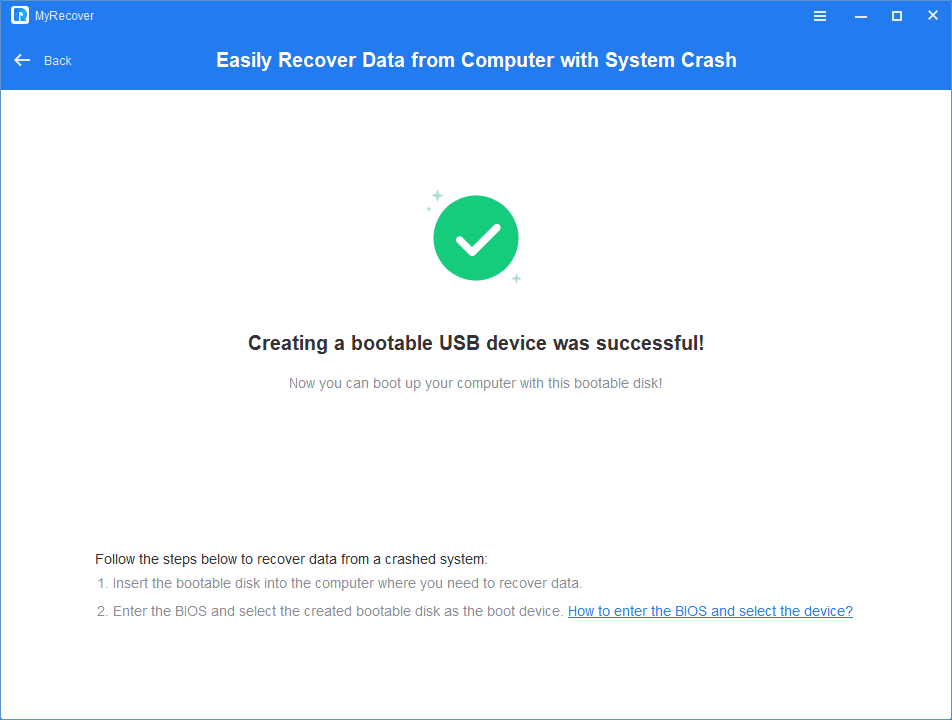
Step 5. Once it is finished, you will get a successful message. And, you will get a notice of steps to boot from the bootable disk and then recover from crashed PC.
AOMEI FastRecovery, a versatile data recovery tool, streamlines the repair process, surpassing the complexities of the Windows built-in tool. The creation of a bootable disk facilitates easy computer booting without data loss, making it an ideal solution for users less familiar with intricate computer operations.
If you find yourself in this category, download this potent tool to effortlessly rebuild the MBR.
Ensure a seamless recovery process and restore the integrity of the MBR for a system that recognizes boot information and executes successful computer boot-ups.
At the same time, AOMEI FastRecovery is a powerful data recovery software. Especially for users without disk backups.
With a high recovery rate and fast recovery speed, AOMEI FastRecovery can help you recover data from SSD not detected in BIOS easily.

- Provide Quick Scan and Deep Scan to find all your lost and deleted data.
- More than 200 file types are supported to recover.
- Keep the original filename, format, and path of recoverable files.
- Support NTFS, FAT32, exFAT, and ReFS file systemsin Windows 11, 10, 8, 7, and Windows Server.
Solution 4. Execute CHKDSK for File System Verification
Leverage CHKDSK, a Windows-provided utility, to identify and rectify file system errors. Follow these steps, akin to method 3, through the command prompt:
1. Initiate your computer using a Windows bootable device.
2. Navigate to Advanced Options and opt for the Command Prompt.
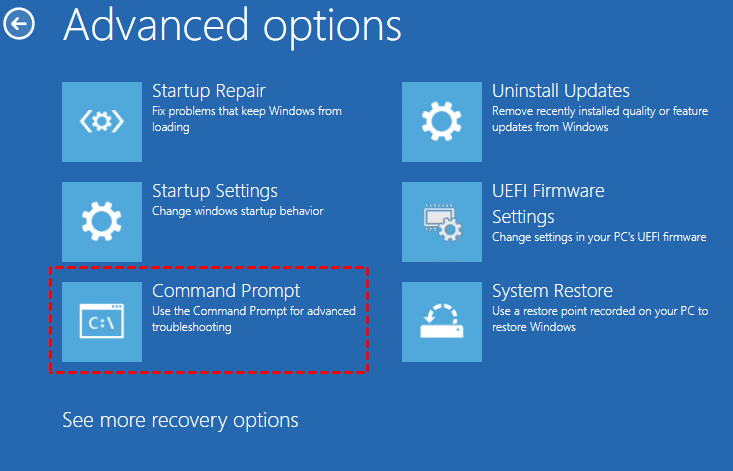
3. Input the following command:
bootrec /fixmbr
bootrec /fixboot
bootrec /scanos
bootrec /rebuildbcd
Solution 5. Initiate Automatic Repair
Employ the Automatic Repair or Startup Repair feature to resolve the error hindering your PC's boot process. Ensure prior Windows installation media to access the Windows recovery environment.
1. Boot your system from the CD/DVD, pressing any key to proceed.
2. Opt for "Repair your computer" and navigate to Troubleshoot.
3. Select Advanced options > Automatic/Start-up Repair.
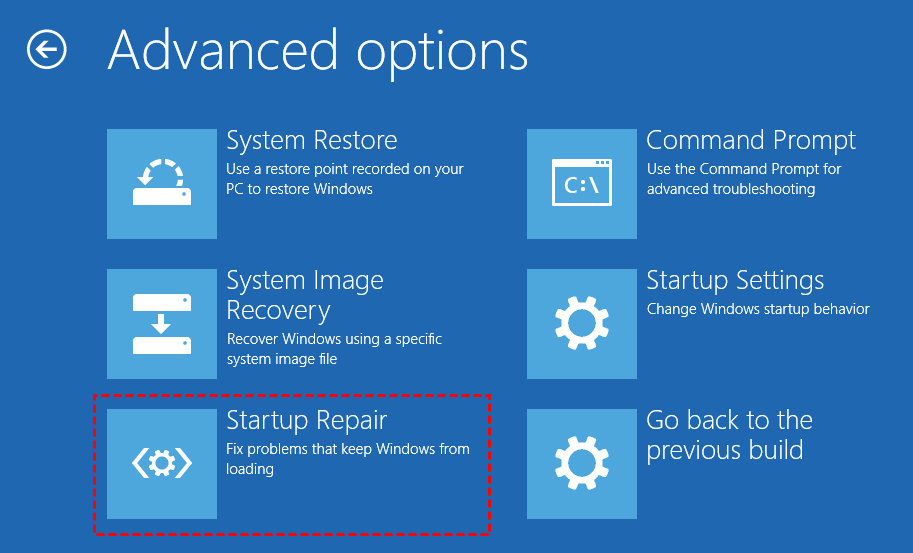
4. Allow Windows to autonomously complete the repair process.
This method streamlines the repair procedure, addressing the underlying issues and facilitating a seamless boot experience for your PC.
Solution 6. Perform a Fresh Installation of Windows
In instances where the previous solutions prove ineffective and the Windows system faces persistent challenges, opting for a fresh install becomes a viable resolution. However, exercise caution as this method involves erasing all files. It is advisable to back up crucial data or replicate a partition to an alternative drive before proceeding. If you encounter data loss, you can try to recover files after clean install via AOMEI FastRecovery.
Solution 7. Consider HDD Replacement
An additional factor contributing to the computer's failure to initiate may be a malfunctioning Hard Disk Drive (HDD), triggering the 'No Boot Disk Detected or the Disk Has Failed' error.
You can follow these steps to assess HDD replacement:
- Check HDD
- Change channels
- Professional involvement
Conclusion
This comprehensive guide provides 7 solutions to resolve persistent boot error – “Boot disk not detected”. These solutions are available for HP laptops and other computer systems and provide a universal approach to solving startup-related issues. Notably, the addition of AOMEI FastRecovery provides a fast and user-friendly solution that simplifies the creation of bootable media and effectively resolves common errors.
Regardless of the specific situation, this guide enables users to successfully navigate and resolve startup issues. Diverse solutions ensure that whether dealing with a loose connection, fixing damaged boot sector or a failed hard drive, users can take proactive steps to restore their system to optimal functionality. For further assistance or complex procedures, it is recommended to consult a qualified computer technician.

