How to Fix No Bootable Device Found & Recover Data?
Learn to fix no bootable device found via six efficient methods in this article. Besides, you can also recover deleted files from hard drives without backups.
The "No bootable device found" error can suddenly appear on your PC, often signaling issues such as a misconfigured boot sequence, a damaged boot sector, disk corruption, or even physical damage to the connectors or the drive itself. If you’re bothered by this issue, you’ve come to the right place because this article can help you solve this problem and recover data from hard drives.
What does no bootable devices found mean?
Your drive's initial sector, known as the Master Boot Record (MBR), holds crucial data needed for booting Windows. When your PC can't locate the drive housing this boot sector information, it triggers the "No bootable device found" message. This error message can be caused by the following common reasons.
- Accidentally deleted the boot partition in Windows 7, 8, 10, or 11.
- Incorrect boot sequence
- Corrupted boot sector or partition table
- Something wrong with the drive or SATA cables
- Inactive Windows partition
Part 1. How to fix no bootable device found?
According to the above reasons, there are five feasible ways for you to solve this issue.
Fix 1. Make a bootable USB media via AOMEI Partition Assistant
When your Windows computer refuses to boot due to a missing boot partition, you can resolve the problem by generating bootable media using a reputable partition manager tool like AOMEI Partition Assistant Standard. This will enable you to rectify the issue and, subsequently, adjust the boot order from your bootable USB flash drive to regain access to your data.
-
Since the data saved on your USB flash drive will be formatted/erased, you’d better use a new USB drive if the budget allows. Or you can utilize AOMEI Backupper to make a free disk backup to protect your USB files.
-
Prepare another working PC.
Step 1. Download and install the free AOMEI Partition Assistant demo version on another working PC. After connecting your USB to it, click Make bootable media > Next.
Step 2. Select “USB Boot Device” and click “Proceed” to begin the pending operation.
Step 3. Click the “Yes” button to begin the process.
Step 4. After connecting your bootable USB media to your unbootable computer, go to its BIOS.
Step 5. In BIOS, locate the Boot menu and look for the Boot Sequence.
Step 6. Change the bootable order from your connected bootable USB media.
Step 7. Press F10 to confirm that your PC will boot from the bootable USB media.
After fixing it, try to get your needed data from your hard drive.
Fix 2. Check if your HDD is physically connected
When you come across the "no bootable device" error, the initial step is to inspect the physical connection of your drive to the PC. Examine the SATA and power cables for any looseness. If necessary, reseat the SATA cable or the SSD.
Additionally, it's wise to scrutinize these components for physical damage. Check for cracks on the SATA connector and any unusual wear on the cable, making sure it's not excessively bent.
For further troubleshooting, consider connecting the drive to another PC to determine if it's detected and readable on that system. This can help pinpoint the root cause of the issue.
Fix 3. Set the boot device order in the BIOS
To ensure a successful Windows boot, the boot drive should occupy the top position in the boot order or sequence. You can verify and adjust this setting within the BIOS's boot manager. It's important to note that the specific steps may vary depending on the manufacturer of your motherboard.
Fix 4. Run CHKDSK on your boot drive
Designed to detect and fix bad sectors or file systems on your disk, CHKDSK might help you solve the no bootable device error. If you’ve created Windows installation media or made a bootable USB media, you can refer to the following steps directly.
Step 1. Connect your Windows installation media or bootable USB media to the Windows > restart your Windows OS > press the BIOS key (F2, F11, etc.) on the initial screen.
Step 2. Change the boot priority to your connected Windows installation media or bootable USB media.
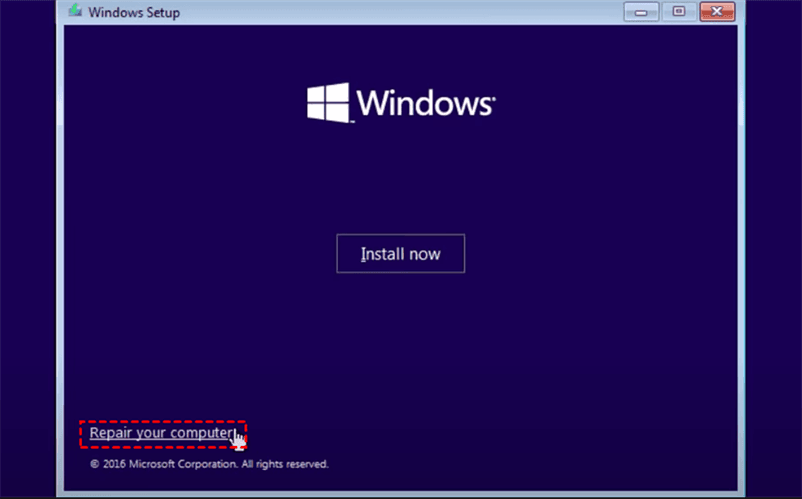
Step 3. In the recovery environment, click Next until you see Repair your computer > click Repair your computer.
Step 4. Click Troubleshoot > Advanced options > Command Prompt.
Step 5. Type cmd in the search bar and click Run as administrator to open the command prompt window.
Step 6. Type chkdsk in the command prompt window.
Step 7. Type chkdsk d: /f or chkdsk d: /r in the window according to your situation.
Fix 5. Mark the primary partition as Active
When the status of the primary partition on your PC is set to "inactive," you'll likely encounter the "boot device not found" issue. Fortunately, you can rectify this by designating the primary partition as active. There are two methods to achieve this:
1️⃣ Using command prompt in Windows Recovery Environment:
Access this environment by selecting "Repair your computer." Then, use the command prompt to change the partition status.
2️⃣ Creating a bootable USB media:
Alternatively, create a bootable USB drive and change the partition status using Disk Management. This method provides another route to resolve the issue.
Let’s take the former solution as an example.
Step 1. Connect your Windows installation media or bootable USB media to the Windows > restart your Windows OS > press the BIOS key (F2, F11, etc.) on the initial screen.
Step 2. Change the boot priority to your connected Windows installation media or bootable USB media.
Step 3. In the recovery environment, click Next until you see Repair your computer > click Repair your computer.
Step 4. Click Troubleshoot > Advanced options > Command Prompt.
Step 5. Type cmd in the search bar and click Run as administrator to open the command prompt window.
Step 6. Please type the following command lines one by one in the window > hit Enter.
diskpart
list disk
select disk 0
list partition
select partition 1
active
Step 7. Close the command prompt window and reboot your PC.
Fix 6. Rebuild the BCD file
The Boot Configuration Data (BCD) file plays a pivotal role in the successful booting of Windows. In instances where it becomes corrupt or goes missing, Windows fails to boot and often presents the "No bootable devices found" error. Fortunately, Windows offers a built-in command-line tool called Bootrec, which enables you to rebuild the BCD file and restore normal boot functionality.
Step 1. Connect your Windows installation media or bootable USB media to the Windows > restart your Windows OS > press the BIOS key (F2, F11, etc.) on the initial screen
Step 2. Change the boot priority to your connected Windows installation media or bootable USB media.
Step 3. In the recovery environment, click Next until you see Repair your computer > click Repair your computer.
Step 4. Click Troubleshoot > Advanced options > Command Prompt.
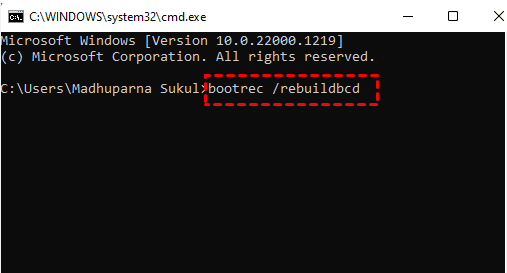
Step 5. Type cmd in the search bar > click Run as administrator to open the prompt command window > type bootrec /rebuild bcd in the window > hit Enter or press OK.
Part 2. Recover deleted & missing files from hard drives via data recovery software
Sometimes, it might be unavoidable to suffer data loss because of deletion, disk formatting, virus attacks, etc. At this point, can you recover deleted files from hard drives?
Without valuable backups, you’ll have no recourse but to utilize professional Windows data recovery software like AOMEI FastRecovery to recover deleted & missing files from internal or external hard drives.
💚 After deletion, please avoid newly written performances on your computer because newly added data can decrease the Windows data recovery rate.
💚 After recovery, please remember to save these retrieved files in a new saved path.
💚 To recover a large number of deleted & missing files from your hard drives, please consider upgrading AOMEI FastRecovery to the Professional or Technician edition.
-
Powerful features: Recover deleted & lost Word, Excel, PPT, folders, compressed files, photos, songs, videos, audio, websites, and other 200+ file types from HDD, USB, SSD, etc.
-
Easy-to-find: Quick Scan and Deep Scan can find your deleted & missing files as many as possible. You can also quickly locate your desired files by Filename, Path, Date, Size, etc.
-
Convenient: Get deleted files’ original Paths, Filenames, and Format after recovery.
-
Excellent compatibility: Support NTFS, FAT32, exFAT, and ReFS file systems and be compatible with Windows 11, 10, 8, 7, or Windows Server PC.
Step 1. After launching AOMEI FastRecovery on your Windows. Hover the mouse over the drive saved deleted files before, and click Scan.
Step 2. Filter your needed data according to Name, Date, Document Type, or Path.
- Name: Type the filenames of your desired files to narrow the search area.
- Date modified: Set the date (today, yesterday, last 7/30 days, and so on) according to your situation.
- Size: Filter the file size (<128KB, 128KB~1MB, 1MB~ 512MB, etc.) based on your needs.
Step 3. Go to the Deleted Files/Recycle Bin/Other Missing Files folder and select the data you want. Then click “Recover x files” to begin the hard disk data recovery process.
In conclusion
What does no bootable devices found mean? How to fix no bootable device found? And how to recover deleted files from hard drives without backups? After reading this article, you may find the respective answers.
Furthermore, it's strongly advised to establish a routine for creating backups using this free AOMEI Backupper Standard. Regular backups serve as the most reliable safeguard against potential data loss, ensuring your data’s security.


