RAID 0/1/5 | How to Rebuild RAID Without Losing Data
How to rebuild RAID 0, 1, 5 without losing data? In this guide, we provide you with 6 methods and useful tips to rebuild raid without losing data. You'll learn everything about RAID rebuild.
By Lori / Updated on November 5, 2024
In the fast-evolving landscape of data storage, RAID configurations are essential for maintaining data redundancy and optimizing performance. However, unforeseen circumstances may arise, necessitating the need to rebuild RAID without losing data.
"Can I rebuild RAID 1 without losing data?" Yes.This comprehensive guide delves into the intricacies of this process, providing detailed methods and step-by-step instructions to rebuild RAID 0, 1, 5 without losing data.
Understanding RAID
Before embarking on the journey of rebuilding RAID configurations, it's imperative to grasp the fundamentals of RAID (Redundant Array of Independent Disks). RAID configurations distribute data across multiple disks, enhancing both performance and data redundancy.
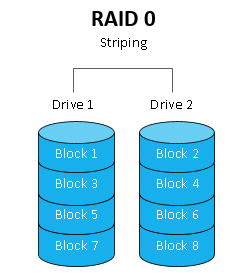
Different RAID levels offer varying degrees of data protection, making them popular choices for diverse storage solutions. RAID 0, RAID 1, and RAID 5 are common types of standard RAID levels, and all RAID types can become corrupted due to:
- Damaged RAID Controller: Often the most frequent cause of RAID failure, physical damage to the RAID controller can disrupt normal operations.
- Malware Attacks: Viruses or malware can compromise the integrity of a RAID, leading to potential data loss.
- Disk Failure: If a disk within the RAID array fails, it can lead to the crash of the entire system, posing a significant risk to essential data.
- Incorrect Drive Replacement: When replacing old drives within a RAID array, it’s crucial to choose the correct drive and ensure it is formatted correctly to avoid errors.
How to Rebuild RAID Without Losing Data: 6 Methods
1. Backup Your Data
The first step in the RAID rebuilding process is to create a comprehensive backup of your data. This precautionary measure ensures that even if unexpected issues arise during the rebuild, your valuable information remains secure.
Step-by-Step Backup Process:
- Identify critical data: Determine the data that needs to be backed up, focusing on essential files and configurations.
- Choose a backup method: Select an appropriate backup method, whether it's using built-in OS tools, third-party software, or cloud-based solutions.
- Schedule regular backups: Establish a routine for backing up your data to ensure you always have an up-to-date copy in case of emergencies.
2. Identify RAID Level
Understanding the RAID level of your configuration is crucial for selecting the right rebuilding method. Different RAID levels require specific approaches, and misidentification can lead to data loss.
Steps to Identify RAID Level:
- Consult documentation: Check your system documentation or RAID controller manual to identify the RAID level.
- Access RAID management tools: Use built-in RAID management tools in your operating system to confirm the RAID configuration.
- Hardware RAID controller: If applicable, access the RAID controller's BIOS during the system boot process to identify the RAID level.
3. Use Built-in RAID Management Tools
Most operating systems provide built-in RAID management tools, simplifying the process of rebuilding RAID configurations without the need for third-party software.
Steps to Use Built-in RAID Management Tools:
- Open Disk Management (Windows) or Disk Utility (Mac/Linux).
- Identify the RAID volume.
- Select the option to rebuild or repair the RAID volume.
- Follow on-screen prompts, ensuring that data preservation options are selected.
4. AOMEI FastRecovery: Your Data Recovery Ally
If you are new to RAID and rebuild your RAID incorrectly, you risk losing all your data. We recommend data recovery software like AOMEI FastRecovery to help you recover lost data from RAID. AOMEI FastRecovery is a powerful and user-friendly data recovery tool designed to handle RAID configurations seamlessly.

- 200+ Types of Data Support: Recover lost Word document,, photos, videos, emails, Excel files, and so on fromRAID drives.
- RAID Support: AOMEI FastRecovery accommodates various RAID levels, ensuring compatibility with your specific configuration.
- File Preview: Preview recoverable files before initiating the recovery process, enabling you to selectively recover essential data.
- Step-by-Step Wizard: AOMEI FastRecovery guides you through the RAID rebuilding process with a user-friendly wizard, making it accessible even for non-technical users.
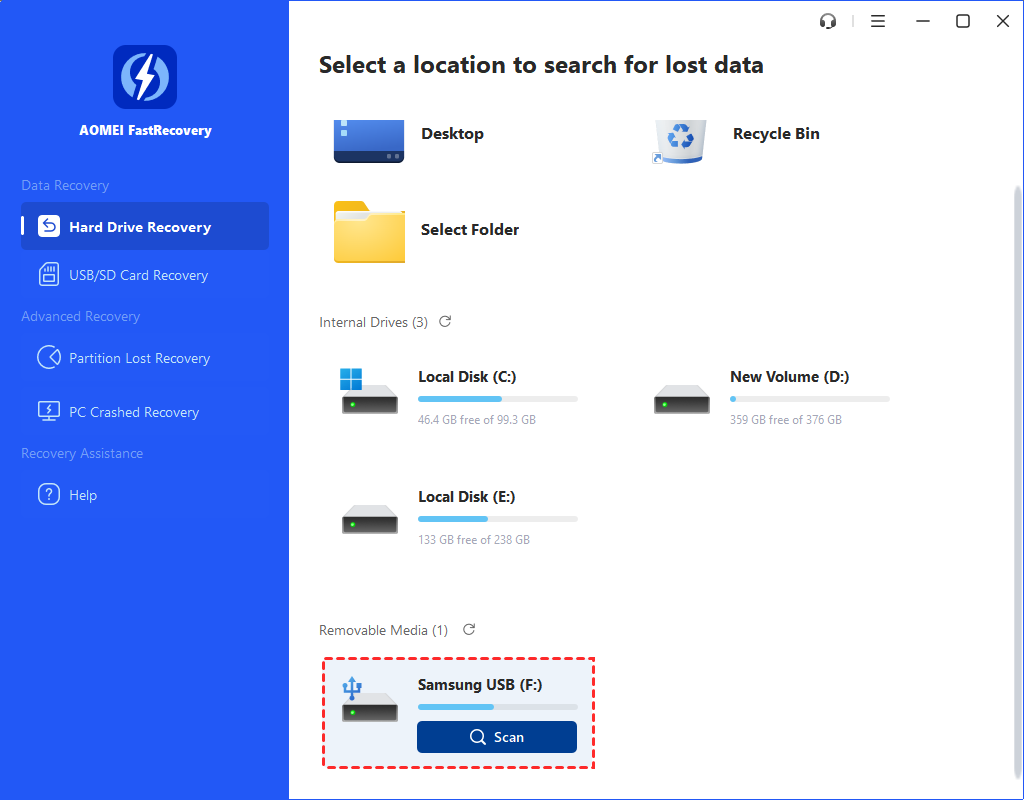
Pleasedownload and install AOMEI FastRecovery torecover lost data from damaged RAID. Here are simple steps:
Step 1: Hover the mouse over the RAID drive from which you want to recover lost data. Click Scan.
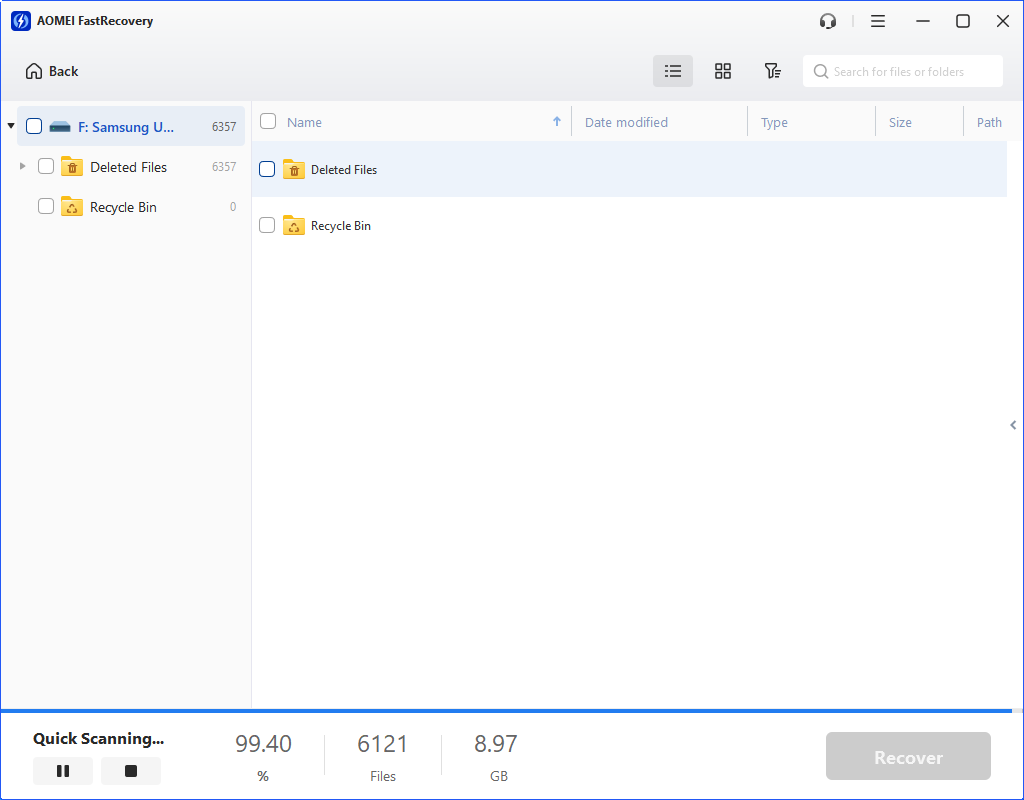
Step 2: It will perform Quick Scan and Deep Scan , then, you'll see a list of deleted and lost RAID files. Quickly locate your files by typing the filename in the search box or using the "Filter" feature to narrow down the results.
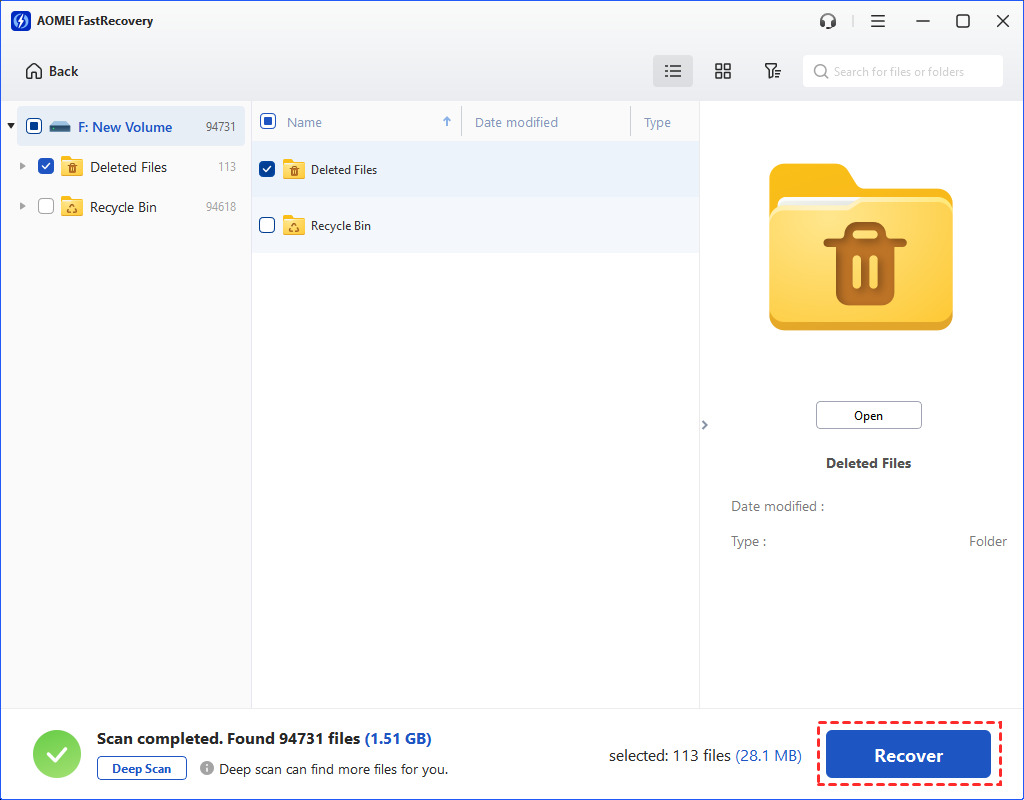
Step 3: Choose the files you wish to recover. Click Recover X files and then navigate to choose a safe location on a different drive to save the recovered files.
5. Check Disk Health
Before and after the RAID rebuild, it's essential to assess the health of each disk in your configuration. Identifying and addressing any disk issues ensures a smoother rebuilding process.
Steps to Check Disk Health:
- Open Disk Management or Disk Utility.
- Navigate to the disk information section.
- Check for any errors or warnings related to disk health.
- Address identified issues promptly to maintain a healthy RAID configuration.
6. Monitor Rebuild Progress
During the RAID rebuilding process, it's crucial to monitor the progress closely. Any anomalies or errors should be addressed promptly to prevent potential data loss.
Steps to Monitor Rebuild Progress:
- Access RAID management tools.
- Look for a progress indicator or log detailing the rebuild process.
- Address any errors or interruptions promptly to ensure a successful rebuild.
Tips to Rebuild RAID Without Losing Data
Here are some effective tips for rebuilding RAID without losing data. You can choose to rebuild the RAID manually or use RAID data recovery software, but either way, following these guidelines will help minimize data loss:
1️⃣Create a RAID structure image and backup: Before you begin, make sure you have a complete image of the RAID structure and a separate backup of all data on another volume.
2️⃣ Avoid creating new RAID on old drives: Setting up a new RAID configuration on old drives may result in data loss. It's best to use a new or thoroughly tested drive.
3️⃣ Use CHKDSK after backup: After backing up your data, run the CHKDSK tool. This helps ensure that the repair tool does not overwrite the file pointer, which could result in data loss.
4️⃣ Don't change corrupted RAID files: Avoid moving, adding, or deleting files on a corrupted RAID. Instead, focus on copying or backing up your files.
5️⃣ Avoid deleting multiple disks at the same time: Deleting multiple disks at once may disrupt the correct order of the drives, potentially resulting in massive data loss.
6️⃣ Be aware of RAID failure warnings: Always take RAID failure warnings seriously and resolve them promptly to prevent further complications.
Conclusion
In conclusion, the process to rebuild RAID without losing data is manageable with the right tools and precautions. Whether utilizing built-in RAID management tools or relying on specialized software like AOMEI FastRecovery, prioritizing data integrity throughout the rebuilding process is paramount.
FAQs
1. Can I rebuild RAID 0 without losing data?
Yes, the ways mentioned above are also help you perform RAID 0 data recovery. Although data loss is a common risk during RAID rebuilds, following these precautions can minimize the risk:
- Create an image of the RAID structure and back up the data on a separate volume.
- Avoid creating a new RAID on old drives.
- Run the CHKDSK tool after creating the backup to avoid file system errors.
- Do not move, add, or delete files from the damaged RAID.
- Avoid removing more than one disk at a time to maintain the correct drive sequence.
- Pay attention to any RAID failure warnings and address them promptly.
2. How to recover data from a damaged RAID 5?
If you have experience with RAID data recovery, you may choose to perform the recovery manually. Otherwise, tools like AOMEI FastRecovery can facilitate the process:
- Scan the target RAID drive.
- Find and preview the lost RAID files.
- Restore the lost files. If you're unsuccessful in recovering data using software, consider contacting professional data recovery services.
3. Can I rebuild RAID without a backup?
While it's possible, creating a file backup is strongly recommended to avoid potential data loss during the rebuilding process.
4. Does AOMEI FastRecovery support all RAID configurations?
Yes, AOMEI FastRecovery is designed to support various RAID configurations, providing a versatile solution for data recovery.
5. What should I do if the RAID rebuild encounters errors?
Address any errors promptly, consult RAID management tools or software documentation, and seek professional assistance if needed.
6. Is RAID rebuilding a time-consuming process?
The duration varies based on factors like RAID level, disk size, and the amount of data. Monitor the process for timely completion.
7. Can I use AOMEI FastRecovery for non-RAID data recovery?
Yes, AOMEI FastRecovery is a versatile tool that supports both RAID and non-RAID data recovery.