How to Recover Data from SSD Not Detected in BIOS?
Get six methods to recover data from SSD not detected in BIOS in this article. Besides, you can get different methods to recover data from SSDs and prevent data loss.
By Penny / Updated on October 30, 2024
Is it possible to recover data from SSD not detected in BIOS?
Hi, my SSD drive on my laptop suddenly crashed, and now my BIOS cannot detect it. I badly need the data in the SSD drive to be recovered. Please suggest to me if there are anyways to recover data from SSD which is not detected by BIOS. Thanks in advance.
-A user from Tom’s Hardware
SSDs (Solid-State Drive or Solid-State Disk) are becoming more and more popular than traditional HDDs (mechanical hard disk drives) because of their higher input and output rates, larger capability, smaller sizes, less noise, etc.
Generally speaking, once the BIOS recognizes your connected SSD drive, it can display its model and capability. But in practice, several users have encountered the above error: SSD not detected in BIOS or SSD not showing up in BIOS.
So is it possible to recover data from SSD not detected in BIOS? It seems it is possible.
Why isn’t my SSD showing up in BIOS?
To solve this issue efficiently, let’s get an overview of common possible factors below.
- SSD is not enabled in BIOS
- Outdated SSD device driver
- Solid-State Drive failure
- Improper connection
Part 1. How to fix your SSD not detected in BIOS?
If there’re no deleted SSD drive files, after fixing the SSD not showing up in BIOS, it’s easy to get your desired data from this recognized Solid-State Drive. Let’s demonstrate how to fix your SSD not detected in BIOS via the following fixes.
Fix 1. Update/Reinstall SSD device driver via Device Manager
If the SSD hardware is not properly installed or is incompatible with your Windows OS, the BIOS cannot recognize it. Besides, an outdated device driver is also responsible for this issue. So you can use Device Manager to update or reinstall your SSD device driver.
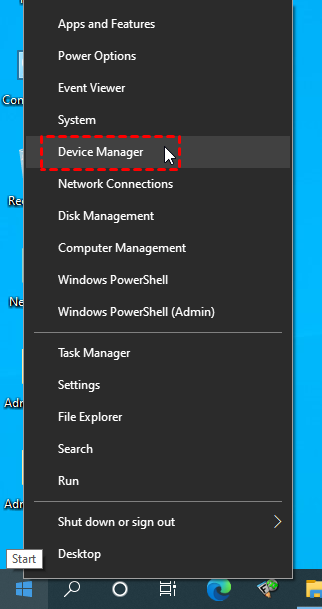
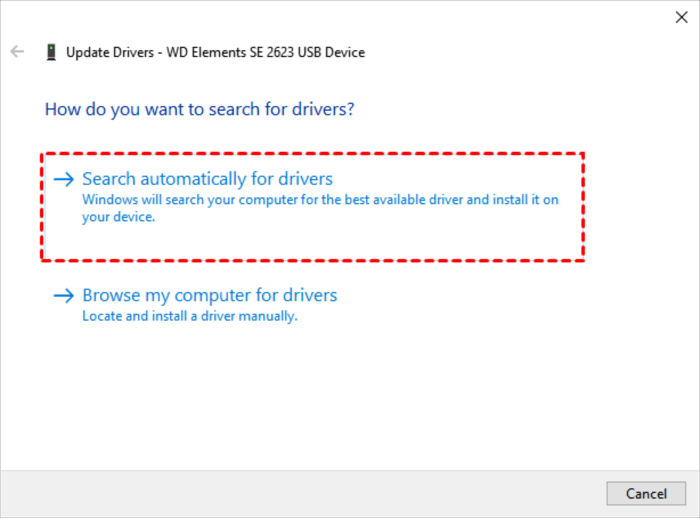
Step 1. Open Device Manager by entering it in the search bar.
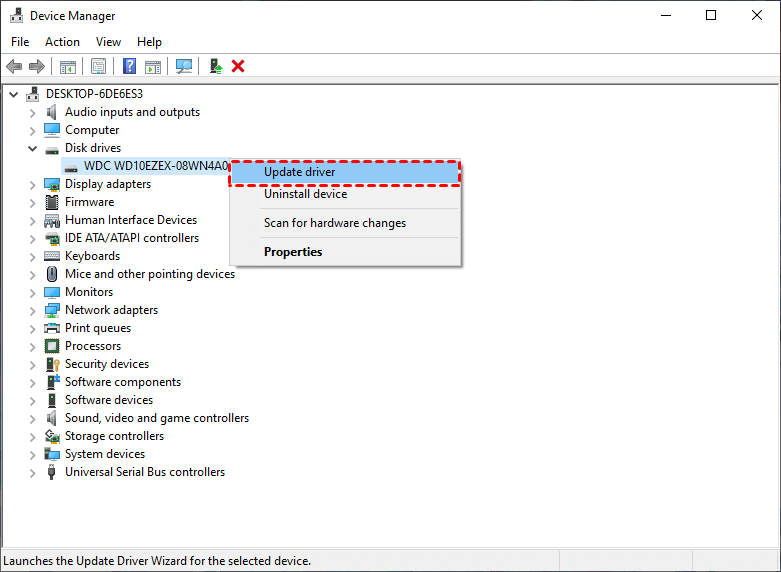
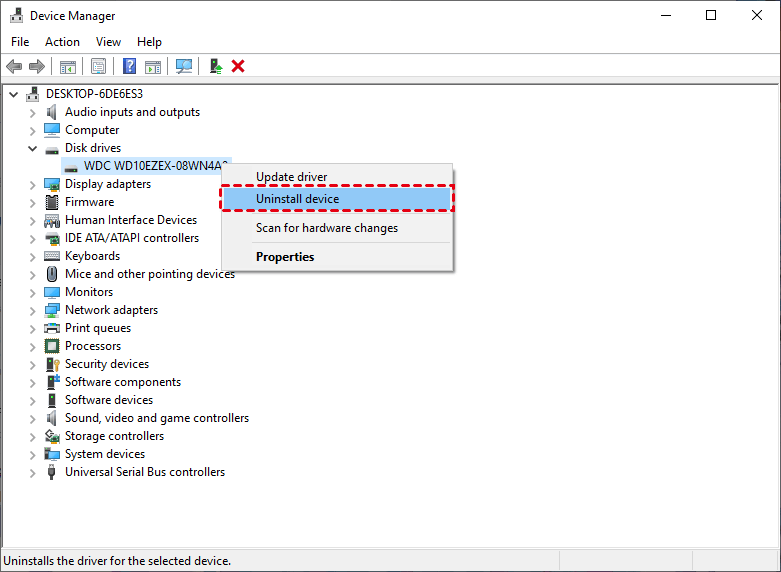
Step 2. Go to Disk drives and right-click on your solid-state drive. Then select the “Update driver” or “Uninstall device” option.
Step 3. Select the “Search automatically for drives” option. Please wait patiently.
Fix 2. Run hardware and devices troubleshooter
Apart from that, you can also use Windows Hardware and Troubleshoot tool to fix your detected SSD errors and resolve your SSD not showing up in BIOS. And this way also can solve this device cannot start code 10. Please refer to the following steps.
Step 1. Press “Win + I” to open Windows Settings and go to Update & Security.
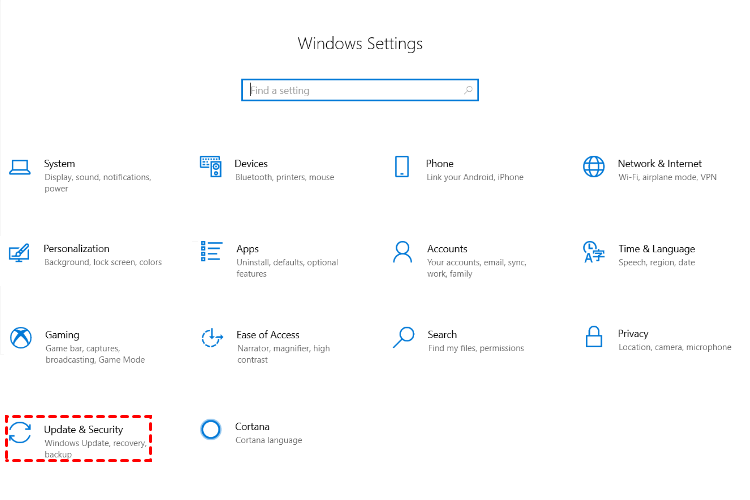
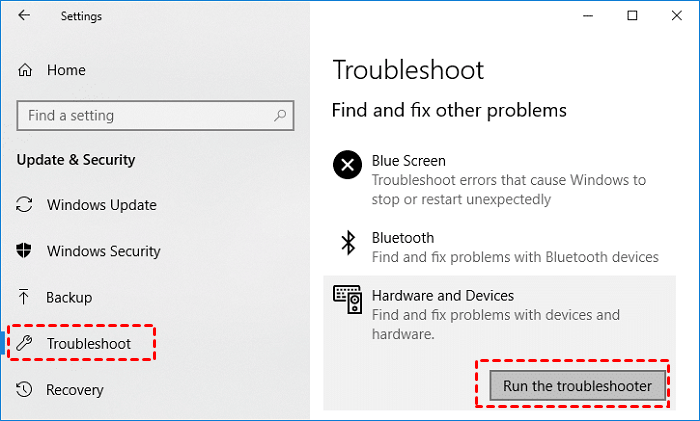
Step 2. Click “Troubleshoot” on the left. Under the “Hardware and Devices” tab, click the “Run the troubleshooter” button.
Fix 3. Set up SSD in BIOS
SATA controller mode is another name for SSD configuration mode. If your SSD drive is not configured with SATA controller settings, it’s not surprising that your SSD drive is not detected in BIOS. So you’d better check & confirm whether your SSD is enabled in BIOS or not. If not, please refer to the following steps to reconfigure your SSD drive.
- Notes:✎...
-
Please note that different motherboards have the corresponding keys to enter into BIOS. In this scenario, let’s take a Dell PC as an example.
Step 1. Restart your PC and press “F2” or “Del” during the boot process.
Step 2. After entering into BIOS, expand SATA Configuration and set Configure SATA as the “IDE” mode.
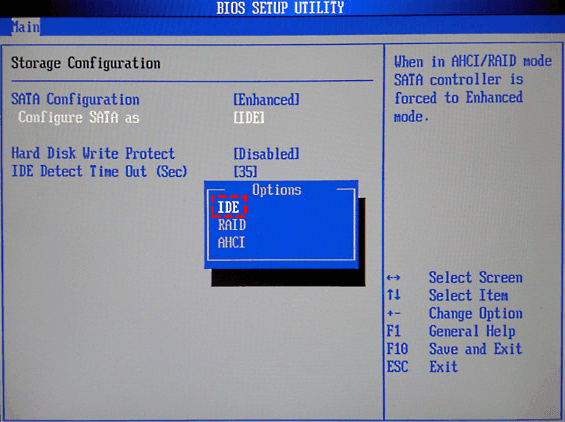
Step 3. Press F8 to save these changes. Then reboot your computer to see if your Solid-State Disk is visible to you or not in the BIOS.
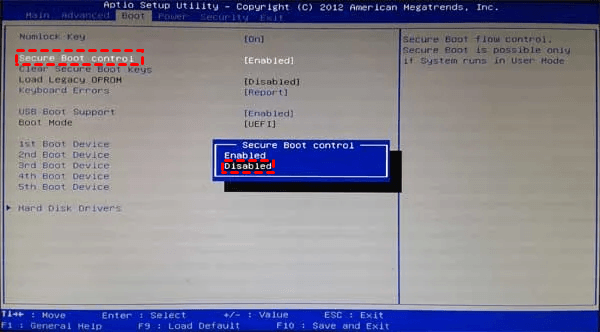
Fix 4. Disable Secure Boot control in BIOS
According to user feedback, disabling Secure Boot in BIOS could efficiently solve your SSD not showing up in BIOS.
- Notes:✎...
- Some motherboards only have Secure Boot but not Secure Boot Control, then you need to alter the setting to Disabled in Secure Boot.
Step 1. Restart your computer and press “F2” or “Del” to enter the BIOS.
Step 2. Go to the Security interface and click the “Secure Boot” button.
Step 3. Set “Secure Boot Control” to Disabled.
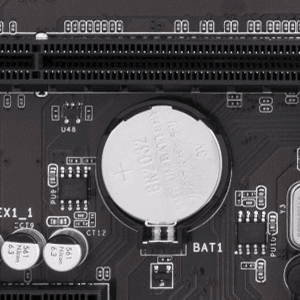
Fix 5. Reset the BIOS to make SSD detected in BIOS
If your M.2 drive not showing up in BIOS, you can try to reset the BIOS to address this issue. Let’s show how it works.
Step 1. Restart your PC and press “F2” or “Del” during the boot process.
Step 2. Select “Load defaults” or press “Alt + F” to reset the BIOS. In addition, you can directly remove the CMOS battery on the motherboard to reset the BIOS. Then wait 1 minute before reinstallation.
Fix 6. Update the BIOS to make SSD detected in BIOS
Like outdated SSD device drivers, an outdated BIOS may fail to detect your connected SSD. In this case, updating BIOS is a pretty good way to adapt to these changes.
During the update process, please avoid power failure and interruption to damage motherboards.
Step 1. Download the BIOS update file from the official website of your Windows PC’s motherboard manufacturer.
Step 2. Load all the updated files into a USB flash drive and reboot your computer.
Step 3. Connect your USB drive to your PC and enter the BIOS interface.
Step 4. In the BIOS interface, select the “Update BIOS From Drive” option. Then select the BIOS update file downloaded from the USB stick.
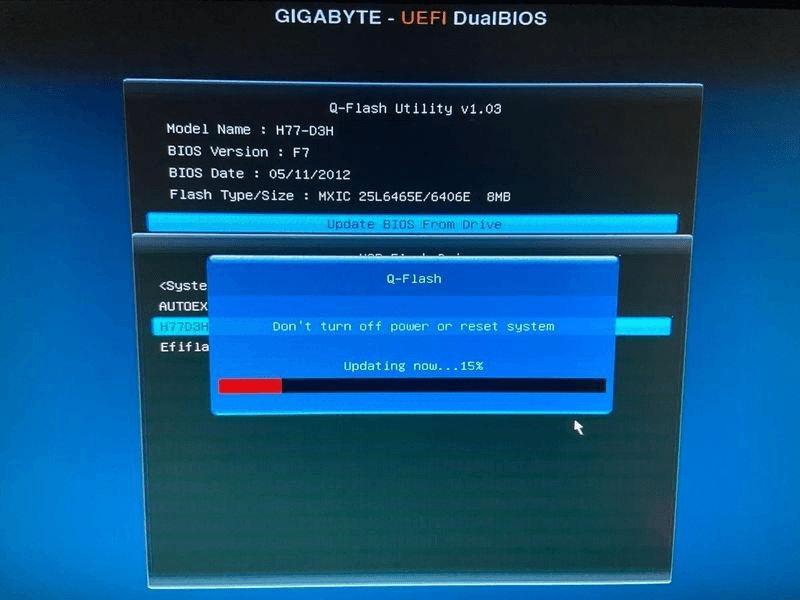
Please confirm this operation and wait for the update process to complete.
Part 2. How to recover data from SSD drives without backups?
After detecting your Solid-State Disk in BIOS, you can recover deleted files from SSDs if needed. And there’re two necessary phases for you to perform SSD data recovery.
Phase 1. Disable TRIM before SSD data recovery
Please disable TRIM before SSD data recovery because TRIM plays an important role in SSD’s data erasing and data writing. To be more precise, TRIM helps SSD to execute Garbage Collection operations to erase invalid blocks and write new data in free space.

In computing, once newly added files overwrite the free space that stores the documents you previously deleted, it can reduce the chances of SSD data recovery. In other words, activated TRIM can cause more issues after data loss. Let’s check and disable Trim now!
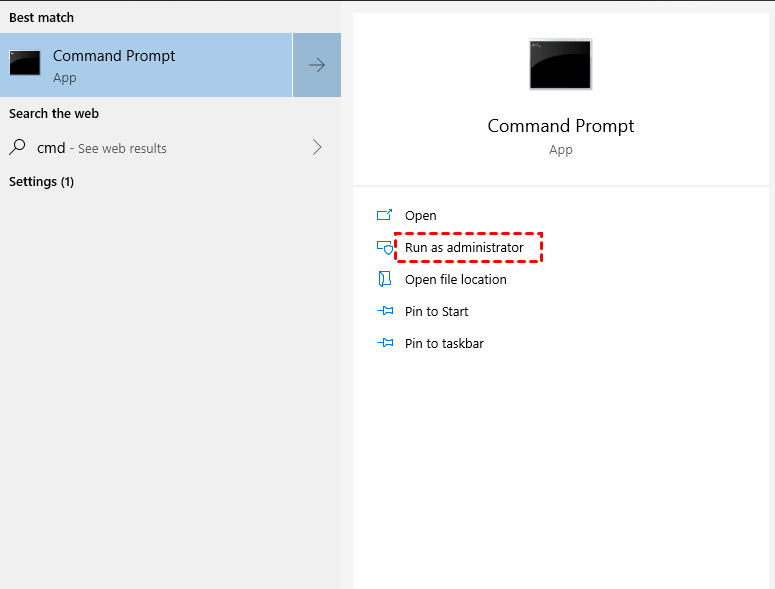
Step 1. Type “cmd” in the search bar and choose “Run as administrator” to open the command prompt window.
Step 2. Type “fustil behavior query disabledeletenotify” in the command prompt windows and press “OK” or hit “Enter” to go on.
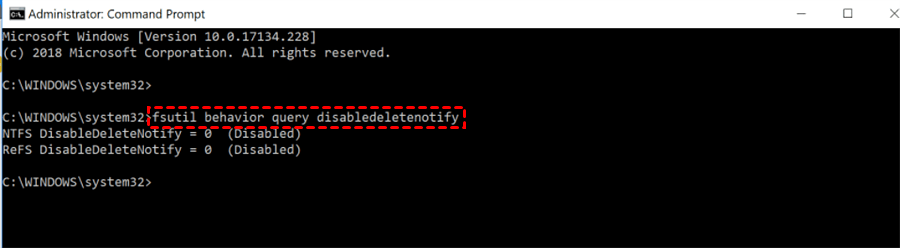
Step 3. Wait to see the return data. If the return data is 1, which implies Trim is activated. If the return data is 0, which implies Trim is disabled.
Step 4. To disable it, please type “fustil behavior disabledeletenotify 0” in the window.
Phase 2. Recover data from SSDs via data recovery software
When it comes to recovering deleted files from SSDs, seeking help from one of the best Windows data recovery software like AOMEI FastRecovery could be your second-to-none choice. Especially for users without disk backups.
- Please avoid newly written executions after data loss for a higher data recovery rate.
- After recovery, please remember to save these retrieved files in a new saved path.
- To recover large-scale deleted & missing files from your SSD drive, please consider upgrading AOMEI FastRecovery to the Professional or Technician edition.
Highlights of AOMEI FastRecovery:
- Powerful features: Recover deleted & lost Word, Excel, PPT, folders, compressed files, photos, songs, videos, audio, websites, and other 200+ file types from SSD, HDD, USB, etc.
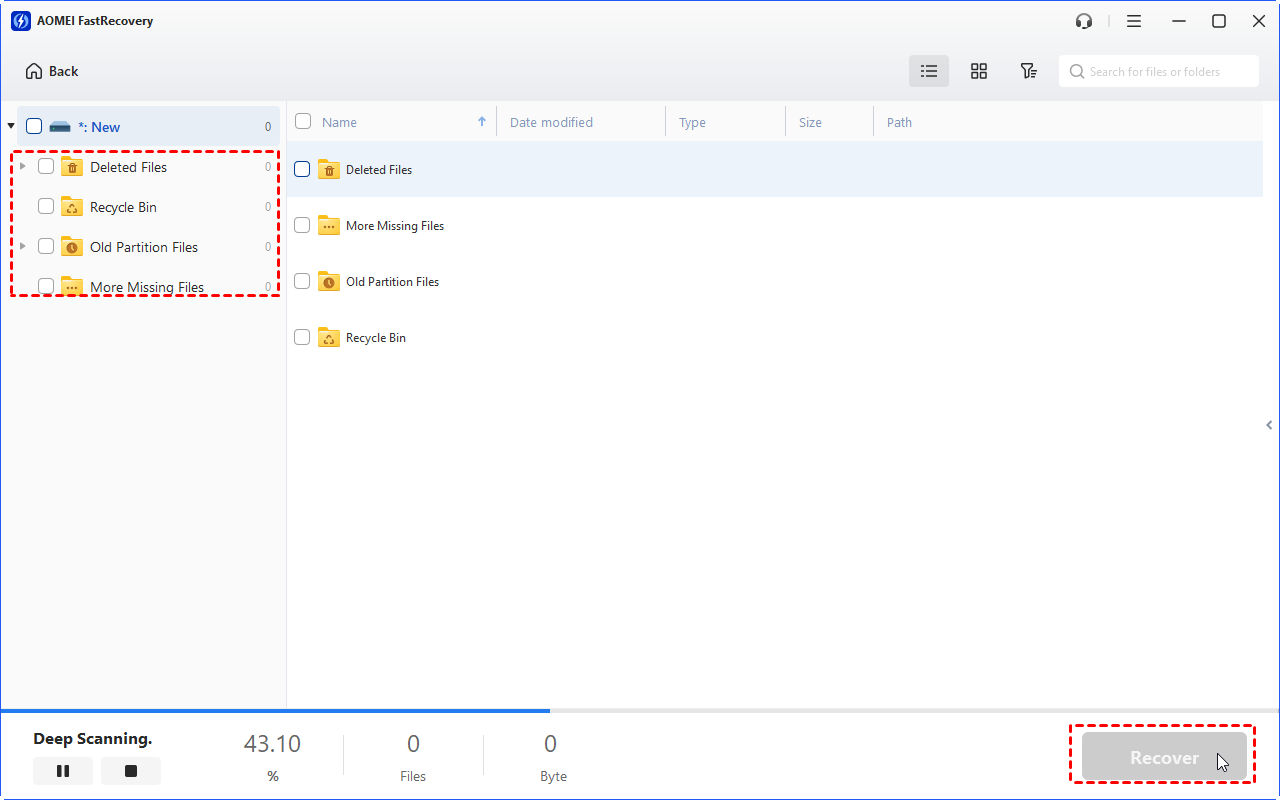
- Easy-to-find: Quick Scan and Deep Scan can find your deleted & missing files as many as possible. You can also quickly locate your desired files by Filename, Path, Date, Size, etc.
- Convenient: Get deleted files’ original Paths, Filenames, and Format after recovery.
- Excellent compatibility: Support NTFS, FAT32, exFAT, and ReFS file systems.
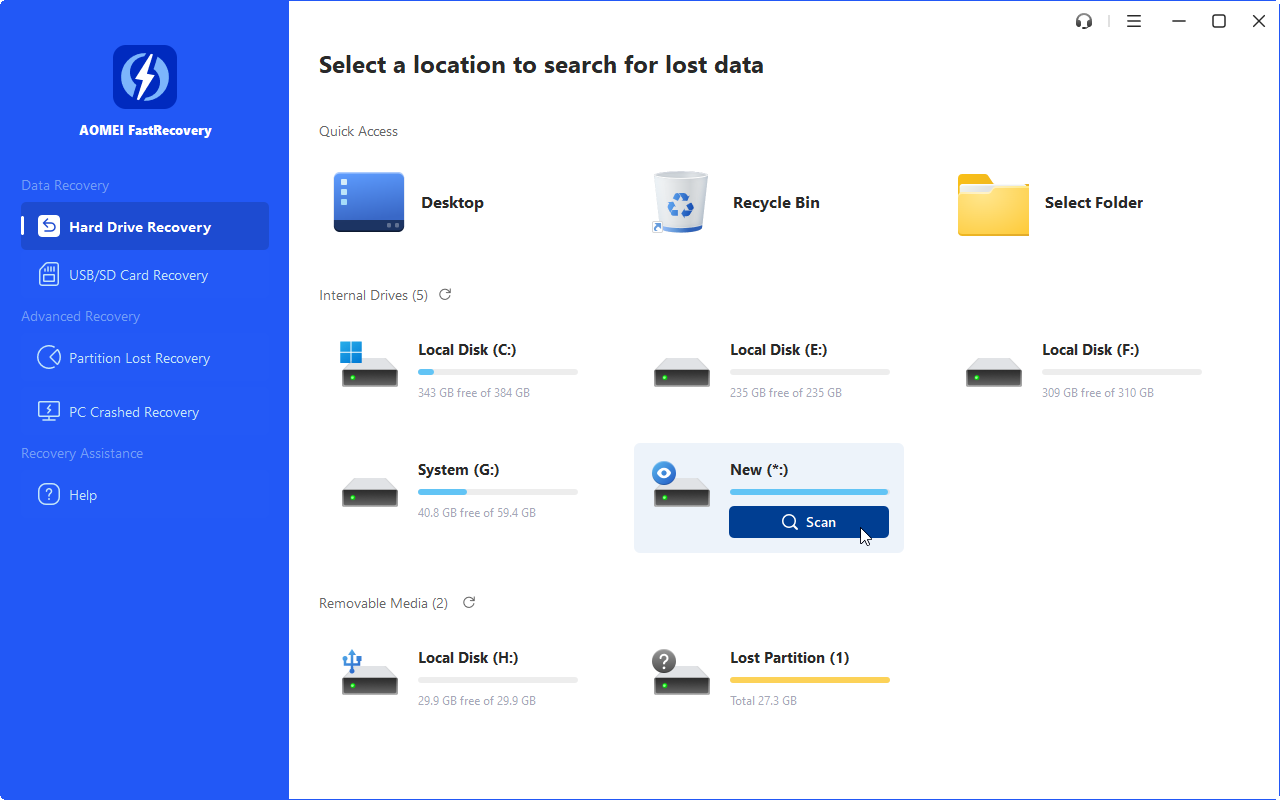
Step 1. After launching AOMEI FastRecovery, hover the mouse over your SSD drive and click Scan.
Step 2. Filter your needed data according to Name, Date, Document Type, or Path.
- Name: Type the filenames of your desired files to narrow the search area.
- Date modified: Set the date (today, yesterday, last 7/30 days, and so on) according to your situation.
- Size: Filter the file size (<128KB, 128KB~1MB, 1MB~ 512MB, etc) based on your needs.
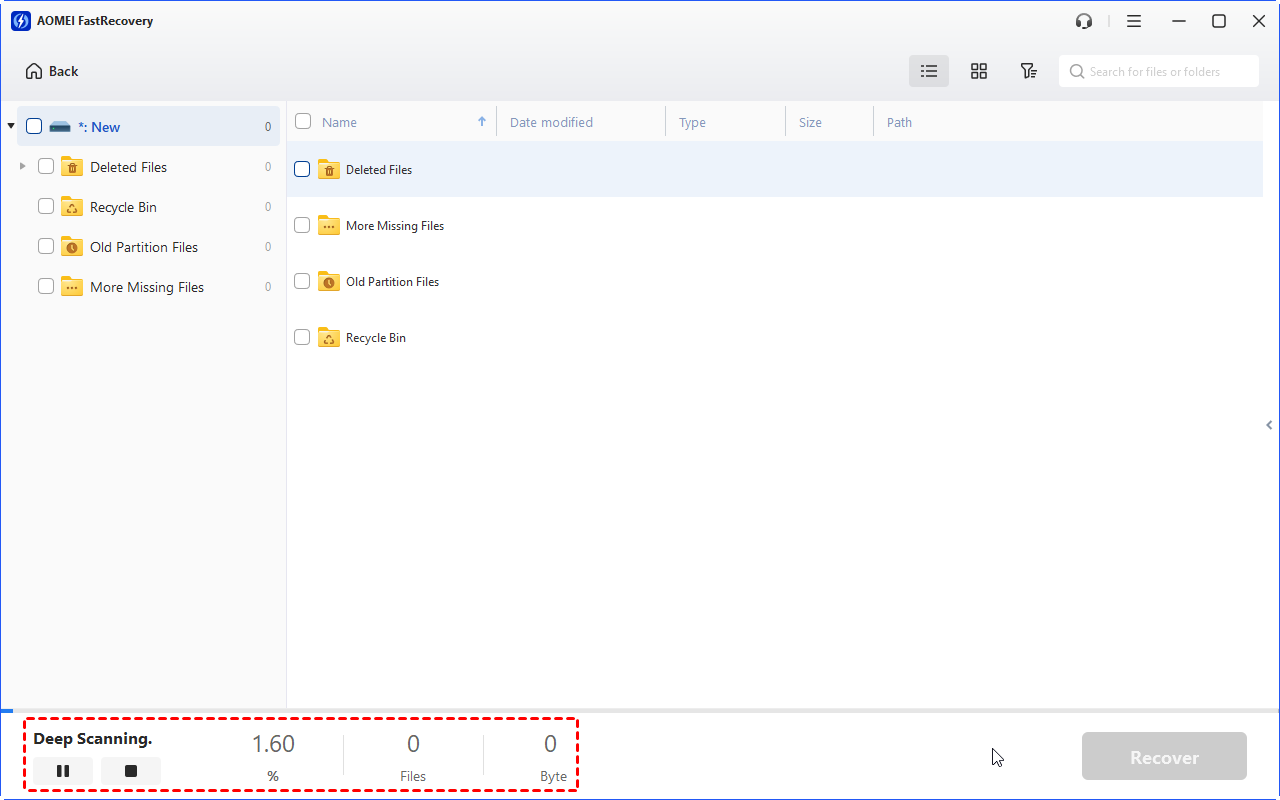
Step 3. Go to the Deleted Files/Recycle Bin/Other Missing Files folder and select the data you want. Then click “Recover x files” to begin the SSD data recovery process.
Related Q&A about data & partition recovery
Please get the corresponding ways to recover data from SSD not detected in BIOS from the above part. Apart from that, there’re some related tips about HDDs and SSDs.