Recover Deleted Word Document not in Recycle Bin[2022 Guide]
Here in this post, we list 5 ways how to recover deleted Word document not in Recycle Bin. If you need it, keep reading and take into practice.
By Ellie / Updated on October 24, 2024
Why is my deleted Word document not in the Recycle Bin?
When we deleted something accidentally, the first thought that comes to our mind is looking for it from Recycle Bin. However, what if your deleted document is not in the Recycle Bin? What are the possible reasons causing the data loss and how can you achieve the goal?

Usually, the reasons why you deleted Word document not in the Recycle Bin can be listed as follows:
- The Word document is deleted with the shortcut Shift + Delete. If you use the Shift + Delete shortcut to delete your document, then your files will be permanently deleted and you can’t find them from Recycle Bin.
- Recycle Bin icon is hidden. And there’s another possibility that the Recycle Bin is hidden. Therefore, you can’t find the Recycle Bin, let alone a Word document in it.
- Recycle Bin is emptied before. If you have a habit to delete Word document regularly to free up more storage on Windows, then the deleted Word document won’t be in the Recycle Bin.
5 ways to recover deleted Word document not in Recycle Bin
After having a thorough understanding of the reasons, now let’s learn how to recover deleted Word document not in the Recycle Bin.
Way 1. Make your Recycle Bin visible
As we said, if your Recycle Bin icon is hidden in some way, then you can’t find your deleted Word document. For this reason, we can change some settings to make your Recycle Bin visible.
Step 1. On your PC, press Win + I to open Settings.
Step 2. Click on Personalisation > Themes > Desktop Icon settings.
Step 3. Toggled on the Recycle Bin checkbox and click on Apply.
Note: On Windows 7, right-click on the desktop and choose Personalisation. Select Change desktop icons to change desktop settings.
Way 2. Search for AutoRecover Files
If you have ever enabled AutoSave, then your Word document would be saved automatically in Microsoft 365. You can follow the steps below to have a check and recover it.
Step 1. Open a new Word document and click File.
Step 2. Click Options and then select Save. You will find the AutoRecover file location.
Step 3. Copy this file path and open it in File Explorer to check the files.
Step 4. Open Microsoft Word > Click File tab > Choose Open > Select Recover Unsaved Documents > Paste the copied .asd file in the File name search box.
Step 5. After that, your Word document will be back.
Way 3. Windows Backup
Windows Backup is a backup tool that could automatically back up your files on your C Drive. Therefore, if your Word document is in the C Drive before the deletion, this way would suit you very well.
Note: Getting tired of the limitation of Windows Backup? Don’t worry, have a look at AOMEI Backupper, a backup tool that can give you a huge relief.
Step 1. Open Control Panel > System and Security (Windows 7).
Step 2. After the window pops up, click Restore my file.
Step 3. Please select Browse for folders and choose the permanent folder you want to retrieve.
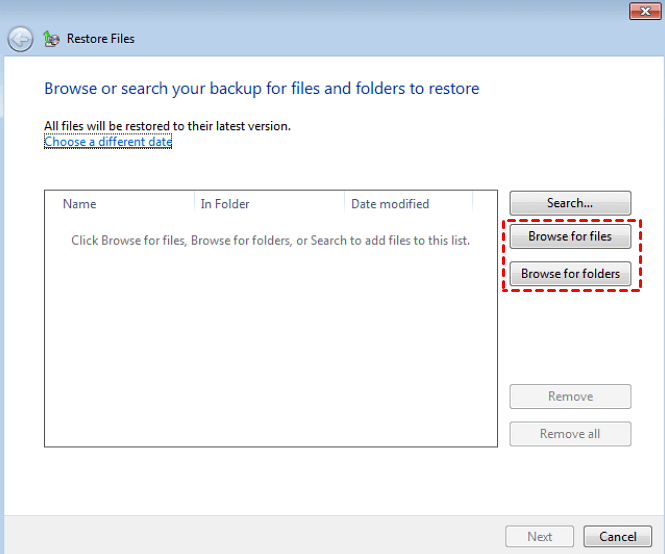
Step 4. After that, you can save your recovered Word document in your original location or in your destination place as your preference.
Way 4. Windows File History
File History is a useful feature that could help you restore your Word document, folders, videos and so on if you have ever enabled Windows Backup or Restore Point.
Step 1. In the Windows search bar, input Control Panel, and open it.
Step 2. Click System and Security.
Step 3. Select File History.
Step 4. Click Restore personal files.
Step 5. Select the files you need to recover and then click the Restore button.
If you have ever enabled File History or Restore Point, you can also follow the steps below to quickly restore the Word document.
Step 1. On the desktop, click on My Computer and then locate the folder that stores the deleted folder before. Right-click and then choose Restore previous versions.
Step 2. There will be a Properties window that pops up. And then you’ll find the deleted Word document. Click on Restore and then the issue “deleted word doc not in recycle bin” will be solved.
Way 5. AOMEI FastRecovery
What can we do to recover deleted Word document not in Recycle Bin? Apart from the ways above, you could also resort to a third-party software--- AOMEI FastRecovery, professional software that is devoted to restoring the lost data. No matter the permanently deleted files or the files just recently deleted, AOMEI FastRecovery allows you to get them instantly within a few clicks.
In addition, AOMEI FastRecovery can easily restore any type of lost data, such as deleted videos, photos, and PPTX files. It is also backward compatible with Windows 11, 10, 8, 7, and Server, allowing you to avoid upgrading to the most recent version.
Get them and let’s have a try.
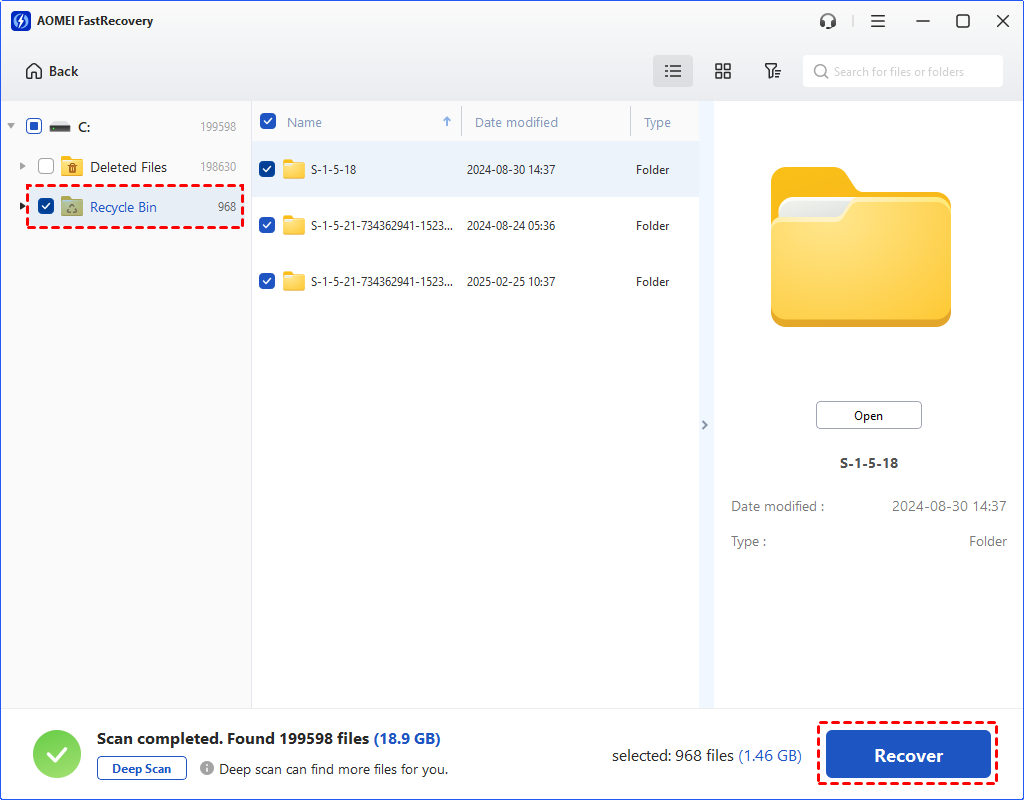
Step 1. Install and run AOMEI FastRecovery on the computer. Then hover the mouse over the partition/disk that includes your deleted Word files, and click Scan.
Step 2. Quick Scan and Deep Scan can search all the deleted Word files and other lost files on your selected partition/disk.
Step 3. Click Recycle Bin in the left panel, select the deleted Word files you want, and then click "Recover x files". And save your recovered Word files in a new position.
Conclusion
This post goes over 5 methods to recover deleted Word documents not in Recycle Bin, such as making the Recycle Bin visible, searching for AutoRecover files, using Windows Backup, File History, and so on. However, AOMEI FastRecovery is highly recommended in terms of efficiency and effectiveness.