[FREE] How to Recover Overwritten Files on External Hard Drive
Refer to this page to learn how to recover overwritten files on external hard drive, and prevent it from happening ever again.
By Dervish / Updated on March 13, 2025
Can I recover overwritten files?
Can you recover an overwritten file? Yes—you can, but overwritten files will not go to the Recycle Bin, so we can't recover the deleted file from the Recycle Bin.
However, you can recover a previous version of an overwritten file using the File History feature in Windows, or the Time Machine tool in macOS, if they've already been enabled on your device. In addition, you can also recover overwritten files with a data recovery program if you don't have a backup.
How to recover overwritten files on external hard drive
How to recover overwritten files on external hard drive? We have concluded 2 useful ways for you: Previous Version and data recovery software. You can choose one according to the situation you met.
▶ Method 1. Recover overwritten files on external hard drive with Previous Version
Previous Version is a useful feature in Windows, which is copy or backup of files or folders. If you regret your edits or deletions, you can use such a feature to restore the previous file version.
However, there are certain conditions for using this Windows built-in tool:
- Your files have been saved before.
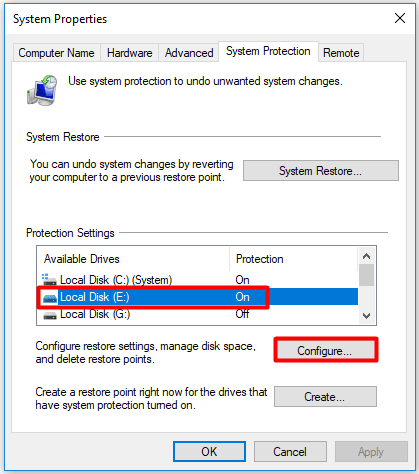
- The System Protection of your external hard drive needs to be On.
- Windows File History on your PC has been activated.
- Windows backups like Backup and Restore are available.
If the situation of your computer meets the conditions above, then you can follow the steps below to recover the overwritten files with Previous Version:
1. Navigate to the location that saved your overwritten files before. Right-click on the file to choose Properties.
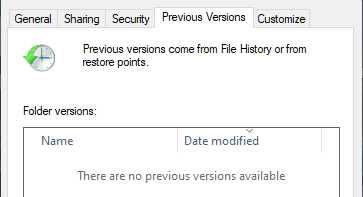
2. Select the Previous Versions tab. You can choose the version you want to restore.
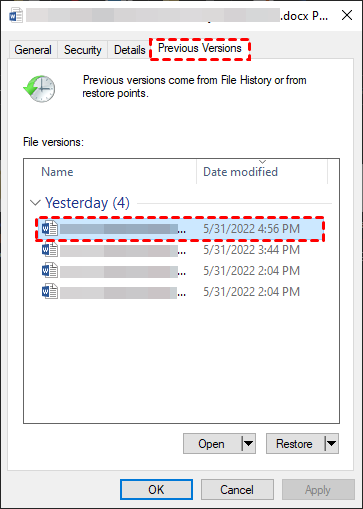
3. Choose the triangle icon to select Open/Open in File History. Then you can check the version of the file.

4. After confirming the version of your files, click on the triangle icon next to Restore. You can choose to restore to the original location or other locations.

▶ Method 2. Use Time Machine to recover overwritten files
File recovery on Mac devices is much simpler than their Previous Versions. Providing the Time Machine feature has been enabled, recovering overwritten files is simple:
-
Connect the Backup Drive
Ensure your Time Machine backup disk is connected to your Mac. -
Open the Folder Containing the File
Navigate to the folder where the overwritten file was originally stored. -
Launch Time Machine
Click the Time Machine icon in the menu bar and select Enter Time Machine.
(If you don’t see the icon, open System Settings > Time Machine and check "Show Time Machine in the menu bar.") -
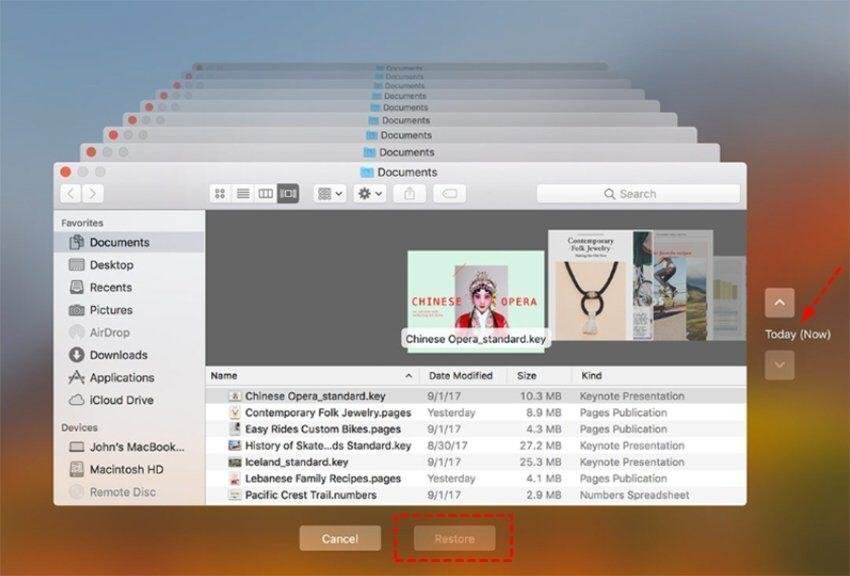
Browse Previous Versions
Use the timeline on the right side of the screen or the arrows to go back to a time before the file was overwritten. -
Select the File
Locate the previous version of the file you want to restore. -
Restore the File
Click Restore, and Time Machine will recover the file to its original location. If a file with the same name exists, you can choose to keep both, replace, or cancel the restoration.
Once restored, you can access the older version of your file as needed.
▶ Method 3. Recover overwritten files via a data recovery tool
However, it is possible for you to see this page: There are no previous versions available. This is because you did not turn on the System Protection or you did not use File History and Windows backups.
Unfortunately, you may not be able to recover the overwritten files in this case. But there is another easy way to solve how to recover overwritten files from hard disk problems - a professional data recovery tool like AOMEI FastRecovery.
AOMEI FastRecovery can help you recover overwritten files, permanently deleted files, formatted partitions, etc. from different situations.
This tool has many advantages as well:
- High recovery success rate and high recovery speed.
- Support 200+ types of files like Word, PPT, Excel, PDF photos, videos, audios, etc.
- Compatible perfectly with all Windows operating systems including Windows 11/10/8/7 and Windows Server.
- Clear graphic user interface and easy operating steps.
If you want to recover overwritten files without backups, you can download this easy data rescue tool, and here are the 3-step guidelines to use it:
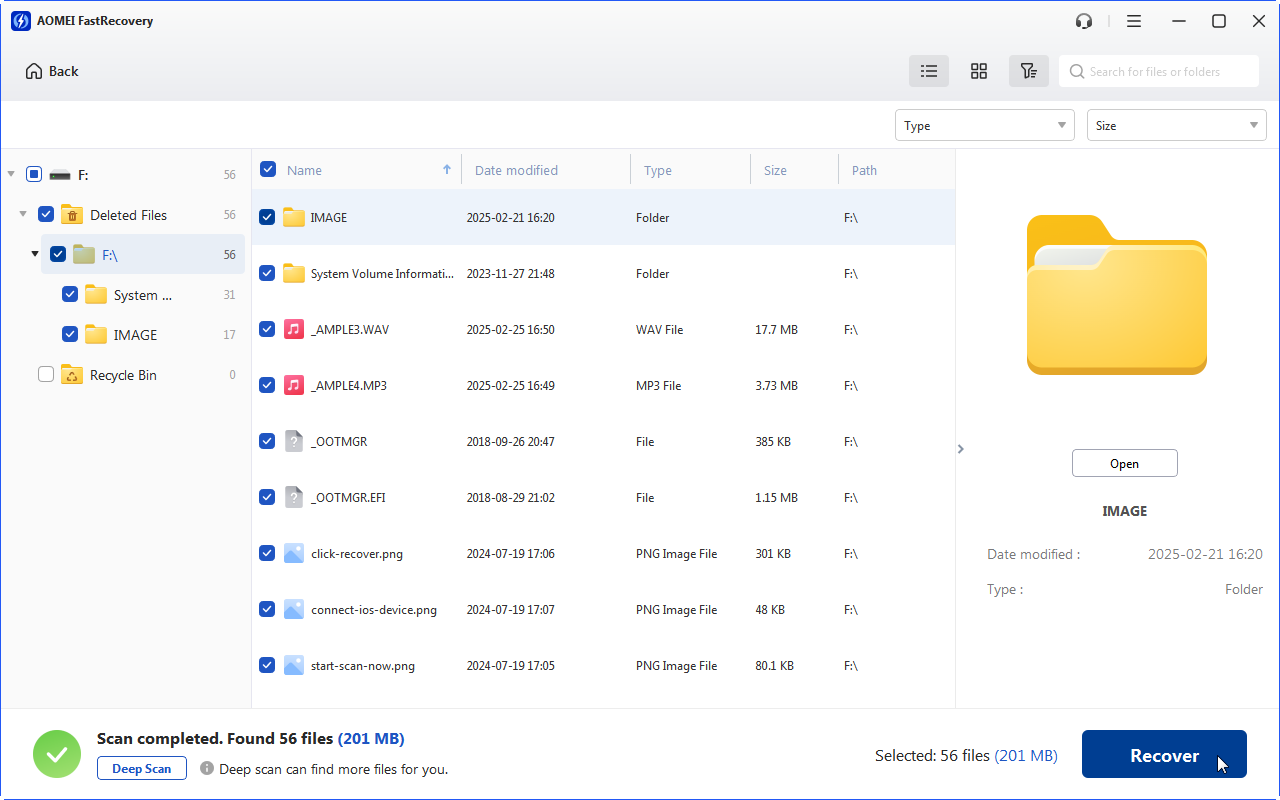
1. First, connect your external hard drive to your computer. Find the external drive under Removable Media, and click Scan.

2. Then, it will scan the external drive with Quick Scan. You can use the Filter and Search to narrow the scanned scope to quickly find the files.

3. Finally, select the target files and click Recover to recover these files to the new location.
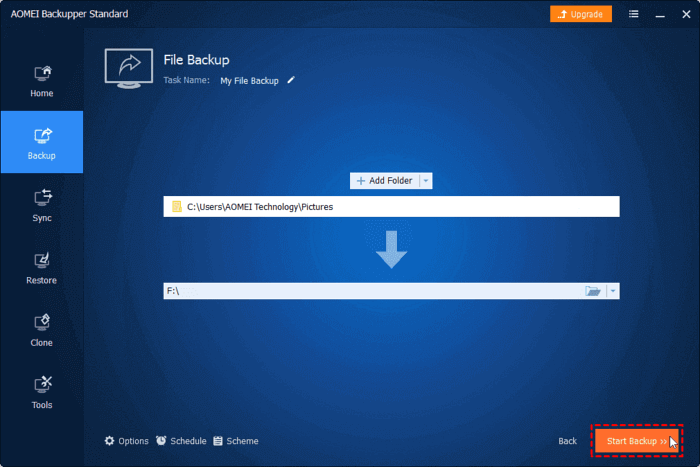
Bonus tip: Protect your files better
A professional backup tool can protect your files from accidental deletion. Here we recommend an easy backup tool called AOMEI Backupper, which provides full backup features like scheduled backup, incremental and differential backup, etc. You can refer to the easy steps to make backups of your files:
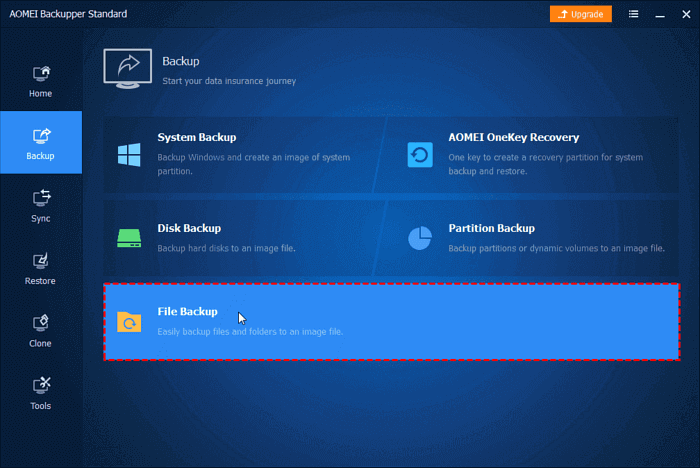
1. Download AOMEI Backupper on your PC. Then choose the File Backup option.
2. Next, select Add Folder or Add File to choose your files to back up.
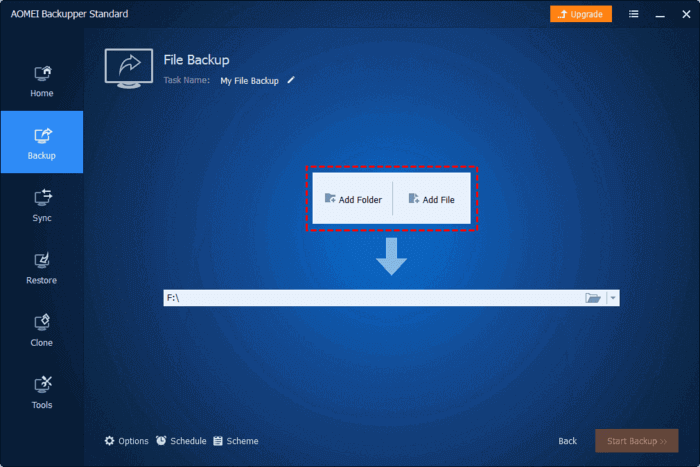
3. Choose a location as the backup destination. Then click on Start Backup to back up your files easily.
Written in the end
Both the Previous Version tool and the easy data rescue tool AOMEI FastRecovery can help you to recover overwritten files on external hard drive. If you have not made backups of your files before, just go to try AOMEI FastRecovery to recover data without backup. Your files will get back with a few clicks.