Troubleshoot | The Disk Check Could Not be Performed
The disk check could be not performed because Windows cannot access the disk! This article helps you fix this issue and recover deleted files from hard drives with the corresponding ways.
By Penny / Updated on October 30, 2024
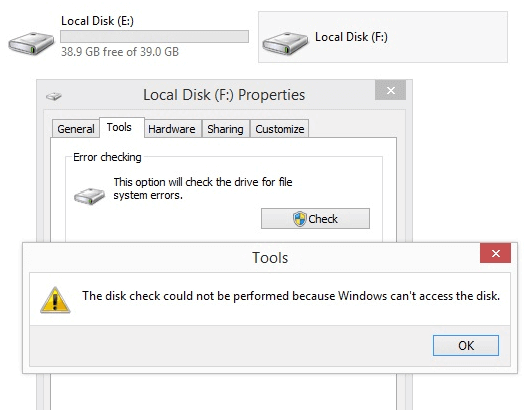
Windows disk check tool is useful to detect and fix errors on your internal/external hard drives. But have you ever received error messages like the following user during a disk check operation?
If I click Properties on my external hard disk, it has zero bytes of free and used space. And if I click the check now under the Tools tab, it says The disk check could not be performed because Windows cannot access the disk. Is there anyone to fix it? How can I operate my external hard drive again? Thanks.
- A user from Microsoft Community
So why Windows cannot access the disk? One of the most common reasons is the loose or improper physical connection to the hard drive. Besides, a corrupted or damaged file system is also blamed for this issue.
Please read further to find feasible fixes to solve the disk check could not be performed.
How do you fix the disk check could not be performed?
According to the possible reasons, this part lists the corresponding solutions for you.
Fix 1. Check the connection
Why Windows cannot access the disk? As mentioned above, the first possible reason is the poor connection between your PC and drive, especially for external HDDs. Because a loose connection can discourage your Windows OS from recognizing your hard drives.
Please check and correct the drive connection via the following tips.
◢ Please ensure all cables are properly connected between your PC and hard drive.
◢ For external HDDs, please use the original USB cable to connect your external HDD.
◢ Please change to another USB port to connect your hard drive.
◢ For internal hard drives, you can take it out of your PC and connect it to another working PC via an external hard drive closure.
Fix 2. Change drive letter and paths via Disk Management
Every hard drive plugged into your Windows computer will be assigned a specific drive letter of the alphabet because drive letter assignment is a process of assigning alphabetical IDs to volumes.
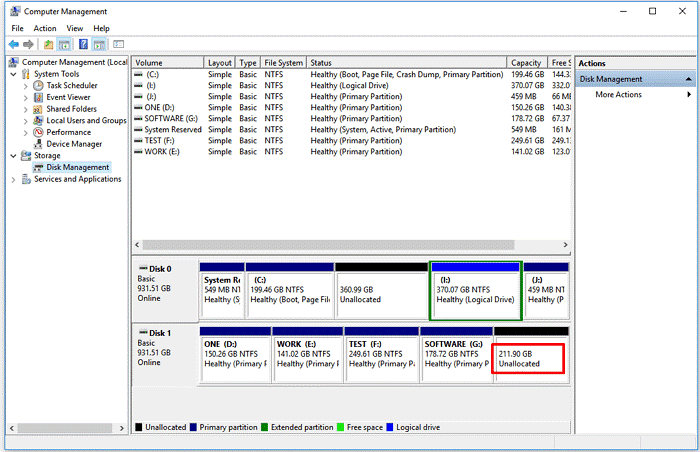
Without a drive letter, you’re likely to receive this error message: the disk check could not be performed because Windows cannot access the disk. In this case, you can assign a new drive letter to this drive via Disk Management because this Windows system tool is designed to execute varied advanced storage tasks easily.
- Notes:✎...
- Disk Management also can help you recover hidden partitions in Windows 7, 8, 10, or 11 computers.
- If you’re familiar with CMD, you can also run Diskpart to change drive letters.
- For an external hard drive, please connect it to your Windows first.
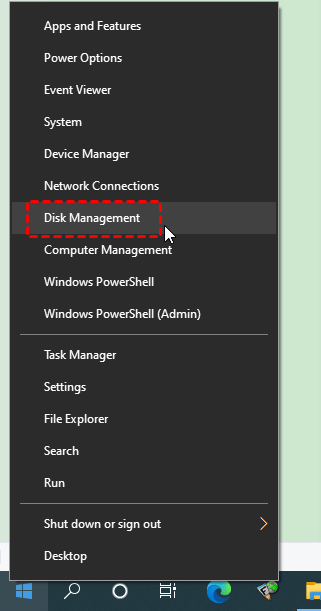
Step 1. Press “Win + X” and select “Disk Management” to enter its main interface.
Step 2. Right-click on your located hard drive and select the “Change Drive Letter and Paths” option.
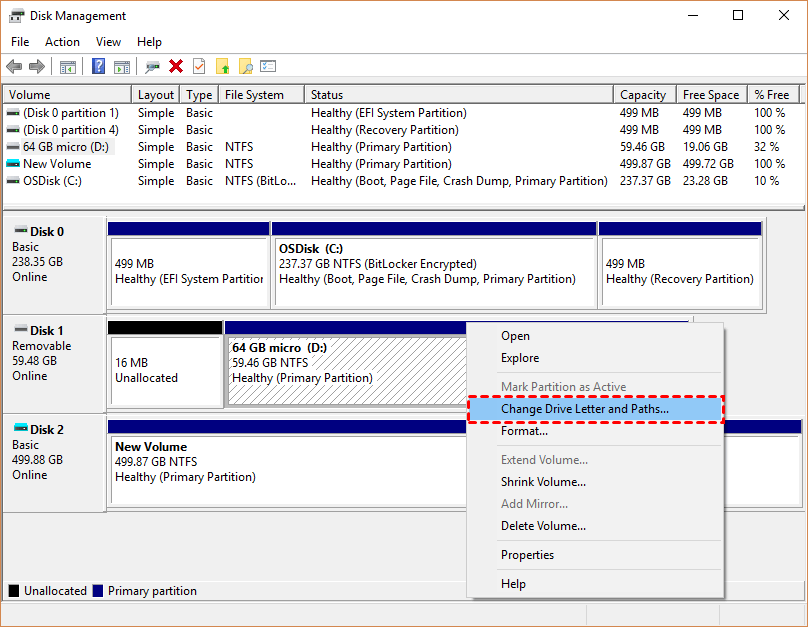
Step 3. Select “Add” to assign a new drive letter to your hard drive.
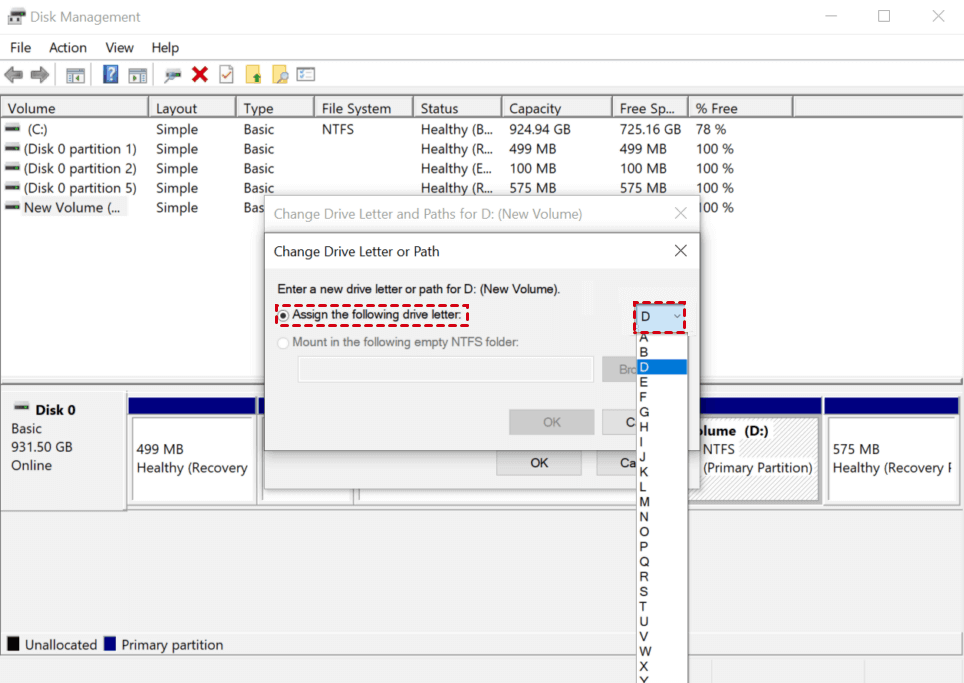
Step 4. Select the “Assign the following drive letter” option. Please ensure the newly selected drive letter needs to be different from all the existing drive letters.
Fix 3. Run CHKDSK to check and repair disk errors
If the above solutions are useless for you, this issue might be caused by corrupted file systems or bad sectors. When it comes to detecting and repairing disk errors, CHKDSK is right for those users who’re proficient in computers. Let’s show how it works.
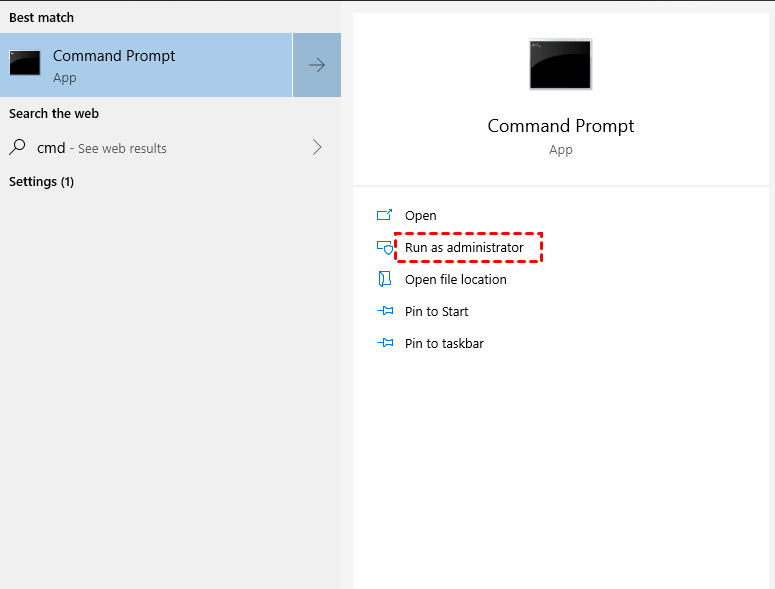
Step 1. Enter “cmd” in the search bar and click “Run as administrator” to open the command prompt window.
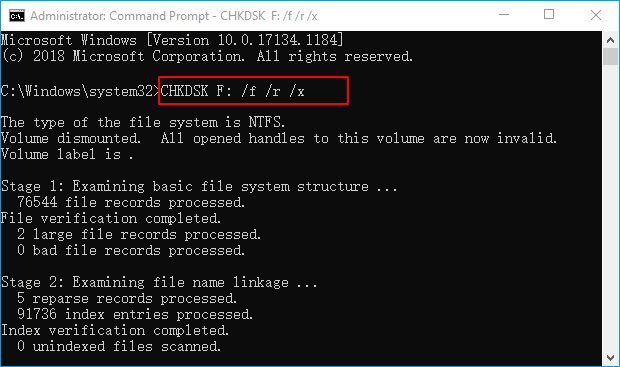
Step 2. Type “chkdsk F:/f /r /x” in the window. You can replace F with your external hard drive letter. Then wait to see this notice: Windows has made corrections to the file system.
Although the CHKDSK command is useful, it could prevent non-tech users from using it because of a lack of GUI. So why not try this free partition manager, AOMEI Partition Assistant Standard to check and fix errors on your partition?
Step 1. On the main interface of the tool, right-click on your selected partition. Then click Advanced > Check Partition.
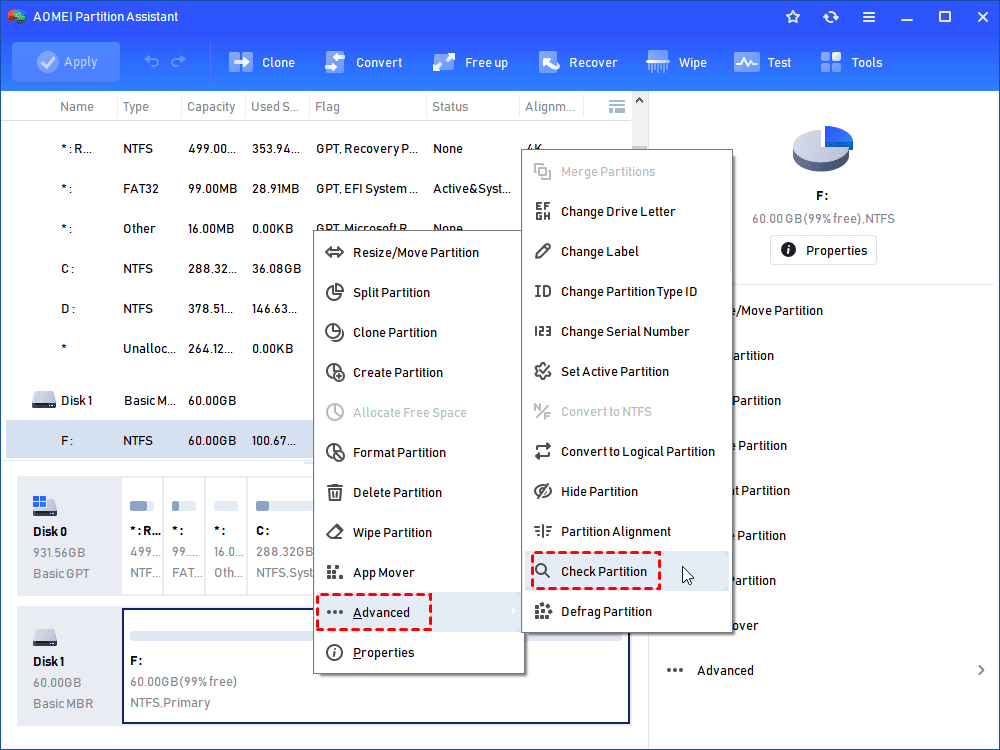
Step 2. Select the first option and click the “OK” button. If your hard drive is in RAW format, please tick the last option.

After the process, you can click “OK” to exit this window.
Bonus tips: How to recover deleted files from RAW hard drives
Does CHKDSK delete files? Sometimes, it does. If you suddenly interrupt or halt the CHKDSK reparation process instead of waiting patiently, you might be eager to salvage deleted files from your hard drives.
Since many users don’t think they’re so unlucky to lose data, it’s unsurprising that there are no backups for them to prevent data loss.
So how to recover deleted files from RAW hard drives without backups? In this case, you might have no choice but to seek help from leading data recovery tools like AOMEI FastRecovery.
Supported by AOMEI Tech, AOMEI FastRecovery is designed to recover deleted & lost files from internal and external hard drives easily. If your hard drives were damaged, you can use AOMEI FastRecovery to recover data from RAW hard drives easily as well.
- ★Key features of AOMEI FastRecovery:
- All-inclusive: Apply to a variety of data loss scenarios such as deletion, disk formatting, system crashes, or virus attacks.
- High-efficiency: Recover 200+ types of files such as MS Office and WPS files, folders, compressed files, photos, audio, songs, videos, and websites from HDD, USB, SD cards, etc.
- Advanced scanning method: AOMEI FastRecovery runs Quick Scan & Deep Scan automatically to search all the recoverable files. Specify the filename, saved path, date, or size to filter your needed files.
- Convenience: Retain the original filename, path, and format for the deleted files.
- Excellent compatibility: Support NTFS, FAT32, exFAT, and ReFS file systems.
Don’t hesitate to download AOMEI FastRecovery on your Windows 11, 10, 8, 7, or Server PC!
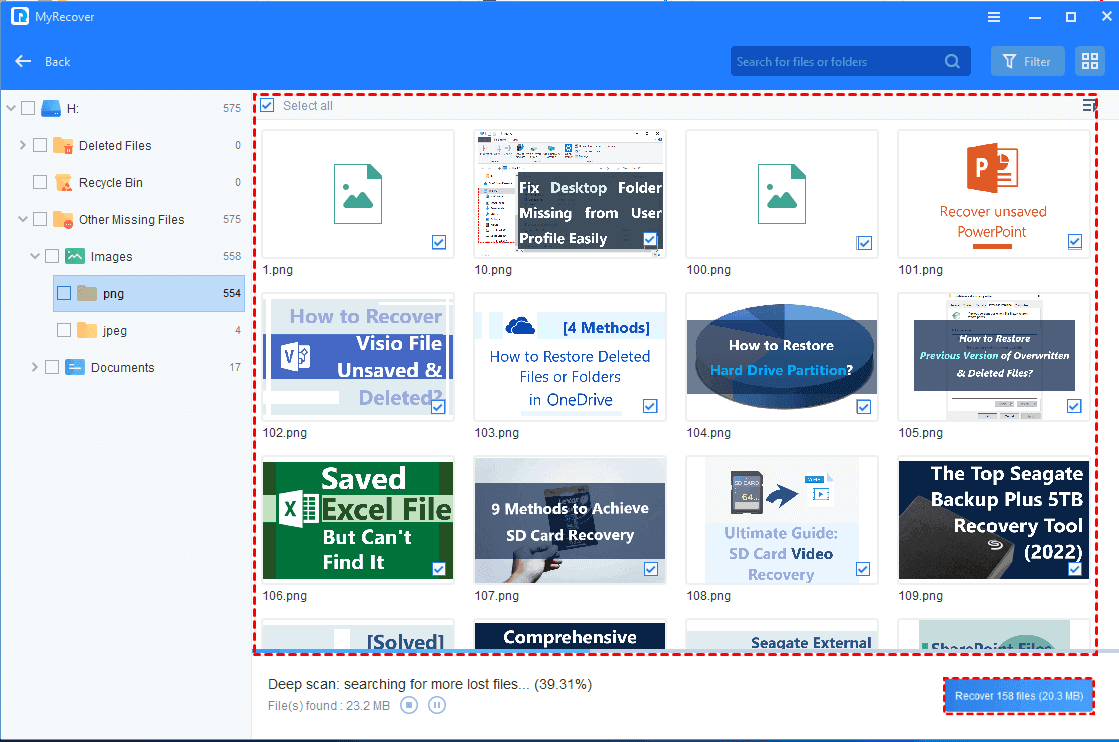
Step 1. After launching AOMEI FastRecovery, hover the mouse over your RAW hard drive and click Scan.

Step 2. Filter your needed data according to Name, Date, Document Type, or Path.
- Name: Type the filenames of your desired files to narrow the search area.
- Date modified: Set the date (today, yesterday, last 7/30 days, and so on) according to your situation.
- Size: Filter the file size (<128KB, 128KB~1MB, 1MB~ 512MB, etc) based on your needs.
Step 3. Go to the Deleted Files/Recycle Bin/Other Missing Files folder and select the files you want to retrieve. Then click “Recover x files” to begin the Windows data recovery process.
- After recovery, you’d better store these retrieved files in another partition instead of the original hard drive.
- Upgrading AOMEI FastRecovery to the Professional or Technician edition is a more cost-effective solution if you want to recover a large number of deleted & lost files from local drives.
Related suggestions
Please refer to the above fixes after receiving this error message: The disk check could not be performed because Windows cannot access the disk during a disk check process.
To recover deleted or lost files from local drives, please avoid writing new files to your hard drive because newly added data could overwrite the free space that originally saves your deleted data.
Besides, there’re some pertinent data loss suggestions for you.
- Please think twice before deletion.
- Don’t empty your Recycle Bin randomly.
- Cultivate a good habit of backing up files, folders, partitions, or systems via free backup software for Windows, AOMEI Backupper.

- Please don’t put all eggs in one basket to prevent data loss.