Fixed: The Last USB Device You Connected to This Computer Malfunctioned
Why my USB device not recognized? Don’t worry, this post provides you with 6 solutions to fix “The last USB device you connected to this computer malfunctioned” error. Read it carefully.
By Ellie / Updated on December 11, 2024
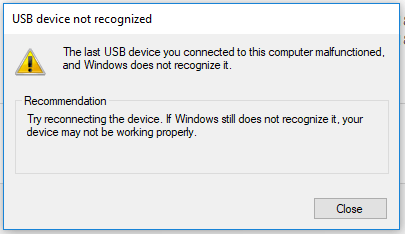
How do I fix “The last USB device you connected to this computer malfunctioned”?
“I am facing the following error with my USB drive when I connect it with my Windows 10 laptop. I also connect it to another system but the problem still remains. Please help me fix the problem. I need to recover some really important files from it.”
What causes “The last USB device you connected to this computer malfunctioned”?
There are many other possible software problems that may prevent the system from recognizing a USB device. Let's take a look at the most common 3 causes of “The last USB device you connected to this computer malfunctioned”:
Cause 1. Malfunctioning or wrong drivers
As you may already know, driver issues are the most common causes of many errors in Windows, and this hasn't changed with the latest version. If the system incorrectly identified your USB device, it will also install the incorrect driver, which will be ineffective.
It's also possible that the device you're attempting to install is too old and the OS simply doesn't recognize it.
Cause 2. The USB drive is not partitioned
You won't be able to see a USB external hard drive in Windows if it isn't partitioned and doesn't have a drive letter.
Cause 3. Malfunctioning USB ports
USB ports can malfunction just like any other component. Although it happens frequently, you can avoid it by choosing a different one.
How to fix “The last USB device you connected to this computer malfunctioned” on Windows 10, 11
If you have unfortunately encountered this problem, here we provide you with 6 effective solutions to fix “The last USB device you connected to this computer malfunctioned” on Windows 10, 11. Before continuing, do the following 3 quick checks.
- ✍Quick check 1. Reconnect the USB Drive.
- ✍Quick check 2. Clean the USB contact points.
- ✍Quick check 3. Use a different USB port.
If you have done the above 3 quick checks and the USB device still not recognized, use the solutions below.
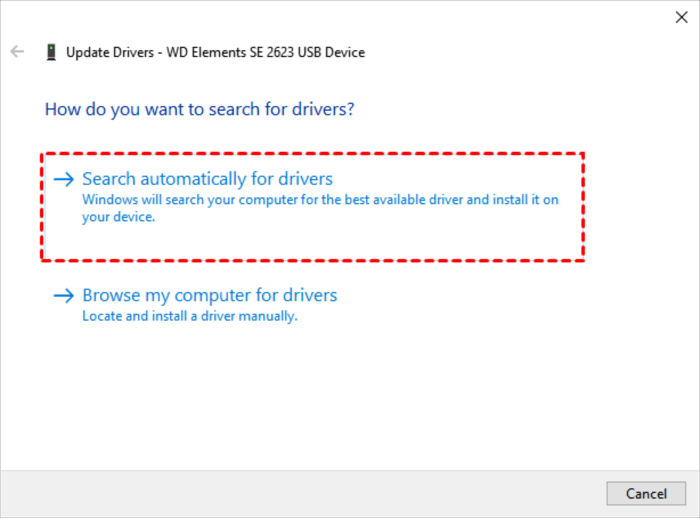
Solution 1. Update or reinstall the USB drivers
The "The last USB device you connected to this computer malfunctioned" error on Windows 10, 11, can be brought on by an old disk drive. As a result, you might attempt to resolve the problem by updating the USB drives.
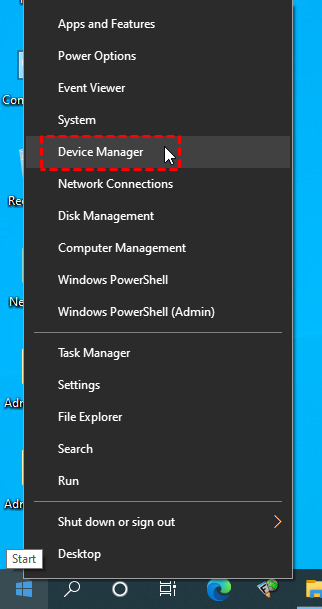
Step 1. Right-click on the Start menu > Choose Device Manager.
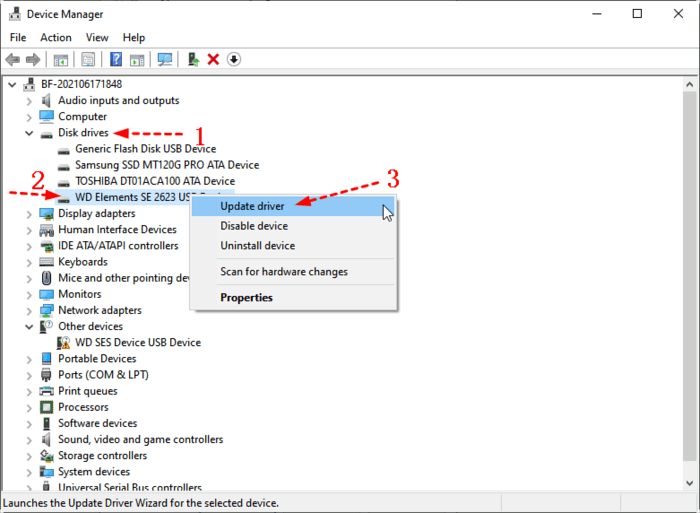
Step 2. Go to Disk Drives and right-click on the USB flash drive you plugged in > Choose Update Driver.
Step 3. Click Search automatically for drivers. Your computer will search the internet for the latest version of drivers and download/install them.
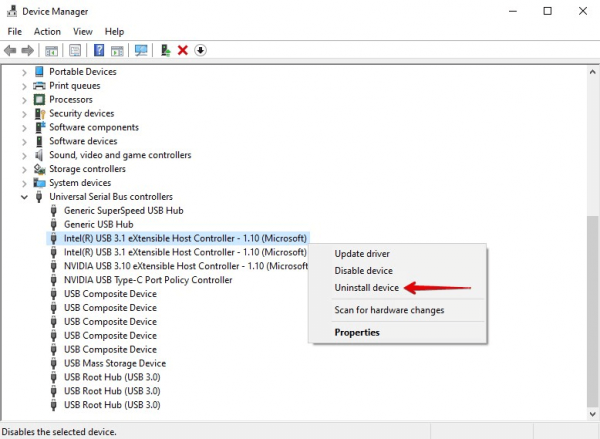
Solution 2. Reinstall the USB controllers
All of your USB-connected devices, including your keyboard, mouse, and USB flash drive, which is a necessary drive for your USB devices to function, are managed by the USB controllers. Reinstalling USB controllers enables your system and USB to communicate once more. To reinstall your USB controller, stick to the steps below.
Step 1. Open Device Manager > Expand Universal Serial Bus controllers.
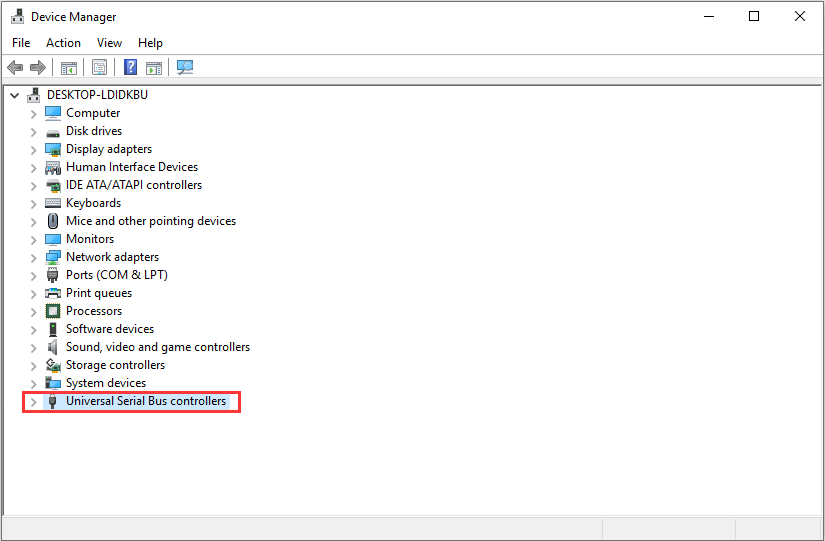
Step 2. Right-click your USB controller and click Uninstall device, click Uninstall again when asked.
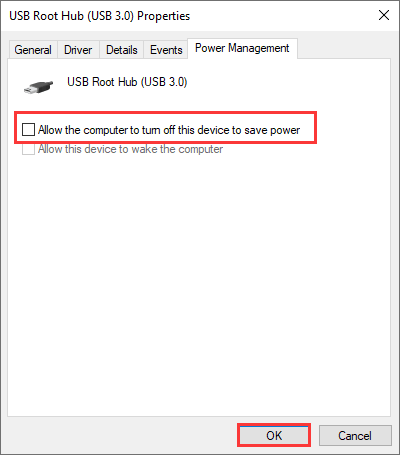
Solution 3. Change properties in USB Root Hub
This method is similar to the one above, but instead of uninstalling the drivers here, you will fix the USB Root Driver's properties.
Step 1. Open Device Manager, locate the Universal Serial Bus controllers section and expand it. Then find the USB Root Hub option. Right-click on it and then select the Properties.
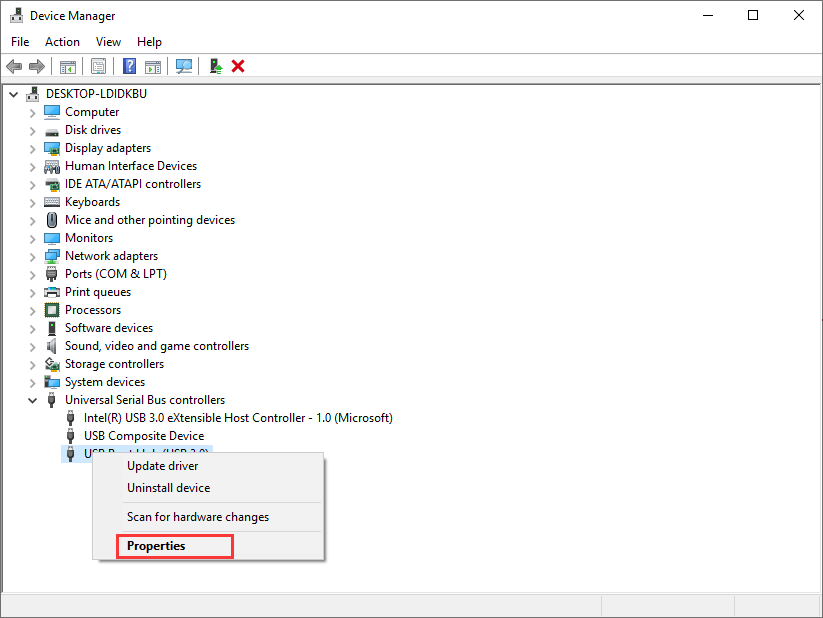
Step 2. Switch to the Power Management tab and then uncheck the option Allow the computer to turn off this device to save power. At last, click OK to confirm the change.
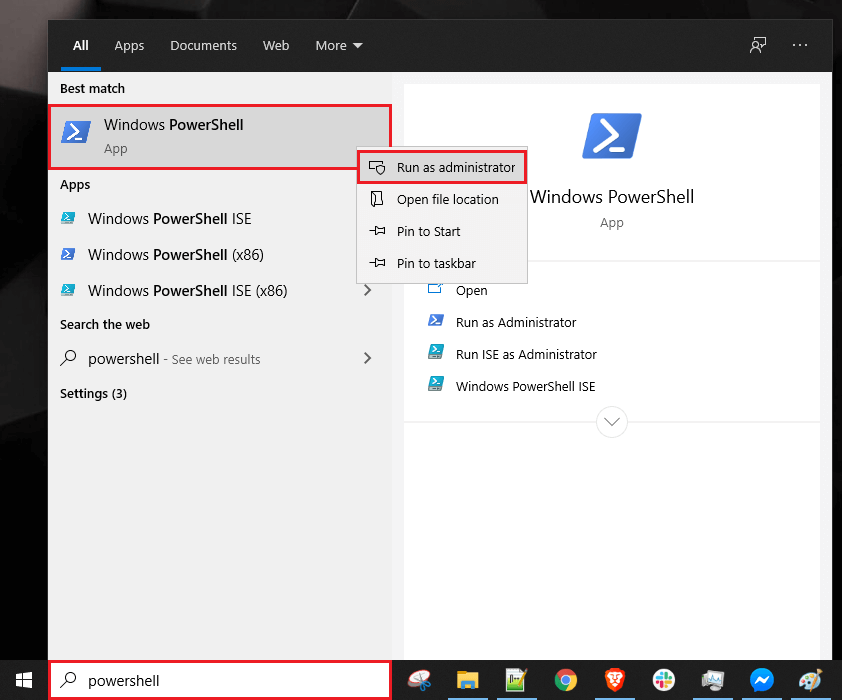
Solution 4. Run Hardware and Devices troubleshooter
Try this simple and effective solution. To try to solve the problem on a software level, we will use Windows troubleshooting capabilities. As follows:
Step 1. Right-click Start and select Windows PowerShell > Choose Run as Administrator > Click Yes if prompted.
Step 2. Type in msdt.exe -id DeviceDiagnostic and press Enter.
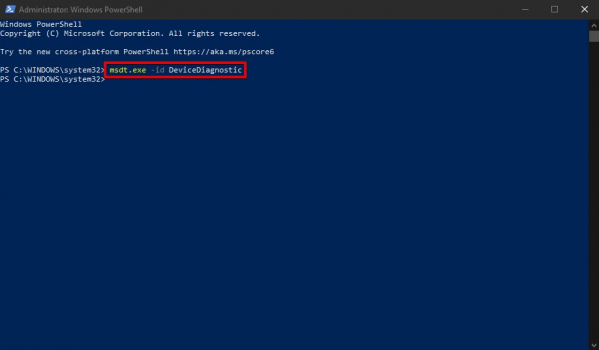
Step 3. Click Next and follow the on-screen instructions based on the problems that Windows discovers.
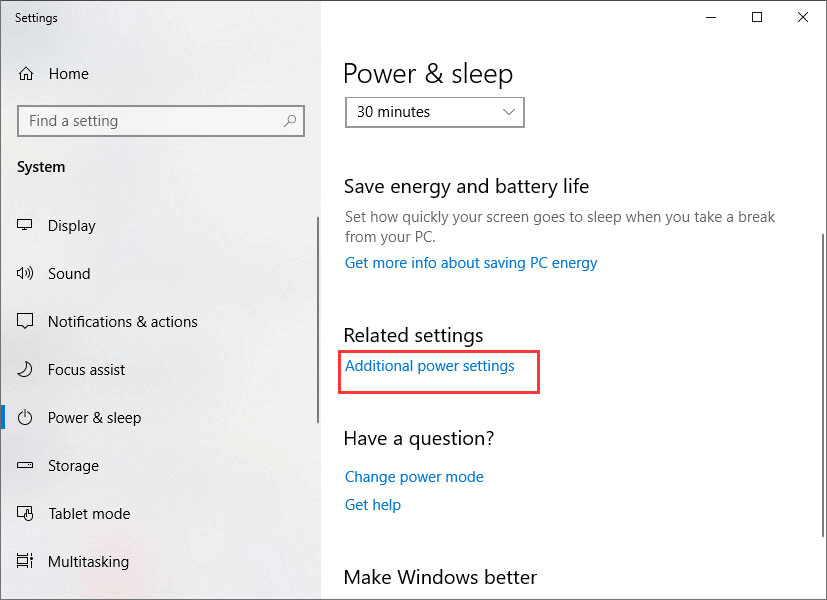
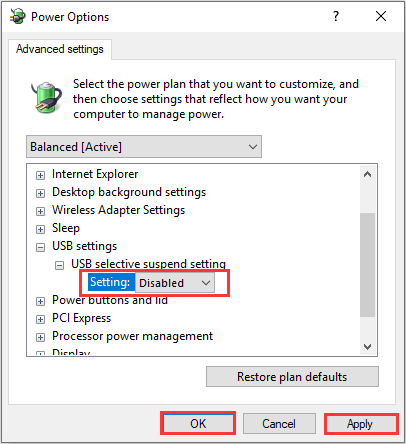
Solution 5. Change the USB selective suspend settings
The hub driver's automatic USB suspension is another potential cause of your USB's malfunction. In this situation, altering the USB selective suspend settings might be beneficial.
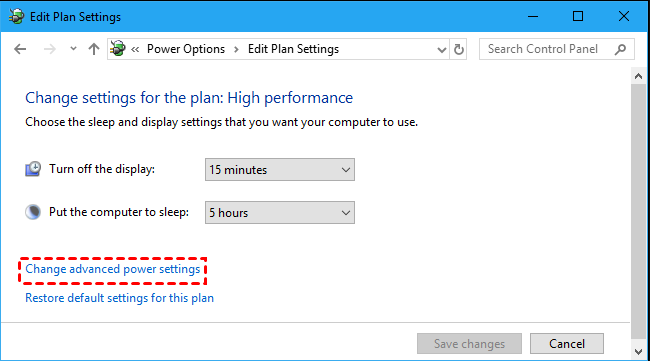
Step 1. Right-click on the Start menu > Choose Power Options > Click Additional Power Settings.
Step 2. In the Choose or customize a power plan window, click Change plan setting.

Step 3. On the Edit Plan Settings window, click Change advanced power settings.
Step 4. Find and expand the USB settings section. Expand USB selective suspend setting. And set it as Disabled. After that, click Apply and OK to save the change.
Solution 6. Assign a drive letter to the USB drive
If your USB external hard drive doesn't show in Windows, it is possible that it isn't partitioned and doesn't have a drive letter. You can assign a letter or change it to address this issue.
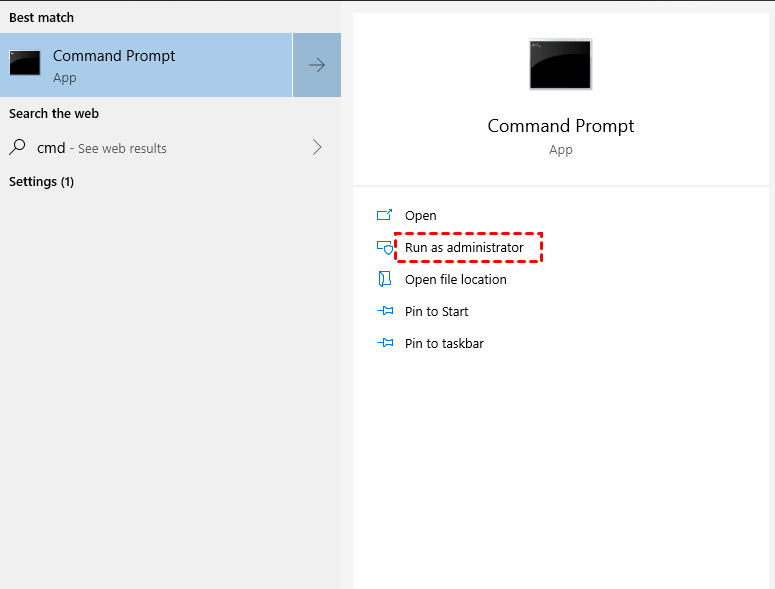
Step 1. Type in cmd. in the search bar beside the Start menu > Click Run as administrator.
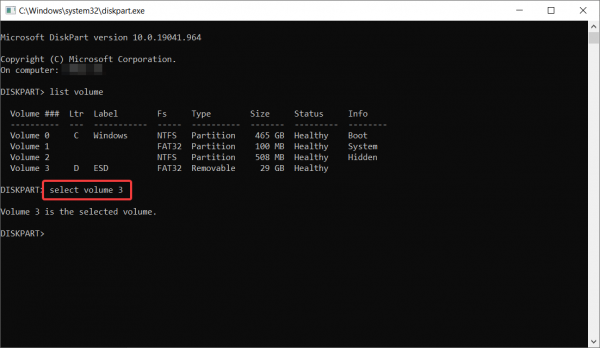
Step 2. Input the command DISKPART > list volume and press Enter. Then, you can see the list of all available volumes, not only physical drives.
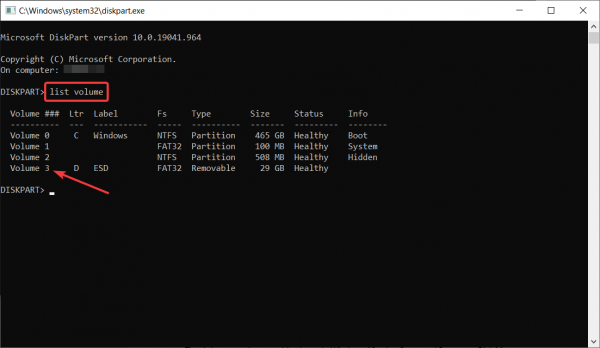
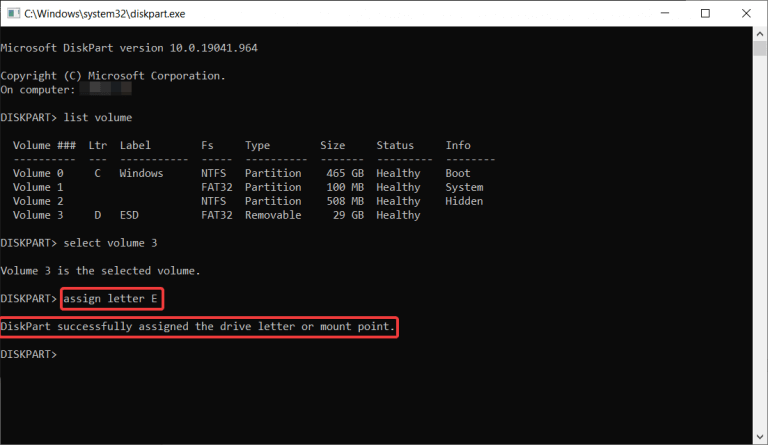
Step 3. Find the letter you want to change and note its number > Enter the Select volume X. Replace the X with the number.
Step 4. Enter the assign=X. replace the X with the letter you want to assign. Finally, close Command Prompt.
Bonus tip: How to recover files from a USB flash drive
To avoid data loss caused by impropriate operations, it is recommended to recover files from the USB flash drive to a safe place in advance. Here we would like to recommend a free yet professional data recovery tool AOMEI FastRecovery to you.
- ✍All-inclusive. It applies to several different data loss scenarios. Files can be recovered from formatted drives, corrupted partitions, after system crashes, virus attacks, etc.
- ✍Efficient. It can quickly recover files and has a high success rate.
- ✍Widely-compatible. Windows Server, Windows 11/10/8/7, FAT32, exFAT, and ReFS are all compatible with it.
- ✍Comprehensive. Any lost data, including texts, emails, compressed files, photos, videos, audio files, and more, can be recovered.
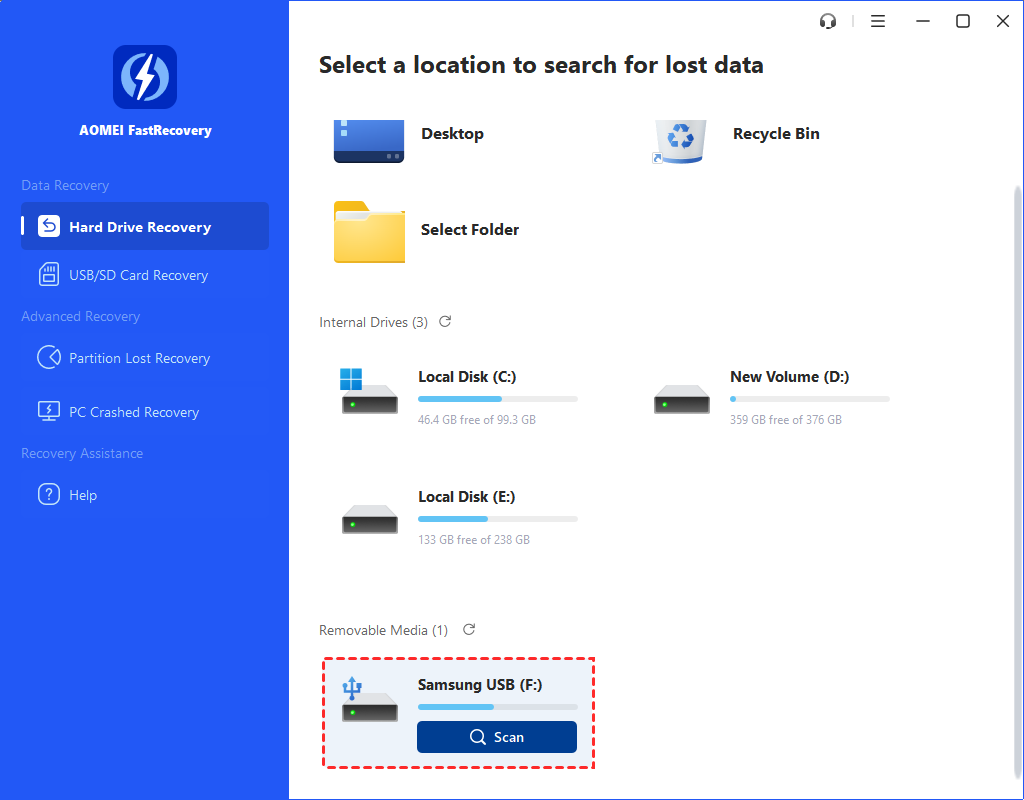
Download, install and launch AOMEI FastRecovery on your computer and connect your flash drive to the computer.
Step 1. Hover the mouse over the drive, and click Scan to let it be scanned.
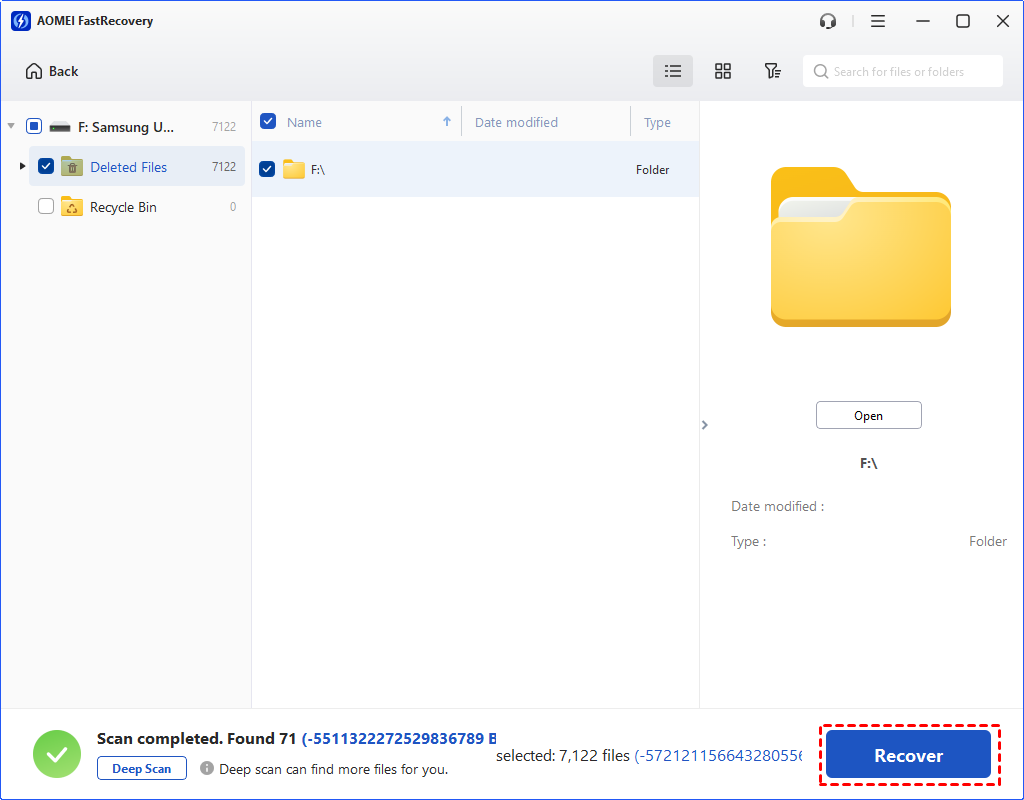
Step 2. You will see all deleted/lost files here. You don’t need to wait for the process to complete if you find the files you want to recover. You can also type in the file name on the upper right search box to find the file you need quickly.

Step 3. Check the scanning result and choose a new location to save your recovered files. Click Recover xx files to save the restored files.
The bottom line
This post focuses on five solutions to the “The last USB device you connected to this computer malfunctioned” error. After you’ve successfully resolved the issue, you can recover the data on your USB drive using the freeware AOMEI FastRecovery.