How to Create Windows Server 2016 Recovery Disk (2 Ways)
It’s necessary to download and create Windows Server 2016 recovery disk to restore your computer without losing data. This article provides you with two simple and efficient ways.
By Ivy / Updated on December 5, 2024
The recovery disk is a bootable media (USB or DVD) loaded with a self-running operating system and several diagnostic tools such as system startup, system restore, system image recovery, command prompt, etc., to deal with a damaged operating system, missing or corrupted system files, diagnose hardware issue, fix disk errors, etc.
In addition, there are many customized third-party packages for different uses, such as creating a system image backup, recovering deleted files in the event of a system crash, etc. You can choose to create a Windows Server 2016 recovery disk depending on your purpose.
Why Should I Create a Windows Server 2016 Recovery Disk Manually?
In the old days, when you bought a new computer, the manufacturer included an installation disc. Usually, it is a CD/DVD. It’s a kind of recovery disk that can be attached to an optical drive.
But starting in the mid-2010s, computer manufacturers began to stop including optical disc drives with their products due to the following reasons:
- The growing popularity of fast and high-capacity USB.
- People started pursuing thinner, lighter, more portable computers.
- A standard 12-centimeter diameter disc added significantly more bulk to a computer.
However, taking into account their needs in specific situations, the manufacturers provide users with a preinstalled recovery partition to factory reset their computers. Microsoft offers ISO files to create Windows Server 2016 recovery disk for repair or troubleshooting. You can also seek help from a third-party package if you have specific needs, such as data recovery.
Create a Windows Server 2016 Recovery Disk from ISO
Here we will introduce you to the official method to create a Windows Server 2016 recovery disk from ISO using CMD, it sounds technical, but with the simplified steps you can easily follow.
Step 1. Download the Windows Server 2016 ISO file from the official Evaluation Center and mount it with an available drive letter. Here take g: as an example.
Step 2. Insert a USB drive into Windows Server 2016 and be sure it’s recognized.
Step 3. Press Win + X and select Command Prompt (Admin). Then, type the following commands to prepare your USB drive. Here take e: as the drive letter of this USB drive.
- diskpart
- list disk
- select disk x(replace x with your USB drive number)
- clean
- create partition primary
- select partition 1
- active
- format fs=ntfs quick
- assign
Step 4. Type the following commands to make the USB drive bootable and copy the installation files of Windows Server 2016 to your USB drive. Replace the drive letters of both ISO files and the USB drive.
- cd boot
- bootsect.exe/nt60 e:/
- xcopy g:\*.* /e/h/f e:\
How to Create a Windows Server 2016 Recovery Disk using USB
You can also seek help from a third-party data recovery package to retrieve data in the event of a system crash if you don’t have a system image backup. AOMEI FastRecovery is worth considering as it offers the following unique advantages and highlights.
❤❤❤ One of the few free data recovery software for servers - AOMEI FastRecovery
- Recover deleted or lost files in Windows Server 2008(R2), 2012(R2), 2016(R2), 2016, 2019, 2022, 2025, etc., even when it’s not bootable.
- Support create a bootable USB, CD/DVD, or ISO file.
- Most surprisingly, the recovery disk can be used on any server system, both 32-bit and 64-bit and in BIOS or UEFI mode.
- With the two significant scanning technologies, it can find and recover up to 200+ data types, including images, documents, audio, videos(e.g. recover WMV videos), emails, etc.
- Selectively restoring files instead of all. You can search, filter specific files or folders, and preview them before recovering. You are allowed to select multiple files or folders using the checkboxes and recover files while scanning.
Now, free download this media creator for servers and follow the steps below to create a Windows Server 2016 recovery USB:
Step 1. Prepare your USB drive and connect it to your Windows Server 2016 system.
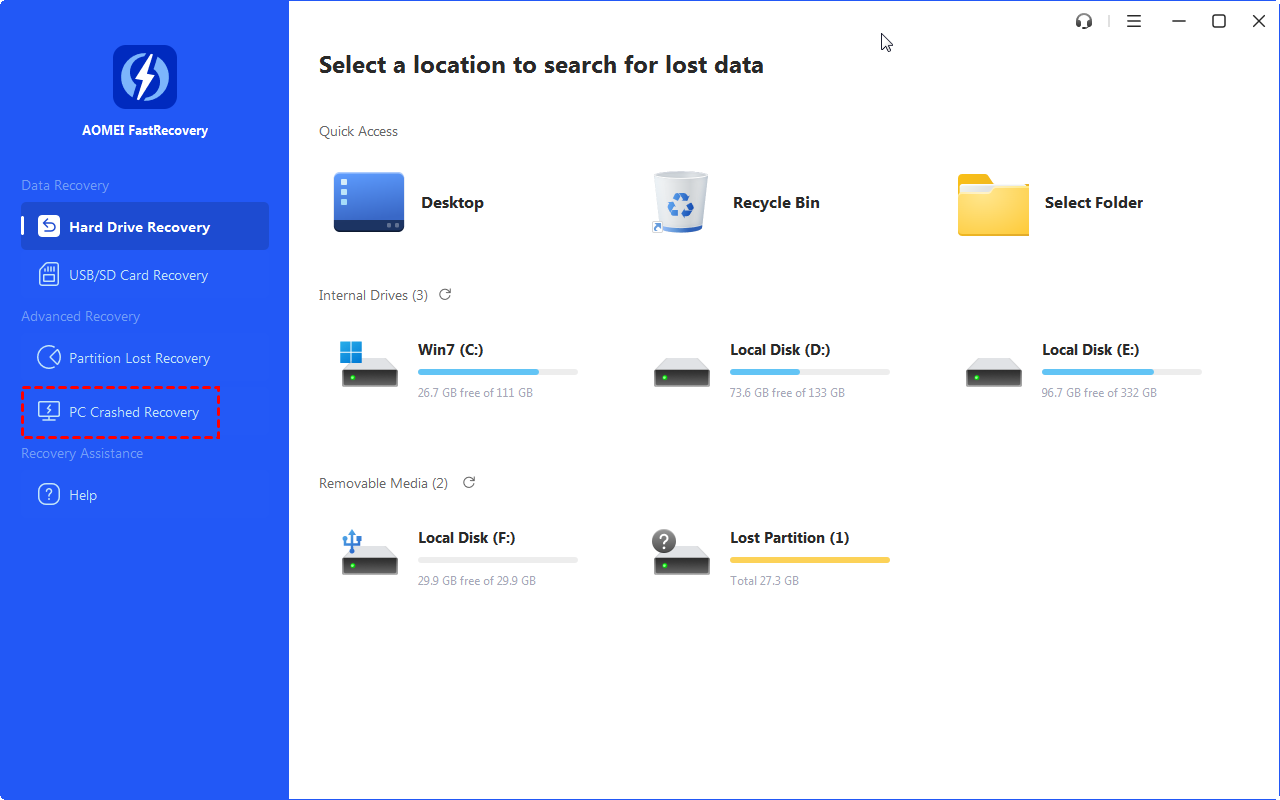
Step 2. Open AOMEI FastRecovery and it will display a clean interface. Click Crashed PC recovery at the left panel.
Step 3. Check the USB Boot Device option and select the prepared USB drive from the drop-down menu.
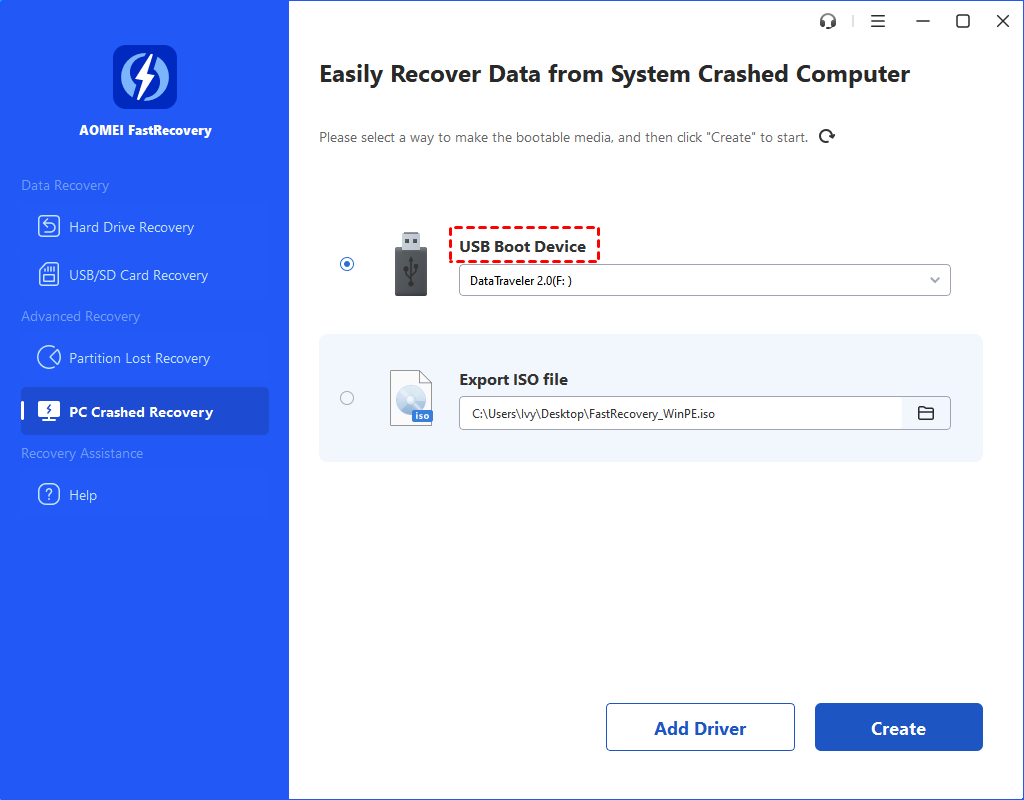
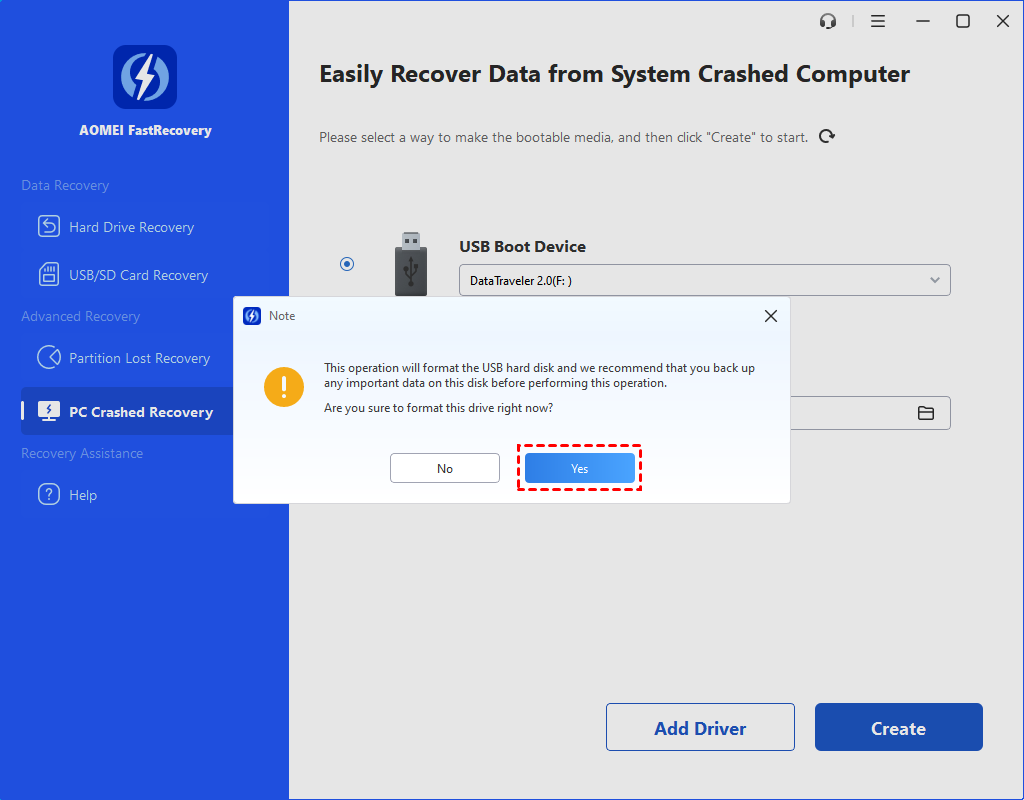
Step 4. Click Create and then Yes to format and create a Windows Server 2016 recovery disk. It may take a few minutes, just wait patiently.
How to Use Windows Server 2016 Recovery Disk
After creating a Windows Server 2016 recovery disk, you can use it to repair your computer, troubleshoot issues, retrieve data in case of a system crash, etc.
To get your computer back to normal without losing data, try system image recovery in the official tool or retrieve data from third-party data recovery packages.
Way 1: Restore System Image in Windows Server 2016 using Official Tool
Restoring system image in Windows Server 2016 using a Microsoft recovery disk is straightforward if you have a working backup image. If not, try third-party data recovery packages in the next part. Following are the steps.
Step 1. Plug the Windows Server 2016 recovery USB into your server and be sure it’s recognized. Restart your server and boot from the USB drive. Click Next in the initial Windows Setup window.
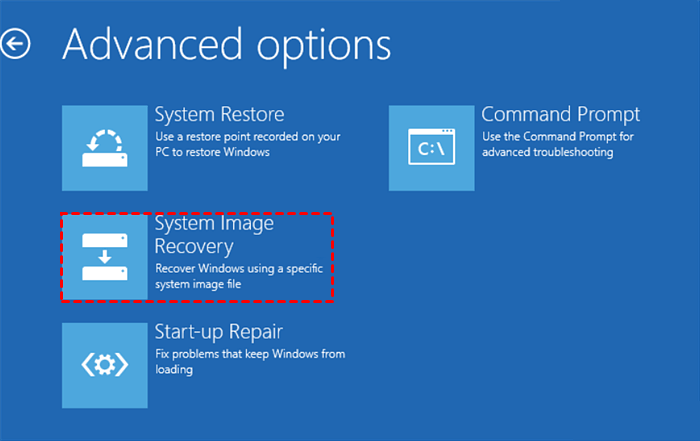
Step 2. Click Repair your computer > Troubleshoot > Advanced options >System Image Recovery, and type your username and password to access your images.
Step 3. In the Re-image your computer window, check Use the latest available system image (recommended) option and click Next.
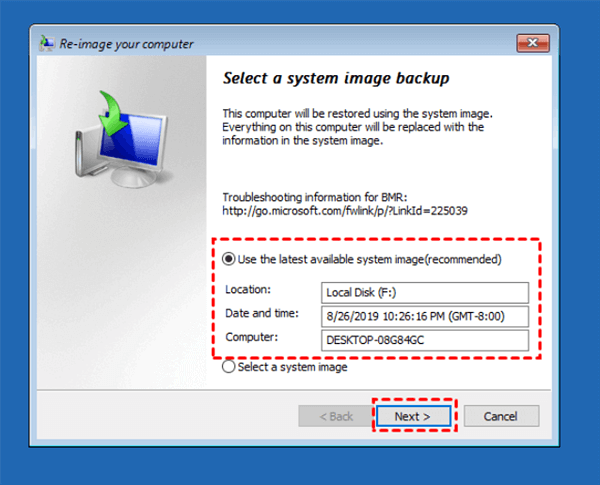
Step 4. Click Finish and Yes to confirm you want to restore system image in Windows Server 2016. Wait patiently this may take some time depending on the size of the image.
Way 2: Restore Deleted or Lost Data in Windows Server 2016 using 3rd Party Tool
With powerful scanning technologies and a user-friendly interface, restoring data using third-party data recovery packages - AOMEI FastRecovery is just as easy. Here's how:
Step 1. Insert the Windows Server 2016 recovery USB created by AOMEI FastRecovery and boot from it. After loading, you will see AOMEI FastRecovery.
Step 2. Hover the mouse over the disk in Windows Server 2016 and click Scan.

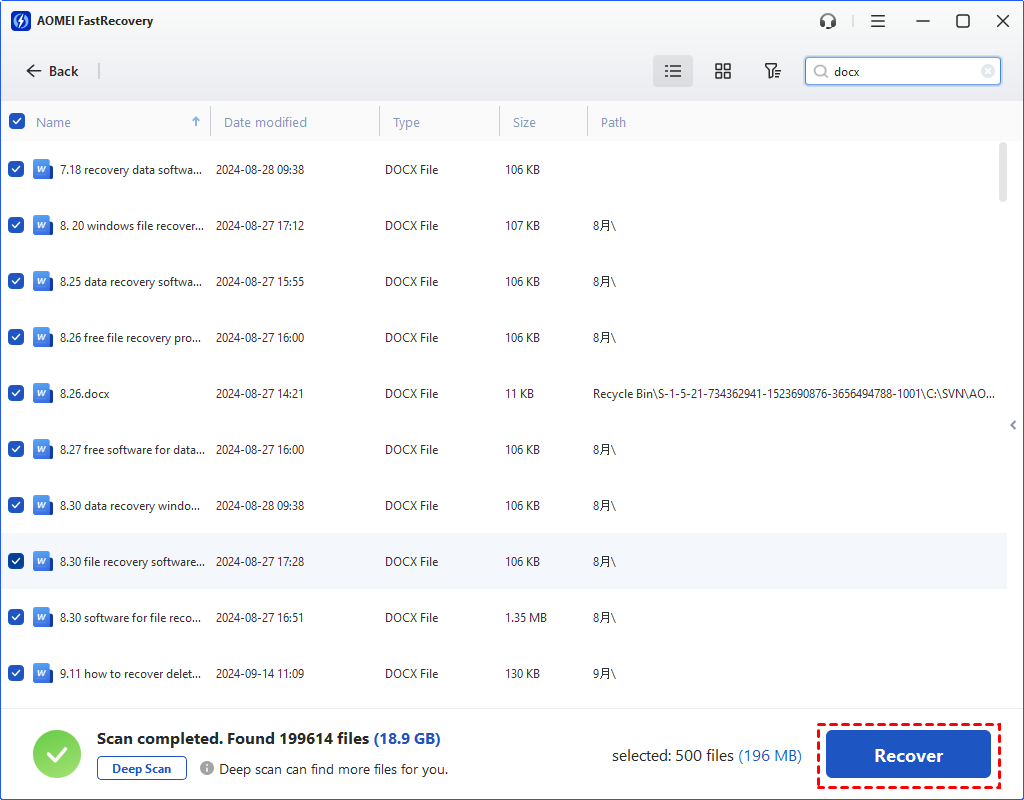
Step 3. It will run Quick Scan & Deep Scan automatically to find and display all the recoverable data files. Just wait patiently until the scanning process is completed. You can then preview and select to restore all or part of your data.

Step 4. Select the desired files and click the "Recover x files" button. You will then be asked to select a location. Please select a new location instead of the original location as it will result in data overwriting.
-
The restore button will display the number of selected files and their full size.
-
You can recover data from Windows Server 2016 for free, up to 500MB. Once exceeded, please upgrade to advanced editions and enjoy unlimited data recovery.
-
Except for recovering data in Windows Server 2016, you can also use it to recover deleted files in Windows Server 2012, 2019, 2022, 2025, and previous systems.
Conclusion
This article offers users two simple and easy-to-follow methods to create a Windows Server 2016 recovery disk. Note that they are both intended to protect your server, but the usage is completely different.
Of the two methods, the official tool is to repair your computer, troubleshoot, or reinstall Windows. To get your computer back to normal without losing data, you can use system image recovery or system restore, but they require you to create them beforehand.
However, the third-party data recovery packages work well to retrieve data without backup. We highly recommend AOMEI FastRecovery because it has many shining points, such as powerful scanning technology, a simple interface, extensive data types, misfortune scenarios, etc.
FAQs
1. How do I recover deleted files on Windows Server 2016?
If you can back up files in Windows Server 2016 using Windows Server Backup, try to restore files from a previous backup image.
- Open Server Manager. Click Tools > Windows Server Backup.
- Right-click Local Backup and select Recover.
- Then, select a backup location, such as another location, specify location type and path, and backup date.
- Select Files and folders to recover and follow the on-screen instructions to recover deleted files in Windows Server 2016.
2. Does Windows Server 2016 have restore points?
There is no such thing as restore points for servers. So you cannot create a system restore point in Windows Server 2016. Fortunately, it has a similar feature named system state backup in Windows Server 2016 to help you.
3. How do I run chkdsk on Windows Server 2016?
- Click Start, type cmd, and run as administrator.
- In the command prompt window, type chkdsk drive letter: /f /r /x. Press Enter to scan and repair any disk errors.
4. How to repair Windows Server 2016 startup?
- Start your installation disc or recovery disk to access the recovery environment. Click Next in the initial Windows Setup screen.
- Click Repair your computer > Troubleshoot > Advanced options > Startup Repair. It will restart your server and try to repair the startup issues.
5. How do I free up disk space on Windows Server 2016?
You can try the following methods to free up disk space:
- #1. Delete useless large files.
- #2. Uninstall programs if you don’t use them anymore.
- #3. Run disk cleanup.
- #4. Turn off hibernation.
- #5. Transfer files to a cloud storage, such as OneDrive.