How to Create and Use Windows Server 2019 Recovery Disk
It’s necessary to download and create Windows Server 2019 recovery disk for disaster recovery, efficient troubleshooting, data protection, etc., to bring your computer back to normal without losing data.
By Ivy / Updated on December 5, 2024
If you’ve ever experienced a server crash or unexpected data loss, you know how crucial it is to have a recovery disk. Here in this article, we will not only show you how to create a Windows Server 2019 recovery disk but also how to use it to repair, troubleshoot, recover data, etc.

What Is a Recovery Disk?
A recovery disk is a bootable media (USB or DVD) loaded with a self-running operating system and several diagnostic tools that can be used to boot a troublesome computer, reinstall Windows to bring it back to factory settings or fix it to go back to normal.
The troubleshooting tools in a recovery disk are system startup, system restore, system image recovery, command prompt, etc., and can handle issues preventing the operating system from starting up or functioning properly, missing or corrupted system files, diagnose hardware issues, scan and fix disk errors, recover data, etc.
Why You Need to Create a Windows Server 2019 Recovery Disk?
Creating a Windows Server 2019 recovery disk is not just a precaution, it is a necessity in the following situations:
🦠Disaster Recovery: The recovery disk lets you quickly restore Windows Server 2019 from a system image and get back to business when your server crashes during peak business hours. Without a recovery disk, you're staring at extended downtime and potential data loss.
🔨Efficient Troubleshooting: The recovery disc also provides a variety of diagnostic tools to help you fix issues related to system errors or boot failure. It's like having a toolkit ready for any server emergency.
🧩Data Protection: Even with regular backups, data recovery can be tricky. You might need a customized recovery disk released by third-party packages to recover files that may not be accessible through backups alone.
In short, a well-prepared recovery disk helps you resolve computer issues quickly, reduce downtime, and avoid expensive recovery services.
How to Create a Windows Server 2019 Recovery Disk
Here we will introduce you to 2 100% working methods and guide you on how to create a Windows Server 2019 recovery disk step by step.
Way 1: Create an Official Windows Server 2019 Recovery Disk using CMD
Creating a Windows Server 2019 recovery disk using CMD might sound technical, but it's very easy to follow. You just need to get the Windows Server 2019 ISO file from Microsoft, copy all the installation files to a working USB drive, and make it bootable. Here's a streamlined process to get a recovery disk ready.
Step 1. Download the Windows Server 2019 ISO file from the official Evaluation Center. Double-click the .exe file to mount it and specify a drive letter (e.g. g:) for it.
Step 2. Insert a USB drive with at least 8GB into Windows Server 2019 and be sure it’s recognized.
Step 3. Press Win + X and select Command Prompt (Admin). Then, type the following commands to prepare your USB drive.
- diskpart
- list disk
- select disk x (replace x with your USB drive number)
- clean
- create partition primary
- select partition 1
- active
- format fs=ntfs quick
- assign
Step 4. Type the following commands to make your USB drive bootable and copy the installation files of Windows Server 2019 to your USB drive. Replace the drive letters of both ISO files g: and USB drive e: with your own.
- cd boot
- bootsect.exe /nt60 e:/
- xcopy g:\*.* /e /h /f e:\
Way 2: Create a Windows Server 2019 Recovery Disk using USB
AOMEI FastRecovery is one of the few free data recovery software for servers and supports creating a recovery disk using USB, CD/DVD, or ISO file. It’s compatible with Windows Server 2008(R2), 2012(R2), 2016(R2), 2019, 2022, 2025, etc. So you can effortlessly create a Windows Server 2019 recovery disk to retrieve data.
❤❤❤ The unique advantages and shining points in AOMEI FastRecovery
- Recover deleted or lost files in Windows Server 2008(R2), 2012(R2), 2016(R2), 2019, 2022, 2025, etc., even when it’s not bootable.
- Support create a bootable USB, CD/DVD, or ISO file.
- Most surprisingly, the recovery disk can be used on any server system, both 32-bit and 64-bit and in BIOS or UEFI mode.
- With the two significant scanning technologies, it can find and recover up to 200+ data types, including images, documents, audio, videos(e.g. recover WMV videos), emails, etc.
- Selectively restoring files instead of all. You can search, filter specific files, and preview them before recovering. You are allowed to select multiple files or folders using the checkboxes and recover files while scanning.
Now, please download this versatile software to create a Windows Server 2019 recovery disk from USB. Here's how:
Step 1. Prepare your USB drive and connect it to your Windows Server 2019 system.
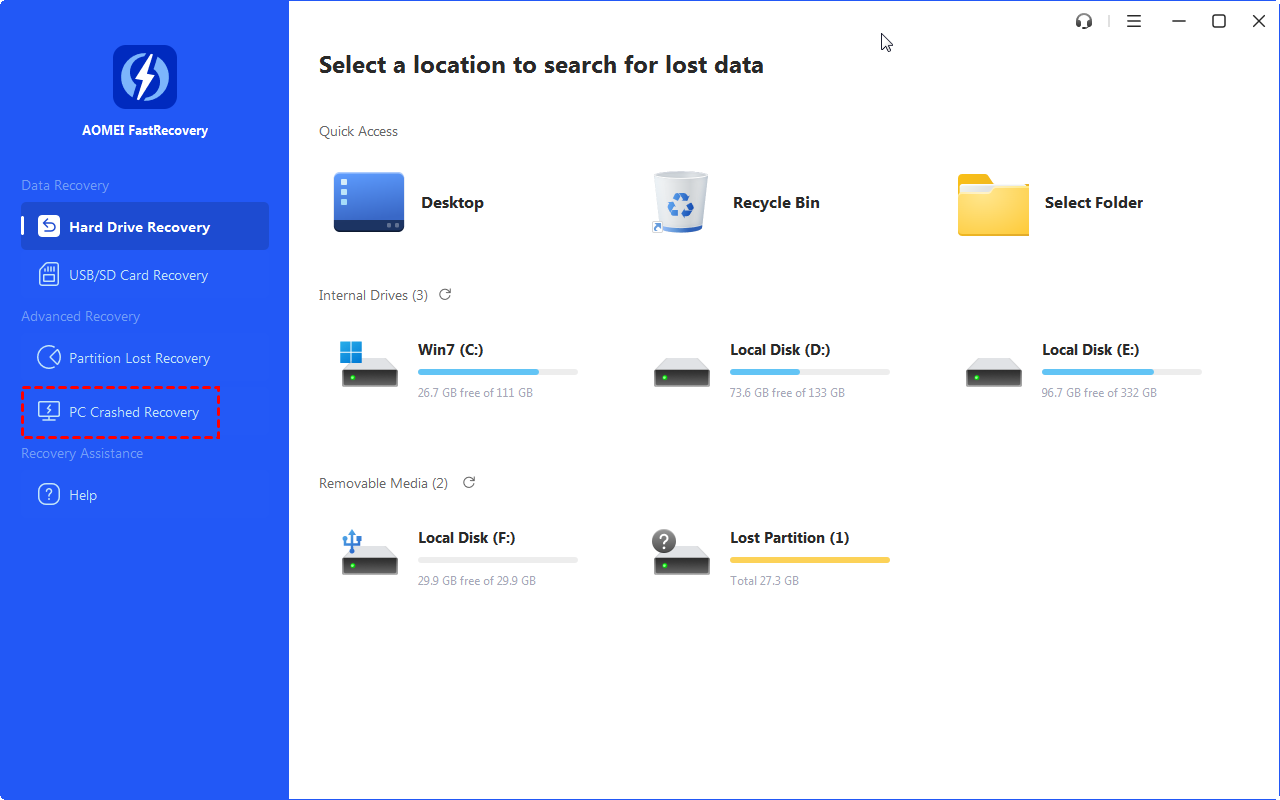
Step 2. Open AOMEI FastRecovery, it will display a clean interface. Click Crashed PC recovery at the left panel.
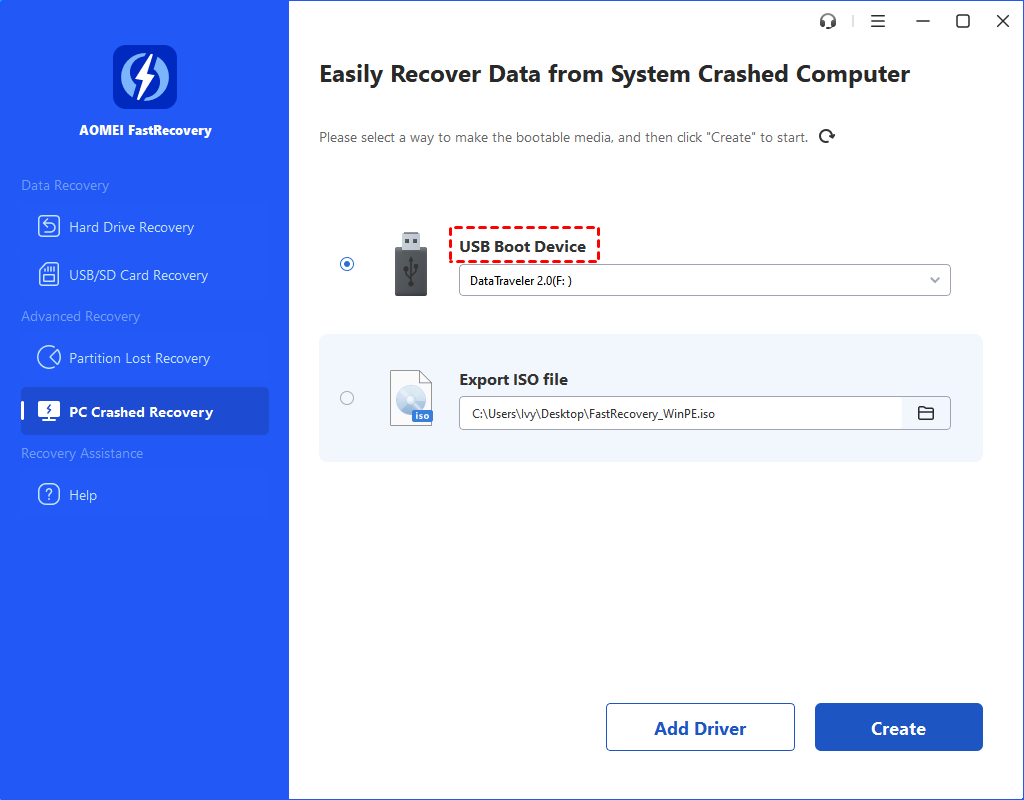
Step 3. Check the USB Boot Device option and select the prepared drive from the drop-down menu.
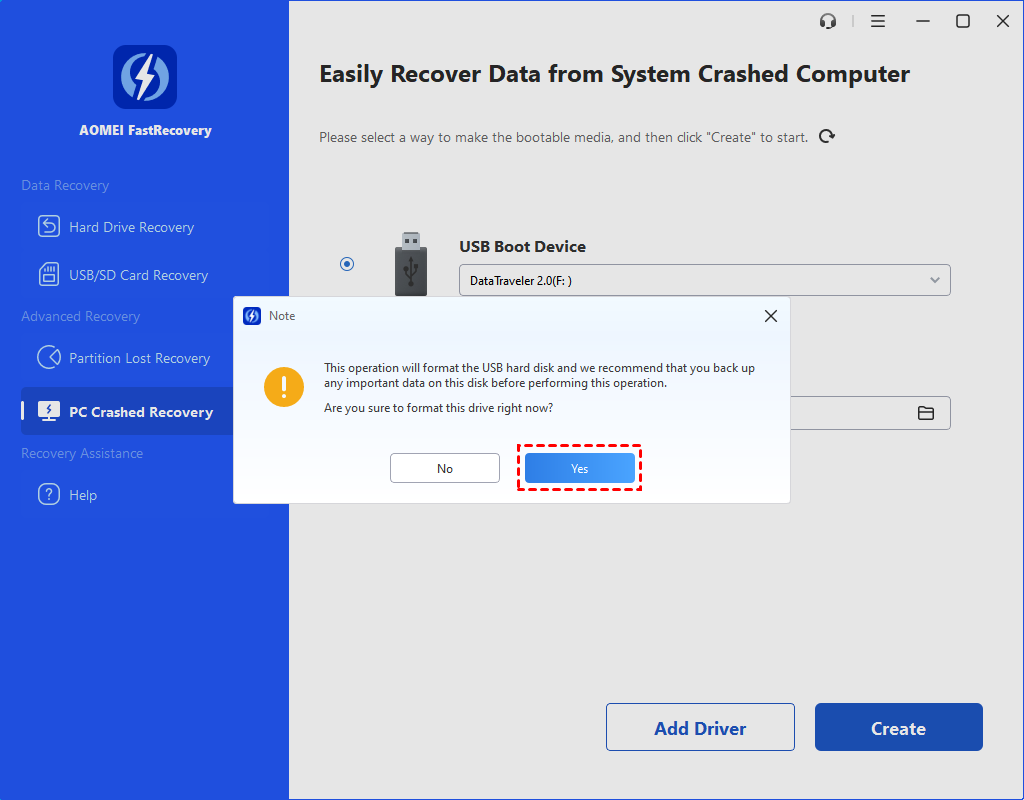
Step 4. Click Create and then Yes to format and create a Windows Server 2019 recovery disk. It may take a few minutes, just wait patiently.
How to Use Windows Server 2019 Recovery Disk
After downloading the Windows Server 2019 recovery disk, you can use it to repair your computer, troubleshoot issues, retrieve data in case of a system crash, etc. To get your computer back to normal without losing data, try system image recovery in the official tool or retrieve data from third-party data recovery packages.
Way 1: Restore System Image in Windows Server 2019 using Official Tool
Restoring system image in Windows Server 2019 using a Microsoft recovery disk is straightforward if you have a working backup image. If not, try third-party data recovery packages in the next part. The following are the steps:
Step 1. Plug the Windows Server 2019 recovery USB into your server and be sure it’s recognized. Restart your server and boot from the USB drive. Click Next in the initial Windows Setup window.
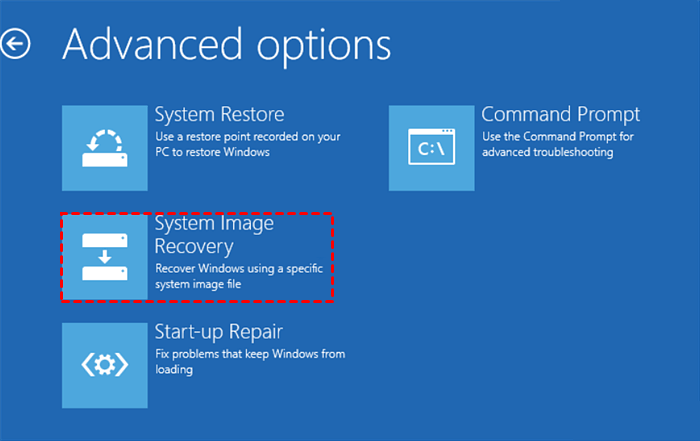
Step 2. Click Repair your computer > Troubleshoot > Advanced options >System Image Recovery.
Step 3. Then, select Windows Server 2019 and type your username and password to access your images.
Step 4. In the Re-image your computer window, check Use the latest available system image (recommended) option and click Next.
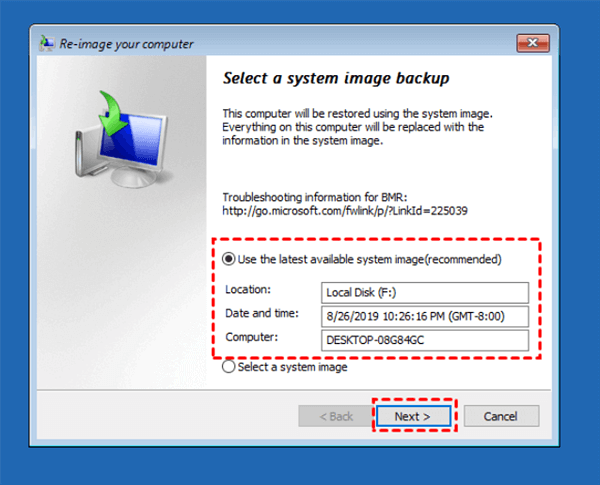
Step 5. Click Finish and Yes to confirm you want to restore system image in Windows Server 2019. Wait patiently as this may take some time depending on the size of the image.
Way 2: Restore Deleted or Lost Data in Windows Server 2019 using 3rd Party Tool
With powerful scanning technology and a user-friendly interface, restoring data using AOMEI FastRecovery is just as simple. Here's how:
Step 1. Insert the Windows Server 2019 recovery USB created by AOMEI FastRecoveryandboot from it. After loading, you will see AOMEI FastRecovery.
Step 2. Hover the mouse over the hard disk in Windows Server 2019 and click Scan.

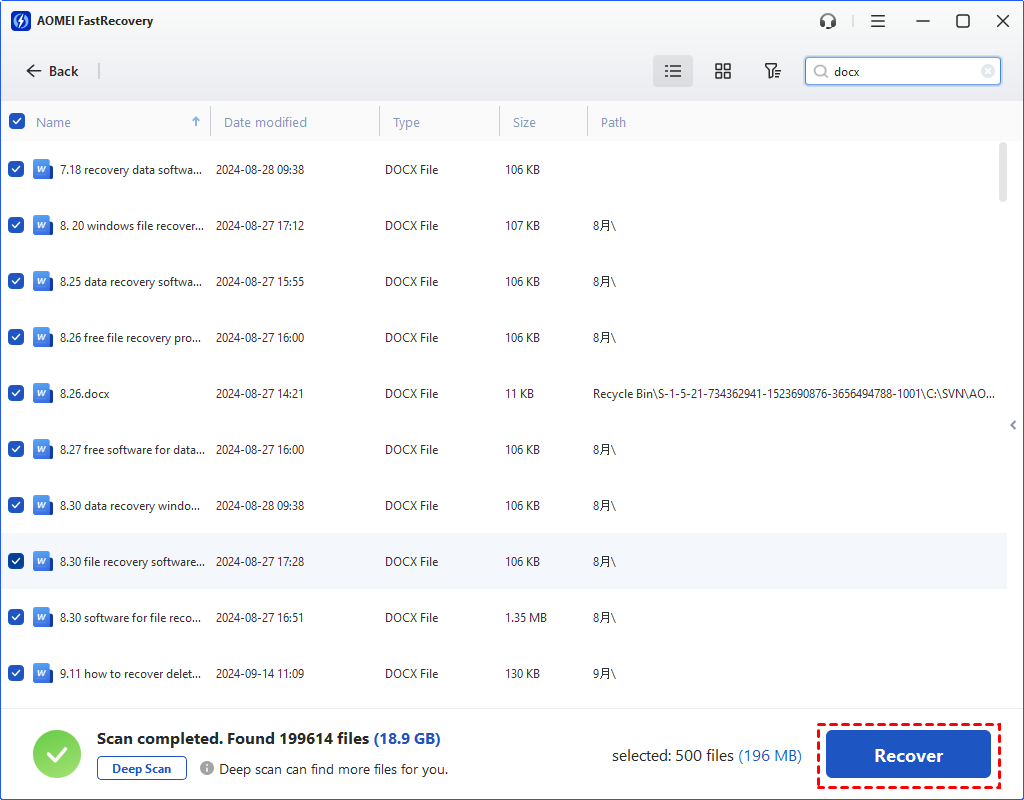
Step 3. It will run two advanced scanning methods - Quick Scan & Deep Scan automatically and display all the found files on the selected disk. Just wait patiently until the scanning process is completed. You can then preview and select to restore all or part of your data.

Step 4. Select the desired files on this disk and click the "Recover x files" button. You will then be asked to select a location. Please select a new location instead of the original location as it will cause data overwriting.
-
The restore button will display the number of selected files and their full size.
-
You can recover data from Windows Server 2019 up to 500MB. Once exceeded, please upgrade to advanced editions and enjoy unlimited data recovery.
Besides, you can also use it to recover deleted files in Windows Server 2012, 2016, 2022, 2025, and previous systems.
Conclusion
Creating and utilizing a Windows Server 2019 recovery disk is essential for users to deal with issues preventing their computer from starting up or functioning and data loss, keeping server running smoothly and data safe.
Of the two methods, the official tool requires you to create a system image or system restore points beforehand. Otherwise, you may lose data during the repair or troubleshooting process.
However, the third-party data recovery packages work well to retrieve data without backup. Try AOMEI FastRecovery if you don’t have a backup image!
Versatile software to create Windows Server 2019 recovery disk for data recovery
FAQs about Windows Server 2019 recovery disk
1. Is it possible to recover deleted files from server?
2. How do I recover deleted files on Windows Server 2019?
- Open Server Manager. Click Tools > Windows Server Backup.
- Right-click Local Backup and select Recover.
- Then, select backup location, such as another location, specify location type and path, and backup date.
- Select Files and folders to recover and follow the on-screen instructions to recover deleted files in Windows Server 2019.
3. Does Windows Server 2019 have backup software?
4. How to restore system image in Windows Server 2019?
5. How do I run chkdsk on Windows Server 2019?
- Click Start, type cmd, and run as administrator.
- In the command prompt window, type chkdsk drive letter: /f /r /x. Press Enter to scan and repair any disk errors.