How to Create a Windows Server 2022 Bootable USB | Easy
Here you can learn 2 feasible ways to create a Windows Server 2022 bootable USB, and use the bootable USB to restore Windows Server 2022 and recover data effortlessly.
By Lori / Updated on December 4, 2024
Having a bootable USB is crucial when facing a server crash or unexpected data loss. A bootable USB lets you install or repair Windows Server 2022 on any compatible machine, without needing physical media like DVDs.
Whether you are setting up a new server, troubleshooting an installation, recovering from an issue, or running the OS directly from USB, a bootable USB is a must-have tool.
Ready to get started? Let’s dive in and learn how to create a Windows Server 2022 bootable USB and recover deleted files from a broken Server system.
How to Create a Windows Server 2022 Bootable USB Using Command Prompt
To create a Windows Server 2022 bootable USB, using a command prompt is a good option, although it can be a bit tricky.
- A USB drive with at least 16 GB of storage space.
- Download the Windows Server 2022 ISO file from Microsoft.
- Back up the USB drive, as all data will be erased. You can use AOMEI Backupper Standard for a full disk backup.
- Ensure your BIOS/UEFI settings are compatible with booting from a USB device.
Step 1. Windows Server 2022 bootable ISO Download
Visit Microsoft’s official website and download the Windows Server 2022 ISO file. Ensure you have enough storage space and note where you save the file.
Step 2. Open Command Prompt
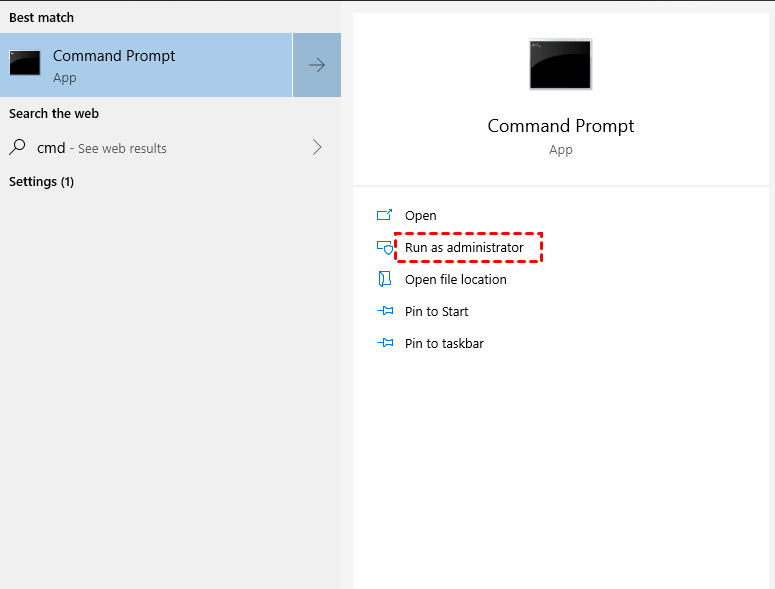
Connect your USB drive to your PC and ensure it’s recognized. Search for "cmd" in the Start menu, right-click on Command Prompt, and select Run as administrator.
Step 3. Type commands
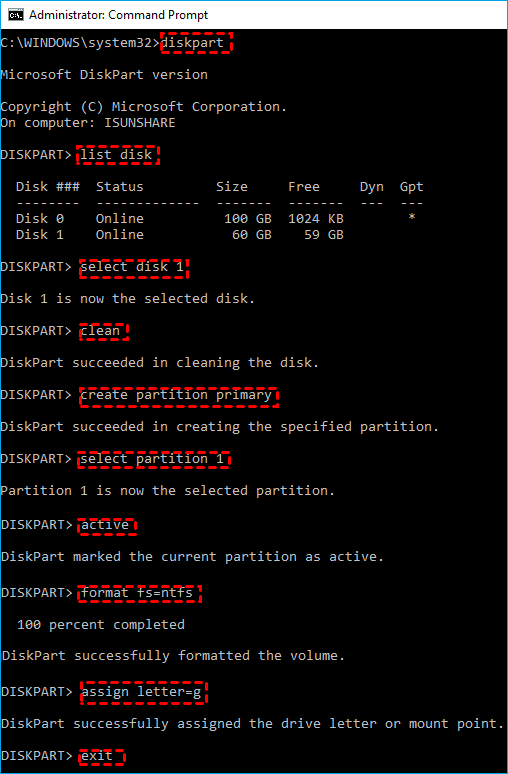
In the Command Prompt window, type the following commands one by one, pressing Enter after each:
- diskpart
- list disk
- select disk 1 (replace "1" with the number corresponding to your USB drive)
- clean (this command will clean the selected hard disk)
- create partition primary (make the disk primary)
- select partition 1
- active (boot partition)
- format fs=ntfs (makes the disk formatted as NTFS file system)
- assign letter=g (replace "g" with your USB drive’s letter)
- exit
Step 4. Mount ISO files on USB
Mount the Windows Server 2022 ISO file and copy its contents to the USB drive using these commands:
- d: (replace the file path with the location of your Windows 11 ISO)
- cd boot
- bootsect /nt60 G: (replace G with the drive letter associated with your USB drive)
- Xcopy d:\* . * g:\ /e /f /h (d stands for the letter of Mounted ISO Volume and g stands for the letter of the USB hard drive)
- If you encounter errors like "file creation error - the parameter is incorrect" or "install.wim is too large," it’s due to FAT32 limitations. You can split the "wim" file into smaller parts using the command: "dism /Split-Image /ImageFile:h:\sources\install.wim /SWMFile:r:\sources\install.swm /FileSize: 4096”.
- Once successfully created, you can use this bootable USB to install Windows Server 2022 on other machines.
- If this method seems too complex, consider using AOMEI FastRecovery, discussed in Method 2, to make the process simpler.
In this way, you have successfully created a Windows Server 2022 bootable disk. You can then use it after booting with your PC.
How to Recover Deleted Data from Windows Server 2022 Bootable USB
After creating the Windows Server 2022 bootable USB, you can use it to repair your computer, fix problems, and retrieve data in case of a system crash. To recover your system without losing data, there are two ways, including using the system image recovery option and exploring third-party data recovery solutions.
▶ Option 1. Restore System Image in Windows Server 2022
Restoring a system image in Windows Server 2022 using a Microsoft bootable USB is simple, as long as you have a valid backup image. If you don’t, you can explore third-party data recovery tools, which we'll discuss in the next section. Here's how to restore the system image in Windows Server 2022:
Step 1. Insert the USB bootable disk into the Windows Server 2022. Restart your server and boot from the USB drive. Click Next in the Windows Setup window.
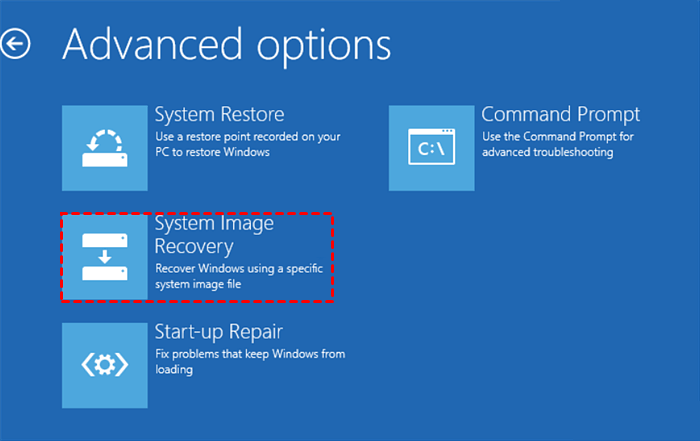
Step 2. Click Repair your computer > Troubleshoot > Advanced options >System Image Recovery.
Step 3. You will need to select an account and enter the password if there is one. After doing so, you will be presented with the Re-image your computer option.
Step 4. In the Re-image your computer window, check Use the latest available system image or Select a system image. Select the options and click Next.
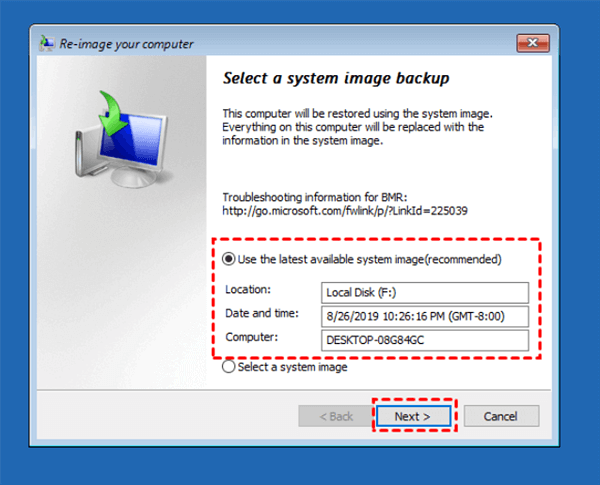
Step 5. Click Finish and Yes to confirm. The recovery process may take a few minutes depending on the size of the image.
▶ Option 2. Alternative to Recover Deleted Files from Windows Server 2022 Easier
Want to create a Windows Server 2022 bootable USB and recover lost data from it more easily?
AOMEI FastRecovery is a free and powerful data recovery software for Windows Server 2022 that supports making a bootable USB easily. It’s compatible with Windows Server 2019, 2008(R2), 2012(R2), 2016 (R2), or the latest Server 2025.

- Create bootable USB, CD/DVD, or ISO files on Windows 11, 10, 8, 7, or Windows Server.
- Recover deleted or lost files from Windows Server 2012, 2016(R2), 2019, 2022, 2025.
- Support 200+ file types, including recovering permanently deleted photos, documents, audio, videos, and emails. Search, filter, and preview files before recovery.
Here’s a step-by-step guide on creating a Windows Server 2022 bootable USB using AOMEI FastRecovery:
★ Part 1. Create Windows Server 2022 recovery USB
Step 1. Download and install AOMEI FastRecovery
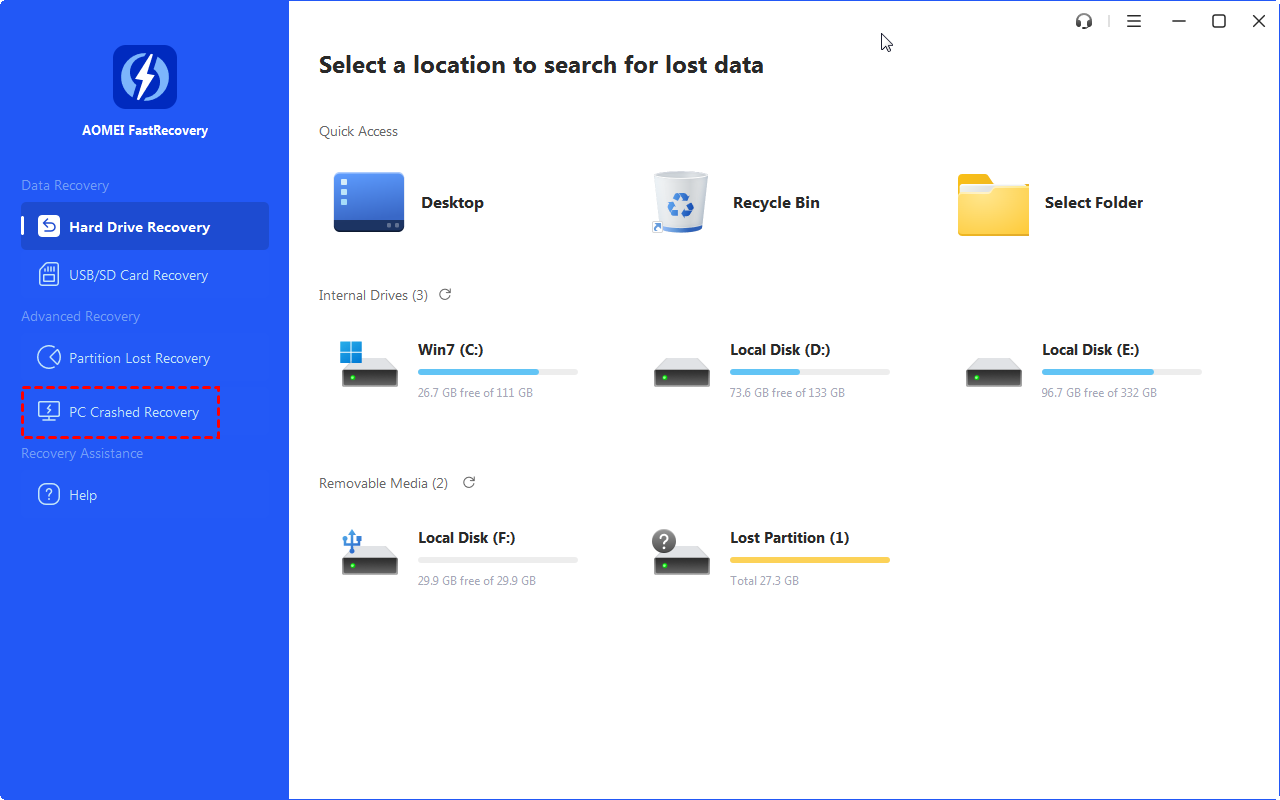
Connect the USB drive to your computer. Launch AOMEI FastRecovery and click "Crashed PC Recovery".
Step 2. Choose the way to start.
Select the USB drive to create the bootable USB and click "Execute".

AOMEI FastRecovery allows you to create a Windows PE-based boot disk in three ways.
- USB boot device: Create a bootable USB device.
- Export ISO file: Use this method to make a bootable ISO file. After exporting the ISO, you need to use a third-party burning program to burn it. Or, you can use the ISO to boot some virtual machines or burn them to other devices.
- Burn to CD/DVD: Create a bootable CD/DVD.
The "Add Drivers" option allows you to manually include additional drivers to the bootable drive, ensuring more devices are available after booting WinPE.
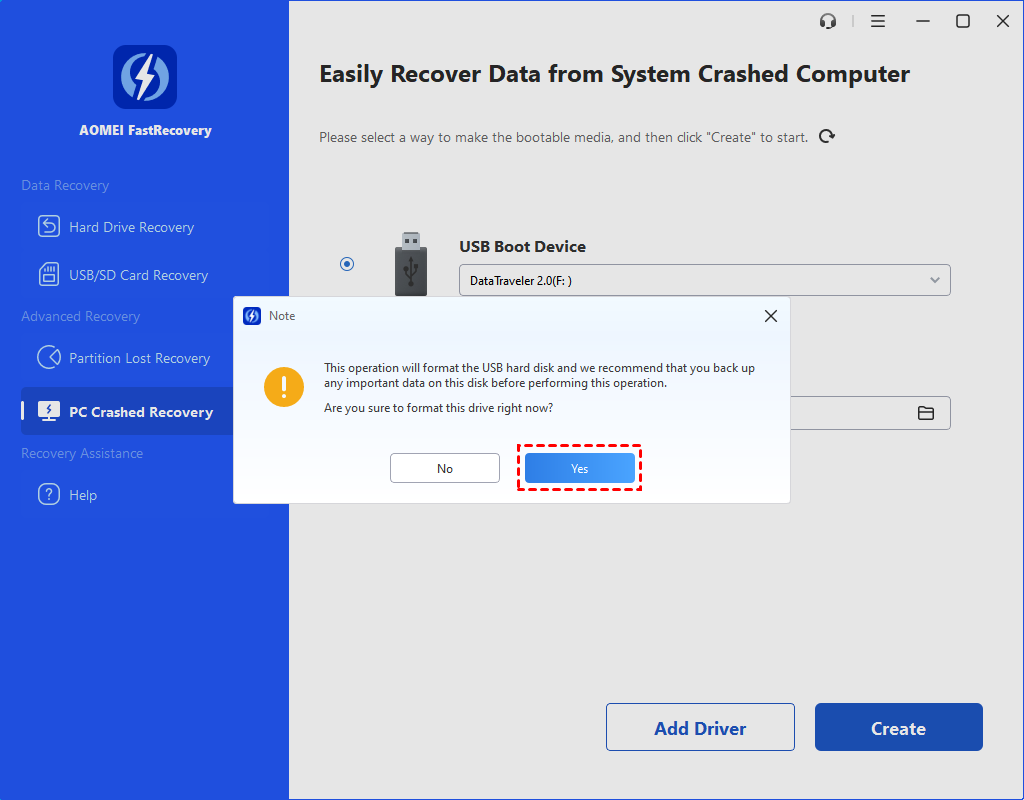
Step 3. Format the USB drive.
Once you select the method, an information window will prompt you to confirm that the USB drive will be formatted. Click "Yes" to continue, assuming you have already made a file backup before.
Step 4. Create a bootable USB drive
It will begin creating Windows Server 2022 bootable USB from ISO. The duration depends on your operating system and internet speed. Once completed, a success message will appear, along with steps on how to boot the Server from the USB drive.
★ Part 2. Boot the Windows Server 2022 recovery USB
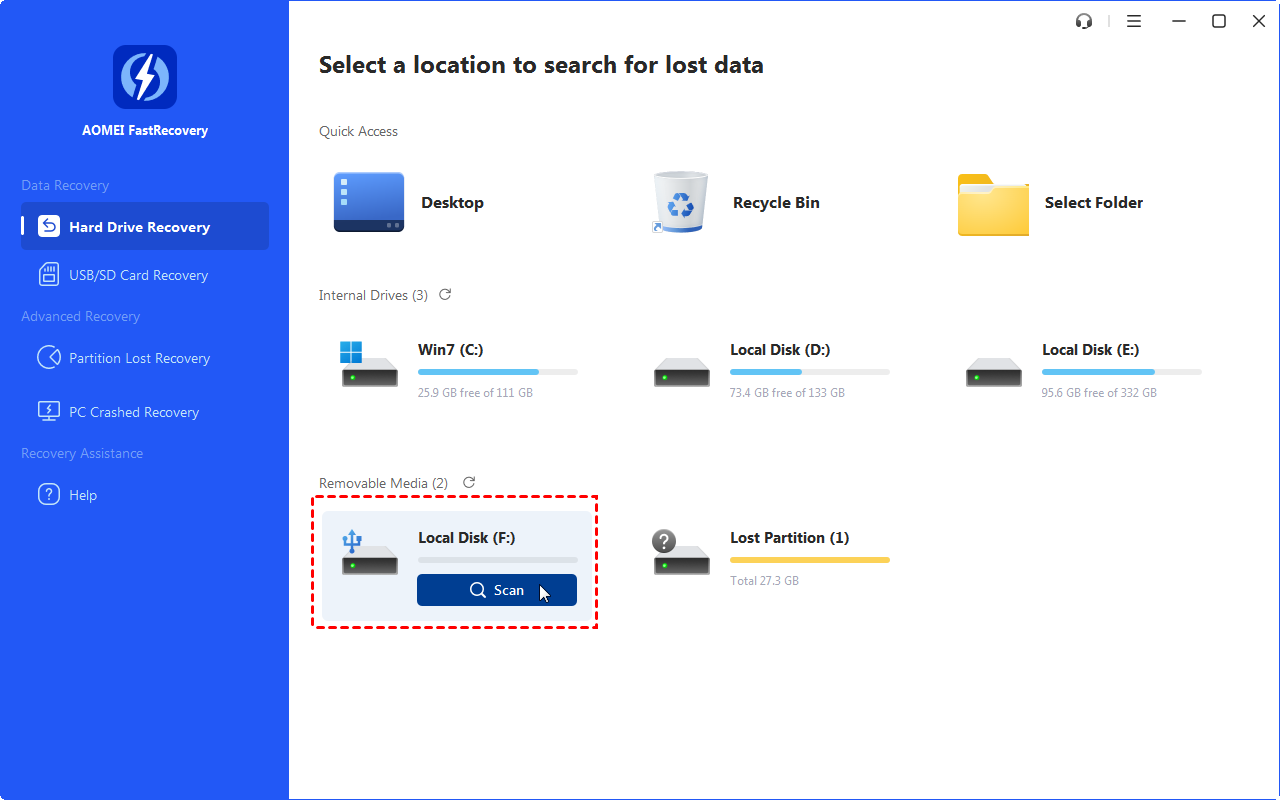
Step 1. Insert the Windows Server 2022 recovery USB created by AOMEI FastRecovery and boot from it. Once it loads, AOMEI FastRecovery will appear on the screen. Hover over the hard disk in Windows Server 2022 and click Scan.
Step 2. AOMEI FastRecovery will automatically run Quick Scan & Deep Scan and display all found files on the selected disk. During the process, you can filter and preview the files and select those you wish to recover.
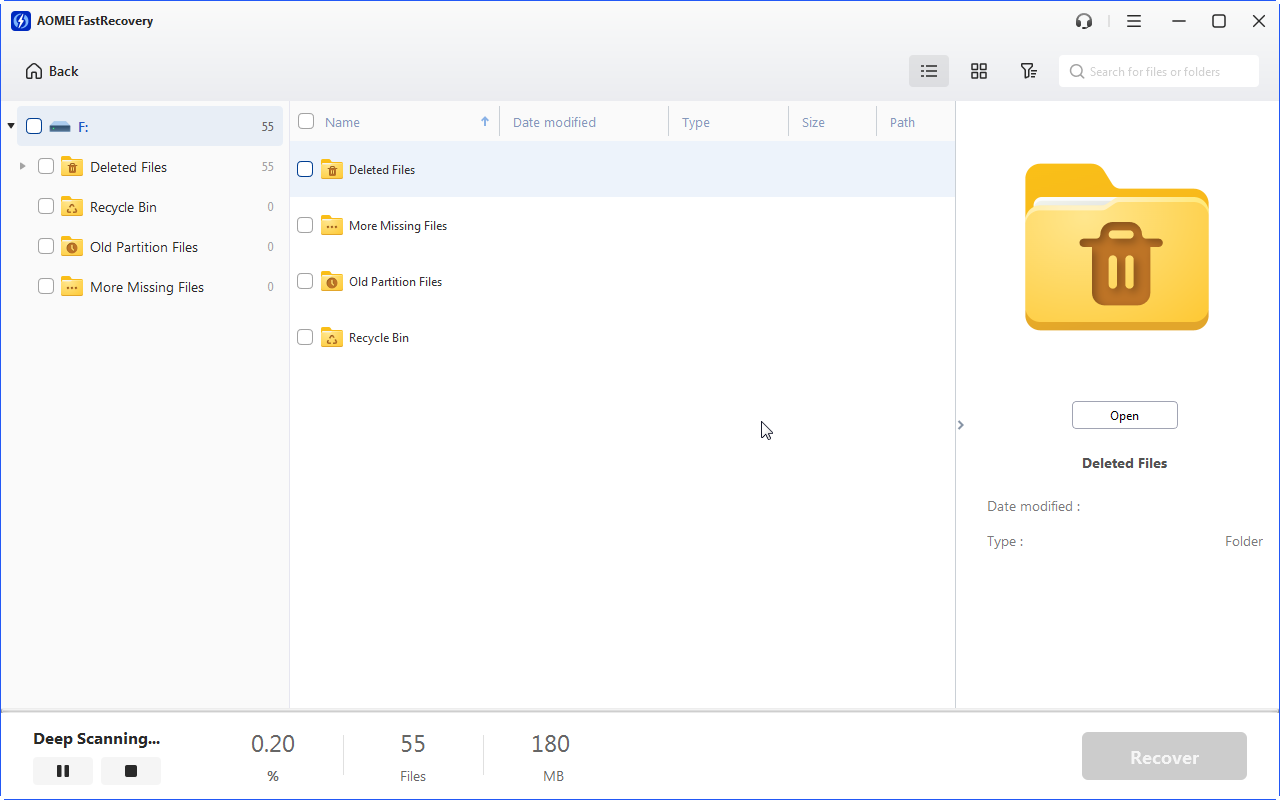
- File Type: Select the file type (Documents, Images, Videos, Audio, Mails, Webpages, Compressed files, etc.)
- Date modified: Set the date (today, yesterday, last 7/30 days, etc.)
- Size: Filter the file size (<128KB, 128KB~1MB, 1MB~ 512MB, 512MB above, etc.)
Step 3. Select the files you wish to recover and click the Recover X Files button to save them to a new location (not the original location to avoid data overwriting).

Conclusion
Creating a Windows Server 2022 bootable USB is a critical skill for anyone involved in server administration or IT. With AOMEI FastRecovery, you can easily create a recovery disk that will allow you to recover your computer even if it won't boot, and protect your important files in the process.
So, what are you waiting for? Grab your USB drive and free download AOMEI FastRecovery, follow the steps below, and you'll have a bootable USB in no time!
FAQs About Windows Server 2022 Bootable USB
1. Are there any precautions I should take before creating a Windows Server 2022 bootable USB?
To create a Windows Server 2022 bootable USB, you need a USB flash drive with at least 8GB of capacity, a working Windows PC, and the Windows Server 2022 ISO file. Alternatively, if you're using Windows Server 2022, you can use AOMEI FastRecovery to create a bootable USB with the current system.
2. Can you boot Windows Server from USB?
Yes, you can boot Windows Server from a USB. Follow these steps:
- Connect the USB to the target computer.
- Open the Boot order menu.
- Select the USB drive from either LEGACY BOOT or UEFI BOOT options, depending on the created image.
- Make sure you choose the correct boot option based on the image to successfully boot your computer from the USB.
3. What should I do if my USB drive isn’t recognized during the boot process?
If your USB drive isn’t recognized, ensure it’s properly formatted and check that the BIOS/UEFI settings are configured to boot from USB. You may also need to disable Secure Boot.
4. Can I use the same method to create a bootable USB for both Windows Server 2022 and other Windows versions?
While the general process is similar, it’s recommended to use tools or methods specifically designed for each Windows version to ensure compatibility. You can also use our handy tool to easily handle the creation process for different versions.
5. What happens if I lose important files during the creation of a bootable USB?
If you lose important files during the creation process, you can use a data recovery tool like AOMEI FastRecovery to retrieve them from the USB drive.