Fixed! Not Enough Memory in the System to Start the Virtual Machine
In this guide, you can learn how to fix "not enough memory in the system to start the virtual machine" error with 6 step-by-step solutions. Also, get a best way to backup virtual machine.
By Lori / Updated on March 26, 2025
Running a virtual machine (VM) requires sufficient system resources, particularly RAM. However, users often encounter the error message "Not enough memory in the system to start the virtual machine", preventing the VM from booting.
If you encounter this issue, don't worry. In this guide, we'll explore why this error occurs and provide 6 proven methods to fix it, ensuring that your VM runs smoothly without memory-related interruptions. In addition, you can also learn how to backup for virtual machines to ensure data safety in case of system failure.
Causes of the "Not Enough Memory" Error
1. Insufficient Physical RAM: Your system may not have enough installed memory to support both the host OS and the virtual machine.
2. Over-Allocated Memory to VM:Assigning excessive memory to the VM leaves the host OS with insufficient resources.
3. Memory Fragmentation:Even with free memory available, fragmented memory blocks may prevent proper allocation.
4. Background Applications Consuming Memory:Other running programs and services may be using too much RAM, leaving insufficient space for the VM.
5. Hyper-V or VMware Configuration Issues:Certain settings in Hyper-V, VMware, or VirtualBox can interfere with memory management.
How to Fix How to Fix Not Enough Memory in the System to Start the Virtual Machine
Here we provide 6 effective methods to help you solve the "not enough memory in the system to start the virtual machine" error. You can try them one by one until the error is resolved.
Outdated or misconfigured virtualization software can cause memory-related errors. Firsto pen Hyper-V Manager, VMware Workstation, or VirtualBox to check for software updates in the settings menu.
Way 1. Adjust Virtual Machine Memory Allocation
To prevent memory allocation issues, adjust the VM memory settings to balance resource usage.
Step 1. Open Hyper-V Manager → Right-click the VM → Settings.
Step 2. Navigate to Memory and adjust the Startup RAM value.
Step 3. Enable Dynamic Memory to allow flexible RAM usage.
Step 4. If using VMware, open VMware Workstation, select the VM, and adjust the Memory allocation slider in Edit Virtual Machine Settings.

Way 2. Increase Physical RAM
If your system lacks sufficient RAM, upgrading can be a long-term solution.
Step 1. Check the total RAM in Task Manager → Performance → Memory.
Step 2. Verify the maximum RAM capacity supported by your motherboard.
Step 3. Purchase a compatible RAM module.
Step 4. Install the RAM by inserting it into the memory slot and securing it properly.
Way 3. Free Up System Memory
Closing unnecessary applications can free up RAM for the virtual machine.
Step 1. Open Task Manager (Ctrl + Shift + Esc).
Step 2. Identify memory-intensive programs under the Processes tab.
Step 3. Right-click on the application and select End Task.
Step 4. Restart the computer to clear cache memory.
Way 4. Modify Virtualization Platform Settings
Misconfigured settings can lead to memory allocation errors.
Step 1. Open Hyper-V Manager → Click Hyper-V Settings.
Step 2. Enable NUMA Spanning to improve memory management.
Step 3. Disable Automatic Start Action for unused VMs.
Step 4. In VMware, modify config.ini by adding: prefvmx.minVmMemPct = "50"
Way 5. Check Page File Settings
Virtual memory (page file) helps prevent RAM shortages.
Step 1. Go to Control Panel → System → Advanced System Settings.
Step 2. Under Performance, click Settings and go to the Advanced tab.
Step 3. Click Virtual Memory and select Custom Size.
Step 4. Set the page file size to 1.5x the installed RAM.
Way 6. Ensure Sufficient Storage Space
Low disk space can affect VM memory allocation.
Step 1. Open File Explorer and check available storage.
Step 2. Delete unnecessary files to free up space.
Step 3. Increase VM storage allocation via the virtualization software settings.
Step 4. Consider moving VM files to a larger drive.
Backing up your virtual machines to ensure data security (Free)
Once you have successfully fixed the Hyper-V not enough memory in the system to start the virtual machineerror, the next crucial step is to implement a reliable backup strategy. Backing up your virtual machines not only safeguards your data from potential loss but also provides restoration points in case of system failures.
Instead of a one-time backup, it is highly recommended to schedule regular automated backups to ensure that your data remains up-to-date and retrievable at any moment. To help you achieve this, I introduce 2 professional and free virtual machine backup solutions:
- AOMEI Cyber Backup – A centralized backup tool for managing multiple virtual machines efficiently.
- AOMEI Backupper Standard – A reliable solution for individual VM backups, ensuring full protection of your system, configurations, and personal data.
Way 1. Use AOMEI Cyber Backup for Centralized VM Backup
AOMEI Cyber Backup eliminates the complexities of traditional backup tools by offering agentless VM backup with a centralized management console. It not only supports secure VM backups but also provides Microsoft SQL database backup and Windows Server backup for comprehensive data protection.
✔ Effortless VM Backup – Complete VM backup creation in just three steps.
✔ Automated Scheduling – Configure backups to run daily, weekly, or monthly.
✔ Full VM Restoration – Restore the entire VM from any historical backup version.
✔ Wide Compatibility – Supports VMware ESXi 6.0 and later, as well as Windows Server 2012 and newer versions.
✔ Role-Based Access Control – Allows administrators to assign sub-accounts with limited privileges, preventing accidental misconfigurations.
To quickly backup VMs using AOMEI Cyber Backup. You can click the following button to download the perpetual free edition:
1. Bind devices: Access to AOMEI Cyber Backup web client, navigate to Source Device > Hyper-V > + Add Hyper-V to add a host. And then click … > Bind Device.

2. Create backup tasks: Navigate to Backup Task > + Create New Task, and set Task Name, Backup Type, Device, Target, Schedule.

- Task Name: Assign a recognizable name to your backup task.
- Backup Type: Choose the type of backup you want to perform.
- Device: Select the virtual machines you wish to back up.
- Target: Choose the backup storage destination (local storage or network storage).
- Schedule: Configure the backup frequency (daily, weekly, or monthly) and choose between full or incremental backup.
- Cleanup (Optional): Set up a retention policy to automatically delete older backup files beyond a specified period. (This feature is available in the upgraded version).
3. Start Backup: You can select Add the schedule and start backup now, or Add the schedule only.

Way 2. Use AOMEI Backupper for free VM backup
If you need a straightforward solution for backing up virtual machines, AOMEI Backupper Standard is an excellent choice. It enables you to back up the operating system, configurations, installed applications, and personal files from your VM.
Additionally, you can save your backups to a physical computer, another networked machine, or an external drive such as a USB flash drive, HDD, or SSD.
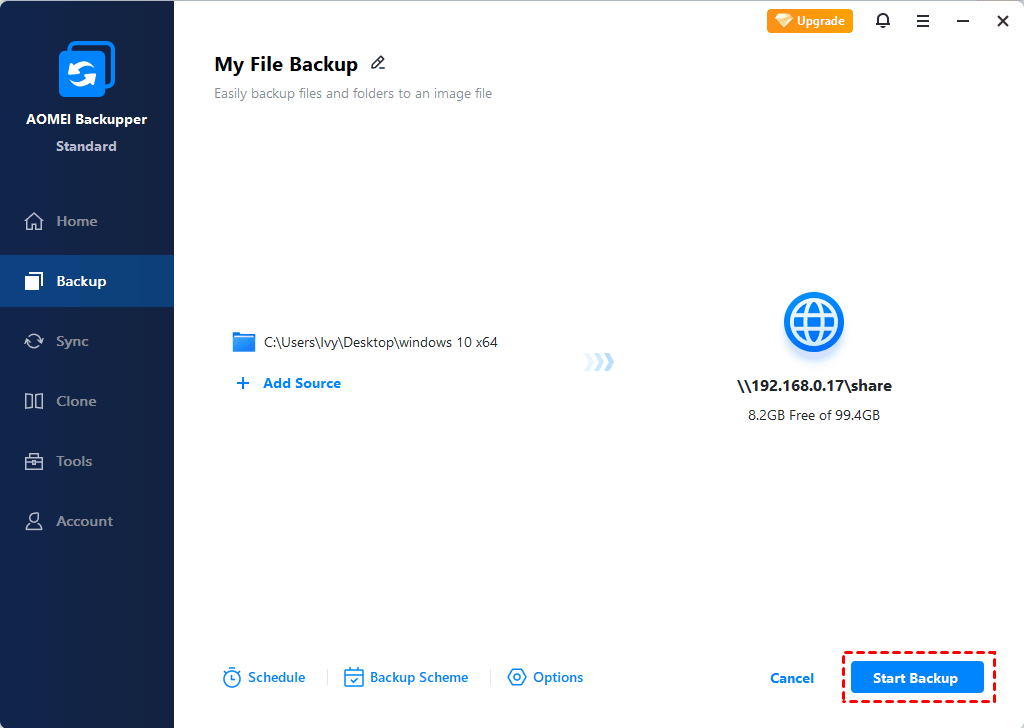
1. Launch AOMEI Backupper Standard. Then, click Backup and File Backup in turn.

Step 2. Click Add Folder to select the folder contains all items of your virtual machine.
Step 3. Select a destination path for your VM files. It can be any detected storage in Windows.
Step 4. Set schedule backup and click Start Backup.
Conclusion
The "Not enough memory in the system to start the virtual machine" error can be frustrating, but it is fixable. Adjusting VM memory settings, freeing up system resources, increasing physical RAM, and optimizing virtualization platform configurations are key solutions.
Additionally, backing up your VMs with AOMEI Cyber Backup or AOMEI Backupper Standard ensures data safety and quick recovery in case of system failures. By following the steps outlined in this guide, you can eliminate memory-related errors and improve the performance of your virtual machines.
FAQs
1. Why does my VM say "not enough memory" even though I have plenty of RAM?
This issue can arise due to physical memory limitations, improper memory allocation settings, or background processes consuming system resources.
2. Can I run a virtual machine with 4GB of RAM?
Yes, but performance will depend on the guest OS requirements. Windows-based VMs typically require at least 8GB for smooth operation.
3. How do I enable dynamic memory in Hyper-V?
Hyper-V dynamic memory can adjust the amount of RAM based on the application priority. Open Hyper-V Manager, go to Settings → Memory, and check the Enable Dynamic Memory option.
4. Will upgrading RAM fix the "not enough memory" issue?
Increasing RAM can help if your system genuinely lacks sufficient memory. However, optimizing VM settings is also necessary.
5. How does AOMEI Cyber Backup help with VM management?
AOMEI Cyber Backup provides automatic, scheduled backups and quick recovery options, ensuring VM data is protected against crashes and failures.