Fixed: There is No More Space for Virtual Disk in VMware
In VMware environments, running out of space on your virtual disk can cause serious performance issues and even render your virtual machine (VM) unusable. What caused this problem, and how to resolve it?
By Crystal / Updated on February 18, 2025
Error message: There is no more space for virtual disk '.vmdk'
In VMware vSphere ESXi 7.x/8.x, the error message "There is no more space for virtual disk '.vmdk" is typically triggered when a VM's .vmdk file reaches its allocated disk space limit, or when there is insufficient physical space on the host machine to accommodate further growth.

✍How to Check Available Space in VMware
Before taking action, you can check the current disk usage:
- In VMware vSphere: Navigate to the VM’s settings, select the “Hard Disk” option, and check the allocated disk size vs. the used space.
- In VMware Workstation: Go to VM settings > Hard Disk and check the virtual disk file size and available space.
Fixed: "There is no more space for virtual disk" in VMware [5 options]
In VMware VMs, the error "there is no more space for virtual disk" can be a serious issue for many users because it not only disrupts with the VM's performance but also runs the risk of data loss or system failure.
Next, we will offer a thorough solution to deal with this problem.
Option 1: Expand the virtual disk size
One of the quickest solutions is expanding the virtual disk size. Here’s how you can add more storage to the VM in VMware:
1. In VMware vSphere Client, power off the VM.
2. Navigate to the VM, and click Edit Settings > Virtual Hardware > Hard Disk.
3. Increase the disk size to a higher value depending on your needs.
4. Click OK to save changes.
After expanding the virtual disk, you’ll need to extend the partition inside the guest operating system to use the newly allocated space.
For Windows, you can do this through the Disk Management tool; for Linux extending disk space, use tools like gparted.
Option 2: Increase host storage
If your physical host storage is full, you need to either:
- Free up space by deleting unnecessary files or moving them to another location.
- Add more storage to the host machine by attaching an additional physical disk.
Ensure that the new storage location is accessible and that VMware can use it to expand the virtual disk.
Option 3: Convert fixed disk to dynamic disk
If you’re using a fixed-size virtual disk, VMware doesn’t allow dynamic growth. You can convert your fixed-size virtual disk to a dynamically allocated disk:
1. Shut down the VM.
2. Clone the virtual disk or use VMware’s vmkfstools command to convert the fixed disk to a dynamic one.
3. Delete the original fixed-size disk and attach the newly created dynamic disk to the VM.
This way, the disk will grow automatically as more space is needed, without running into the same issue in the future.
Option 4: Add a new virtual disk
If expanding the current disk isn't enough, or you want to spread the load across multiple disks, you can add a new virtual disk:
1. Power off the VM.
2. In the VM settings, go to the “Hard Disk” section and click on “Add New Device.”
3. Choose to create a new virtual disk and allocate the desired size.
4. Once created, power on the VM, and format the new disk inside the guest OS to start using it.
Option 5: Clean up and consolidate the snapshots
Delta files in snapshots can accumulate VMware snapshot size and consume significant disk space over time, especially if they’re not consolidated or cleaned up regularly.
- Snapshot Cleanup: Deleting unnecessary snapshots However, be careful not to delete snapshots that are still necessary for your backup or restore purposes.
- Snapshot Consolidation: When you delete or commit a snapshot, VMware needs to consolidate the changes made in the delta file back into the base virtual disk (.vmdk). If this process is incomplete, it can lead to orphaned snapshot files that still take up space.
📌 To prevent the "There is no more space for virtual disk"error further:
✔ Choose dynamic disk instead of over-allocating disk space upfront.
✔ Set up alerts within VMware to notify you when disk usage reaches a certain threshold (e.g., 80% full).
✔ Use thin provisioning to allocate only the space that’s actually used by the virtual disk.
✔ Always have backups in place and avoid keeping unnecessary snapshots.
Always protect virtual machine backups to prevent disk errors
When dealing with virtual machine-related issues, data backup is a crucial step that cannot be ignored. No matter what method you use to solve the problem of insufficient disk space, the risk of data loss always exists. Once an operational error or other unexpected situation occurs, important data may disappear in an instant, causing significant losses to work and life.
Therefore, using AOMEI Cyber Backup to regularly back up VMware ESXi VMs maximizes data security. It includes automated backup scheduling features, which means you can set the software to perform regular backups at intervals that suit you.
When disaster strikes, you can enable instant recovery to restore your VMware virtual machines easily.
1. Choose whether you want to back up your entire system, specific files, partitions, or disks.
Step 1. Click Source Device >> VMware >> + Add VMware Device to add vCenter or Standalone ESXi host.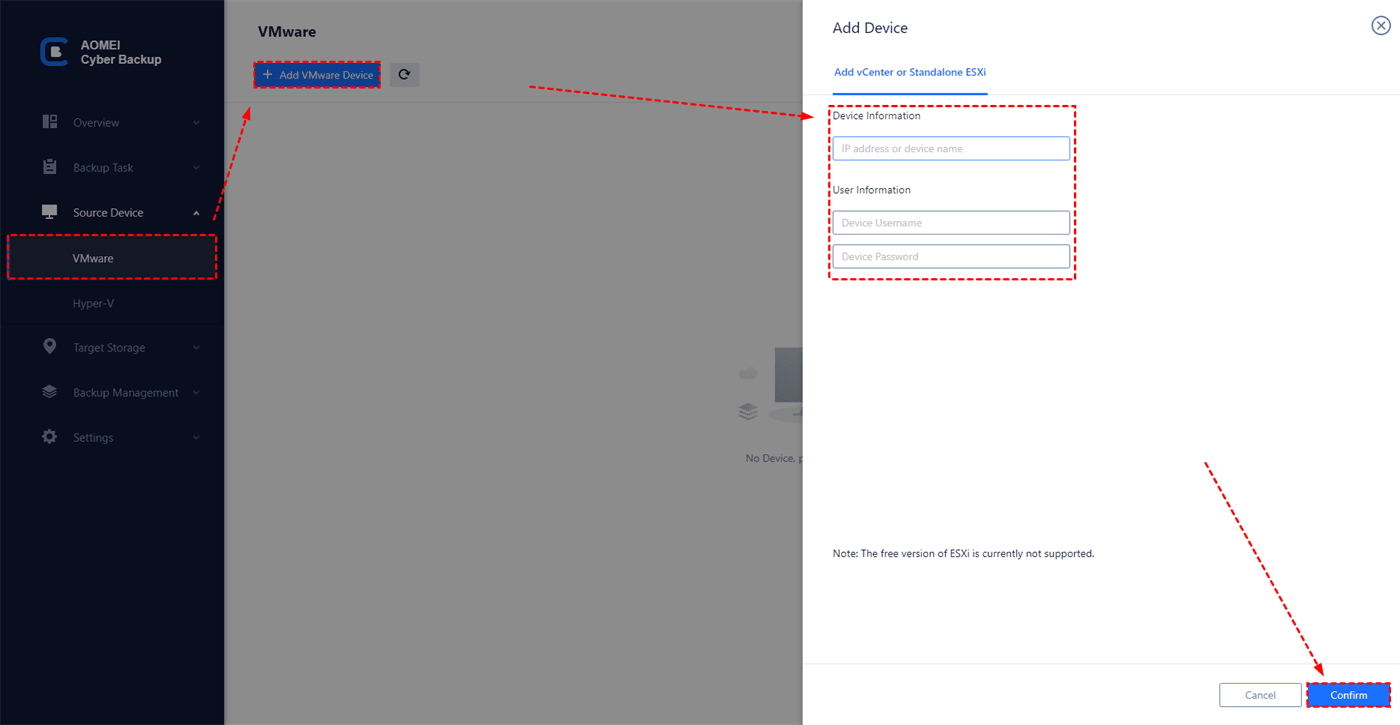
Step 2. Create backup task: Click Backup Task >> Create New Task.
✦ Enter task name and select virtual machines and destination (such as an external hard drive, NAS, or network share).
✦ Archive (Optional): enable archiving backup versions to Amazon S3 and click Select to choose the added Amazon S3.
✦ Schedule (Optional): schedule backup as full / incremental / differential backup and specify time to run the backup, so you never have to worry about forgetting to back up your data.
✦ After configuring the backup task, review the information and click Start Backup.
Step 3. Restore
✦ In case of a disaster, simply use the Restore wizard to restore your data to its original state quickly.
Conclusion
When encountering this issue again, follow the steps in the text to resolve the "there is no more space for virtual disk vmdk" error. At the same time, make sure to back up to avoid irreversible losses caused by virtual machine data loss.