A Complete Guide to How to Remove Core Sync from Mac
Core Sync is an essential part of Adobe Creative Cloud that can become an unwanted burden on your Mac's resources. This article explores the reasons why you might want to remove Core Sync from your Mac, and provides detailed, step-by-step instructions on how to do so effectively.
By Sebastian Updated on August 13, 2024
Cannot remove Core Sync on Mac OS
“Hello,
A few weeks ago I wanted to take a trial for Photoshop and by that, I had to install Creative Cloud. A week later I removed Photoshop and CC altogether from my Mac, however, Core Sync and similar services still show in the activity monitor and there's not much I can do about it but close it.
It starts with the computer. How do I remove these things? They do not show up in Applications.”
– Community.Adobe
Understanding Core Sync on Mac and Why You Might Want to Remove It
What is Mac Core Sync
Mac Core Sync is a process associated with Adobe Creative Cloud, responsible for syncing files between your Mac and Adobe’s servers. While it serves a useful purpose for Adobe users, it can also be a resource-intensive process that some users may find unnecessary—particularly if they no longer use Adobe services. Additionally, Core Sync can occasionally cause system slowdowns or conflicts with other software, making it a candidate for removal.
How Does It Affect Your Mac?
There are several reasons why you might want to remove Core Sync from your Mac, particularly if it no longer serves your needs or is causing system issues. Here are some common motivations:
⚡Resource Consumption: Core Sync can become resource-intensive, consuming significant amounts of CPU and memory.
⚡System Conflicts and Slowdowns: In some cases, Core Sync can cause conflicts with other software or lead to system slowdowns.
⚡Improving Startup Speed: Core Sync may be set to launch automatically when you start your Mac, which can increase startup time.
⚡No Longer Using Adobe Creative Cloud: If you’ve stopped using Adobe Creative Cloud or have switched to other software solutions, Core Sync becomes redundant.
⚡Battery Life Preservation: For MacBook users, reducing the number of background processes can help preserve battery life. Core Sync can drain your battery more quickly.
How to Remove Core Sync from Mac
If you have Adobe Creative Cloud installed on your Mac and you want to temporarily disable Core Sync without completely uninstalling it, you can pause the background sync, remove Core Sync from macOS Login Items, and turn off the Finder extension.
To Pause Syncing:
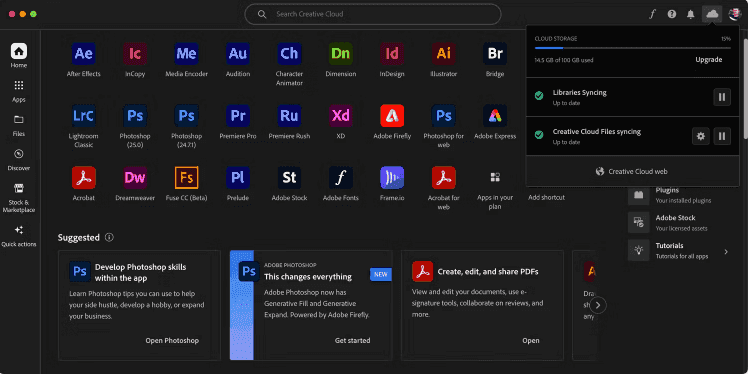
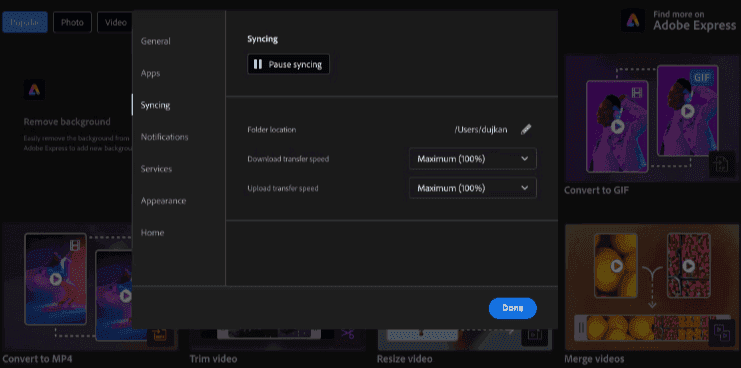
Open Creative Cloud and click on your profile icon in the upper-right corner. Go to Preferences, select Syncing from the sidebar, and then choose Pause Syncing on the right.
To Prevent Creative Cloud from Auto-Launching:
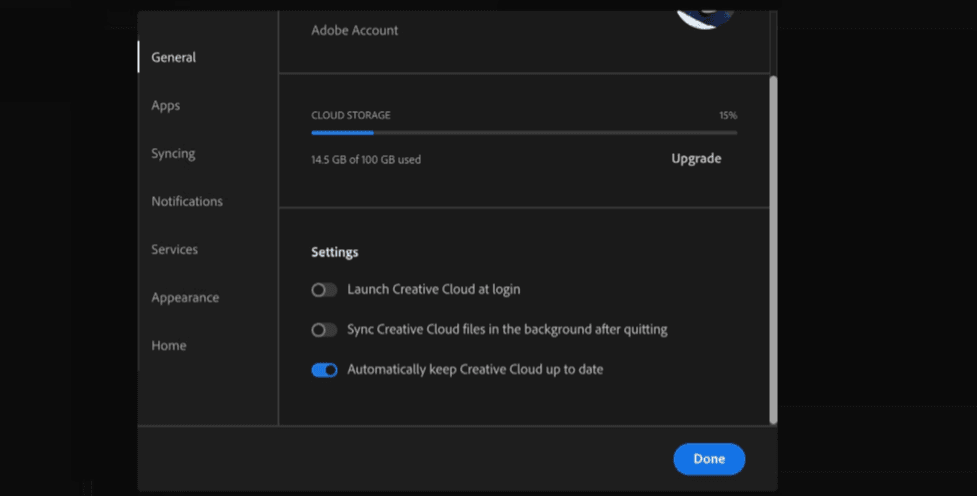
In the sidebar, go to General, scroll down, and turn off Launch Creative Cloud at login and Sync Creative Cloud files in the background after quitting. Finally, click Done.
How to Prevent the Syncing Component from Running
Go to System Settings > General and click on Login Items. Then, switch off Adobe Creative Cloud under Allow in the Background.
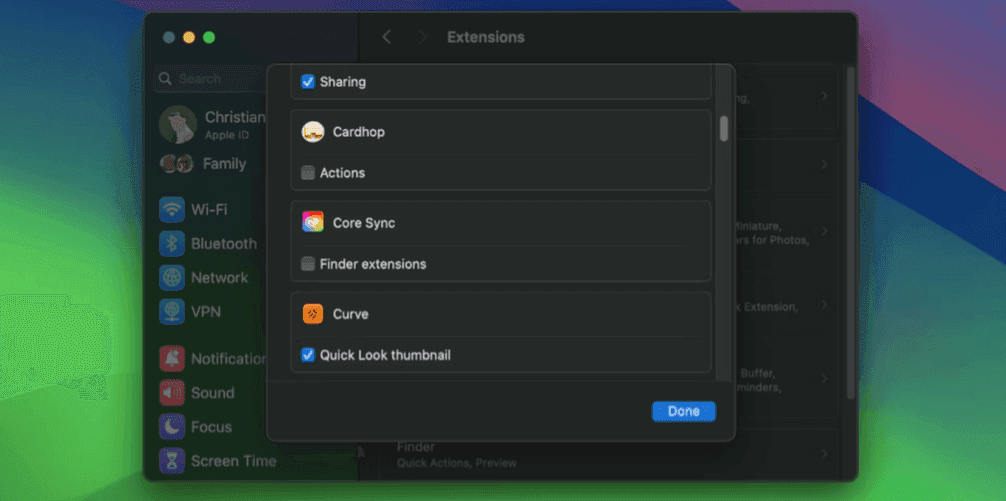
Next, disable Adobe's extension that links Core Sync with Finder. Navigate to System Settings > Privacy & Security, scroll down and select Extensions under Others, click on Added extensions, uncheck Finder extensions under Core Sync, and click Done.
Alternative Sync Tool: AOMEI Backupper Sync Files on Mac
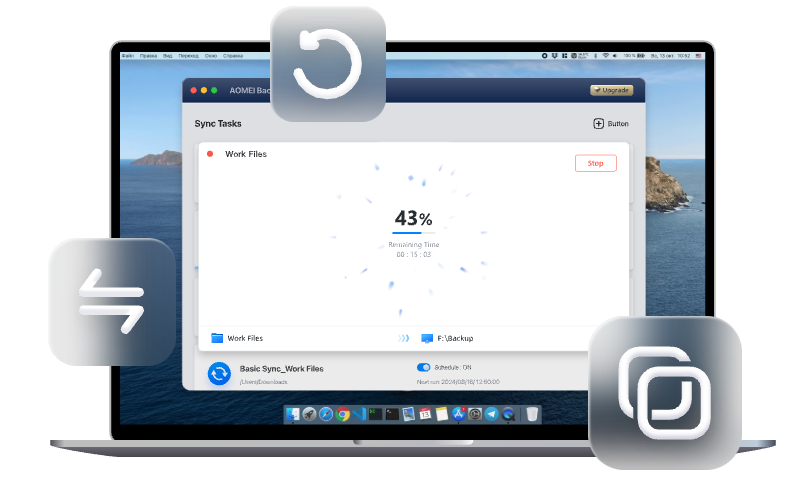
After you've disabled or uninstalled MAC Core Sync, you may be looking for an alternative to third-party software for file synchronization. Rather than stressing over it, consider a dependable Mac data sync solution. AOMEI Backupper Mac is a top-notch option for keeping your vital files synced and safe. With its easy-to-use interface and robust features, managing your data becomes simple, ensuring your important files are always secure and within reach.
Free Mac sync software to sync files and folders automatically
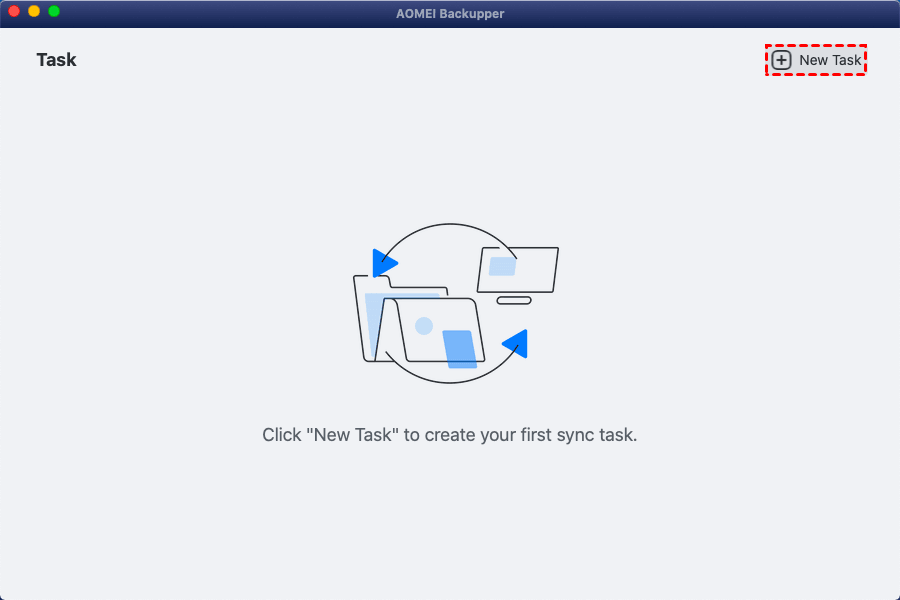
Step 1: Start by downloading and installing the AOMEI Backupper Mac. Once it's installed, launch the software and click on "New Task" to get started.
Step 2: Pick the synchronization method that best suits your needs. For example, if you need to sync files between two folders, you might choose Mirror Sync or Two-Way Sync.
Basic Sync: Moves files from one place to another, but keeps them in the original spot as well.
Mirror Sync: Creates an identical copy of your files at the destination, and removes any files at the destination that are no longer in the source.
Two-Way Sync: Ensures files in both the source and destination remain updated by reflecting any changes made in either location.

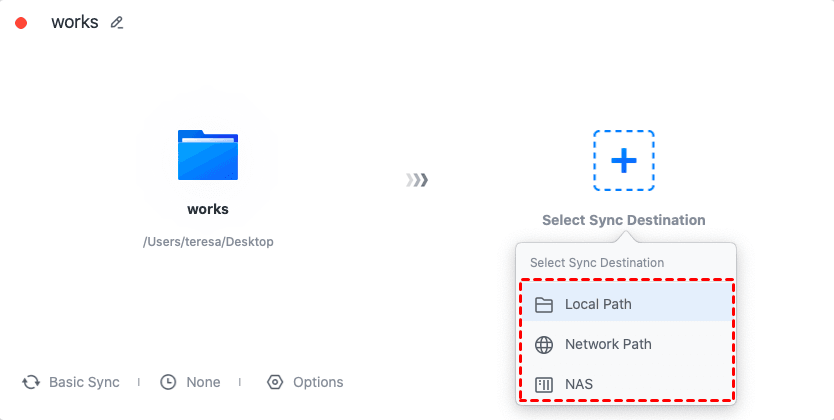
Step 3: Choose the folders you want to sync—one as the source and the other as the destination.
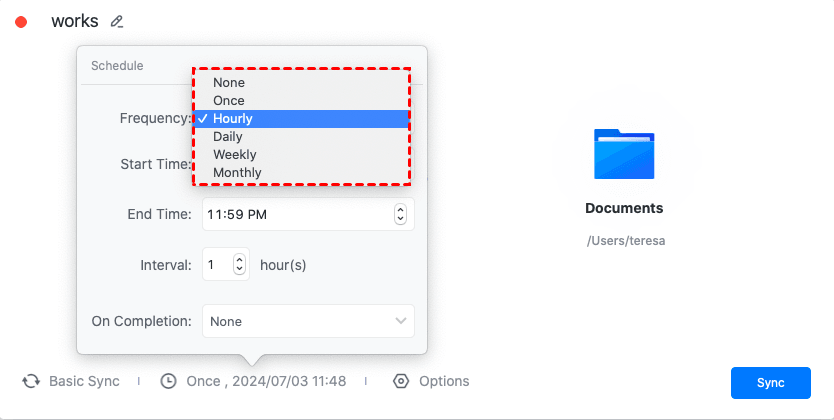
Step 4: Adjust the sync schedule and other settings according to your preferences.
You can choose how often the sync happens—whether it’s once, hourly, daily, weekly, or monthly. Additionally, you can set a specific start time and decide if the system should hibernate or shut down once the sync is done.
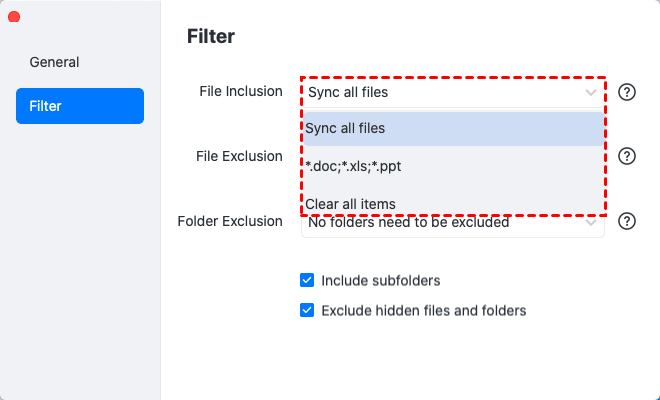
In the Options menu, you have the ability to fine-tune the sync process by including or excluding specific files and folders.
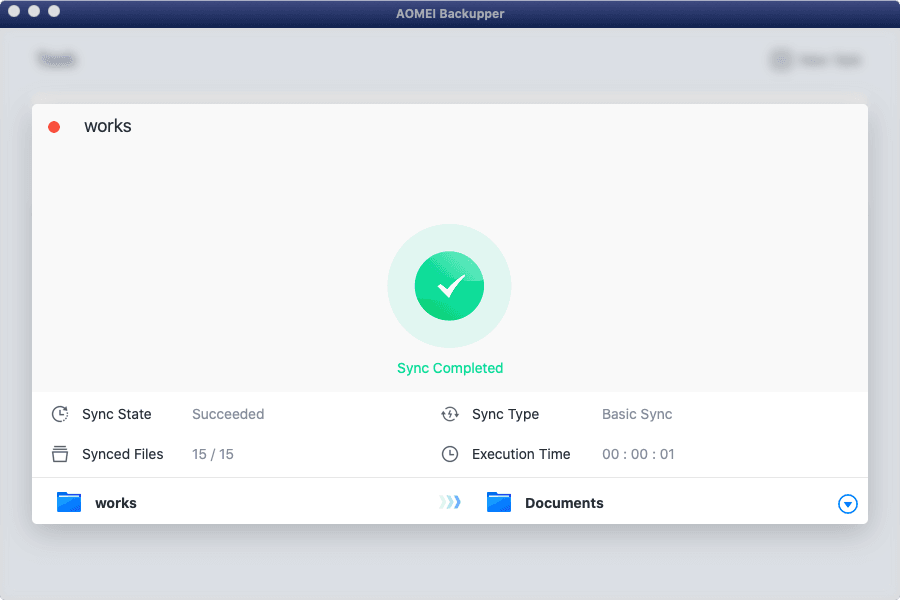
Step 5: After setting everything up, click "Sync" to begin the process.
FAQs About How to Remove Core Sync from Mac
Q 1: What happens if I delete Core Sync from my Mac?
A 1: Deleting Core Sync will stop the synchronization of files between your Mac and Adobe Creative Cloud. If you rely on Adobe apps, you might lose the ability to sync files across devices.
Q 2: Is there a risk of losing files if I uninstall Core Sync?
A 2: Uninstalling Core Sync won’t delete any of your files, but it will stop them from syncing with Adobe’s servers. Make sure to manually back up any important files before uninstalling.
Q 3: Can I reinstall Core Sync after removing it?
A 3: Yes, you can reinstall Core Sync by downloading Adobe Creative Cloud again. During installation, Core Sync will be reinstalled along with the other necessary components.
Expert Tips for Managing Mac Performance
- Regular System Maintenance: Perform routine maintenance tasks, such as clearing cache files and uninstalling unused applications, to keep your Mac running smoothly.
- Monitor Background Processes: Use Activity Monitor to keep an eye on background processes that may be consuming resources unnecessarily. Disable or quit those that you don’t need.
- Keep Software Updated: Ensure that your macOS and all installed applications are up-to-date. Updates often include performance improvements and bug fixes.
Conclusion
Core Sync is an essential component for Adobe Creative Cloud users, but for those who no longer need it, removing it can significantly enhance your Mac’s performance. Whether you choose to uninstall Core Sync completely, disable it temporarily, or prevent it from launching automatically, this guide provides you with the knowledge and tools to take control of your system. Remember to back up your data using AOMEI Backupper before making any major changes, and stay informed about managing your Mac’s processes for optimal performance. By following these steps, you can maintain a streamlined, efficient system that meets your specific needs.