How to Transfer Photos from Mac to Hard Drive: 2 Easy Ways
Discover why transferring photos to an external hard drive is essential, how to prepare your devices, follow step-by-step methods, troubleshoot issues, and organize your photos effectively.
By Lily Updated on September 30, 2024
Benefits of storing photos externally
Storing your photos to an external hard drive offers several compelling advantages that can enhance both your digital organization and data security. Some of the advantages are listed below:
✔ Freeing Up Space on Your Mac
Photos, especially in high resolution, can quickly consume gigabytes of space. By moving them to an external source, you not only free up valuable internal storage but also improve your Mac’s overall performance.
✔ Enhanced Data Security
Storing photos externally adds an extra layer of protection against data loss. In the event of a Mac malfunction, theft, or accidental damage, having your photos on a separate drive can be a lifesaver.
✔ Easy Accessibility and Portability
External drives make it easy to access your photos across multiple devices. Whether you’re using another Mac, a Windows PC, or even a smart TV, you can connect your external drive and access your entire photo library without needing to sync or transfer files.
✔ Better Organization and Management
When you store photos externally, you have the opportunity to organize them more effectively. You can create a dedicated photo library on the external drive, complete with custom folders, albums, and naming conventions that make it easier to locate specific images.
Then, how to backup Mac photos to external hard drive? Please keep reading.
👉 Prepare your hard drive for photo transfer
👉 How to copy photos from Mac to external hard drive🔥
👉 Troubleshoot 2 common issues
Prepare your hard drive for photo transfer
Before you begin transferring your photos from your Mac to an external hard drive, it’s crucial to ensure that your hard drive is properly prepared. Follow the instructions below:
1. Choose the right external hard drive
- Storage Capacity: Depending on the size of your photo library, you’ll need to choose a drive with enough storage space. It’s a good idea to opt for a drive that offers more capacity than you currently need to accommodate future growth. For large photo collections, a drive with at least 1TB of space is recommended.
- Speed and Performance: If you’re dealing with high-resolution photos or large video files, consider a drive with faster data transfer speeds, like an SSD (Solid State Drive) or a drive with a Thunderbolt connection. This will make the transfer process quicker and more efficient.
2. Connect the hard drive to your Mac
Most external hard drives connect via USB or Thunderbolt cables. Simply plug the drive into your Mac’s corresponding port. For newer Macs, you might need an adapter if the drive uses an older USB standard.
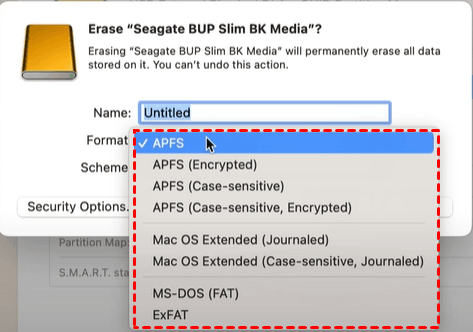
3. Ensure proper format for macOS
Before transferring any files, you need to make sure that your hard drive is formatted correctly for macOS. The recommended format is APFS for macOS High Sierra and later, or HFS+ (Mac OS Extended) for older macOS versions.
Here’s how to check and reformat if necessary:
- Go to Applications > Utilities > Disk Utility.
- Select your external hard drive from the list on the left.
- Click the Erase button at the top. The format of the drive is listed below the drive’s name.
- If it’s not APFS or HFS+, select the appropriate format, and click “Erase.”
How to copy photos from Mac to external hard drive
To transfer photos from Mac to external hard drive, there are two methods for your reference.
Method 1: Move Photos Library to external hard drive
1. Quit Photos.
2. In the Finder, open the folder that contains Photos Library. By default, Photos Library is stored in the Pictures folder of your home folder. You can open your home folder by choosing Go > Home from the Finder menu bar.
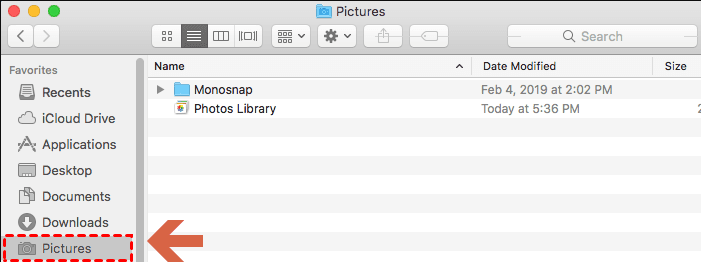
3. Drag Photos Library to a location on your external storage device.
4. After the move is finished, double-click Photos Library in its new location to open it.
✍ Helpful tips:
- If you use iCloud Photos, or to access the library via the Photo Picker in other apps, designate this library as the System Photo Library.
- If you want to delete the original Photos Library to save storage space on your Mac, you can drag it from its original location to the Trash. Then empty the Trash.
- Always make sure that your storage device is turned on and available before opening Photos. If Photos can't find the device, it stops using the Photos library stored there and will create a new empty library at the default location (~/Pictures).
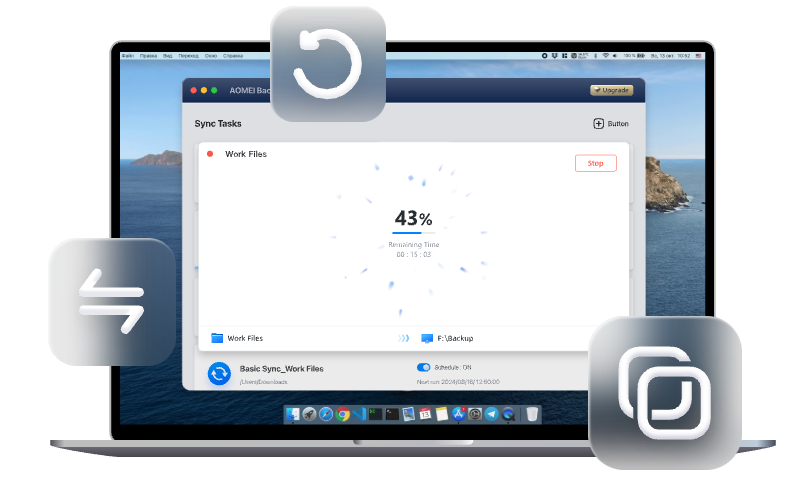
Method 2: Transfer photos to external hard drive with a free sync tool
The top file copy software for Mac – AOMEI Backupper Mac – is also a great tool for transferring photos. It provides comprehensive sync features to meet all your needs.
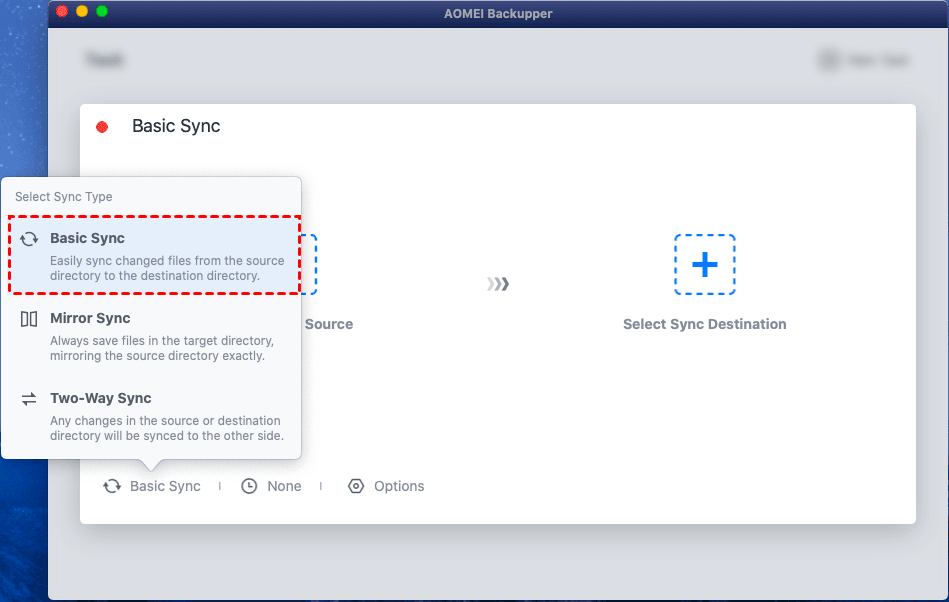
💛 Basic Sync: Easily sync changed files from the source directory to the destination directory.
💛 Mirror Sync: Always keep the files in the destination directory exactly the same as the source directory.
💛 Two-Way Sync: Any changes in the source or destination directory will be synced to the other side.
💛 Schedule Sync: Set a sync task to run Once, Hourly, Daily, Weekly or Monthly based on your need.
💛 File Filtering: Include or exclude specific file/folder types from the sync task.
Download AOMEI Backupper now and learn how to copy photos on Mac to external hard drive using AOMEI Backupper below.
Free Mac sync software to sync files and folders automatically
Prerequisites: AOMEI Backupper only supports an external hard drive formatted as exFAT. If your external drive is in other formats, format it as exFAT in advance.
1. Install and launch AOMEI Backupper Mac. In the main interface, click New Task in the top-right corner.
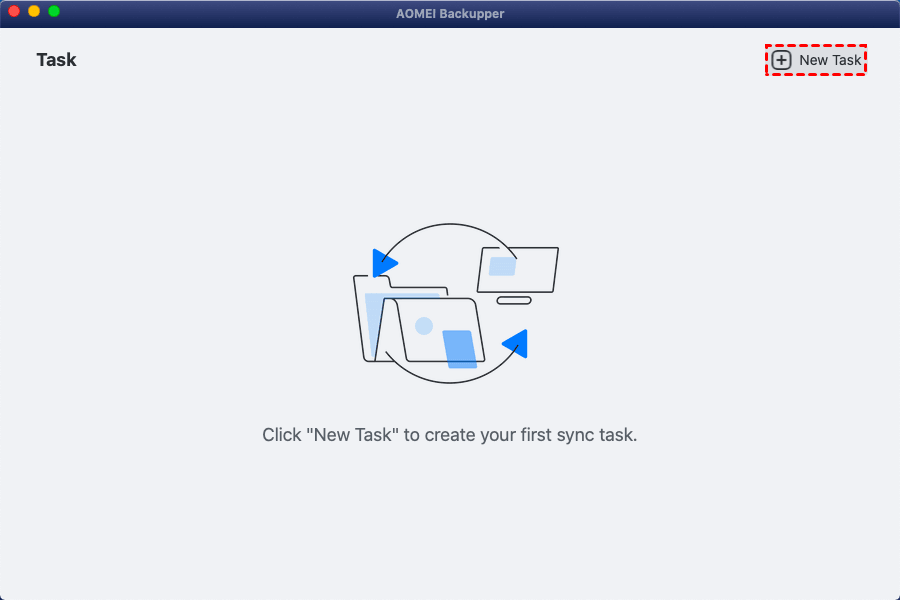
2. Select your desired sync type. Here I take Basic Sync as an example.
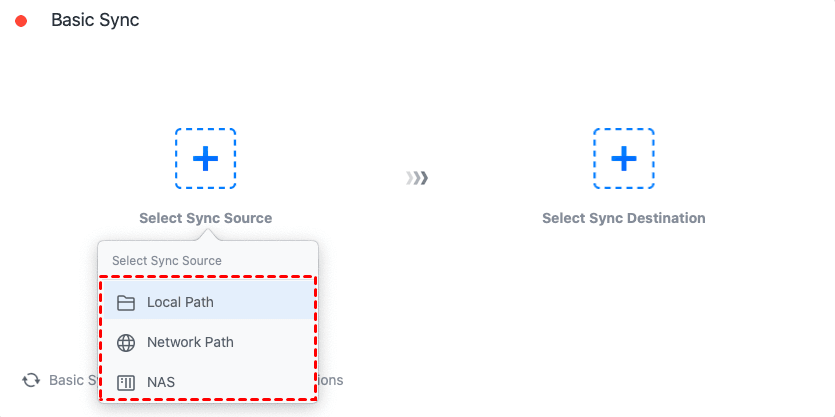
3. Click Select Sync Source > Local Path to choose the folder that contains the photos you want to transfer.
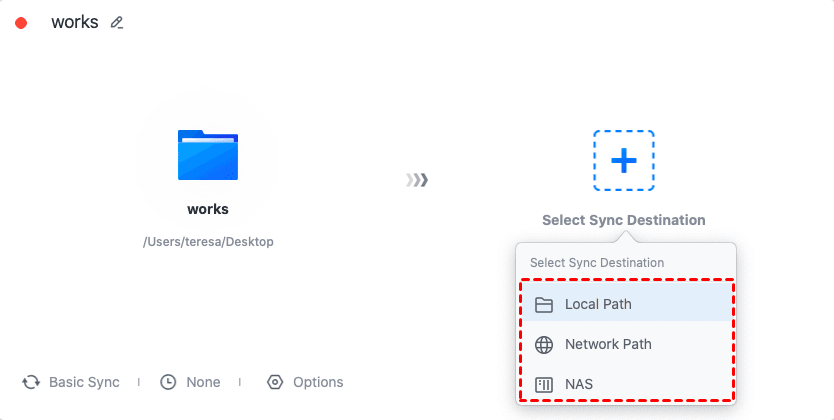
4. Click Select Sync Destination > Local Path to choose the external drive to receive the copied files.
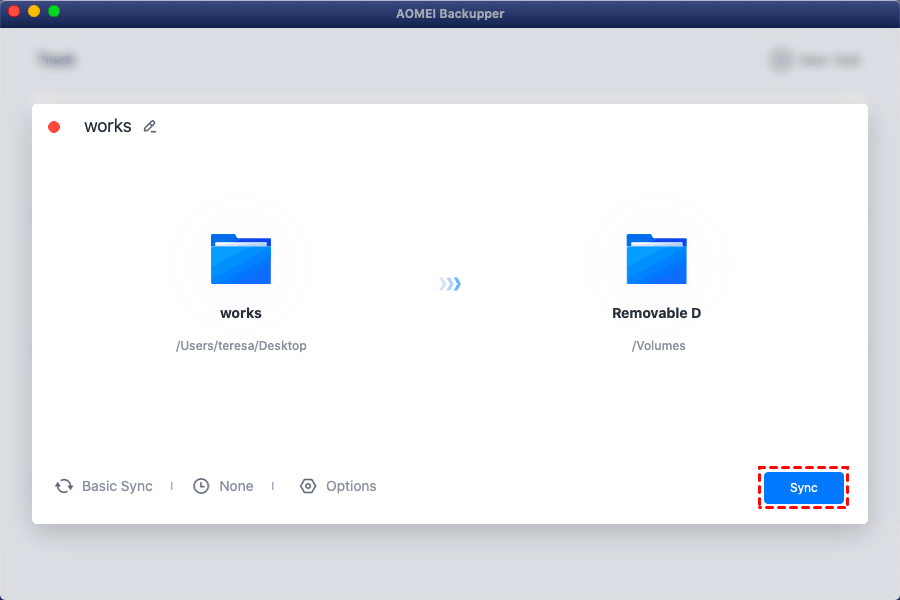
5. Click the clock icon to enable Schedule as necessary. Finally, click on the Sync button to begin photo transfer.
Troubleshoot 2 common issues
Transferring photos from your Mac to an external hard drive is usually straightforward, but sometimes things don't go as planned. Here’s how to tackle the 2 most frequent challenges you might encounter.
Issue 1: Hard drive not recognized
If you’ve connected your drive and it’s not showing up in Finder, here’s what to do:
✅ Check the Connection: Make sure the cable is securely connected to both the Mac and the hard drive. If possible, try using a different cable or port to rule out a faulty connection.
✅ Verify Power Supply: If your external hard drive has an independent power source (like some desktop models), ensure it’s properly powered.
✅Check in Disk Utility: Open Disk Utility and see if the drive appears there. If it does, but not in Finder, you may need to manually mount the drive by selecting it in Disk Utility and clicking “Mount.”
✅Update macOS and Drivers: Ensure your Mac is running the latest version of macOS, as software updates can sometimes resolve compatibility issues. Additionally, if your external drive has specific drivers, make sure they are up to date.
Issue 2: Slow transfer speeds
If you’re experiencing unusually slow transfer speeds, follow the troubleshooting steps below:
✅ Check the Connection Type: USB 2.0 connections are significantly slower than USB 3.0 or Thunderbolt. If your drive supports faster connections, make sure you’re using the appropriate cable and port.
✅ Optimize File Transfer: Large batches of small files can slow down transfer speeds. If possible, try transferring fewer files at a time or compressing them into a single archive (like a ZIP file) before transfer.
✅ Close Background Applications: Running multiple applications simultaneously can consume system resources and slow down the transfer process. Close unnecessary apps to free up RAM and CPU resources.
✅ Check the Drive for Errors: Use Disk Utility to check the external drive for errors. Select the drive in Disk Utility and click First Aid to repair any issues that could be causing slow performance.
Summary
Now you know how to transfer photos from Mac to hard drive. It’s a smart move that offers numerous benefits, from freeing up space on your device to enhancing the security of your precious memories. By carefully preparing your hard drive, following the step-by-step transfer methods, and troubleshooting any issues that arise, you can ensure a smooth and efficient process.
AOMEI Backupper is an excellent choice for reliable file transfer on Mac. It allows you to seamlessly transfer files between different locations, and with the Schedule feature enabled, it can automatically copy any changes. Give it a try!