How to Transfer Photos from SD Card to Mac: A Complete Guide
This article provides a comprehensive guide on how to transfer photos from an SD card to a Mac. It covers three detailed methods for transferring photos, including using the Photos app and Google Photos. The article also introduces AOMEI Backupper, a tool for syncing and managing your photos. Finally, it offers practical tips for optimizing the photo transfer process.
By Sebastian Updated on August 6, 2024
Introduction
Transferring photos from an SD card to a Mac is a common task for photographers and casual users alike. Whether you're backing up vacation snapshots or organizing professional shoots, knowing how to move images to your Mac efficiently is essential. This guide will walk you through the process, ensuring your photos are safely and quickly transferred.
Why Transfer Pictures from SD Card to Mac
An SD card is a compact storage device used in mobile phones to expand their storage capacity. These cards come in various sizes and can hold different types of files, including videos, music, photos, and documents. However, due to their limited storage space, SD cards can fill up quickly. Therefore, it's essential to back up your data and clear some space on the SD card regularly to ensure it continues to function effectively.
⚡Data Backup: Ensuring your photos are stored on your Mac protects them from accidental loss or damage to the SD card. Macs often have more reliable storage and can be further backed up to external drives or cloud services.
⚡Editing and Organizing: Macs come with powerful photo management and editing software like Photos, and third-party apps like Adobe Lightroom. Transferring photos to your Mac allows you to organize, edit, and enhance your pictures more efficiently.
⚡Freeing Up Space: Moving photos from your SD card to your Mac frees up space on the card, allowing you to take more pictures without worrying about running out of storage.
⚡Sharing and Accessibility: Once transferred, photos can be easily shared via email, social media, or other platforms. They are also accessible from your Mac anytime, without needing to insert the SD card.
⚡Security: Keeping your photos on your Mac reduces the risk of losing them due to a damaged or lost SD card. Additionally, Macs can be configured to back up automatically to cloud services like iCloud, ensuring your photos are always safe.
By transferring pictures from an SD card to a Mac, you can safeguard your memories, optimize your workflow, and enjoy seamless access and sharing options.
How to Import Photos from SD Card to Mac
Moving photos from an SD card to a MacBook is a straightforward process with several methods available. You can use the Photos app, an SD card reader, or Google Photos to move images effortlessly. Let's go through the steps for each method to help you import photos from an SD card to your Mac.
Method 1: Quickly Transfer Files from an SD Card to a Mac with the Photos APP
SD cards are a popular choice for storing various types of data due to their compact size and versatility. While they can be directly used in smartphones, connecting them to a Mac requires an SD card reader. Here’s a straightforward guide to importing photos from an SD card to your Mac using an SD card reader:
1. Connect your SD card to your Mac using an SD card reader.
2. Launch the Photos app on your Mac. You should see the import icon appear.
3. Click on the name of your SD card under the import icon. If it doesn't appear, look for it in the upper left corner of the screen.
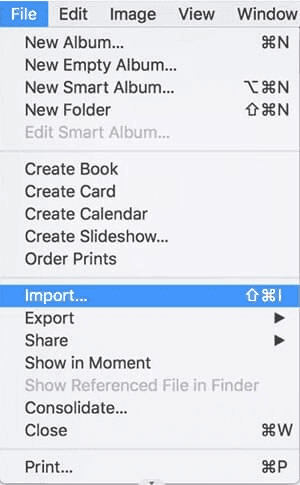
4. Go to the File menu, select Import, and a Finder window will open. Find your SD card in the Finder, select the images you want to transfer, and click Import.
You’ve now successfully moved your photos from the SD card to your Mac using an SD card reader. This process not only keeps your photos safe but also frees up space on your SD card for more pictures.
Method 2: Download Pictures from SD Card Using Google Photos
How to transfer pictures from an SD card to your Mac? If you prefer a wireless method, Google Photos is a great option. This service syncs your photos and videos, ensuring they're accessible on both your SD card and Mac. To import photos from an SD card to your Mac using Google Photos, follow these steps:
Step 1: Download the Google Photos app on your phone, ensuring the SD card is inserted.
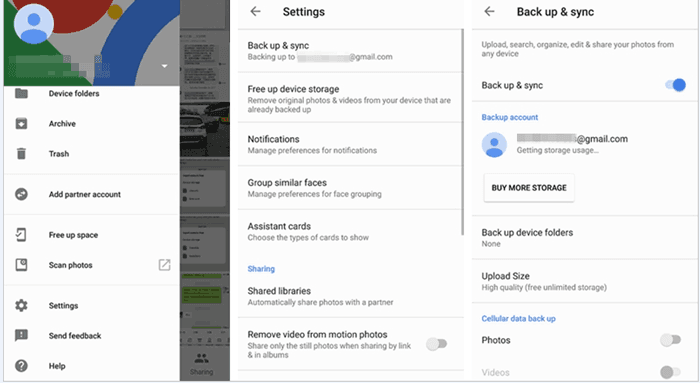
Step 2: Open Google Photos, sign in, and complete the setup. Go to Menu > Settings > Back up & sync. Select the folder containing your SD card photos to back up.
Step 3: On your computer, visit the Google Photos website and log in with the same account. Your uploaded photos will appear, and you can download them to your computer.
Method 3: Import Photos from SD Card to Mac Using Professional Software
Opting for a professional Mac file syncing tool can be an excellent choice for users who want to sync their photos from SD cards to Mac seamlessly. AOMEI Backupper Mac provides a superior solution for both backup and synchronization needs. With its intuitive interface and powerful features, safeguarding your files becomes straightforward. AOMEI Backupper ensures reliable and efficient data synchronization, keeping your information secure at all times.
- Effortlessly Sync Your Mac: Easily keep all your files on a Mac synchronized to ensure complete data protection.
-
Variety of Sync Options: Select from Basic Sync, Mirror Sync, or Two-Way Sync to meet your specific requirements.
-
Versatile Sync Destinations: Sync files to various storage solutions, including local storage, cloud services, NAS devices, external hard drives, USB drives, SD cards, and more.
-
Fast and Secure: Enjoy rapid file synchronization with advanced technology, ensuring your data remains encrypted.
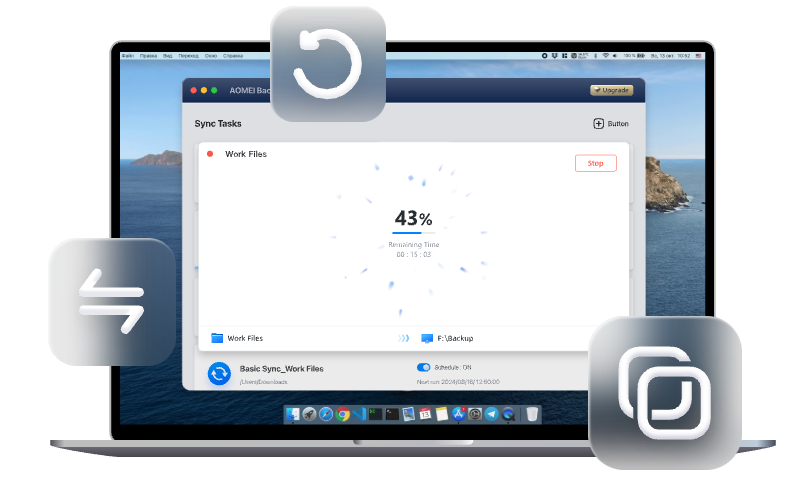
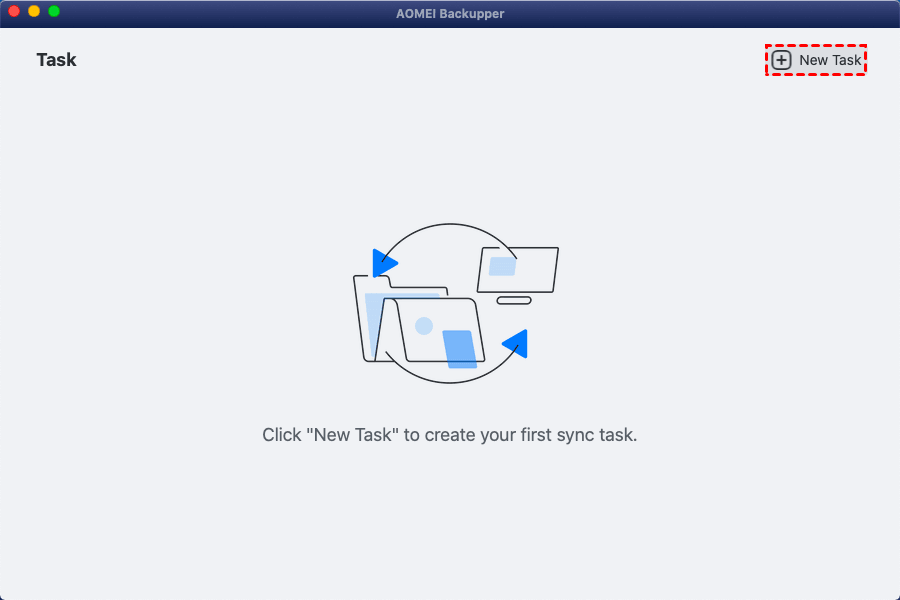
Step 1: Download and install AOMEI Backupper Mac. Open the application and click "New Task" to get started.
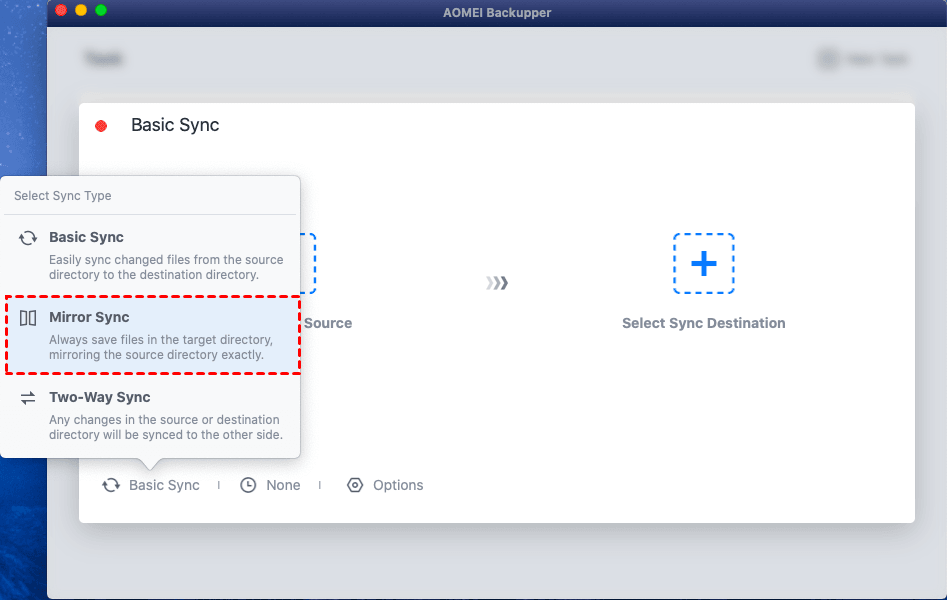
Step 2: Choose the synchronization method that best suits your needs. For syncing between two folders, consider Mirror Sync or Two-Way Sync.
Basic Sync: Moves files from one place to another without deleting them from the original location.
Mirror Sync: Creates an exact copy of source files at the destination, including deleting destination files that no longer exist in the source.
Two-Way Sync: Keeps files in both the source and destination updated, ensuring that changes in one location are reflected in the other.
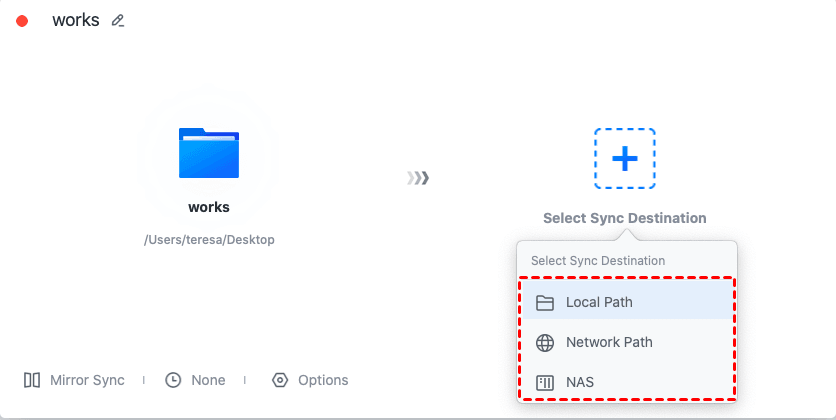
Step 3: Select the SD card as the source folder and the destination folder for synchronization.
Step 4: Adjust the sync schedule and other options to match your workflow preferences.
You can set the sync frequency to once, hourly, daily, weekly, or monthly. Additionally, you can schedule a specific start time and decide if the system should hibernate or shut down after the sync completes.
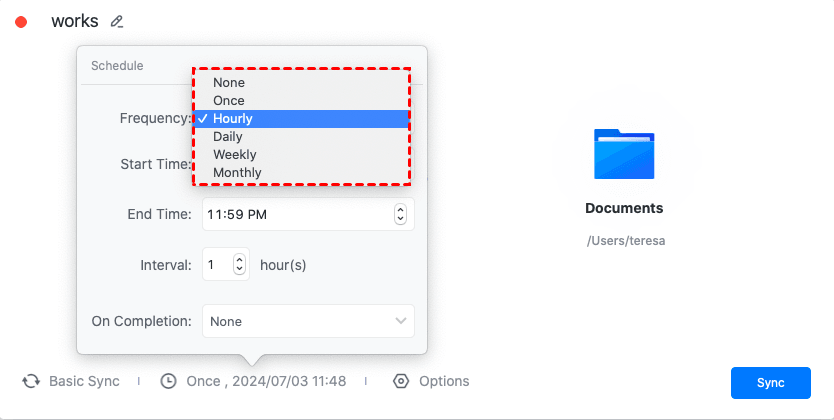
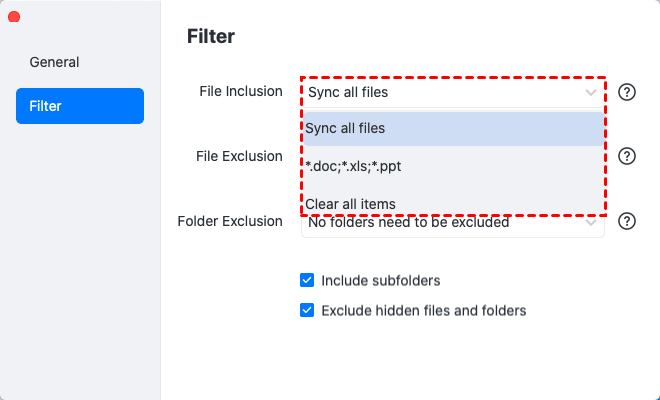
In the Options menu, you can tailor the sync process with settings such as File Inclusion, File Exclusion, and Folder Exclusion.
Step 5: Once all settings are configured, click the "Sync" button and let the process complete.
Frequently Asked Questions
Q 1: Can I transfer photos from an SD card to my Mac wirelessly?
A 1: Yes, using apps like AirDrop or cloud services such as iCloud Drive can facilitate wireless transfers. However, a direct connection via an SD card slot or reader is typically faster and more reliable.
Q 2: What should I do if my Mac doesn't recognize the SD card?
A 2: Ensure the SD card is properly inserted and the card reader is functional. Restart your Mac and try again. If the issue persists, check the SD card on another device to rule out card corruption.
Q 3: How do I free up space on my SD card after transferring photos to my Mac?
A 3: After confirming the successful transfer, you can use the Finder to delete the photos from the SD card. Alternatively, you can format the SD card using Disk Utility for a clean start.
Practical Tips for Efficient Photo Transfer
- Regularly Update Software: Ensure your macOS and photo transfer apps are up-to-date to avoid compatibility issues.
- Organize Photos Immediately: Create albums and tag photos upon transfer to streamline future access.
- Use High-Quality SD Cards: Invest in reliable SD cards to prevent data corruption and ensure faster transfer speeds.
Conclusion
Transferring photos from an SD card to a Mac is a crucial task for both casual users and professionals. By following the methods outlined in this guide, you can ensure your photos are safely and efficiently moved to your Mac. Tools like AOMEI Backupper provide additional security, ensuring your valuable images are backed up and accessible. Embrace these practices to optimize your photo transfer process and maintain an organized digital library.