Mac Black Screen of Death: Top 8 Fixes for MacBook Pro/Air
Encountered a black screen of death on your MacBook Pro or MacBook Air? Go through this article to get 8 effective solutions.
By Lily Updated on July 26, 2024
User case: MacBook black screen of death
“My MacBook M1 Pro 2021 was working completely fine this morning. Then eight hours later, when I opened it back up, it was just a black screen. Now, when I turned it off and turned it on... it just boots up with the Apple logo and nothing else shows. Plz help!”
👉 Possible reasons for Mac black screen of death
👉 Quick fixes to Mac black screen of death
👉 Bonus: Backup crucial data with free Mac sync software🔥
Possible reasons for Mac black screen of death
If you encounter a black screen of death on MacBook Pro, MacBook Air, iMac or any other Mac machine, there are 5 common reasons:
◉ Power Issues
- Battery Problems: For MacBooks, battery issues can cause the screen to go black if the device can't maintain power.
- Power Supply: Problems with the power supply or adapter can lead to a black screen, especially if the Mac isn't getting enough power.
◉ Peripheral Issues
- External Devices: Faulty or incompatible external devices connected to the Mac can cause display problems.
- Loose Connections: Loose or damaged cables connected to external monitors can lead to a black screen.
◉ Firmware and BIOS Problems
System Management Controller (SMC) or Parameter RAM (PRAM) issues can affect the display.
◉ Hard Drive Problems
Corrupted or failing hard drives can cause boot issues, leading to a black screen.
◉ Faulty System
macOS might encounter a critical error, causing the screen to go black.
Quick fixes to Mac black screen of death
In this part, you’ll learn 8 MacBook black screen of death fixes. These fixes apply to MacBook Pro and MacBook Air.
Fix 1: Check power and connections
If your Mac isn't getting enough power to maintain all the operations or your battery is left with minimal charge, your Mac automatically turns off the display. To have the display work properly, you can:
👉 If you are using a power adapter
Ensure that the power adapter is securely connected to both your Mac and the electrical outlet. If your power adapter has an LED indicator, make sure it’s lit up.
👉 If you are using a battery
Connect your MacBook to the power adapter and let it charge for at least 10 minutes. Sometimes, if the battery is completely drained, it may take a while before your MacBook responds.
Fix 2: Detach the peripheral devices
Certain external devices such as a smart trackpad, keyboard, stylus and multi-port USB connector may be incompatible with some system settings and cause the computer unable to boot normally. As a result, you can disconnect all peripherals, try to start the Mac again, and see if the black screen problem persists.
Fix 3: Perform a hard restart
1. Press and hold the power button for about 10 seconds until your Mac completely shuts down.
2. Let your Mac rest for a few seconds.
3. Press the power button to boot it again and see if it can work properly.
Fix 4: Reset the NVRAM/PRAM
NVRAM (Non-Volatile Random-Access Memory) or PRAM (Parameter RAM) stores settings like screen resolution, sound volume, and startup disk selection. Resetting these can often resolve display issues, including the black screen problem.
1. Shut down your Mac completely.
2. Turn on Mac and immediately press and hold the Option + Command + P + R keys.
3. Release the keys only when you hear the second startup chime. If you have a Mac with a T2 chip, wait until the Apple logo appears and disappears for the second time, and then release the keys.
4. The NVRAM/PRAM is reset on your Mac. Try restarting your system and check if the black screen disappears.
Fix 5: Reset the SMC (System Management Controller)
The System Management Controller (SMC) is a critical component in your Mac, responsible for low-level functions like power management, thermal management, and battery charging. Resetting the SMC can resolve issues that cause your Mac to display a black screen.
1. Shut down your MacBook and connect it to a power source using the MagSafe or USB-C power adapter.
2. Press and hold the Shift + Control + Option keys and the power button simultaneously.
3. After 10 seconds, release all keys and the power button.
4. Press the power button again to turn on your MacBook. Check if the issue is resolved.
Fix 6: Boot into safe mode
Safe mode can help you to determine whether the black screen of death issue is caused by software that loads as your Mac starts up. Follow the steps below.
1. Shut down your Mac.
2. Press and hold the power button on your Mac. As you continue to hold the power button, your Mac turns on and loads startup options. When you see Options, release the power button.
3. Select your startup disk. It's named Macintosh HD, unless you changed its name.
4. Press and hold the Shift key, then click the Continue in Safe Mode button below your startup disk.

5. Log in to your Mac. You might be asked to log in again.
6. Check if the black screen issue still exists.
👉 If the issue doesn't continue in safe mode, boot your Mac normally to see if the issue returns. If it doesn’t return, problem solved. If it returns, remove login items to find out whether a login item is at fault.
👉 If the issue continues in safe mode, you may need to reinstall macOS.
Fix 7: Repair startup disk
There is a possibility that the formatting or directory structure of your Mac's startup disk has developed errors, causing black screen on Mac. Here’s how to fix it.
1. Shut down your Mac.
2. Boot into recovery mode.
- Apple silicon: Turn on your Mac and continue to press and hold the power button until you see the startup options window. Click the gear icon labeled Options, then click Continue.
- Intel processor: Turn on your Mac, then immediately press and hold Command + R until you see an Apple logo or a different image.
3. You may be asked to select a user you know the password for. Select the user, then click Next and enter their administrator password.
4. From the utilities window in macOS Recovery, select Disk Utility and click Continue.
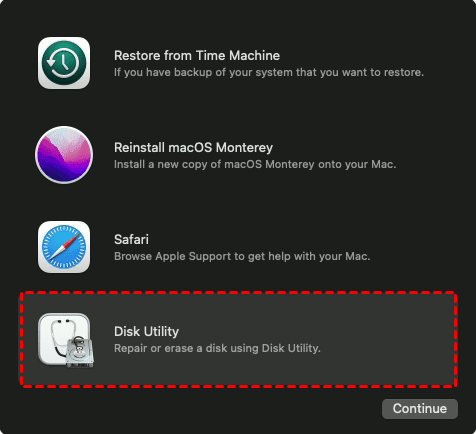
5. In Disk Utility, choose View > Show All Devices (if available) from the menu bar or toolbar.
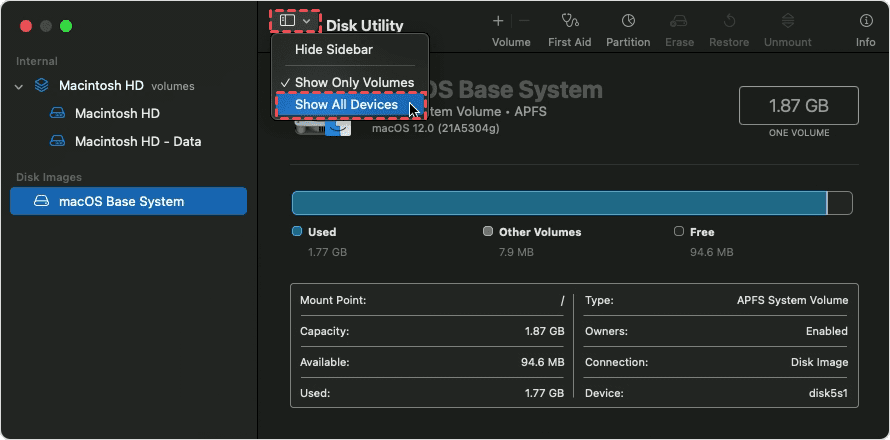
6. The sidebar in Disk Utility should now show each available disk or other storage device, starting with your startup disk. Select the last volume on your startup disk, and click First Aid > Run.
7. Keep moving up the list, running First Aid for each volume on your startup disk, then each container on the disk, then finally the disk itself.
8. When it's finished, exit Disk Utility. Choose Apple menu > Restart to restart your Mac.
Fix 8: Reinstall macOS
If nothing has worked for you, this final method to get rid of the problem is to reinstall macOS. Follow the instructions below.
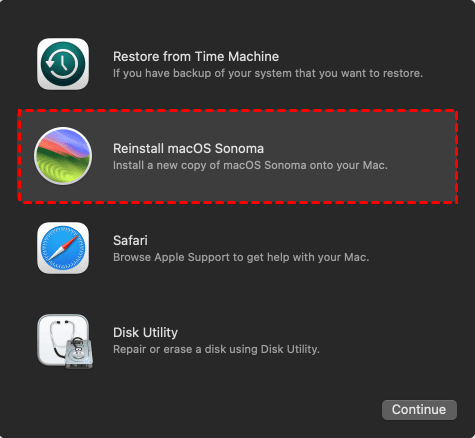
1. Boot into recovery mode as mentioned in Fix 7. From the utilities window in macOS Recovery, select Reinstall macOS and click Continue.
- If the installer asks to unlock your disk, enter the password that you use to log in to your Mac.
- If the installer offers the choice between installing on "Macintosh HD" or "Macintosh HD - Data", choose Macintosh HD.
- If the installer doesn't see your disk, you might need to erase your disk first.
2. Allow installation to complete without putting your Mac to sleep or closing its lid. Your Mac might restart and show a progress bar several times, and the screen might be empty for minutes at a time.
3. When installation is complete, your Mac might start up to a setup assistant. Follow the steps in the setup assistant.
Bonus: Backup crucial data with free Mac sync software
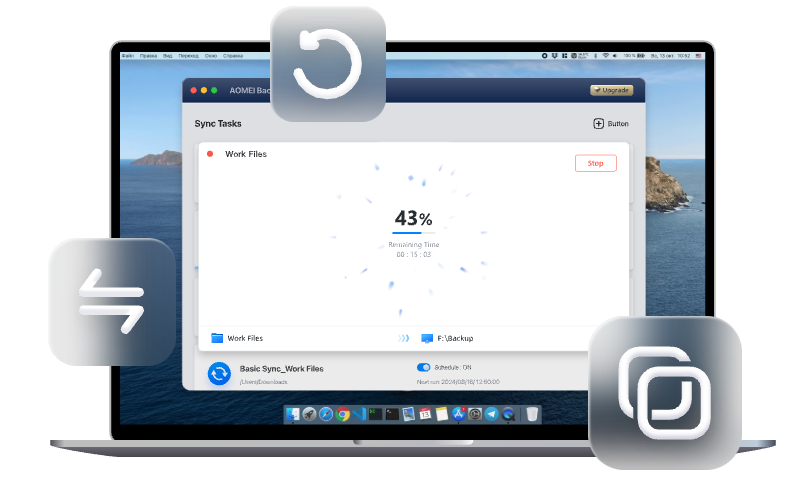
Errors can happen on your Mac at any time, so it's essential to back up your important data. AOMEI Backupper Mac, the best free Mac sync software, can help with this. It allows you to sync files and folders from one location to another, providing an effective backup solution.
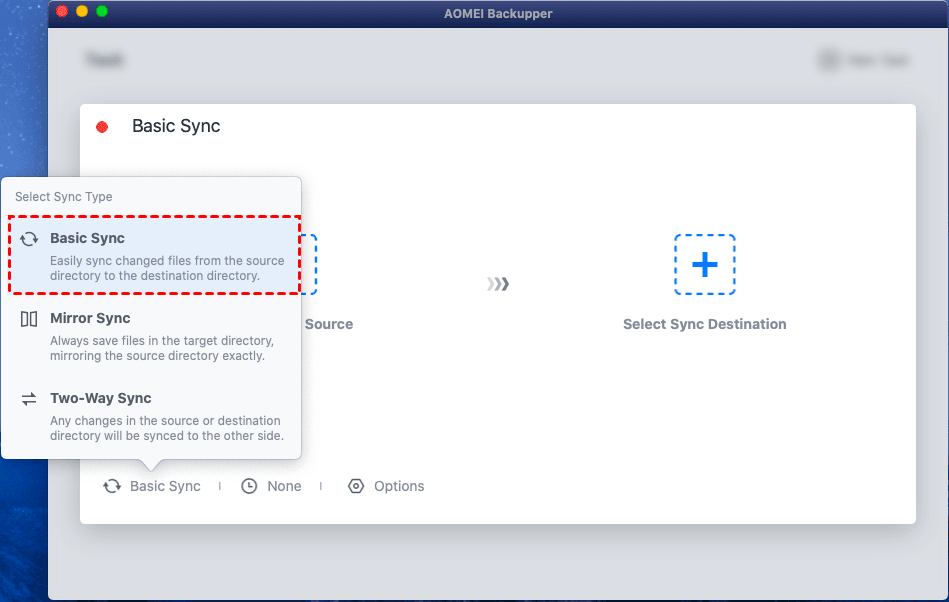
💛Multiple sync types: You can sync files from source to destination with Basic Sync or Mirror Sync. You can also sync files both sides with Two-Way Sync.
💛Various sync source and destination: You can select folders on the local disk, external hard drive, network location or NAS device as the sync source or destination.
💛Schedule Sync: Set a sync task to run Once, Hourly, Daily, Weekly or Monthly based on your need.
💛File Filtering: Include or exclude specific file/folder types from the sync task.
Don’t hesitate to download AOMEI Backupper Mac and try it out!
Free Mac sync software to sync files and folders automatically
To sync Mac folders using AOMEI Backupper, click New Task in the main interface. Then, choose sync type > select sync source/destination. Finally, click Sync to run the task.
Conclusion
The Mac black screen of death can be a frustrating experience, but with the right approach, you can often resolve the issue on your own. To keep your data secure, it's recommended to run free file sync on Mac using AOMEI Backupper. It stands out for its comprehensive features and ease of use. Give it a try and see for yourself!