Unlock Seamless Connectivity: How to Turn on Sync Services on Mac Effortlessly
This article provides an in-depth guide on how to turn on sync services on Mac, ensuring seamless synchronization across your Apple devices. It covers detailed solutions, step-by-step instructions, and answers to frequently asked questions.
By Sebastian Updated on July 30, 2024
Introduction
In the digital age, maintaining seamless connectivity across devices is paramount. Apple's ecosystem offers robust synchronization capabilities, enabling users to keep their data consistent and accessible on all their devices. However, many users find themselves puzzled when trying to turn on sync services on their Mac. This comprehensive guide aims to demystify the process, providing you with the necessary steps and solutions to ensure your Mac syncs effortlessly with other Apple devices.
Do I Have to Sync?
For iPod classic, iPod nano, or iPod shuffle: Yes, syncing with your Mac is necessary to add content to these devices.
For iPhone, iPad, or iPod touch: Syncing is only required when you have new or updated content to add.
⚡Data Consistency: Ensures that your data, such as contacts, calendars, and files, is consistent across all your Apple devices.
⚡Convenience: Allows you to access your data from any device, anytime, anywhere.
⚡Productivity: Enhances productivity by reducing the need for manual data transfers.
If you prefer not to sync your iPhone, iPad, or iPod touch, you don’t have to. You can directly download items from the iTunes Store, App Store, Apple Books, and other Apple services to your device. Additionally, you can use iCloud to keep your items updated across all your devices.
What’s the Difference Between Using iCloud and Syncing?
Using iCloud to Transfer Files:
When you use iCloud, files move automatically between your Mac and your iPhone, iPad, or iPod touch. Any new items on your Mac will transfer to your devices, and any new items on your devices will transfer to your Mac. For instance, if you use iCloud Photos and take a picture on your iPhone, that picture will soon appear on your Mac and other devices. With iCloud enabled, your Mac, iPhone, iPad, and iPod touch are continuously updated as content changes—no extra steps are required.
Using Syncing to Manage Files on Your Device:
Syncing transfers items from your Mac to your devices. It allows you to update your device to the latest iOS or iPadOS software, back up your device data to your Mac or iCloud, and, if needed, restore information on your device from a backup. Syncing gives you control over which content is transferred. You can sync all files or choose specific ones from your Mac. For example, if you’re going on a trip, you can sync selected audiobooks from your Mac to your iPhone to listen to while traveling.
How to Turn on or Off Sync Services on Mac
You can set up your Mac to automatically sync content with your device whenever it’s connected, or choose to sync manually.
1. Connect Your Device: Attach your device to your Mac using a USB, USB-C cable, or Wi-Fi connection.
2. Open Finder: On your Mac, open Finder and select your device from the sidebar.
3. Access General Settings: Click on the "General" tab in the button bar.

4. Turn On Automatic Syncing: Check the box labeled “Automatically sync when this iPhone is connected” to enable automatic syncing.
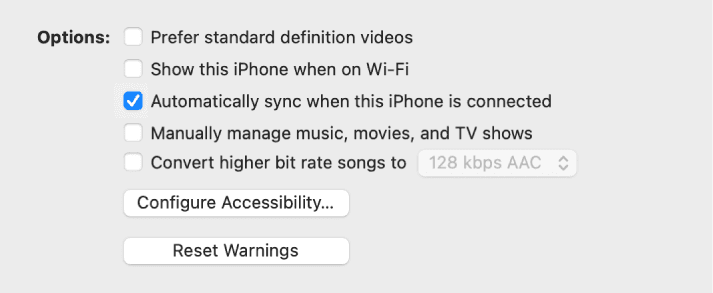
5. Apply Changes: Click the "Apply" button to save your settings.
Use Third-Party File Syncing Software
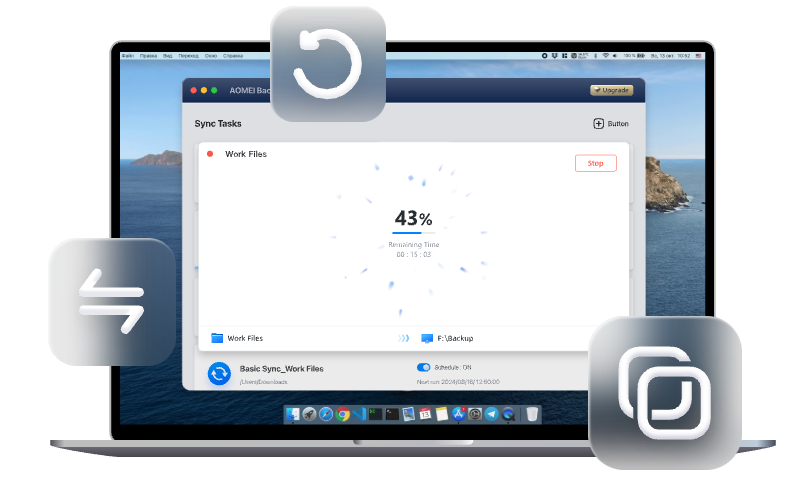
You can also use third-party file sync software as an alternative to make file syncing. AOMEI Backupper Mac provides an excellent solution for file syncing. This software features an intuitive interface and robust capabilities, making data protection simple. With AOMEI Backupper Mac, you can reliably and efficiently sync your important files, ensuring they are always secure and well-managed.
-
Complete Mac File Syncing: Easily sync any files on your Mac to keep your data fully protected.
-
Flexible Sync Options: Choose from Basic Sync, Mirror Sync, or Two-Way Sync to match your sync needs.
-
Multiple Storage Destinations: Sync to local storage, cloud drives, NAS devices, external hard drives, USB flash drives, SD cards, and more.
-
Quick and Secure Syncing: Benefit from high-speed synchronization with advanced technology, ensuring your data remains encrypted and safe throughout the process.
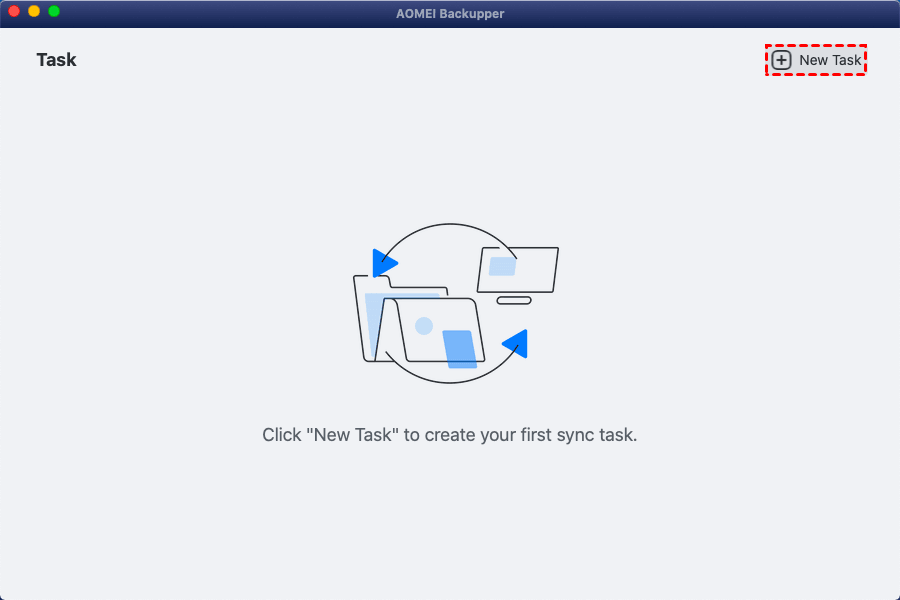
Step 1: Download and install AOMEI Backupper Mac. Launch the software and select "New Task" to get started.
Step 2: Choose the synchronization type that fits your requirements. Opt for "Mirror Sync" or "Two-Way Sync" to ensure folders stay updated.
Basic Sync: Copies files from one location to another without altering the original files at the source.
Mirror Sync: Replicates the source files exactly at the destination, deleting any files at the destination that no longer exist at the source.
Two-Way Sync: Ensures that any changes made in either the source or destination locations are updated in both, keeping them in perfect sync.

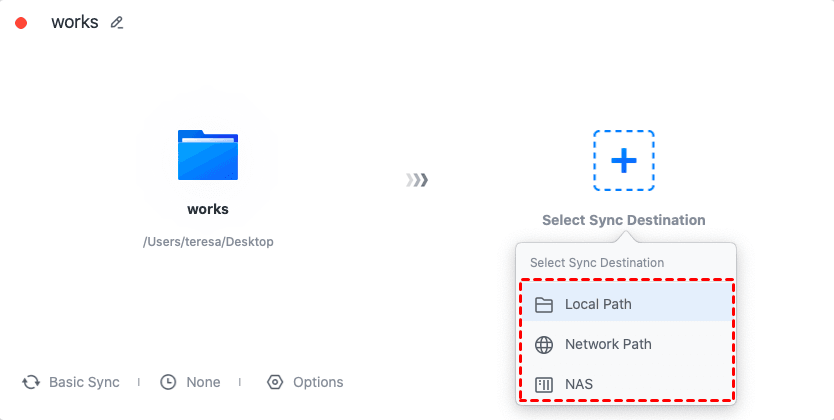
Step 3: Pick your sync source and destination locations.
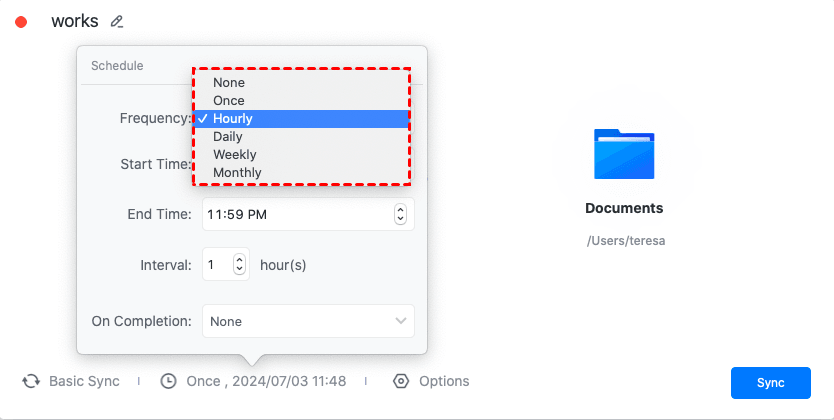
Step 4: Customize the sync schedule and other settings according to your preferences.
You can choose how often to sync your files: once, hourly, daily, weekly, or monthly. Additionally, you can set a specific start time and decide if the system should hibernate or shut down once the sync is finished.
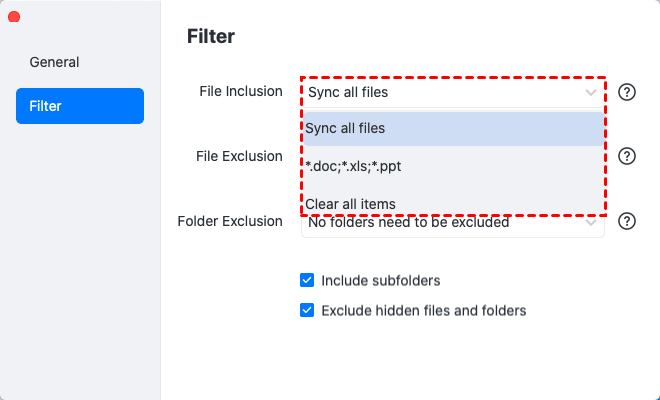
Fine-tune your sync process with advanced options like File Inclusion, File Exclusion, and Folder Exclusion, allowing you to customize which files and folders are included in the synchronization.
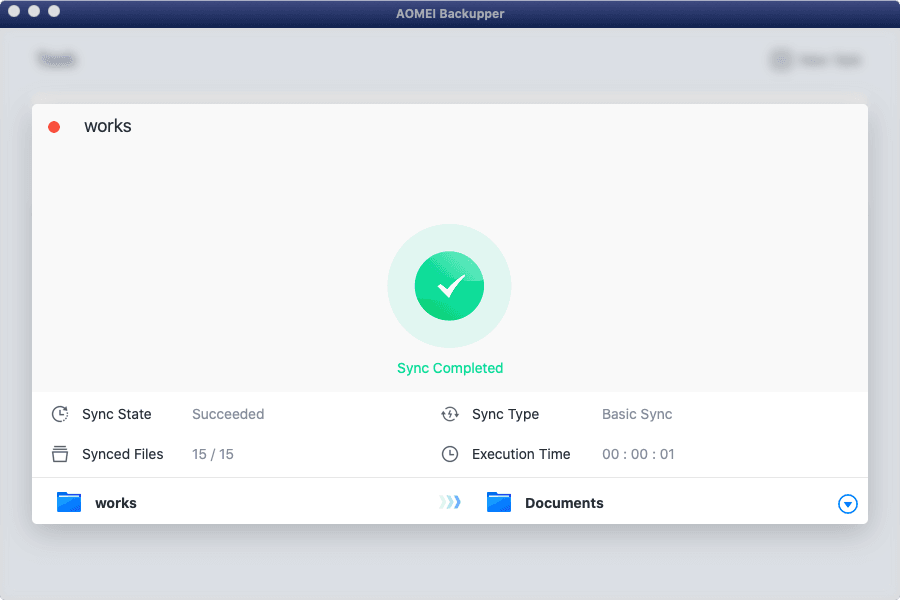
Step 5: Click "Sync" to initiate the process and wait for it to finish.
Frequently Asked Questions
Q 1: How do I know if my data is syncing correctly?
A 1: You can check the status of your data sync by going to System Preferences > Apple ID > iCloud and ensuring the desired services are enabled and up to date.
Q 2: How do I sync my contacts between my iPhone and Mac?
A 2: Enable Contacts to sync in iCloud settings on both your iPhone and Mac. Go to Settings > [your name] > iCloud on your iPhone and System Preferences > Apple ID > iCloud on your Mac, then check the box next to "Contacts."
Q 3: What should I do if iCloud storage is full?
A 3: You can manage your iCloud storage by deleting unnecessary files, upgrading your iCloud storage plan, or using alternative backup solutions like AOMEI Backupper.
Practical Tips for Successful Synchronization
- Regular Backups: Regularly back up your data using Time Machine or AOMEI Backupper to ensure data safety and quick recovery in case of sync issues.
- Check Sync Settings: Periodically review your sync settings in System Preferences and on your other devices to ensure they are correctly configured.
- Stay Updated: Keep your macOS and iOS updated to the latest versions to benefit from the latest features and security enhancements.
Conclusion
Enabling sync services on your Mac is a vital step towards achieving seamless connectivity and data consistency across your Apple devices. By following the solutions outlined in this guide, you can ensure a smooth and efficient synchronization process. Additionally, integrating a robust backup solution like AOMEI Backupper can provide an extra layer of security, ensuring your data remains protected and easily recoverable. Embrace the power of Apple's ecosystem and enjoy the convenience of having your data at your fingertips, anytime and anywhere.