Simple Steps: How to Create a Recovery Partition Effortlessly
Read this article to learn how to make a Windows 11/10/8/7 recovery partition, which is an important procedure to restore the computer to its factory settings once your main Windows partition suffers from disasters. Create recovery partition easily and safely.
Why do we need to make a recovery partition?
When your computer breaks down, you may be advised to reinstall the Windows. This operation only gives you a brand-new computer with preinstalled programs. You still need to spend time reinstalling the programs and settings you need.
It’s troublesome and time-consuming. Creating a recovery partition on your computer can be crucial for various scenarios. Here are some key reasons why it's beneficial to have one:
🛑 Operating System Failure: If your operating system fails to boot or crashes frequently, creating a recovery partition ensures you can restore your system quickly and efficiently.
🛑 System File Corruption: Corrupted system files due to malware, software conflicts, or accidental deletions can compromise your system’s functionality. A recovery partition provides tools to repair or restore these files.
🛑 Malware Infection: Malware that is difficult to remove through conventional antivirus methods can be effectively eliminated by performing a clean installation from a recovery partition.
🛑 Performance Degradation: Over time, system performance may degrade due to accumulated software bloat or misconfigurations. A recovery partition allows you to reinstall the operating system and regain optimal performance.
🛑 Preparation for Resale: If you plan to sell or repurpose your computer, a recovery partition allows you to reset the system to factory settings, ensuring all personal data is wiped and the OS is fresh for the next user.
You can choose to make a factory recovery partition in advance, which will contain a copy of your operating system and boot-related files. It’s much easier to operate and saves you a lot of time. It will retain your system as well as all the programs and settings installed on the computer.
How to Create Recovery Partition in Windows 11/10/8/7
Speaking of bootable recovery partitions, you can take advantage of Recovery Drive in Windows 7/8/10/11. You just need to connect the recovery drive and set the boot priority for it in the BIOS, then you can go to the main page to restore your computer.
In addition, many computer manufacturers offer you OneKey recovery software. It can also help you protect your system and it’s bootable. However, it can only be used on the specified computer. For example, you can only use Lenovo OneKey Recovery on the Lenovo computers. Sometimes, you will encounter the Lenovo F11 not working and other troubles.
👉Method 1. Create a recovery partition in Windows using OneKey Recovery
👉Method 2. Create a recovery partition in Windows using a built-in tool
For a beginner, these operations are still too complicated. When you encounter problems in this process, you will be at a loss. Thus, you’d better turn to a third-party backup software like AOMEI OneKey Recovery, which is easy to use. It will add a boot menu in the system automatically after you create a recovery partition in Windows 11/10/8.1/8/7.
Method 1: Create a recovery partition in Windows using AOMEI OneKey Recovery
AOMEI OneKey Recovery is a safe and easy-to-use system recovery partition maker. It is designed to back up and restore your system, supporting:
- All Windows PC operating systems, including Windows 11, 10, 8.1, 8, 7, Vista, XP (all editions, 32-bit and 64-bit).
- Windows Server 2003, 2008, 2011, 2012, 2016, 2019, 2022 (including R2), WHS 2011, SBS 2003, 2008, 2011.
- Computers of different brands, including HP, Lenovo, Asus, Dell, etc.
If you want to create a factory recovery partition, you need to back up the system at the first time you get the computer. Also, you can create a system backup later and it will restore to the state you backup. Download its demo program to have a try.
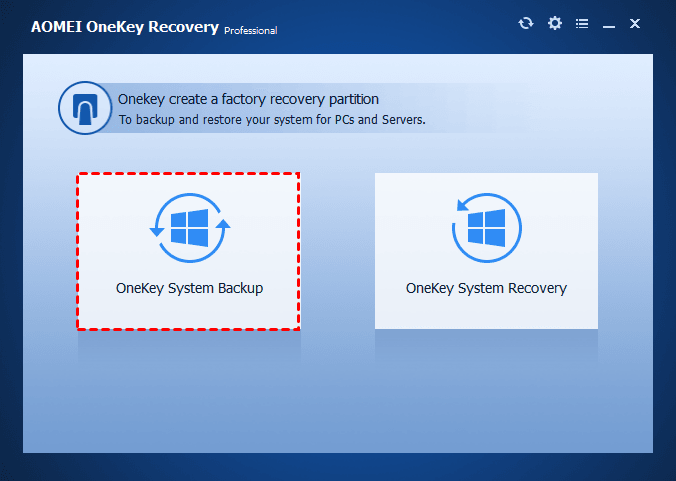
Step 1. Download, install, and launch AOMEI OneKey Recovery. And then choose "OneKey System Backup".
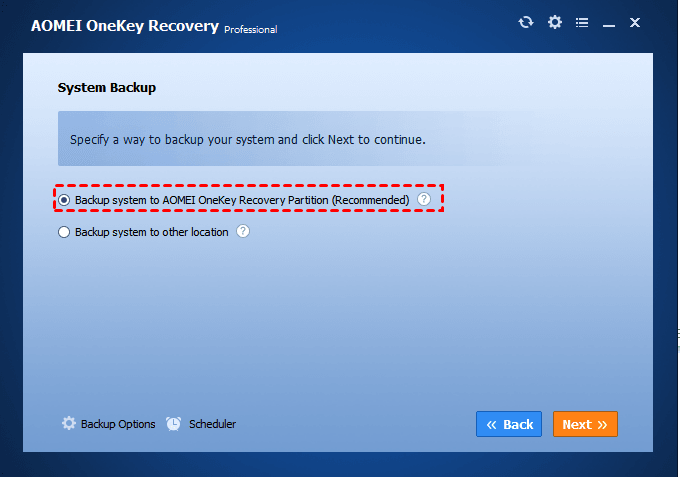
Step 2. There are two ways available for you to create a recovery partition.
-
Way A: Backup system to AOMEI OneKey Recovery Partition - system backup image file will be saved on the system disk. It requires that the system disk has enough free disk space to store it.
-
Way B: Backup system to other location - system backup image file can be saved to any other location, such as an internal secondary disk, an external hard drive, or a removable USB flash drive, etc.
If you choose Way A, please follow the instructions below:
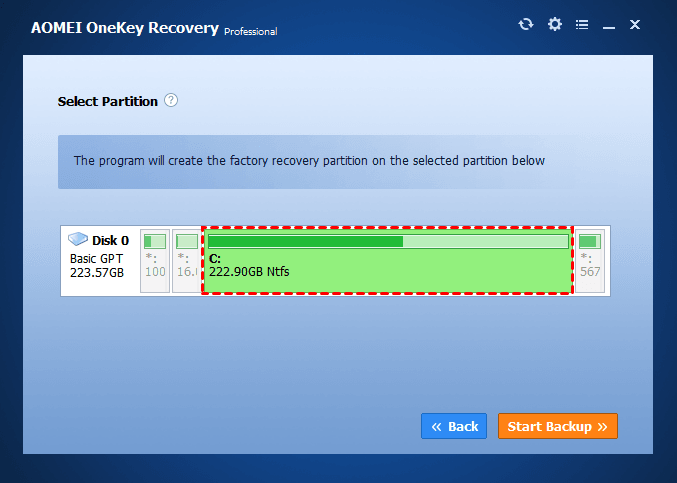
You need to select one of your existing partitions (here is C: drive) on the system disk to divide some space (the size depends on how big your system partition is) for creating a factory recovery partition, which includes a system backup image file and AOMEI OneKey Recovery bootable environment. After that, click "Start Backup" to continue.
🎯Tips:
-
The partitions in grey cannot be selectable, since their unused space is not enough to make a recovery partition. The selected partition (C: partition) will be highlighted.
-
If there is already enough unallocated space on the system disk, the program will automatically select it to make a factory recovery partition.
-
The new factory recovery partition will be labeled with "*" to make it a hidden partition, thus preventing it from being damaged.
If you choose Way B, please follow the instructions below to back up the system:
Click "Browse" to select a location to save the system image file. The program will automatically select an existing partition to save the AOMEI OneKey Recovery bootable environment.
Click "Advanced", and then you can edit "File Name" and change the default location for AOMEI OneKey Recovery bootable environment. Then, click "Start Backup".
Step 3. Wait patiently until the process is over. The process will take some minutes depending on how much data is on your system. Then, a pop-up window will appear on the screen and you just need to click "OK" -> "Finish".
🎯Tips:
-
As the pop-up window mentioned, you can click the setting icon on the toolbar to configure the boot menu. It allows you to enable or disable the boot menu, hide or display the message, and change the residence time on the boot menu.
-
If you not only want to backup your system but your entire hard disk, specified partition, or individual files and folders, you can use the complete backup software - AOMEI Backupper. It supports backing up to an external hard disk, USB flash drive, CD/DVD, shared Network, or NAS. Then enable the AOMEI Backuper recovery environment in the Windows boot options menu. After that, you can restore data easily under the AOMEI Backupper recovery environment.
How to recover the system from boot failure
When your computer fails to boot because of a system crash or operating system not found error, you can use the factory image you created to return things to normal. However, the way of system recovery may vary considerably according to the disk partition styles of your system.
-
For most computers whose system disk style is MBR, please press "F11" (default) or "A" on the keyboard during the process of system startup. After that, your computer will be booted into the Windows PE recovery environment.
-
For computers whose system disk style is GPT (EFI/UEFI boot), please choose "AOMEI OneKey Recovery" in the Windows boot menu. After a reboot, your computer will be booted into the Windows PE recovery environment.
Step 1. After the Windows PE recovery environment starts, AOMEI OneKey Recovery will automatically pop up. Click "Yes" to confirm that you need to restore the system. To restore your system when your computer can boot, just select "OneKey System Recovery".
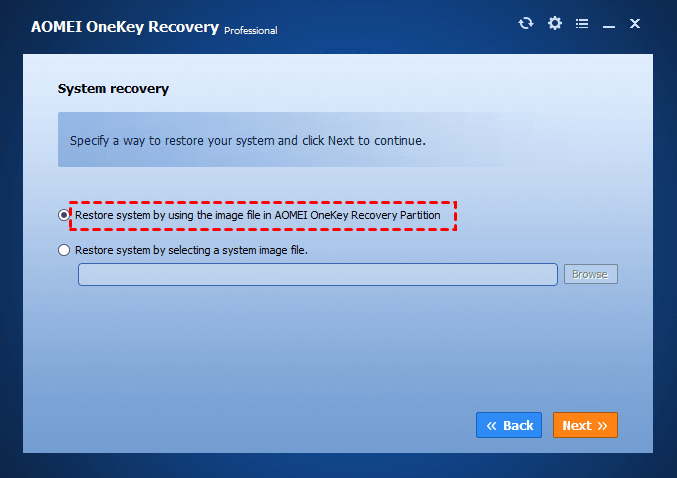
Step 2. There are two ways available for you to restore the system. The way to restore depends on how you backed up the system.
If you selected Way A to back up the system, please follow the instructions below to restore the system:
The program will use the system backup image file in the AOMEI OneKey Recovery partition to restore your system.
Here are two choices for you to restore your system. Please choose one according to your situation.
-
One choice: There is no other disk in your computer. In such a case, you can only restore to the original location. Please click "Start Restore" if you confirm the changes.
-
The other choice: If you have another disk (s) in your computer and you don’t want to restore your system to its original location, please tick the checkbox before "Restore to other location". And then click "Next" to continue. You need to select a location, which can be an unallocated space or a partition (Note: If you select a partition, the data on it will be overwritten). And then click "Start Restore".
If you selected Way B to backup system, please follow the instructions below to restore the system:
Click "Browse" to find the system backup image file. Click "Next" to continue.
Here are two choices for you to restore your system. You can follow the steps of restoring the system by using the image files in the AOMEI OneKey Recovery Partition, because both ways of restoration are basically the same, except that the location of the image file is different.
Step 3. Now, you just need to wait patiently until the process is over. After all operations are completed, click "Finish".
Method 2. Create a recovery partition in Windows using a built-in tool
To create a recovery partition using Windows' built-in tools, you'll need a USB drive. For 32-bit systems, an 8GB drive is sufficient, but 64-bit systems require at least 16GB. Keep in mind that this process will erase all data on the USB drive, so make sure to backup important files beforehand. Once you're ready, follow the step-by-step tutorial below.
Step 1. Open the Start menu in Windows, search for "Create a recovery drive," and select it. You may need to enter an admin password or confirm your choice.
Step 2. Check the box that says "Back up system files to the recovery drive," then click Next.
Step 3. Choose the connected USB drive and click Next.
Step 4. Click the Create button to begin creating a recovery partition in Windows.
Restore Recovery Partition with Windows Built-in Tool
If your computer runs into issues, you can create a recovery partition to restore it to normal. Follow these simple steps:
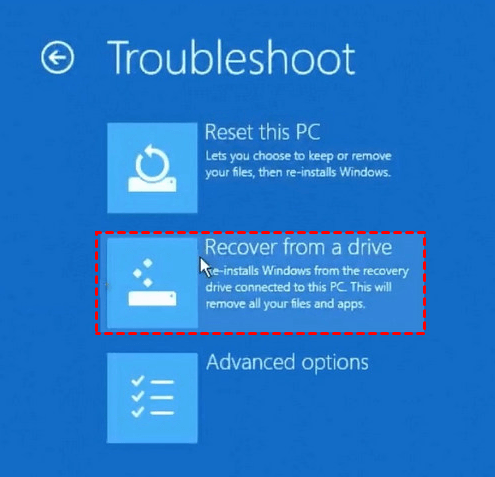
Step 1. Boot your Windows PC using the recovery USB drive. Click Next until you reach the Troubleshoot option.
Step 2. Choose Troubleshoot, then select Recover from a drive.
Step 3. Pick your preferred reset option: Just remove my files or Clean the drive fully. Confirm the selections and click Recover to begin. Wait for the process to complete, and your PC will restart automatically.
Why won't Windows create a recovery drive?
When using Windows' built-in tool to create a recovery drive, some users encounter the error message, "We can't create the recovery drive. A problem occurred while creating the recovery drive." To resolve this issue, consider the following two solutions:
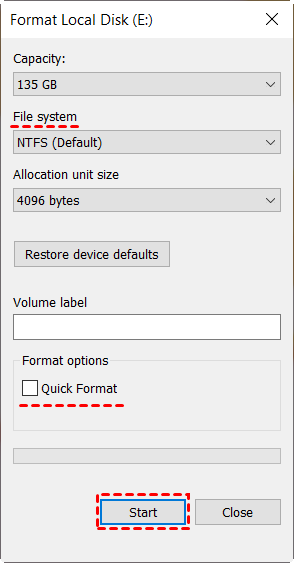
👉 Solution 1: Completely format the USB flash drive
To begin, right-click on the USB drive in File Explorer and choose Format. Before formatting, ensure to uncheck the Quick Format option for a thorough process.
👉 Solution 2: Mend system files
Launch Command Prompt as an administrator. Then, input sfc /scannow and hit Enter to inspect and rectify any operating system issues.
Extended reading: What is a recovery partition?
A recovery partition is a dedicated section of your computer's hard drive that is designed to help you restore your system to its original factory state or repair the operating system in case of failure.
This specialized partition holds essential recovery tools, diagnostic utilities, and a copy of the original operating system installation. Many users wonder how to create a recovery partition to ensure they have a reliable way to recover their system without needing external media.
Understanding what a recovery partition is and how to create a recovery partition can significantly enhance your ability to manage system failures and maintain your computer’s health. This built-in feature is a vital tool for quick and efficient system restoration.
FAQs about creating a recovery partition
1. Why do I have two recovery partitions?
When upgrading Windows to a higher edition, the upgrade program checks the available space on the recovery partition. If the existing partition lacks sufficient free space for the update, Windows creates a second recovery partition. This is why you may notice more than one recovery partition on your device.
2. How large should my recovery partition be?
According to Microsoft's support pages for KB5034440 (Windows 11 21H2) and KB5034439 (Windows Server 2022), a minimum of 250 MB of free space is required in the recovery partition. This ensures sufficient space for system updates and maintenance tasks.
3. Does a recovery partition require a drive letter?
Typically, recovery partitions do not have assigned drive letters to safeguard them from unintended changes or deletions. In Disk Management, these partitions usually appear without drive letters, and only a Help option is available. Assigning a drive letter to the recovery partition serves no practical purpose and is not recommended.
Final words
To make Lenovo/ HP/ Dell recovery partition bootable, you can consider AOMEI OneKey Recovery. It gives you two options, including a backup system to AOMEI OneKey Recovery Partition, and a backup system to another location. If the drive has enough space, it’s recommended to use the first option, because it does not need an extra storage device.
If you didn't create a recovery partition for Windows 7/8/10/11, you can download AOMEI OneKey Recovery and try it by yourself.
