Deploy System Image to Different Computer in Two Situations
You will how to deploy system image to different computer in different situations. Support for dissimilar hardware restoration.
By Ivy Updated on May 28, 2025
User case: deploying a windows image to different computer
"We use industrial pcs running windows 10 with our software to control machines we sell. The pcs are identical hardware. How would we go about creating an image to use on another or each so we don't have to go through the Windows install, drivers and software install each time. Are there any issues to be aware of here?“
You can easily restore Windows 10 image to different computer as long as you use a reliable backup and restore software, AOMEI Backupper Professional, for example.
But if you want to do this on multiple computers, it's really difficult, since you need to remove SID and customize a backup image with an answer file and dism.exe. For detailed steps, refers to system builder deployment. If you don't want to, you could try AOMEI Image Deploy in the Technician or TechPlus edition of AOMEI Backupper.
When will we deploy system image to different computer?
In general, if you are in the following 5 situations, you may want to restore system image to different computer or multiple computers due to different purposes.
- Recover a failed system.
- Update hardware like motherboard, CPU, chipset, etc. Windows 10 and Windows 11 integrate various drivers for system startup but the previous system like Windows 8 and Windows 7 does not, so there is a great possibility that your computer may fail to boot due to driver compatible issues.
- Batch multiple bare-metal computers to save time and effort.
- Uniform computer configuration (eg: programs, drivers, system settings, etc) to meet work requirements.
In sum, this is divided into two situations, namely restore system to one computer and multiple computers and you will get how to do image deployment below in different situations.
How to deploy system image to different computer(s)
The backup image restore between two computers can be easily completed. But if you are the administrator of a company and want to deploy system image created on a well-configured computer to client computers, you need to use AOMEI Image Deploy instead of restoring system one by one.
This minimizes the tedious installation and follow-up work. And you can directly use all the deployed computers after this operation is complete.
Situation 1: Restore system image to different computer
Here you will use AOMEI Backupper Professional to restore system image from one computer to another. It allows you to accelerate the reading and writing speed of SSD disk if the disk on the target computer is. Also, you can restore system to new hard drive with its Universal Restore feature, which will install all the necessary drivers for system startup.
Please be sure you have a system image backup including everything you want. If you don't have, please download AOMEI Backupper Professional and backup system partition with its System Backup feature. For detailed steps, please refer to create a system image backup.
If the computer you want to restore image to does not have OS or is not bootable, you still need to create a bootable disc to boot computer from it.
Then, follow the steps below to deploy system image to different computer:
Step 1. Connect the backup drive and bootable media, and make sure it can be detected. Then, boot computer from the bootable media.
- Click start menu and select “Restart”.
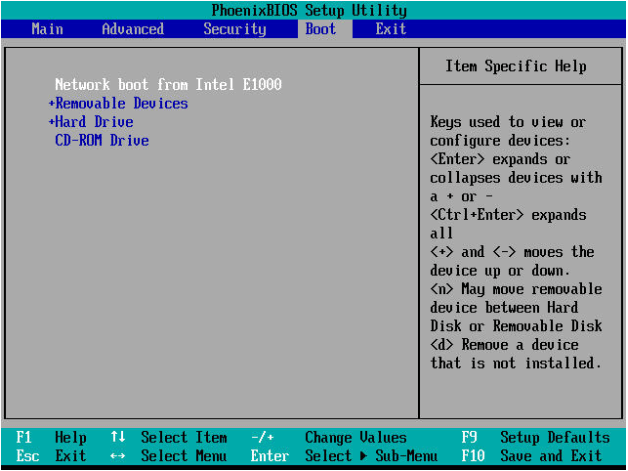
- Press the specific key on the first screen (usually F2 or ESC) to access BIOS.
- Switch to the Boot tab and set the bootable media as the first boot option by “+”.
- Finally, press “F10” to save the changes and start the computer from it.

Step 2. After loading files, you will see the main page of AOMEI Backupper. Click “Select Task” under the ”Restore” tab and then select system image in the next window.
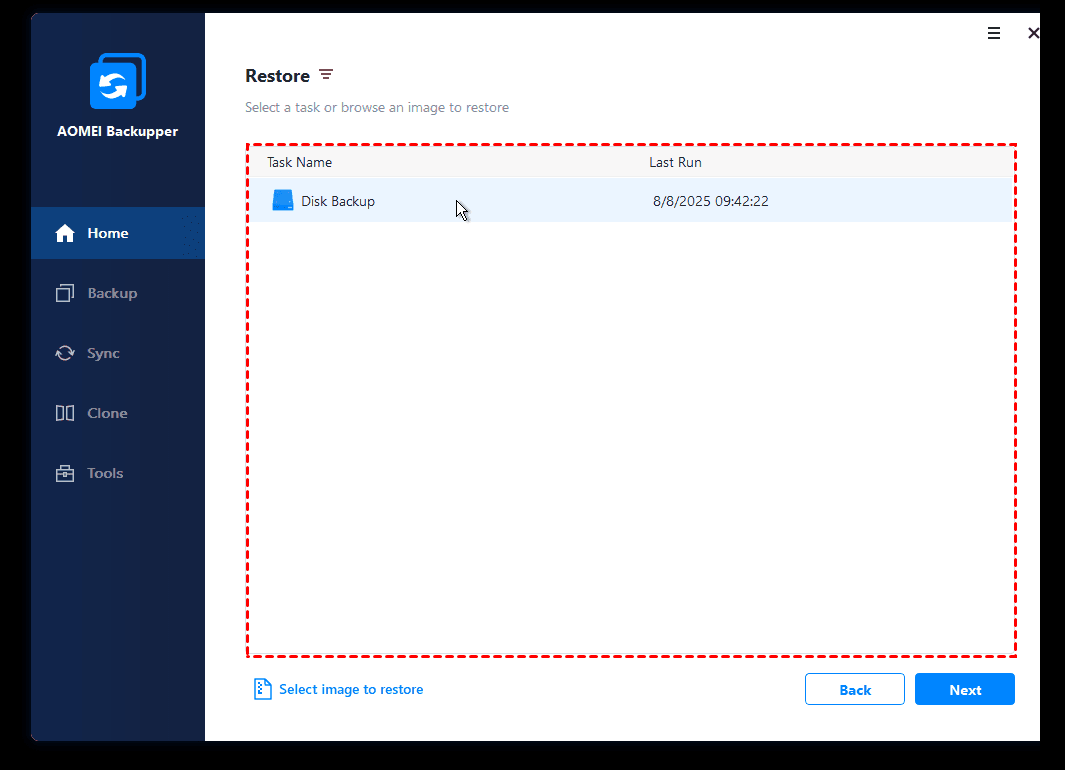
- Note:✎...
- If you cannot see any system image in the Restore window, just go back and tick “Select Image File” as instead.
Step 3. Tick “Restore this system image backup” and "Restore system to other location". Then, click “Next”.
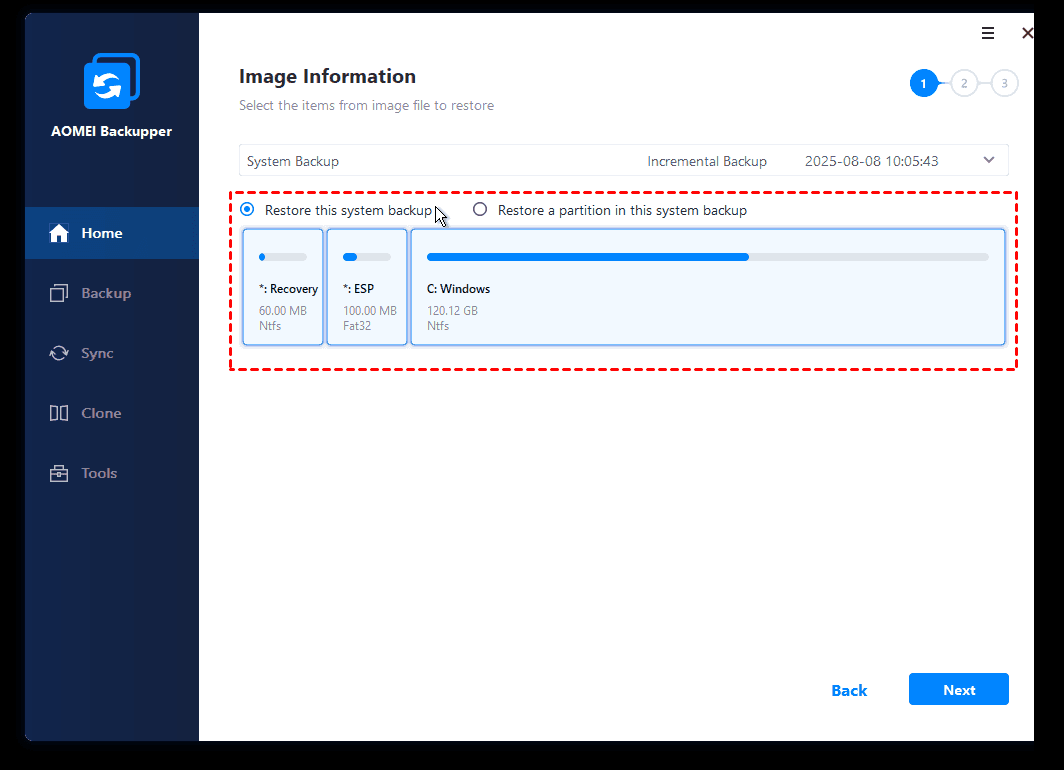
- Note:✎...
- You can select the backup image at a certain point or created by different backup method - full backup, incremental backup or differential backup.
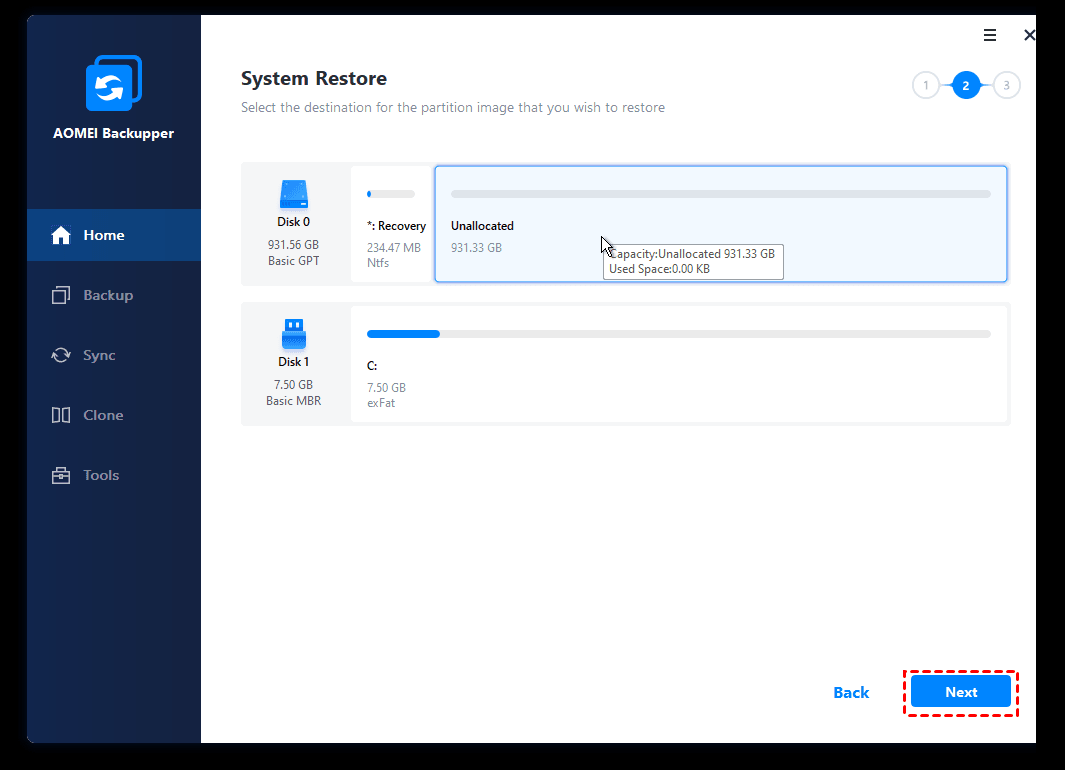
Step 4. Select disk on another computer to store backup image and click “Next”.
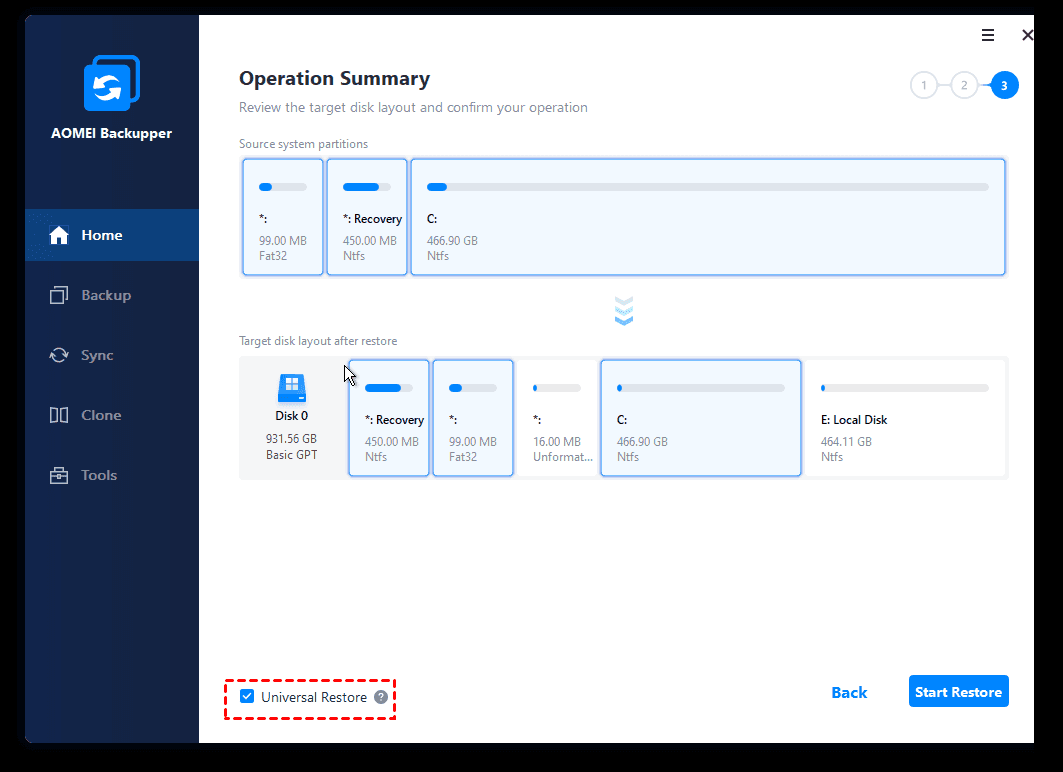
Step 5. By default, this software will check ”Universal Restore” feature automatically if the hardware of new computer is not the same as the computer you create system image on. Then, click ”Start Restore” to deploy system image to a different computer.
Situation 2: Deploy Windows 10 system image to multiple computers
Here you will use AOMEI Image Deploy in the Technician edition or TechPlus edition of AOMEI Backupper to deploy Windows 10 system image to multiple computers. You need to select a server computer and decide on all the client computers you want to deploy an image to.
>> The server computer can be any PC or server machine and you need to install AOMEI Backupper Technician or TechPlus edition on it for image deployment.
>> The client computers are the ones to receive backup image, and usually, they don't have the operating system.
Besides, you still need to create a system image backup without SID, otherwise, the deployed computers may have conflicts. Note you need to boot into Windows PE immediately after removing SID, otherwise it will create a new one. Thus, the overall steps should be:
2. Remove SID on the computer you want to backup.
3. Boot the computer you want to backup from the created bootable USB and then create a system image with AOMEI Backupper.
4. Create Windows PE automatically or manually with AOMEI Image Deploy.
5. Boot all the client computers and deploy image to multiple computers with the created system backup.
Preparation of server and client computers:
-
Go to the download page, download and install AOMEI Backupper Technician or TechPlus edition on the server computer. It's suggested to use Windows 7 or higher version as a server computer. Since this software requires Windows AIK/ADK if you use previous version of Windows 7, so you can create Windows PE successfully.
-
Check the cable connection between server and client computers, and ensure that they are in the same network segment in a LAN.
-
Verify the network card of client computers supports network boot (PXE boot).
-
Verify that the disk number for client computers is the same as the server computer. If there is only one disk, it is disk 0.
-
Remove all the other disks on the client computer in case of mistake selection and data loss due to it.
Remove SID and Create A System Image on A Well-Configured Computer
To minimize the follow-up work of image deployment, you need to configure a computer with everything you want. And it does not have to be the server computer.
Step 1. Create a bootable USB with AOMEI Backupper.
- Go to the download page and download AOMEI Backupper Technician or TechPlus edition. The previous one supports unlimited PCs while the latter one supports unlimited PCs and servers.
-
Then, click "Tools" > "Create Bootable Media" after launching it, select bootable disc types - Windows PE and boot device - USB, CD/DVD or ISO file.
-
Finally, click "Next" to start the creation of bootable media.

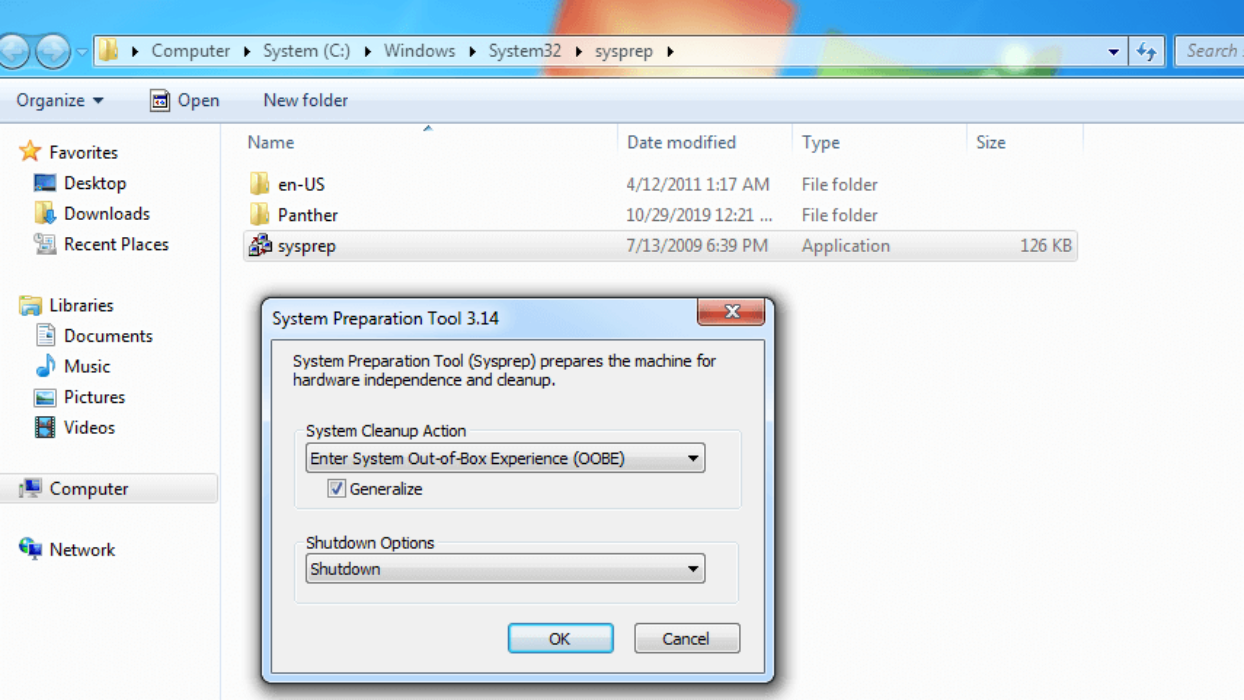
Step 2. Remove SID on the computer you want to backup.
Press "Win + R" and enter "sysprep" in the textbox to find Sysprep.exe. Run it and choose Enter System OOBE, tick Generalize option, and select Shutdown. This step is necessary for users to avoid compatibility issues after deployment.
Step 3. Boot the well-configured computer from a bootable USB and then create a system image with this software.
- Insert the bootable USB created in Step 1, set it as the first boot option, and boot from it.
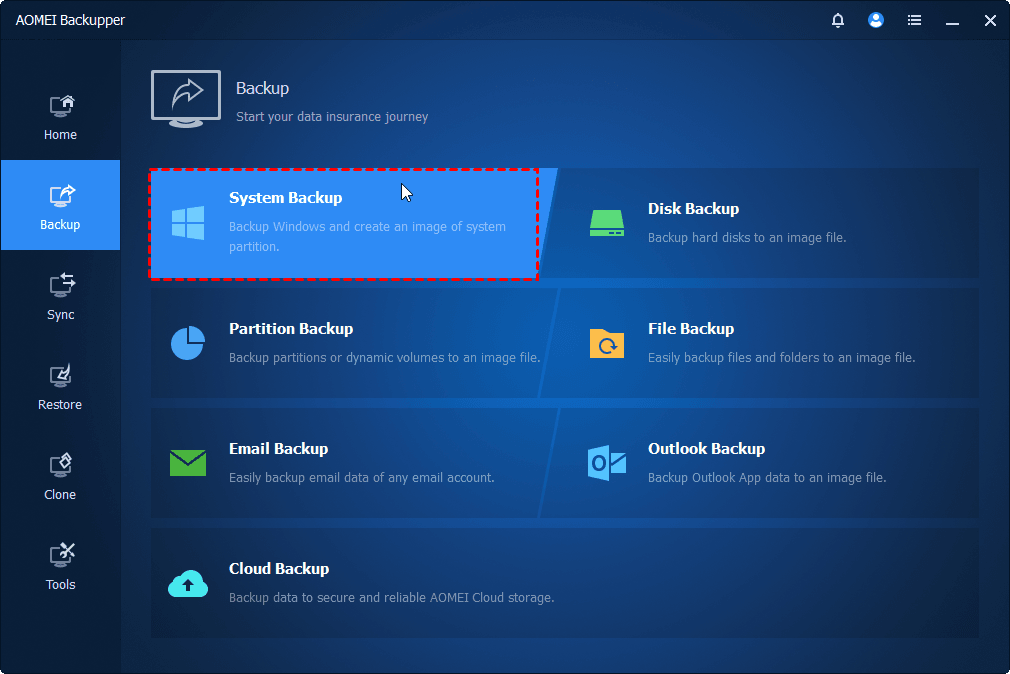
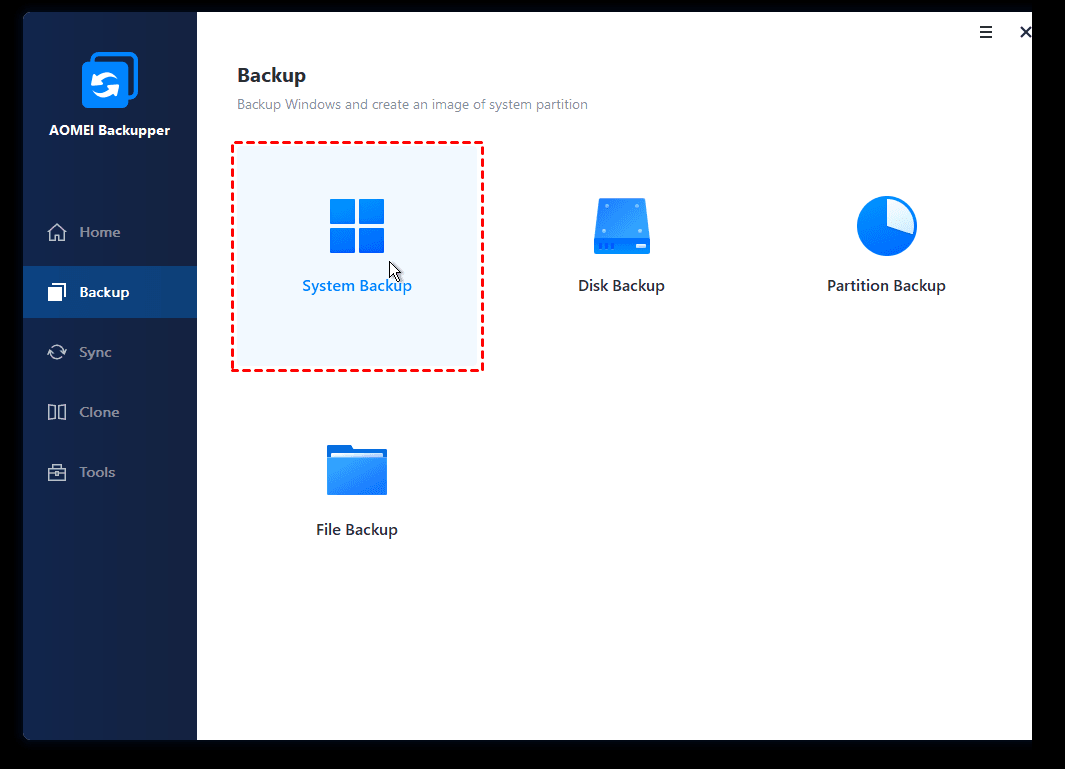
- On the main page of AOMEI Backupper, click "Backup" > "System Backup". Also, you can create a disk backup by selecting Disk Backup in the following picture.
- Then, select a network share or NAS to store backup image and "Start Backup" to excute this operation. Note the network path should be on the same network segment with all the client computers and server computers. For detailed steps, you can refer to backup Windows 10 to network drive.
Deploy Image to Multiple Computers Step by Step
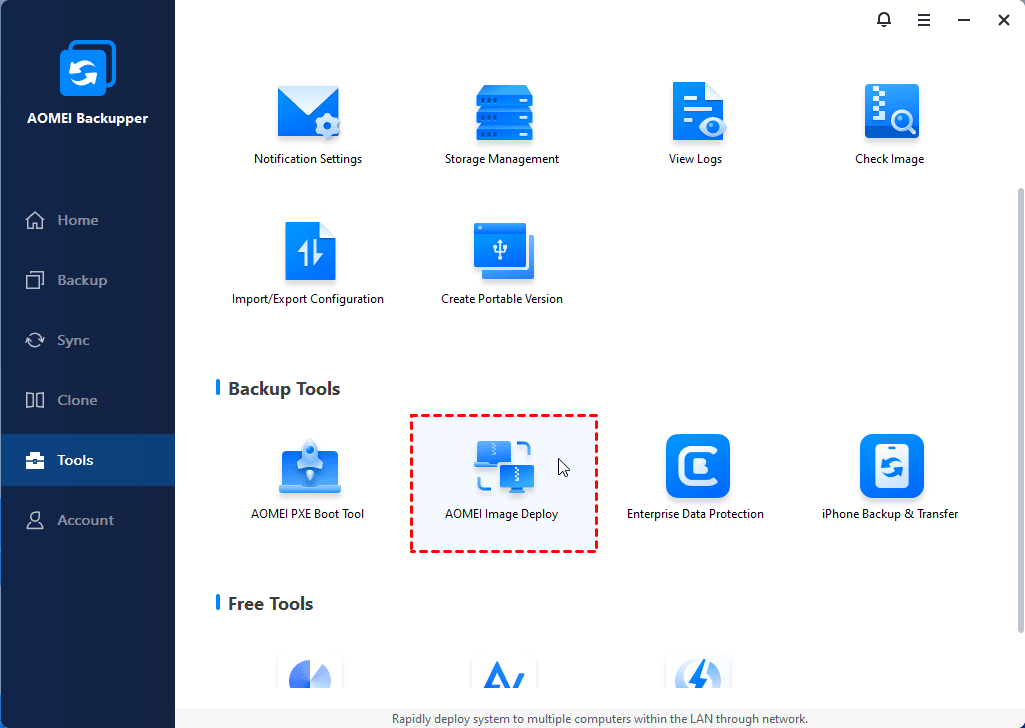
1. Switch to "Tools" and select "AOMEI Image Deploy" to launch the image deploy software.
2. Then, click "Create WinPE automatically" to create a bootable ISO file. It supports booting from both BIOS and UEFI mode. Please remember to tick "Enable DHCP" to ensure you can boot up client computers over network. Then, click Next.
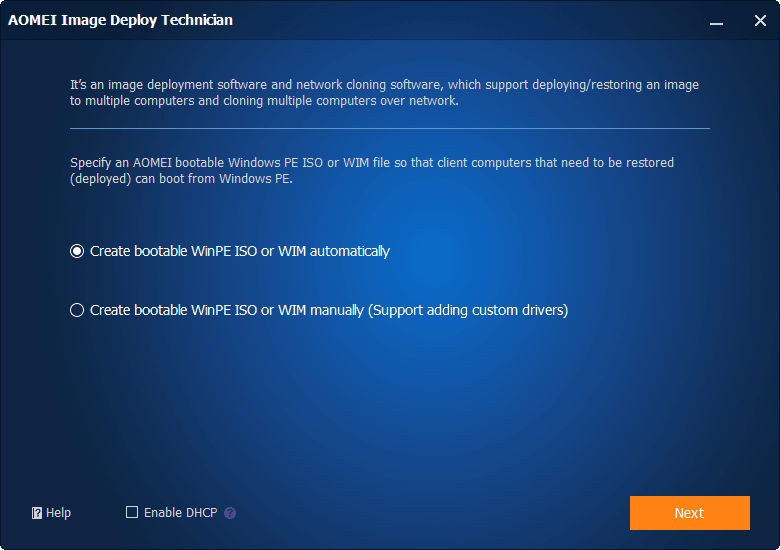
- Notes:✎...
- If there are drivers incompatible with your hardware and the WinPE cannot start up the client computers, select the "Create bootable WinPE ISO manually" option. It allows you to create Windows PE and add compatible device drivers into WinPE by clicking “Make ISO” or "Make WIM file" on the main page and then “Add Drivers”. Note that the first option only supports BIOS mode.
- Usually, the DHCP server is enabled if you use a router and used to assign IP address for computer. And it's suggested to tick "Enable DHCP" to ensure your computer can be connected to network automatically. Note there has to be and one only DHCP server within LAN, otherwise, the client IP address distribution may be messed up.
3. In the second wizard page, AOMEI Image Deploy program will prompt “The service has started, waiting for connect…”, then start all the client computers and set the PXE boot or network boot as the first boot option, boot from it. Then, you will see the IP address of server computer and client computer as well as the connection status.
At the same time, you will see the IP address of all the client computers as well as the connection status in the server computer. Then, tick "I confirm ...." and "Next" to continue.

- Note: You can only boot the client computers when you see the prompt “The service has started, waiting for connect…”. Otherwise, client computers cannot boot successfully.
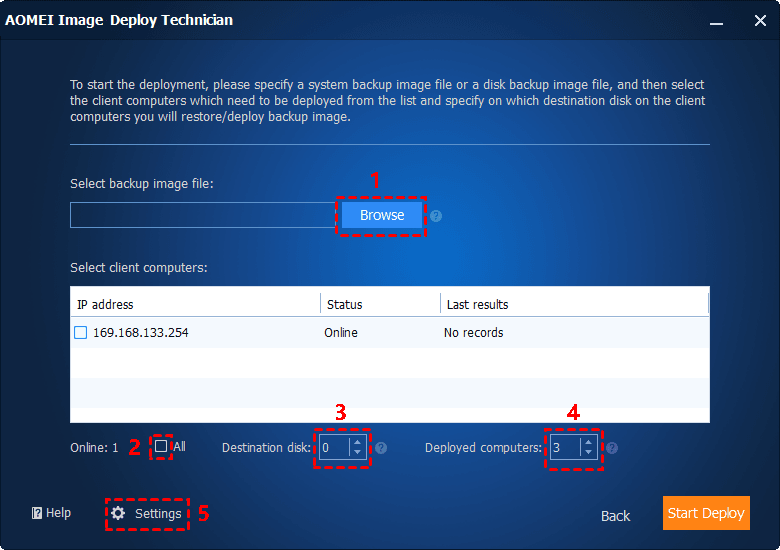
4. Specify backup image and image deployment settings.
- Click “Browse” > “Add share or NAS device” and input the display name, IP address, user name and password. Then, you can select the backup image (its file name is .adi) you want to deploy.
- Then, select "All" to select all the online client computers or only tick some of the client computers for image deploy.
- Afterward, set the disk number and deployed computers at a time.
- One more thing, batch preset computer name, IP address and enable "Universal Restore" to ensure your computer is bootable after image deployment.
- Finally, click "Start Deploy" to deploy image to multiple computers.
- Notes:✎...
- All the client computers need to use the same disk number as the server computer, otherwise, this software will report an error. And if you restore to the wrong disk, there may be data loss.
- If there is only one disk on the client computers, it is 0. The disk number ranges from 0 to 256.
- The number of deployed computers is at least 1, and 33 at most. The more computers you want to deploy, the longer it will take to deploy. The suggested number of deployed computers is 5 and in this case, it will restore 5 computers every time and then go for the next 5 computers.
Tip: Necessary backup strategy for multiple computers
Recently year, there have been more data disasters occurring for computers. You may encounter a cyber-attack, system crash, and many other misfortune that can lead to serious data loss. Especially if you have more than one computer, the loss can be tremendous.
So after deploying the system, it is necessary to backup your computers, once you lose your data, you can easily retrieve data from the backup. If you have one or two computers, AOMEI Backupper can do a good job.
But if you have more computers and need to centrally manage device backups, you can turn to a professional enterprise backup solution called AOMEI Cyber Backup. It offers an easy way to backup multiple computers on a user-friendly console. It supports disk backup, system/partition backup, and file backup for different levels of data backup.
You can hit the download button to install this tool. Then we will guide you on how to use it to backup multiple computers.
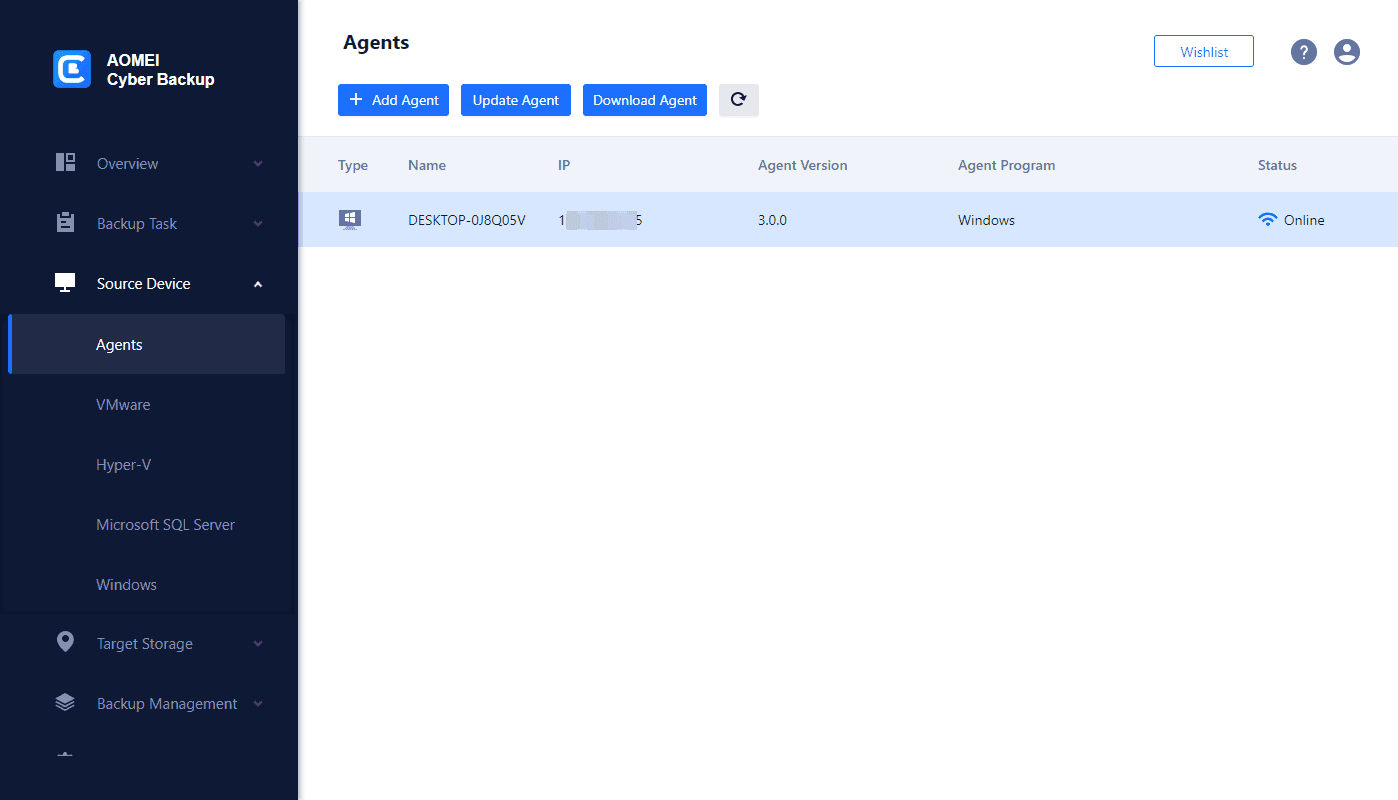
Step 1. Install AOMEI Cyber Backup software on a Windows. You can click Source Device > Agents > Add Agent to add computers that you want to back up.
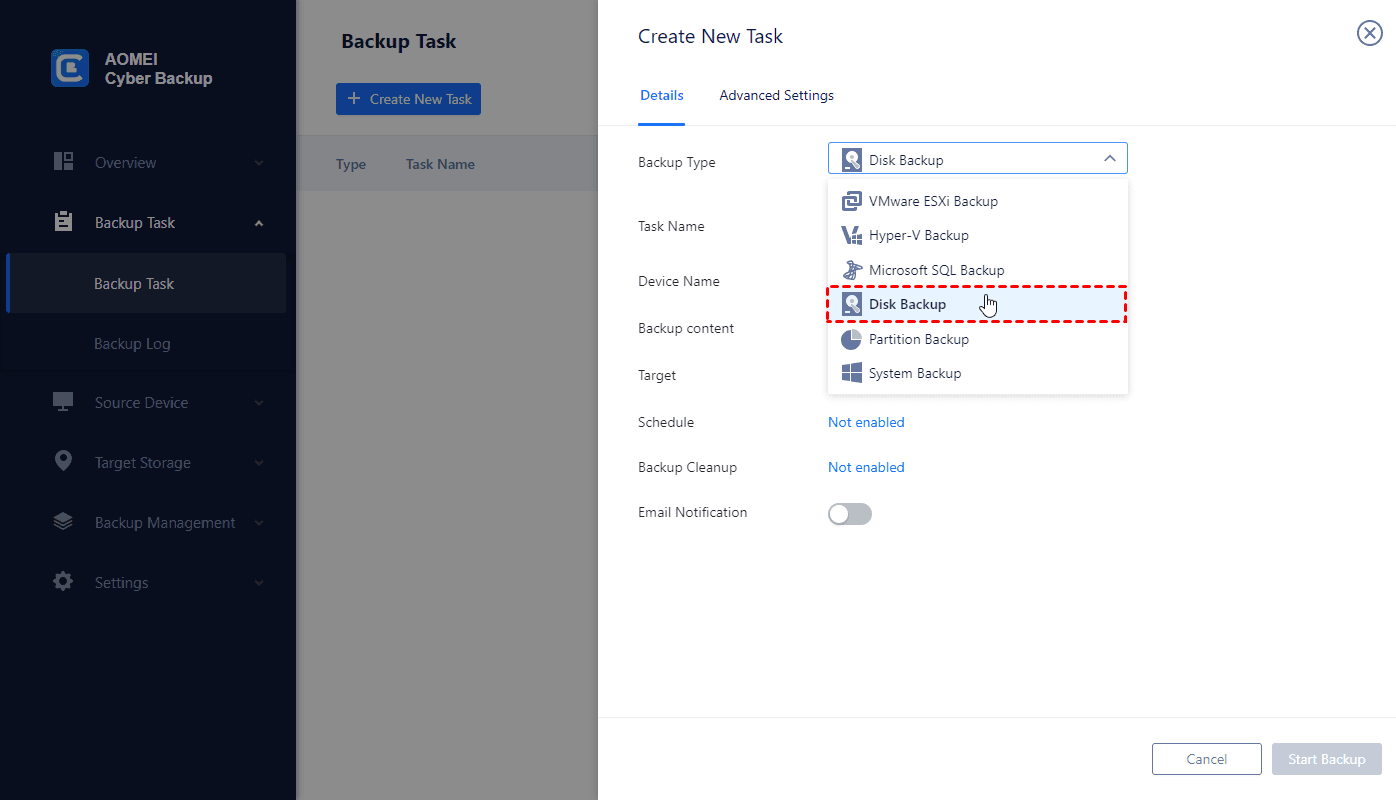
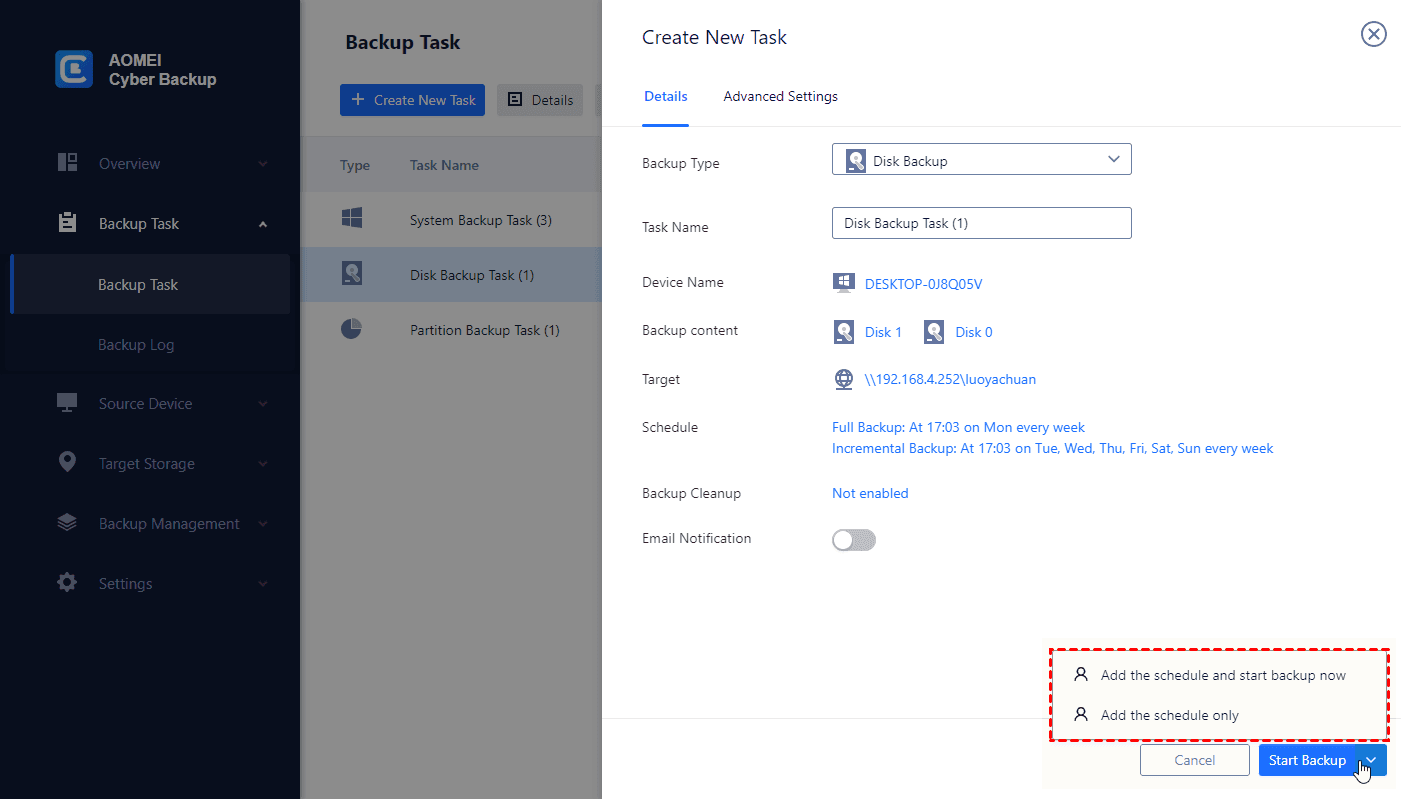
Step 2. Click Backup Task > Create New Task. Choose a backup type, here we choose Disk Backup as the backup type. Here you can also choose other types.
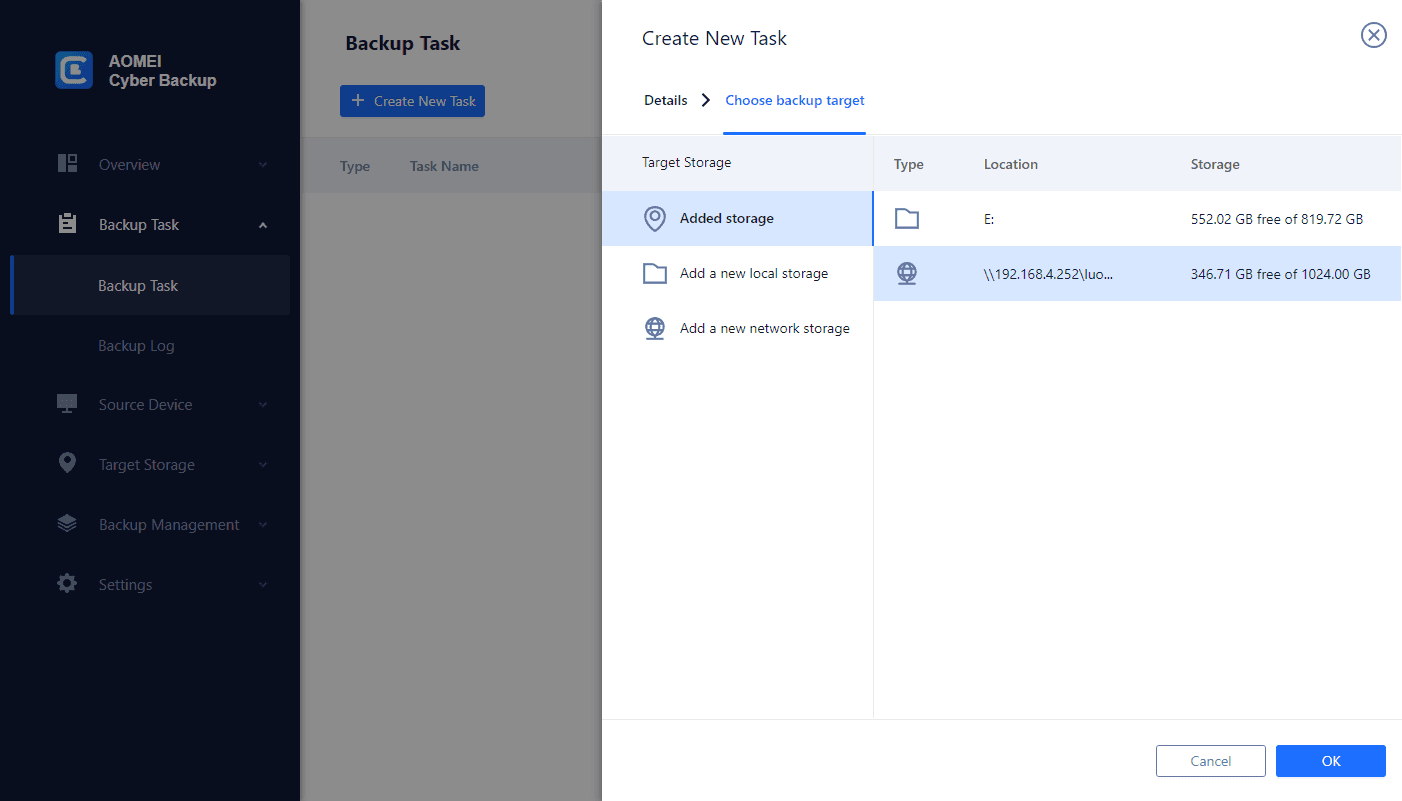
Step 3. Fill in a task name, choose the backup content, backup target, backup schedule, and other information according to your need.
Target: Here choose a location to save your backup.
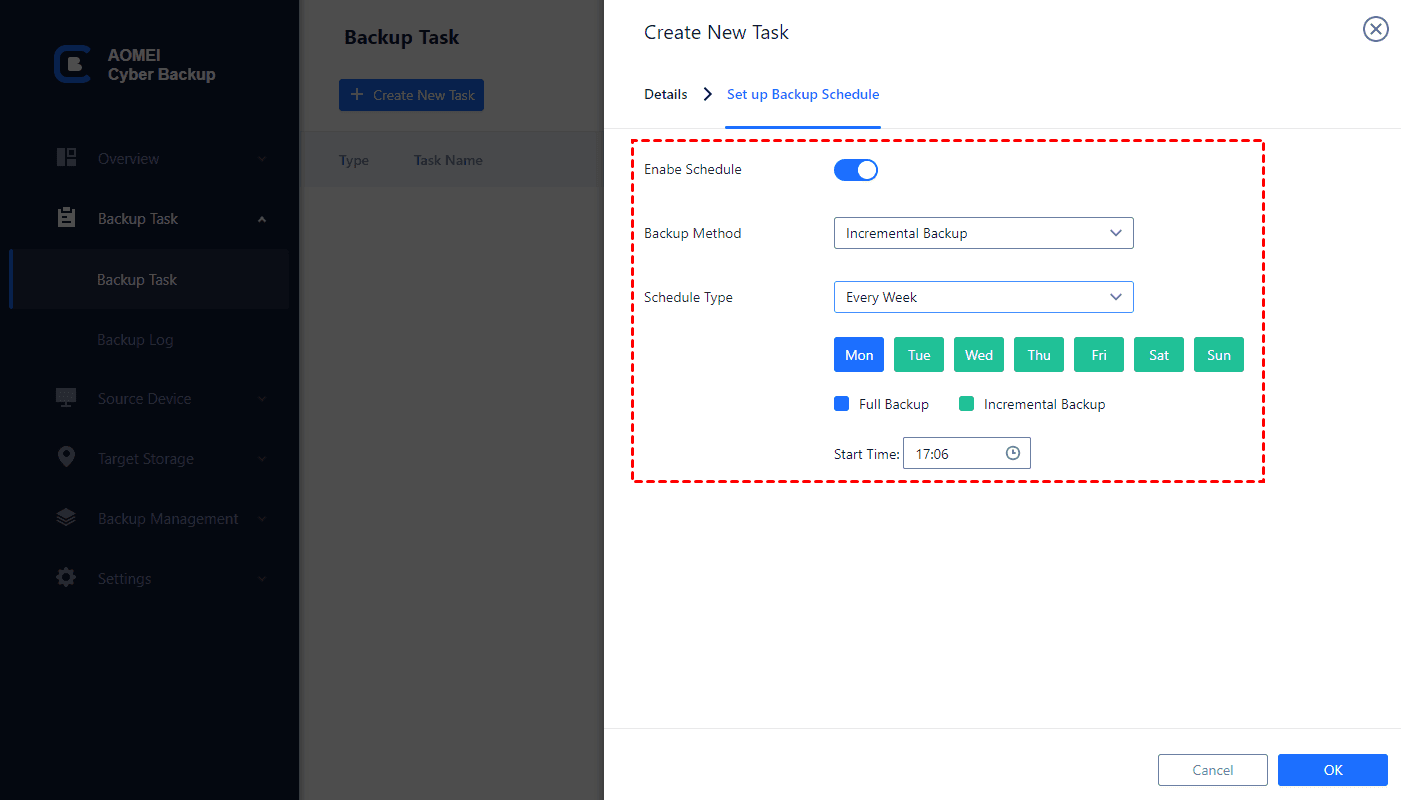
Schedule: The computer backup software gives you full, incremental, and differential backup options. And you can specify a backup frequency to backup every day, every week, every month.
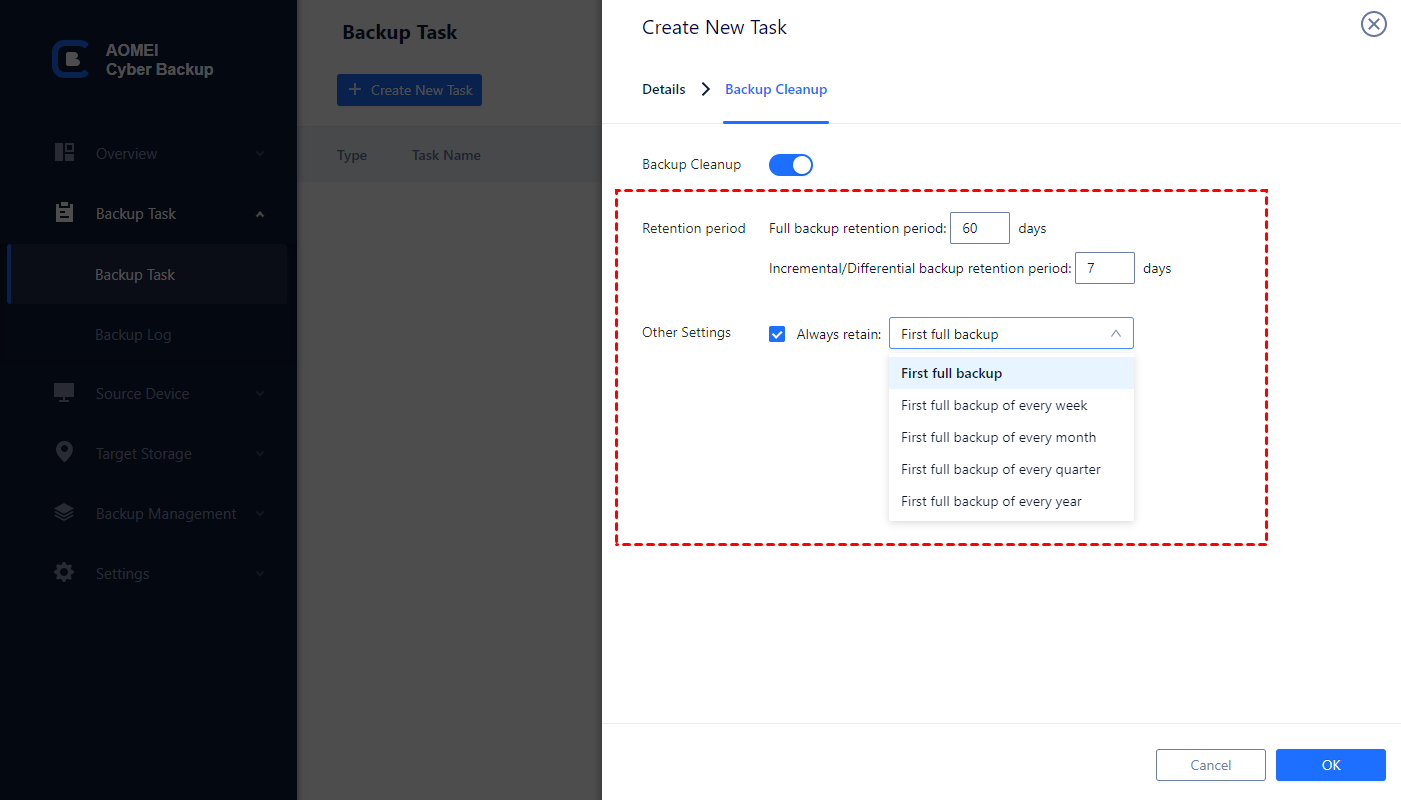
Backup Cleanup (Optional): This feature helps you automatically delete the old backup copies.
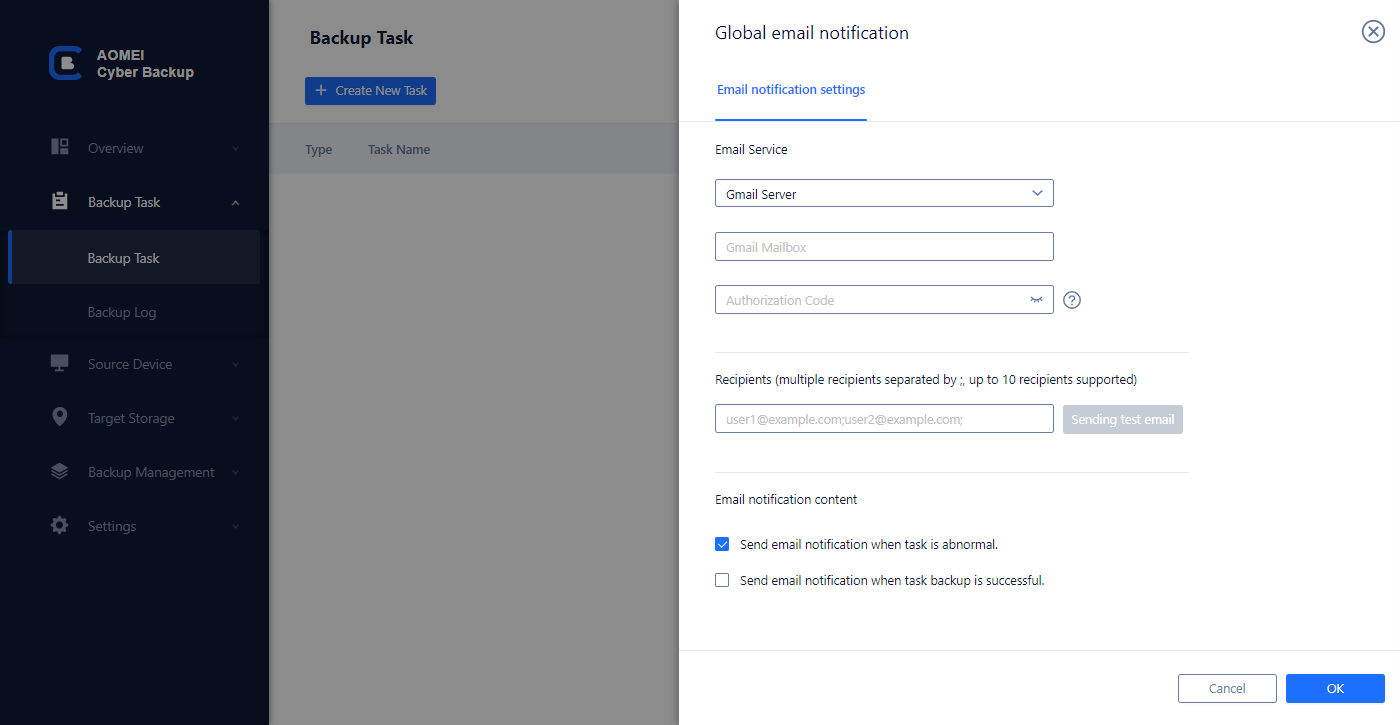
Email Notification(Optional): You will get an email notification when a backup is complicated or encounters an issue.
Step 4. Click Start Backup . You can click Add the Schedule and start backup now to backup immediately or click Add the schedule only to backup based on the schedule.
Drop it in the box
You can easily deploy system to different computer with the help of AOMEI Backupper whether it is one computer or multiple computers. Either way, you can perform dissimilar hardware restore if the target computer has different CPU, motherboard, etc.
However, the Technician or TechPlus version will be more convenient for deploying multiple computers. Since it is able to batch preset IP addresses for all the client computers, so you don't need to set the network one by one.
And it’s highly recommended to keep this software installed on your computer. It can help you protect system and data on the computer with different backup solutions. To keep all the changes and avoid backup disk full issue, you need to set schedule backup and backup scheme feature. No matter what your purpose is, download this software and try it yourself.