Migrate Windows 11/10 to M.2 SSD Without Reinstalling | Ultimate Guide
Migrate Windows 10/11 to M.2 SSD for faster boot and better performance—no reinstall required. Quick, easy, and safe.
By Lily Updated on August 19, 2025
Migrating your Windows 10 or 11 system to an M.2 SSD is a great way to dramatically improve your PC’s boot time, responsiveness, and overall performance. Instead of reinstalling everything from scratch, you can transfer Windows 10 or 11 from HDD to M.2 SSD via system cloning or backup & restore method, making the migration seamless.

Preparations: Install M.2 SSD on Windows 10/11 Correctly
Please prepare an M.2 SSD (NVMe or SATA, depending on your motherboard support), a screwdriver, and your PC manual (optional). To choose the right SSD, you may visit SSD Benchmarks Hierarchy 2025 of Tom's Hardware for referrence.
Follow the steps below to properly install M.2 SSD before OS migration.
1. Shut down and unplug your PC. Open the case, and locate the M.2 slot (often labeled M.2 or PCle M.2).
2. Gently insert the M.2 SSD into the slot at a 30-degree angle. Push it down flat against the motherboard. Use a screw to secure the drive in place. Close the case and reconnect all power and cables.
You can check if the M.2 SSD is recognized in BIOS and initialize it in Disk Management. In addition, 2 other important preparations include cleaning up the old drive by uninstalling uncessary applications or deleting unwanted files to speed up cloning process, and backing up important data to prevent potential loss due to unexpected errors.
How to Transfer Windows from SSD or HDD to M.2 SSD
Generally, there are two ways of moving Windows 10/11 to M.2 SSD. You can either use Windows built-in tool or a third party disk cloning tool. Next, I will walk you through the detailed steps of each way.
| Feature | AOMEI Backupper | Windows Built-in Tool |
|---|---|---|
| Ease of Use | Easy; Beginner-friendly | Complex; Manual Steps |
| Clone Type | System/Disk Clone | Backup & Restore |
| Resize Paritions | ✅ | ❌ |
| Clone to Smaller | ✅ | ❌ |
| UEFI/MBR Support | ✅(Auto Handle) | ❌(Manual) |
| Bootable Media Needed | ❌ | ✅ |
| Post-Boot Issues | Rare | Common |
| Best For | Most users; Hassle-free | Tech-savvy users |
Way 1. Clone Windows 10/11 to M.2 SSD (Simple Way)
AOMEI Backupper Professional is powerful and safe system clone software that allows you to transfer Windows to M.2 SSD without reinstalling operating system.

-
1-Click OS Migration: Simplify complex system migration into a few clicks, no command lines needed.
-
GPT & MBR Cloning: Supports both UEFI and Legacy, no need to manually convert partition styles.
-
4K Alignment: Automatically optimizes SSD for peak performance, reducing boot time.
-
Clone to Smaller SSD: Supports different sizes cloning, as long as the target drive has enough space for used data.
-
Resize Partitions: Easily resize partitions during the cloning process.
Download this M.2 SSD cloning tool now. Please note that the clone operation can only be previewed in the trial version. To execute it, please upgrade to full version.
YouTube Tutorial on How to Move Windows to M.2 SSD:
Graphic Tutorial of how to move Windows to M.2 SSD:
Step 1. Launch AOMEI Backupper Professional. Click Clone and then select System Clone.
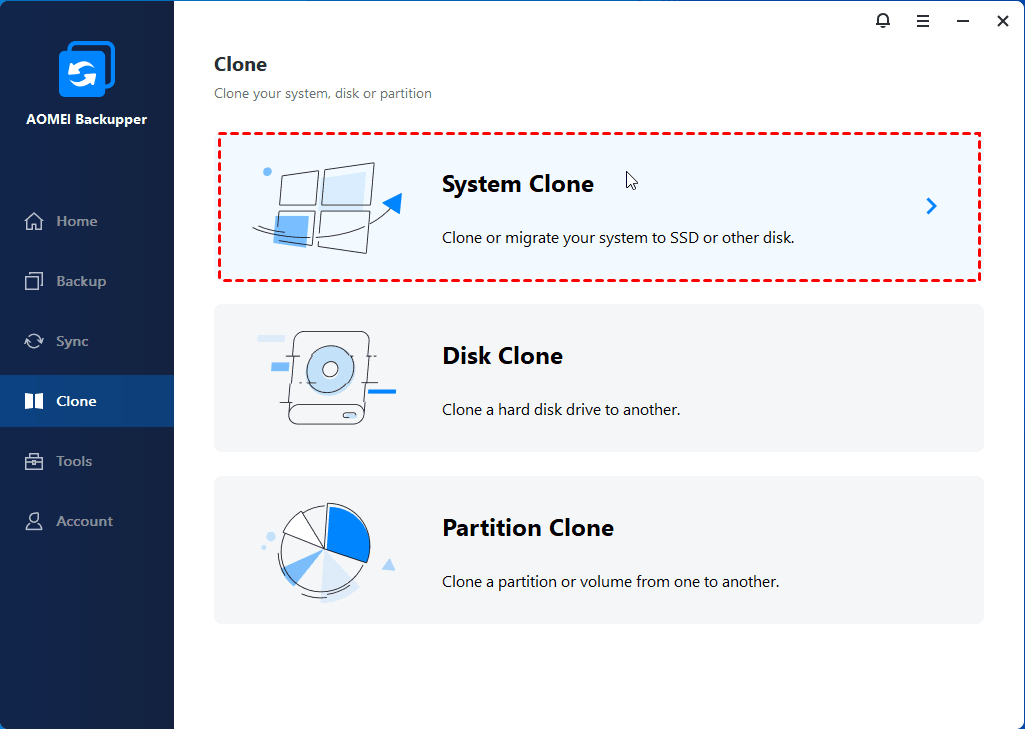
✍ If you want to transfer the entire hard drive, choose Disk Clone instead. It enables you to clone HDD to SATA SSD, clone SSD to M.2 SSD, etc.
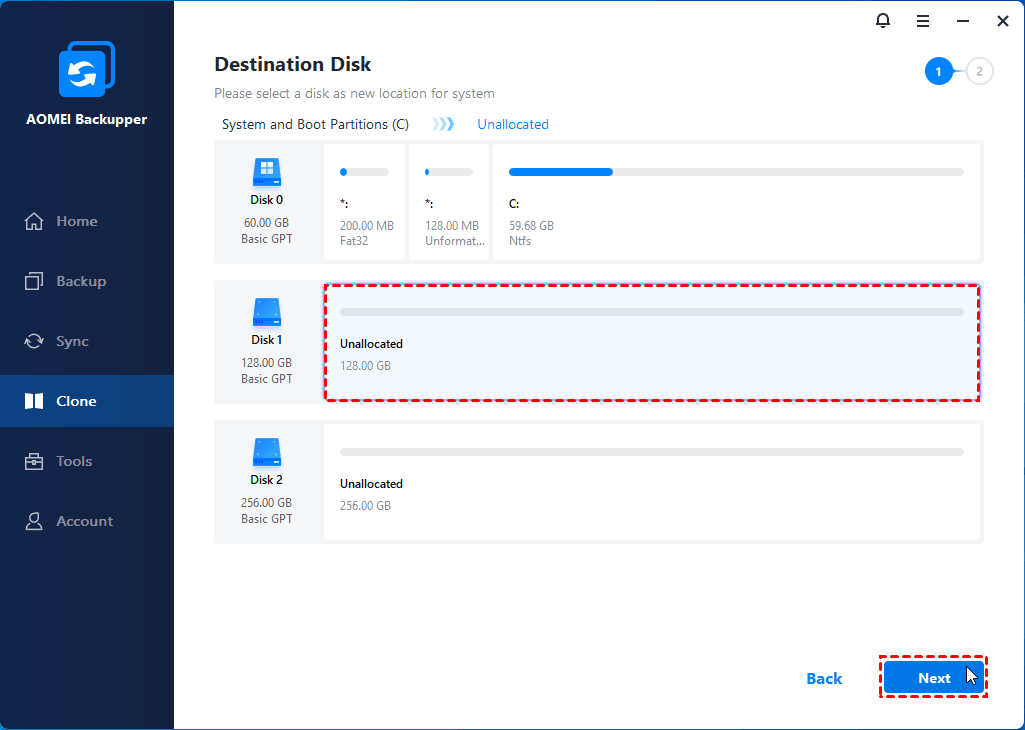
Step 2. The system partitions will be selected automatically. You just need to select the M.2 SSD as the destination disk, and click Next to continue.
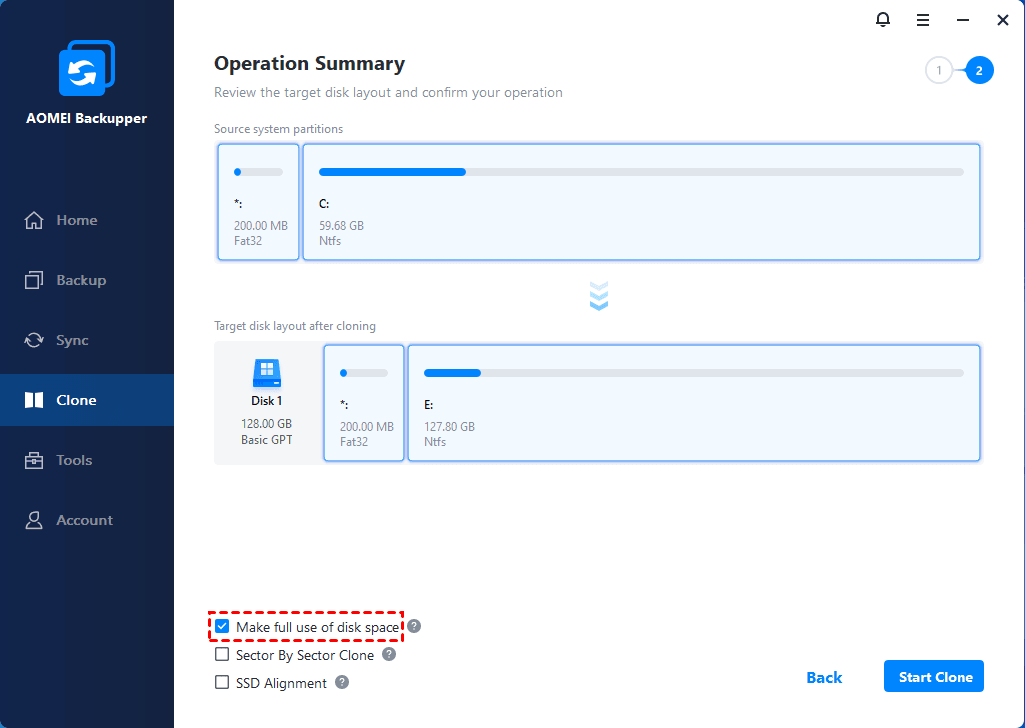
Step 3. Check SSD Alignment to accelerate M.2 SSD's reading and writing speed. Then click Start Clone to migrate Windows 10/11 to M.2 SSD.

💛 Tips:
- The default intelligent cloning mode copies only used sectors on the system partitions, which allows you to clone OS from larger HDD to smaller SSD without boot issues. If you want to clone every byte on the source partitions, you may check "Sector by sector clone".
- If your M.2 SSD is larger, there will be an option called "Make full use of disk space", and it is checked by default to extend the system partition size.
✍More advanced features in higher edition:
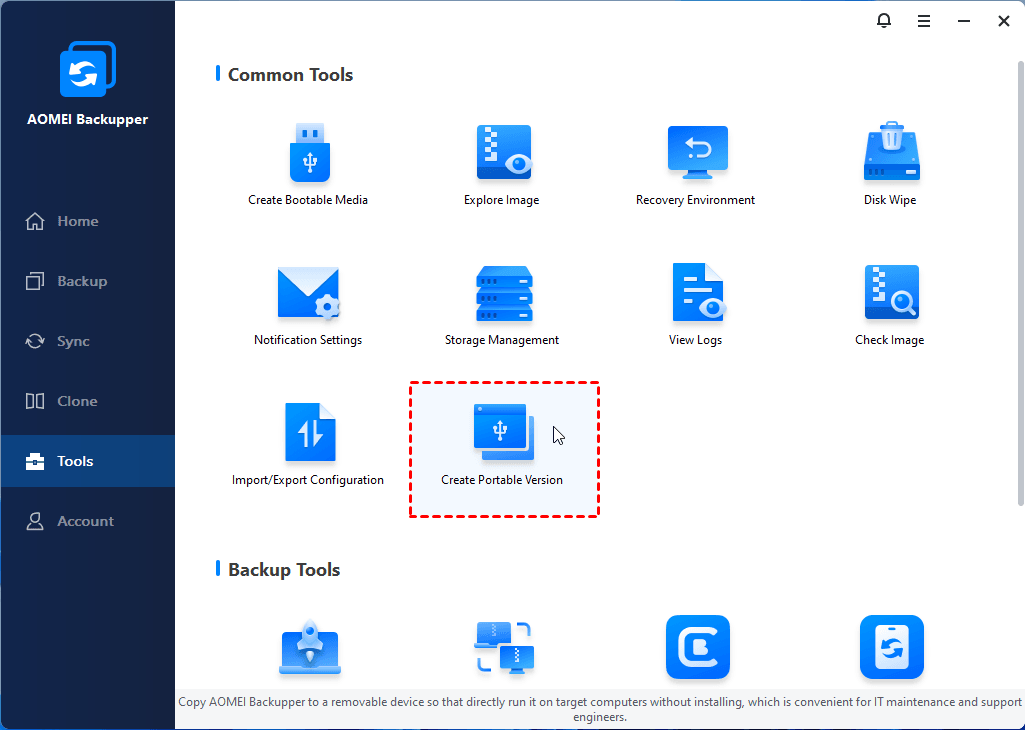
If you want to use AOMEI Backupper on different computers without installing it again and again, it's suggested to upgrade to AOMEI Backupper Technician Plus.
- It allows you to create portable version of this software on USB drive and directly run off from it. Then, you can use all its features including System Clone on any computer.
- Its image deploy tool allows you to deploy/restore system image file on server-side computer to multiple client-side computers over network.
Way 2. Transfer Windows 10/11 to M.2 SSD (Windows Backup and Restore)
Here you will use built-in tool to create a system backup and then restore it on SSD with the help of an installation disc. Now, go through all the detailed steps in the following:
Step 1. Create a Windows 10/11 system image
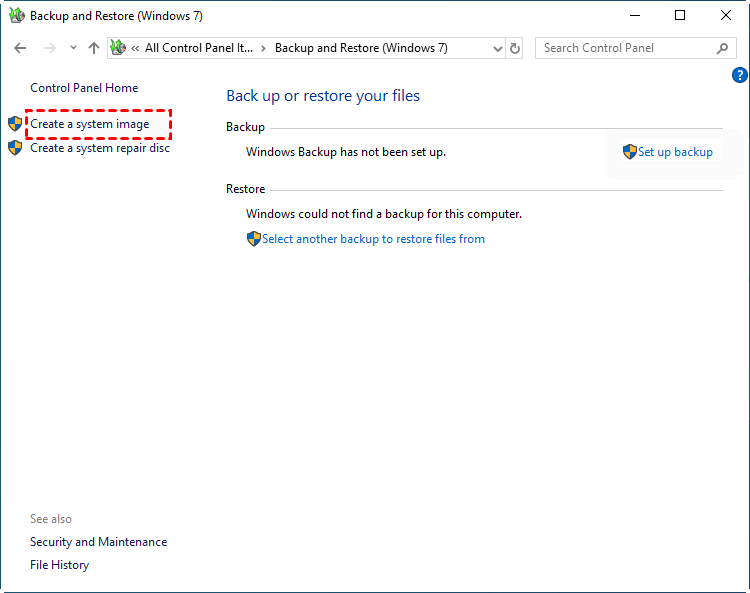
1. Type “backup” in the Search Box, select Backup settings and then Go to Backup and Restore (Windows 7). Then click Create a system image.
- ★ Open Backup and Restore (Windows 7) in Windows 11:
- If you are currently using Windows 11, the path is a little different. You can go to Settings -> System -> Storage -> Advanced Storage options > Backup options, then scroll down to "Looking for an older backup" and select Go to Backup and Restore (Windows 7).
2. Select an external hard drive as destination place to save your backup.
3. The system drive and system reserved drive are included by default. Click Next to continue.
4. Confirm the settings and click Start Backup.
Step 2. Create installation media
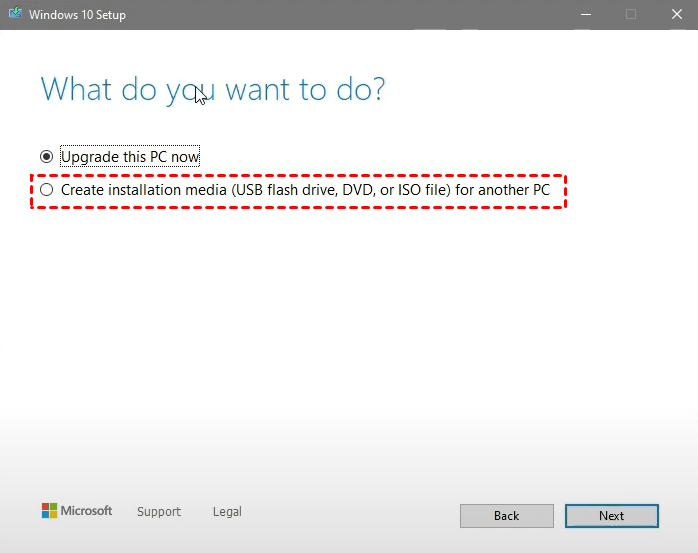
After creating a system image in Windows 10, you can easily migrate OS to M.2 SSD. The process requires an installation disc for boot. Please download Windows 10 Media Creation tool on the Microsoft software download page and create a bootable USB with it.
Step 3. Restore system image to M.2 SSD
Then, you can insert the bootable USB drive into your computer for system image recovery. The detailed steps are below:
1. Shut down the computer and connect SSD to it.
2. Restart your computer and change the boot device to USB drive in the BIOS window. Then, save changes and reboot from this USB drive.
3. In the Windows Setup window, click Repair your computer -> Troubleshoot -> Advanced Options -> System Image Recovery.
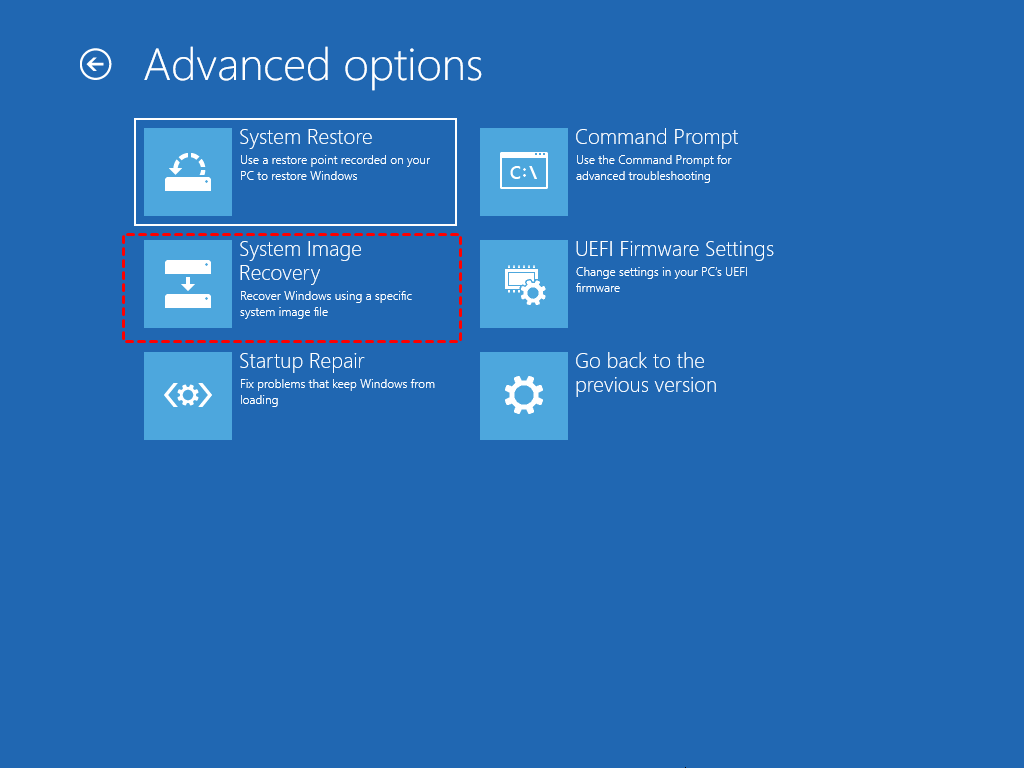
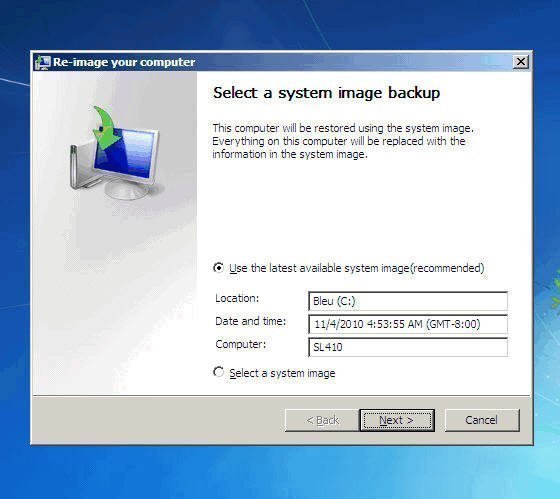
4. After that, you will see the Re-image your computer screen. Click Use the latest available system image(recommended) and then click Next. And complete the restoration process by following the instruction.
That is the way of transferring Windows from HDD/SSD to M.2 SSD. Obviously, the operation steps are a little bit troublesome, and it is error-prone for users who have less computer knowledge and skills. In a few cases, you may encounter the error Windows 10 backup not working.
To make things easier, it is recommended to try the first way, migrating Windows 11/10 with M.2 SSD cloner. It has a user-friendly interface and is popular among Windows users.
✍ Tip: Both ways are apply to how to transfer Windows 10/11 from SSD to M.2 or NVMe SSD.
Booting from the M.2 SSD (with Troubleshooting)
After cloning, you can go to BIOS and change the boot device to boot from the M.2 SSD. Here's how to set it up in BIOS:
-
Restart your PC and press the manufacturer-specific key (such as
F2,F10,F12, orDel) to enter BIOS. If you're unsure which key to press, consult your device’s manual or search online for your motherboard model. -
In the BIOS menu, navigate to the "Boot" tab, and set the M.2 SSD as the first boot device.
-
Press
F10to save changes and exit BIOS. Your PC should now attempt to boot from the M.2 SSD.

💡Tip: After confirming everything works smoothly, you can optionally delete the old 450MB recovery partition (if present) to free up space.
🛠️ Troubleshooting: What If Your PC Fails to Boot from M.2 SSD?
Sometimes things don’t go as planned. If your PC doesn't boot successfully from the M.2 SSD, try the following:
🚫 Black Screen or Boot Loop
-
Double-check that the M.2 SSD is listed as the first boot device in BIOS.
-
Disconnect the old HDD/SSD temporarily to ensure the system isn't defaulting back to it.
🚫 "No Boot Device Found" Error
-
Make sure the M.2 SSD is properly seated in the M.2 slot.
-
Re-enter BIOS and confirm that the drive is recognized.
-
If not, your BIOS may not support NVMe booting, just check for BIOS updates on the motherboard manufacturer's website.
🚫 UEFI vs. Legacy Mode Conflicts
-
If the original system was installed in UEFI mode, ensure that the BIOS is set to UEFI only, not Legacy or CSM.
-
For older systems, you may need to switch to Legacy mode if the SSD was cloned using MBR partitioning.
🚫 Missing or Incorrect Drivers
-
Some NVMe SSDs may require special drivers. Check the SSD manufacturer’s website for the latest firmware or drivers.
-
Boot into Safe Mode by interrupting the startup 3 times or using installation media, then reinstall chipset or storage drivers if needed.
📕 If the PC still not booting, you may try running Startup Repair from a Windows installtion USB stick.
Extended Reading: What is M.2 SSD?
An M.2 SSD is a type of solid-state drive (SSD) that uses the M.2 form factor, a small, rectangular shape that resembles a stick of gum. It’s designed to plug directly into the motherboard via an M.2 slot, making it compact and ideal for modern desktops, laptops, and ultrabooks.
The term “M.2” refers only to the physical form factor. M.2 SSDs can use different types of interfaces, such as SATA or PCle (M.2 NVMe SSD for instance). NVMe is designed specifically for SSDs and allow them to communicate directly with the CPU at high speeds.
What's the difference between M.2 SATA SSD and M.2 NVMe SSD? They have different performance in these aspects.
| Feature | M.2 SATA SSD | M.2 NVMe SSD |
| Interface & Protocol | SATA; AHCI | PCle; NVMe |
| Max Speed & Performance | ~550 MB/s; Good | 3000~7000+ MB/s; Excellent |
| Compatibility | Most systems | Requires NVMe-capable |
| Price | Lower | Higher |
5 FAQs on Moving Windows to M.2
1. M.2 vs. SATA SSD for boot drive, which is better?
An M.2 SSD takes up less room than 2.5-inch SSD. What's more, an M.2 SSD usually uses NVMe protocol (PCI-e), so it is generally faster than a SATA SSD that uses AHCI protocol. As a result, there's a growing need to migrate Windows 10/11 to M.2 SSD nowadays.
2. Would a 250GB M.2 SSD be sufficient purely for OS storage?
Actually, for Windows OS installation and all other basic applications, a 128GB SSD would be enough. To leave more space for future use, 250GB is also a good choice.
3. Can I keep my old drive after successful migration?
Yes. After ensuring Windows boots correctly from the M.2 SSD, you can format the old drive to use it for extra storage. Optionally, you can keep the old OS for dual-boot purposes, but this requires configuring the bootloader accordingly.
4. How can I ensure my M.2/NVMe SSD is compatible with my motherboard?
Verify that your motherboard has an appropriate M.2 slot and supports the NVMe protocol. Consult your motherboard's manual or the manufacturer's website for compatibility details.
5. Is it necessary to enable AHCI mode for optimal SSD performance?
Yes, enabling AHCI mode in BIOS ensures better performance and compatibility with SSDs. Confirm that AHCI is enabled before migration.
Summary
Generally, there are two ways on how to migrate Windows 10/11 to M.2 SSD, professional third-party cloning tool like AOMEI Backupper or Windows built-in tool. You may choose the most suitable one based on your situation.
If you're not so familiar with computer operations, the first method, AOMEI Backupper is a perfect choice. If you're a DIYer, the second method is worth trying.
Besides, AOMEI Backupper is powerful Windows backup software, allowing you to do system backup, disk/partition backup and file/folder backup, etc. Try it now to discover more!