How to Convert MBR to GPT in Windows 11 Easily (3 Ways)
You can learn 3 easy methods to convert MBR to GPT in Windows 11 and how to easily restore Windows 11 system backup to GPT without converting partition style. You can read on for more details.
Reasons for Converting MBR to GPT in Windows 11
Since Windows 11 offers significant improvements in the user experience and also adds a bunch of new, powerful features, you may want to install Windows 11 and explore this new operating system for yourself.
For users who want to upgrade to Windows 11, there is a question that they are very concerned “Does Windows 11 use MBR or GPT?” According to the Windows 11 minimum requirements released by Microsoft, Windows 11 will abandon the old MBR partition scheme and switch to the GPT scheme. This is also in order to make your Windows computer more secure. So, if you want to upgrade to Windows 11, you need to convert your current MBR disk to a GPT disk.

If you want to get the latest Windows 11 update - Windows 11 24H2 version, follow this guide to get its ISO download. Read more>>
How to Convert MBR to GPT for Windows 11 Easily
If your disk is still MBR, it needs to be converted to GPT before you update to Windows 11. Many users will ask: How do I change from MBR to GPT in Windows? Don't worry, next, this article will introduce you 3 simple methods, including built-in tools and professional third-party software.
👉 Method 1. Convert MBR to GPT in Windows 11 using Disk Management
👉 Method 2. Convert MBR to GPT in Windows 11 using Diskpart
👉 Method 3. Convert MBR to GPT in Windows 11 using Third-party Software🔥
You can also restore Windows 11 system backup to GPT without converting partition style. Give this backup and restore tool a try.
Method 1. Convert MBR to GPT in Windows 11 using Disk Management
The built-in tool - Disk Management helps you expand, shrink, delete and format volumes and disks. It also allows you to convert MBR disks to GPT disks.
However, during the conversion process, it will delete all your partitions and then create a new one using the unallocated space, so you will lose all your previous data. Please make a backup of your partitions in advance. Then you can follow the steps below.
Step 1. Right-click the Windows icon and select Disk Management.
Step 2. Right-click the volumes of the target disk, select Delete Volume and repeat this operation to delete all volumes.
Step 3. When the disk is displayed as unallocated space, right-click the disk and select Convert to GPT Disk. And finish all the rest steps.
Close Disk Management when the conversion process is done. You can now use your GPT disk to create partitions as you want or install a new OS on the disk.
Method 2. Convert MBR to GPT in Windows 11 using Diskpart
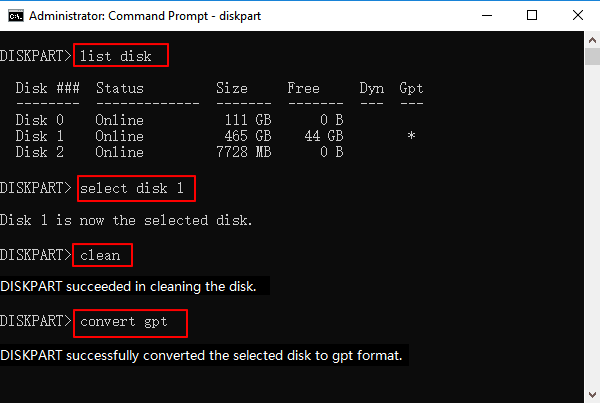
Besides the first method, you can also choose another built-in tool Diskpart to help you convert MBR disks to GPT. Since converting MBR to GPT with Diskpart requires cleaning up the whole disk, remember to backup your disk data first. Then follow the steps below.
Step 1. Click the Start button and type cmd. Then right-click Command Prompt and select Run as administrator.
Step 2. Type diskpart and click Enter.
Step 3. Type the following commands one by one and hit Enter each time.
- list disk
- select disk 1 (you need to choose your MBR disk.)
- clean
- convert gpt
Step 4. Type exit when the conversion process completes.
Method 3. Convert MBR to GPT in Windows 11 using Third-party Software
When using the first two MBR to GPT conversion tools you need to be aware that both Disk Management and DiskPart can only convert an empty MBR disk to GPT. Therefore, It requires you to delete every existing partition on the MBR disk, which will cause data loss.
If you want to convert MBR to GPT without deleting the volume and losing data, the third-party partition software - AOMEI Partition Assistant Professional can best meet your requirements. It's an MBR to GPT converter as well as a GPT to MBR converter. As a result, whether you're converting MBR to GPT or GPT to MBR on Windows 11/10/8/7, it can ensure a successful conversion with keeping all partitions secure on the target disk.
Now, you can download AOMEI Partition Assistant Professional and install it. Then follow the steps below.
Step 1. Open the software and right-click on the MBR disk that you want to convert then choose the Convert to GPT Disk option.
Step 2. Click OK on the pop-up window to confirm the operation.
Step 3. Click Apply button to commit the conversion.
Note:
This software also supports converting GPT to MBR. If you want to convert GPT to MBR without operating system, you can create a bootable media, boot your PC from it to enter Windows PE mode to finish the conversion
How to Change the Boot Mode to UEFI
When you have converted MBR to GPT in Windows 11, then you should go to BIOS to change the boot mode to UEFI. The following graphic tutorial will show you how to do that.
Step 1. Shut down and restart your computer. Keep pressing the F2/F9/Del (different computer may have different key ) to enter the BIOS setting.
Step 2. On the Boot menu, Select UEFI/BIOS Boot Mode first and use the up and down arrows to select UEFI, and press Enter.
Step 3. Press F10 to save the changes and exit.
✍ Recommended Reading:
After switching the boot mode to UEFI, there's one more step: enabling Secure Boot. This is also a minimum requirement for users looking to upgrade to Windows 11. Get details from the following guide:
Restore Windows 11 System Backup to GPT without Converting Partition Style
After you have converted the disk to GPT, you need to upgrade Windows 10 to Windows 11. The official method provided by Microsoft requires TPM2.0 and Secure Boot. But some computers don't satisfy these two conditions. At this time, you can choose a reliable backup and restore software - AOMEI Backupper Professional to help you.

-
It allows you to restore system backup to GPT without converting disk partition style, and it can bypass TPM and Secure Boot.
-
The Universal Restore feature enables you to restore your system backup to another computer even with different hardware.
-
Besides System Backup, it offers Disk Backup, Partition Backup and File Backup. You can backup any items you want.
The Universal Restore feature can help you when you encounter any of the following situations:
✔ Install Windows 11 bypass TPM 2.0 and Secure Boot.
✔ Install Windows 11 without disk conversion.
✔ Instant recovery of a crashed system on different hardware.
✔ Migrate system to a computer with dissimilar hardware installed.
✔ Install your system between real and virtual machines.
✔ Reinstall your system after replacing your motherboard, CPU and other hardware.
Before you start the restore process, you need to install AOMEI Backupper Professional on a computer that has already installed Windows 11 and do the following preparations:
- Create a system image of Windows 11.
- Create a bootable disk to boot the target computer.
After finishing these preparations, you can follow the steps below to restore Windows 11 to another computer.
Note: If you don't want to lose your existing system and data on the target computer, you may back up your computer before upgrading to Windows 11.
Step 1. Insert the disk containing system image and bootable disk into the computer you want to install Windows 11. Then, restart your computer and boot from the bootable disk. When the software interface appears, click Restore and then click Select Image File.
Step 2. Select Restore this system backup and click Next.
Step 3. Select the destination to restore your Windows 11 to the GPT disk.
Step 4. If your computer hardware is different from the previous one, this software will recognize and automatically select the Universal Restore function. You just need to click Start Restore.
FAQs about Windows 11 Converting MBR to GPT
1. Does Windows 11 require UEFI?
2. What are the MBR and GPT for disk?
3. How do I know if my disk is MBR or GPT?
Summary
Since Windows 11 requires your computer to support UEFI mode, you need to convert your disk to GPT. This article provides you with 3 useful ways to convert MBR to GPT in Windows 11. When using Disk Management or Diskpart, it is recommended that you backup your important files in advance, because the conversion process will delete all your previous data. If you don't want to delete the volume and losing data, you can choose to convert MBR to GPT with AOMEI Partition Assistant Professional Edition.
You can use AOMEI Backupper Professional to restore your Windows 11 system backup to GPT disk without disk conversion. The Universal Restore feature of this software can help you restore system backup to a computer with different hardware so that you can avoid losing your data and reinstalling computer.
Besides, it also supports cloning dynamic disks, clone and resize partition, etc. If you are a Windows server user, you can try AOMEI Backupper Server. You can download this software to explore more functions.


