How to Run DISM Offline to Repair Windows 11
You can learn how to use DISM offline to repair Windows 11. And creating a system image is essential to safeguard your system from potential failures and ensure its stability.
By Miya Updated on August 24, 2023
What is DISM Offline?
DISM offline refers to the capability of the Deployment Image Servicing and Management (DISM) tool to perform operations on Windows images without requiring the running operating system. It allows administrators to service or modify Windows images while they are offline, meaning the operating system isn't running on the target computer.
When using DISM offline to repair Windows 11, you typically work with Windows image files in the Windows Imaging Format (WIM) or Virtual Hard Disk (VHD/VHDX) formats. These image files contain a snapshot of a Windows installation, including the operating system files, drivers, and configurations.
Here are some common use cases for DISM offline:
✦ Image servicing: You can apply updates, service packs, or language packs to a Windows image offline, ensuring that the image is up-to-date before deployment. This can save time and bandwidth compared to updating each individual deployed system.
✦ Image customization: DISM offline allows you to add or remove components, drivers, packages, or features from a Windows image. This customization can be useful when creating specialized or streamlined installations for specific purposes.
✦ Image recovery: If a Windows installation becomes corrupted or unbootable, DISM offline can be used to repair the image by replacing or fixing corrupted system files. This can help restore your computer to previous date without requiring a reinstallation.
In the next part, we'll show you how to use DISM offline on Windows 11.
How to Use DISM Offline Repair Windows 11
DISM, an integrated tool within the Windows system, can be easily accessed through Windows PowerShell or Command Prompt. The offline DISM repair command differ depending on the Windows edition and the image's state (offline or online).
Nevertheless, some users have encountered difficulties when utilizing the DSIM command-line tool to repair or prepare a Windows 11 image backup stored on an external drive. They encounter the following error message during their attempt to perform the operation:
The source files could not be found.
This guide aims to provide you with the correct procedure for running DISM on an external drive to repair a Windows 11 image backup.
Step 1. To begin, execute the following command:
DISM /Online /Cleanup-Image /CheckHealth
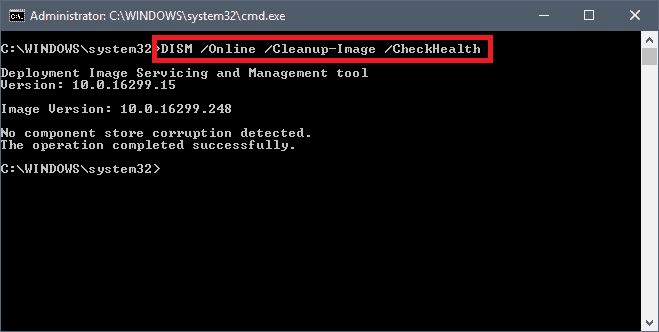
By utilizing the /CheckHealth parameter, the DISM tool will provide a report indicating whether the image is in a healthy state, repairable, or non-repairable.
- If the image is deemed non-repairable, it is advisable to discard the image and commence the process anew.
- If the image is found to be repairable, you can proceed to employ the /RestoreHealth parameter to initiate the image repair.
Step 2. In the event that the DISM tool fails to work, you will need to perform a cleanup of the Windows system components. To do so, press the Windows key and search for cmd. Right-click on Command Prompt and select Run as Administrator. Within the Command Prompt window, input the subsequent command and press ENTER:
Dism.exe /Online /Cleanup-Image /RestoreHealth /Source:C:\RepairSource\Windows

Note: In the aforementioned command, ensure to substitute the C:\RepairSource\Windowssection with the precise location of the repair source.
☎ Run DISM offline to repair Windows 11
If your intention is to repair an offline image using a mounted image, you can employ the following command:
Dism /Image:C:\offline /Cleanup-Image /RestoreHealth /Source:C:\test\mount\windows
To prevent the DISM tool from utilizing Windows Update as a repair source or backup repair source for online images, you can append /LimitAccess to the command.
By executing these straightforward commands, you will be able to resolve the issue and effectively utilize DISM on external drives.
Dism /Image:C:\offline /Cleanup-Image /RestoreHealth /Source:C:\test\mount\windows

Tip:
❤ To further enhance your usage of DISM on external drives, an additional option is available: you can include /LimitAccessat the end of the command. This option serves the purpose of preventing the DISM tool from utilizing Windows Update as a repair source or backup repair source for online images.
❤ By incorporating these straightforward commands and utilizing the /LimitAccess option, you will successfully resolve the issue and gain the ability to effectively use DISM on external drives.
Create Your System Image to Protect Data
After knowing how to repair Windows with DISM offline, creating a functioning Windows image is crucial for the proper booting of your computer. In the event of any errors, your computer may fail to boot, resulting in potential data loss. As the repair process can be complex, especially for novice users, it is undesirable to encounter such situations.
To prevent system failures or other severe issues, it is highly recommended to create a system image before or after performing DISM offline repair on Windows 11. A reliable backup freeware, AOMEI Backupper Standard, can assist you in creating a comprehensive system image that includes the operating system, system files, drivers, custom settings, personal data, and more.
By creating a system image, you can avoid the need to reinstall programs and eliminate concerns about data loss regardless of what may occur. Additionally, AOMEI Backupper Standard offers several advantages during the backup process:
✎ Its schedule backup enables you to schedule regular system backups, such as daily, weekly, monthly, event triggers or USB plug in. Ensuring that all subsequent changes are captured.
✎ By default, it utilizes incremental backup, which only backs up modified files after the initial full backup. Furthermore, it employs normal compression, intelligent sector backup, and other techniques to significantly reduce the size of the backup image.
✎ You have the flexibility to choose various storage options for backing up Windows 11, such as backup Windows 11 to USB, external hard drives, cloud drives, network shares/NAS, and more.
To proceed, simply download, install, and launch AOMEI Backupper Standard to utilize its features and safeguard your system.
Tip: The free version of AOMEI Backupper is compatible with Windows 10, 11, 8, 7, XP, and Vista operating systems. However, if you are a server user, I recommend trying AOMEI Backupper Server, which provides specialized features and support tailored for server environments.
Step 1. Launch the software. Click on Backup and select System Backup.

Step 2. By default, the system partition and all boot partitions will already be selected for backup. Your task is to choose a backup destination where all the contents from the system partition will be stored. If you prefer backing up to an external disk or USB drive, make sure to connect it to your computer.

Step 3. Click on Options, followed by Schedule Backup and Backup Scheme (in Pro version) to customize your backup settings according to your preferences. Once you have made the necessary adjustments, ensure that everything is in order, and then click on Start Backup to initiate the creation of a system image after performing DISM offline repair on Windows 11.

❦ How to repair Windows 10 image with a backup image:
Once you have successfully created a system image, you can utilize it to restore the Windows image onto a new hard drive in the event of various unfortunate circumstances, such as Windows image corruption or unsuccessful attempts to repair Windows 11 using DISM.
To proceed with the restoration process, follow these steps:
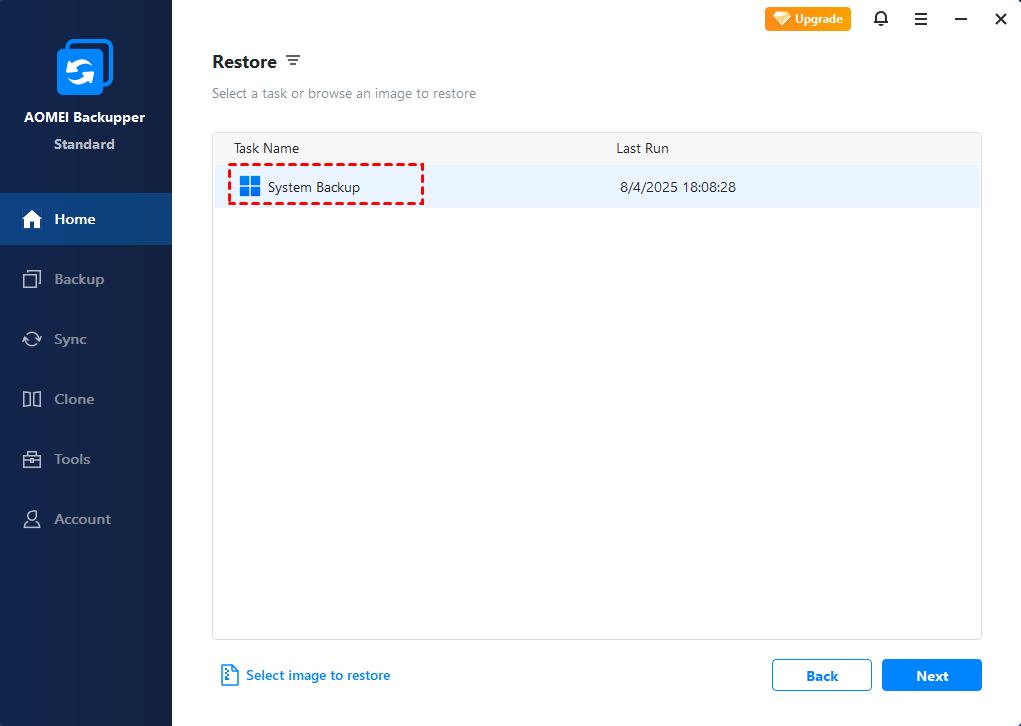
Step 1. Launch the software once again. On the Home tab, locate the backup task you created, or navigate to the Restore tab.
Step 2. Find the system image you want to restore and select it. Follow the guided instructions provided by the wizard to complete the restoration operation.
Tip: Additionally, you have the option to utilize the software to restore the system to a new computer that possesses different hardware specifications. What's more, the Technician or Tech Plus edition offers additional support by enabling you to create a portable version of the software on a removable device. This allows you to conveniently use the software on multiple Windows computers without the need for reinstallation.
Conclusion
By now, you should be familiar with how to utilize DISM offline to repair Windows 11 image when your computer is experiencing issues. However, the repair process may be difficult to follow or ineffective. Therefore, it is strongly recommended to create a system image backup after repairing the image. This will allow you to restore the system image from an external hard drive and quickly regain the functionality of your computer.
AOMEI Backupper Standard not only functions as free backup software but also serves as disk cloning software. This means you can easily clone external hard drive over Ethernet and replace your laptop's HDD with an SSD, clone NVMe to NVMe SSD, clone HDD to Samsung SSD, migrate the OS to an SSD, and more. After cloning, you can directly boot from the new drive. To explore additional features, please download AOMEI Backupper Standard and experience them firsthand.