How to Repair Windows 11 Bootloader: Step-by-Step Guide
Having trouble booting into Windows 11? Learn how to repair the Windows 11 bootloader with this step-by-step guide. We cover automatic repair, command-line fixes, and system file restoration to help you get your PC running smoothly again.
By Rosie Updated on February 8, 2025
The Windows 11 bootloader is a crucial component that loads the operating system when you turn on your computer. However, bootloader issues can arise due to corrupted files, failed updates, malware, or misconfigured system settings. If your PC fails to boot properly, repairing the bootloader is essential to restore system functionality. In this guide, we’ll walk you through the step-by-step process to repair Windows 11 bootloader and get your system back up and running.
Needing Preparations Before You Start Repairing
Before proceeding with bootloader repairs, take these preparatory steps to minimize data loss and ensure a smooth recovery.
1. Backup Your Important Files and Data
Before attempting to repair bootloader Windows 11, it’s essential to back up your PC system and important files. While most bootloader repair methods don’t erase data, there’s always a small risk of data loss when modifying system settings or running recovery commands. Creating a backup with AOMEI Backupper Standard ensures that your files remain safe in case anything goes wrong.

-
Full System Backups – Capture a complete image of your Windows 11 system, allowing for a full restore if the bootloader repair process fails.
-
File and Folder Backups – Select specific files or folders to protect important data without backing up the entire system.
-
Bootable Backups – Create a bootable USB or external drive to restore your system if Windows becomes completely unbootable.
How to Back Up Your Data with AOMEI Backupper
Follow these steps to create a backup before proceeding with bootloader repairs:
Step 1: Open AOMEI Backupper and navigate to the "Backup" tab. Select "System Backup" if you want a complete system image.

Step 2: Choose an external hard drive, USB flash drive, network storage, or cloud storage as the backup location.

Step 3: Click "Start Backup" and wait for the process to complete.

Important Backup Tips:
🔹 Store your backup on an external drive or cloud storage to prevent data loss in case of system failure.
🔹 Ensure you have enough storage space for the backup.
🔹 Keep your backup updated to protect your most recent files.
By using AOMEI Backupper, you can secure your important data before repairing the Windows 11 bootloader, minimizing the risk of data loss and ensuring a smooth recovery process.
2. Check BIOS/UEFI Settings
Incorrect BIOS/UEFI settings can prevent Windows from booting properly. Here’s how to check and adjust them:
- Restart your PC and press the designated key (usually F2, F12, Delete, or Esc) to enter BIOS/UEFI.
- Navigate to the Boot tab and ensure the correct drive is set as the primary boot device.
- Disable Secure Boot if you're experiencing boot issues.
- Enable UEFI mode if you’re using a GPT partitioned disk.
3. Ensure Hardware Components Are Properly Connected
- Check if your SSD/HDD is securely connected to the motherboard.
- If using an external bootable drive, make sure it is properly inserted.
- If you suspect a drive failure, test with another device or replace the storage drive if necessary.
3 Methods to Repair the Windows 11 Bootloader
Once you've completed the preliminary checks, try the following solutions to repair the Windows 11 bootloader.
A. Using Automatic Repair
Windows 11 has a built-in recovery tool that can automatically fix boot issues. Here’s how to use it:
1. Boot into Windows Recovery Environment (WinRE):
- Turn off your PC and turn it back on.
- When the Windows logo appears, force shutdown by holding the power button. Repeat this 3 times.
- On the fourth startup, your PC should enter WinRE.
2. Run Automatic Repair:
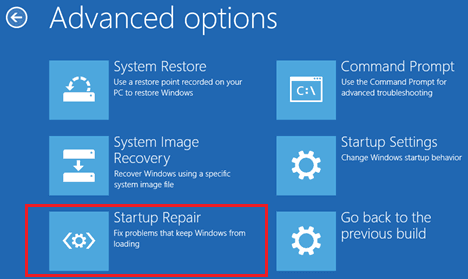
- Click on Advanced options → Troubleshoot → Advanced options.
- Select Startup Repair and let Windows attempt to fix boot issues.
- Restart your PC and check if the issue is resolved.
B. Rebuilding the Bootloader via Command Prompt
If Automatic Repair doesn’t work, try manually repairing the bootloader using Command Prompt:
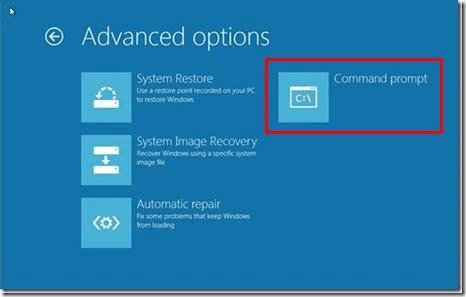
1. Access Command Prompt in WinRE:
- Follow the same steps to enter WinRE.
- Go to Advanced options → Command Prompt.
2. Run Bootloader Repair Commands:
Type the following commands one by one, pressing Enter after each:
- bootrec /fixmbr
Fixes the Master Boot Record (MBR), essential for booting.
- bootrec /fixboot
Repairs the boot sector, but may return an "Access Denied" error on EFI systems.
- bootrec /scanos
Scans for installed Windows versions and lists them.
- bootrec /rebuildbcd
Rebuilds the Boot Configuration Data (BCD) file.
If bootrec /fixboot fails, use the following additional commands:
- bootsect /nt60 sys
- bcdboot C:\Windows /s C: /f UEFI
Exit the Command Prompt and restart your PC to check if the issue is resolved.
C. Running System File and Disk Repairs
If the bootloader is still not fixed, check for corrupted system files or disk errors:
1. Run CHKDSK (Check Disk) to Fix Drive Errors
In Command Prompt (WinRE), type: chkdsk C: /f /r
- /f fixes errors.
- /r scans for bad sectors and recovers readable information.
2. Run SFC (System File Checker) to Repair System Files
- sfc /scannow

This will scan and repair corrupted system files.
3. Use DISM to Restore Windows Image
If sfc /scannow finds errors but can’t fix them, run:
- DISM /Online /Cleanup-Image /RestoreHealth
This will fetch missing or corrupted system files from Windows Update.
FAQs about Repairing Windows 11 Bootloader
1. How do I fix a missing EFI bootloader in Windows 11?
2. What if bootrec /fixboot gives "Access Denied"?
3. Can I use third-party tools to repair the bootloader?
Conclusion
Repairing the Windows 11 bootloader is essential when your PC fails to start due to corruption, updates, or disk issues. Following this guide, you can use Automatic Repair, Command Prompt, and disk/system file checks to resolve bootloader problems.
If all else fails, consider reinstalling Windows 11 or seeking professional assistance. To prevent future issues, always back up your data with AOMEI Backupper, maintain healthy storage drives, and keep your system updated.