A Full Guide to Solve Windows 11 PC Must Support Secure Boot
Secure Boot is one of the requirements for Windows 11 installation. From this article, you can get a full guide to enable Secure Boot with a few clicks.
By Clytze Updated on October 31, 2024
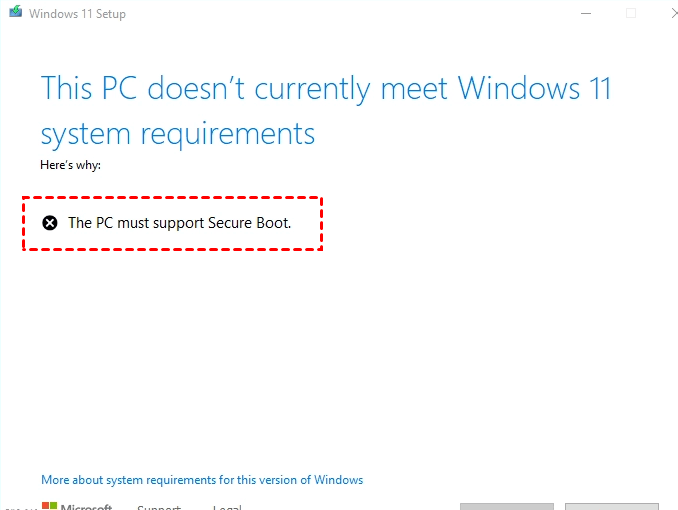
Windows 11: The PC must support Secure Boot
Windows 11 installation requires Secure Boot. If the Secure Boot feature is not enabled, you will get a “The PC must support Secure Boot” message when upgrading to Windows 11. This issue will make your Windows 11 upgrade fail.
🧱 Windows 11 installation requirements:
Processor: 1 GHz or faster with 2 or more cores on a compatible 64-bit processor or System on a Chip (SoC).
RAM: 4GB.
Storage: 64GB or larger.
System Firmware: UEFI, Secure Boot capable.
TPM: TPM version 2.0.
Graphics Card: Compatible with DirectX 12 or later with WDDM 2.0 driver.
Display: HD 720p display that is greater than 9” diagonally, 8 bits per color channel.
If you encounter the same issue when you want to install Windows 11, you could be eager to know what the PC must support secure boot on Windows 11 fix. Then you can refer to the following content to check if your current PC support Secure Boot and if it is, how to enable it easily.
Check Secure Boot state on Windows 11
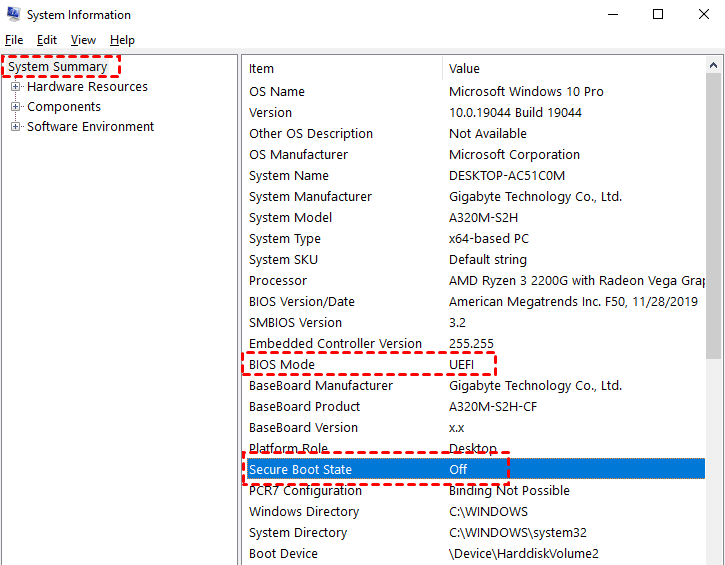
Firstly, you could check whether the Secure Boot option is enabled or disabled on Windows 11 in System Information. The Secure Boot state can be shown in On, Off, and Unsupported status.
1. Press Windows + R to open the Run dialog, type msinfo32 and press Enter.
2. Then the System Information window will open. Tap System Summary.
3. On the right side of the screen, scroll down to locate BIOS Mode and Secure Boot State.
◈ Case 1: If BIOS Mode shows UEFI, and Secure Boot State shows Off, it indicates that Secure Boot is disabled. Then you would be able to switch to the next part to enable it.
◈ Case 2: If BIOS Mode shows Legacy, and Secure Boot State shows Unsupported, it indicates that Secure Boot is disabled. This is because your system is installed on an MBR disk.
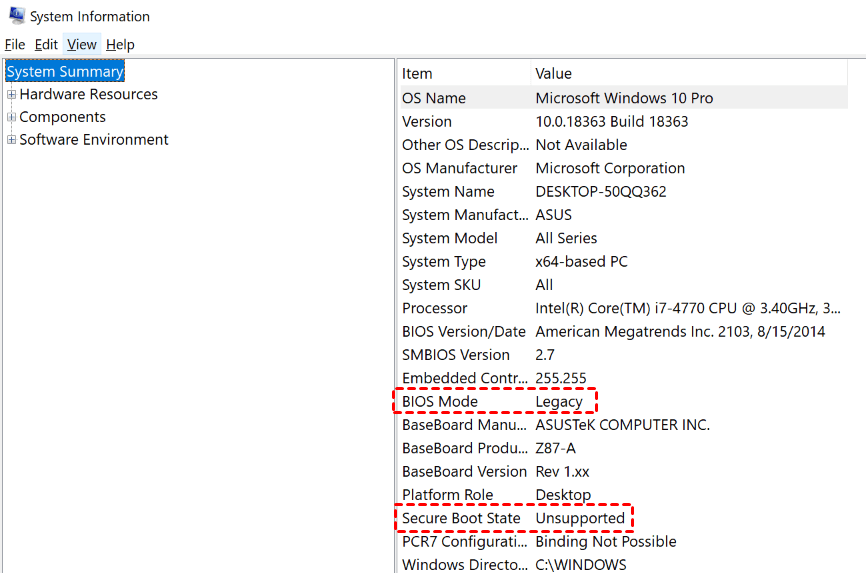
✐In general, if your system disk is MBR style, you should use the Legacy (also named BIOS) mode to boot it. If your system disk is GPT style, you should use the UEFI mode to boot it.
How to solve Windows 11 PC must support Secure Boot
In this section, you are able to enable Secure Boot on Windows 11 in two situations. Keep reading to catch more details below.
Way 1. Enable Secure Boot in Off state
1. Open Start and go to Settings and then click on Update & Security > Recovery > Advanced startup > Restart now.
2. It will open a blue screen with advanced menus, then click on Troubleshoot > Advanced Options > UEFI Firmware Settings.
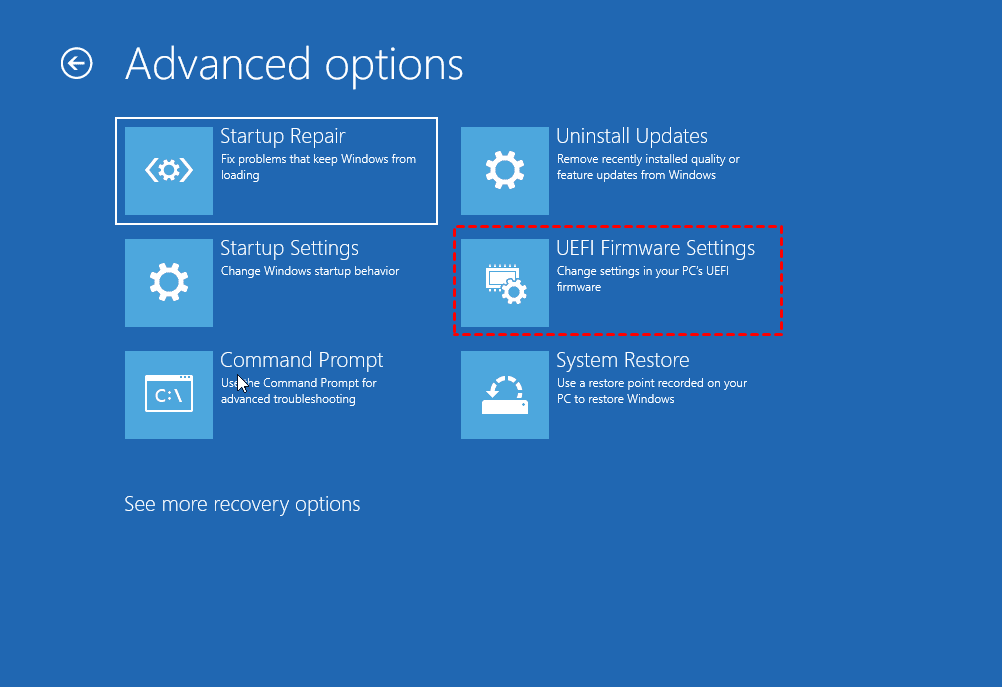
3. Find Secure Boot setting in this menu in Security or Boot tab to enable it. Then press F10 to save changes and exit.
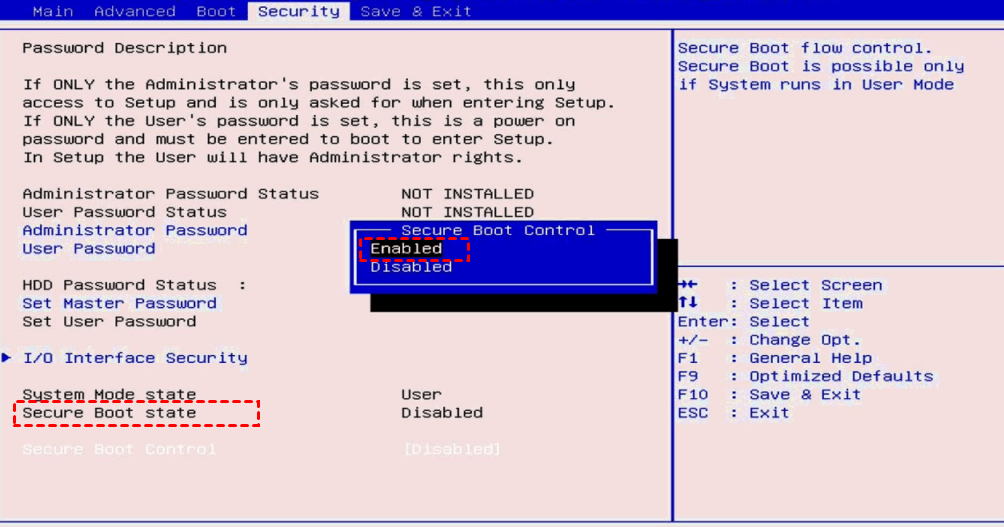
💥 Tip: If you encounter Secure Boot enabled but not active in Windows 11 error, it may due to the wrong System Mode: Setup. Because the Secure feature is possible only if system runs in User Mode.
Way 2. Secure Boot state unsupported
Part 1. Convert system disk from MBR to GPT
The Legacy boot mode doesn’t support the Secure Boot feature, so the Secure Boot State is “Unsupported.” To solve this problem, you need to convert the system disk from MBR to GPT and then enable the UEFI boot mode and Secure Boot feature for it.
When you have converted MBR to GPT in Windows 11, then you should go to BIOS to change the boot mode to UEFI. The following graphic tutorial will show you how to do that.
Part 2. Check if your PC supports UEFI mode and enable it
1. Restart your PC and press the specific F2/F10/Del key to enter your BIOS settings.
2. Navigate to the Boot Menu. Locate the Boot Mode section and check if your computer supports UEFI mode. If you see a UEFI mode, then it is. Change to UEFI boot mode and press Enter.
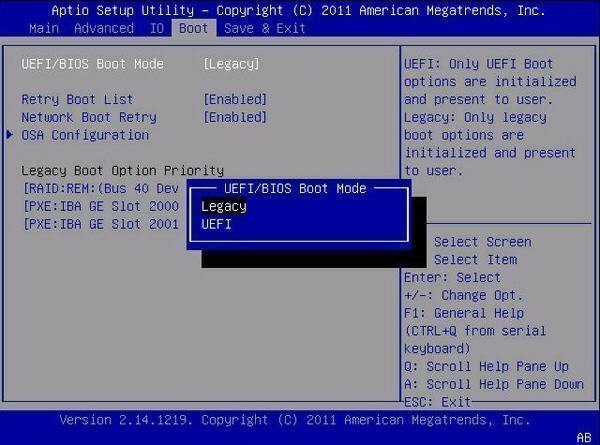
3. Press F10 to save the changes and exit.
Part 3. Enable Secure Boot
1. Restart your PC and re-enter your BIOS settings.
2. Navigate to the Boot Menu, select Secure Boot settings and set its state to Enabled.
Now you’ve completed the PC must support Secure Boot on Windows 11. After you have completed these steps, the computer will begin using the Secure Boot feature to comply with the requirements for installing Windows 11.
Backup your OS after upgrading to Windows 11 as a recovery solution
After you successfully upgrade Windows 11 with Secure Boot, it is recommended that you backup your new system for data protection and recovery solution. If your computer won't boot or encounter other problems such as 0xc000000e in Windows 11, you can use this system backup to restore your Windows 11 and then get it back to normal use.
To enable that, the best free backup and restore software AOMEI Backupper Standard can be your exact choice. It enables you to backup system, files, disk, and partitions to multiple locations such as internal/external hard drives, NAS devices, USB flash drives, Network location and clouds, etc. in a daily, weekly, or monthly basis.
This software works on all PCs running Windows 11, 10, 8, 7, Vista, XP, you can download and install it for FREE use:
Create a system backup in case of any computer errors:
Step 1. Launch this freeware, go to Backup tab and select System Backup. It will backup all your system files, applications and settings.

Step 2. The system partitions will be automatically selected, you just need to specify a destination to save the system image. It’s recommended to backup OS to external hard drive, USB drive, cloud drive, etc.

🧱 Options: Compress level, backup mode, image splitting, comment, and email notifications are available.
🧱 Schedule Backup: Set up automatic backup task based on Daily/Weekly/Monthly/Event triggers/USB plug-in. The last two options are available in advanced edition.
🧱 Backup Scheme: You can also enable automatic backup cleanup (available in Pro edition) to auto-delete old backups to free up disk storage space.
Step 3. Click Start Backup and wait for the process to complete.

- In case your PC fails to boot someday, you can go to Tools tab and create a bootable media. It can be used to boot a crashed PC into WinPE for further operations or to fix your PC.
- It also offers a Universal Restore feature (paid) that can help you restore your system to a computer with different hardware if you need it.
In the end
Now you know how to solve Windows 11 PC must support Secure Boot issue when you are intending to upgrade your OS to Windows 11. Since Secure Boot is one of the requirements for Windows 11 installation, you can follow the steps above to enable this feature with ease.
After completing Windows 11 installation, it is quite necessary to backup your system as a recovery solution because computer failures are unpredictable. In this case, you can rely on the help of the best backup freeware AOMEI Backupper to create system backups and restore them in an emergency when needed.
In addition, it is also a secure portable disk wipe utility, which allows you to wipe disks safely and conveniently on any computer without having to install it every time. Other powerful features such as sync and clone are also available, so try it now by yourself!