How to Run Sony VAIO Laptop Recovery on Windows 7 | 3 Ways
Facing system issues on your Sony VAIO? This guide walks you through recovery methods for Windows 7. Scroll down to learn more.
By Lily Updated on February 10, 2025
Why perform recovery on Sony VAIO Windows 7?
If you have been using a Sony VAIO laptop running Windows 7 for a long time, you might need to initiate a Sony VAIO laptop recovery for the following reasons:
✅ Fixing System Crashes and Boot Failures
If your laptop fails to start properly, gets stuck on the Windows logo, or enters a reboot loop, system recovery can help restore it to a functional state.
✅ Removing Viruses and Malware
Persistent malware or virus infections can compromise system performance and security. A full recovery wipes the system clean, eliminating hidden threats.
✅ Resolving Performance Issues
Slow boot times, frequent freezing, and laggy performance often indicate software corruption. Restoring your laptop to factory settings can improve speed and responsiveness.
Then, how to perform Sony VAIO laptop recovery on Windows 7? Please read on.
👉 Way 1: Factory reset Sony VAIO Windows 7 via VAIO Care (computer can boot)
👉 Way 2: Recover Sony VAIO Windows 7 with System Recovery Options (computer can't boot)
👉 Way 3: Run Sony VAIO laptop recovery using third-party tool🔥 (computer can boot or not)
Way 1: Factory reset Sony VAIO Windows 7 via VAIO Care
The VAIO Care software can be used to restore the computer to the original factory software configuration. Follow the procedure below to run a system recovery:
Preparations:
- Connect the AC adapter to the computer so power is not interrupted.
- Disconnect all external devices, such as printers, network cables, cameras, external hard drives or flash drives.
1. Make sure the computer is powered on and press the Assist button.
Note: If your computer does not have an Assist button on the top of the keyboard, click Start, then click All Programs.
2. In the All Programs menu, click the VAIO Care folder and then click VAIO Care.
3. In the VAIO Care application, click Advanced Tools > Restore and recovery > Recover computer.

4. Click Yes to proceed with the Recovery. The computer will restart.
5. In the VAIO Care Rescue window, click Start recovery wizard.
6. When asked “Do you need to rescue your data?”, click Yes, I'd like to rescue my data.
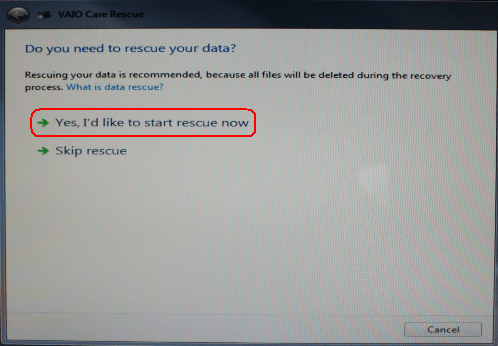
Note: If you do not have any data to be backed up, click Skip Rescue and proceed to step 11.
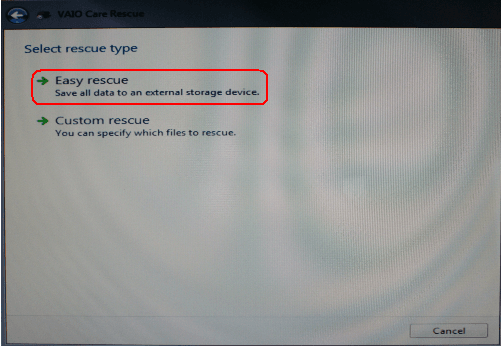
7. Connect an external storage device to the computer. In the Select Rescue type window, click Easy rescue. The software will automatically detect your data.
8. Click to select the drive where you would like to back up your data and then click the Next button.
9. Confirm your options and click the Start Rescue button.
10. When you see “Rescue has completed successfully”, click the Next button.
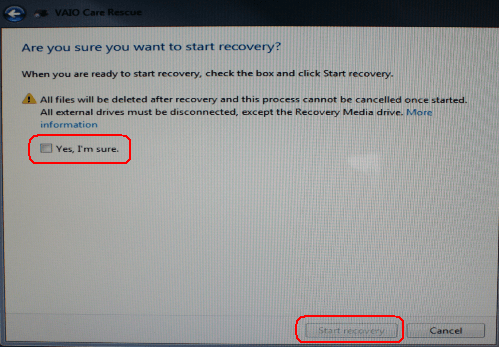
11. When asked “Are you sure you want to start recovery?”, click Yes, I'm sure and then click the Start Recovery button.
12. A status window is displayed indicating the progress of the different applications. No action is required. This process may take up to 2 hours and the computer may restart several times.
13. In the Recovery complete window, click the Restart button.
14. Follow the on-screen instructions to set up the operating system and complete the system recovery.
Way 2: Recover Sony VAIO Windows 7 with System Recovery Options
Actually, there are some inbuilt System Recovery Options in Windows 7 that can help you recover Sony VAIO. Follow the instructions below to use them:
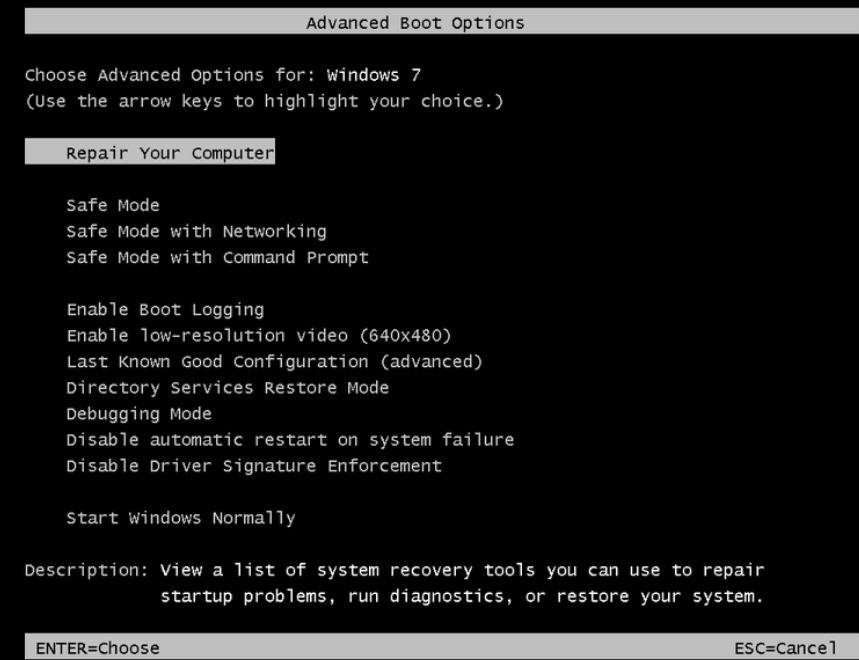
1. Turn on the computer and then at the VAIO screen, press the F8 key.
2. In the Advanced Boot Options screen, verify Repair Your Computer is selected and then press the Enter key.
3. In the System Recovery Options window, click the Next button.
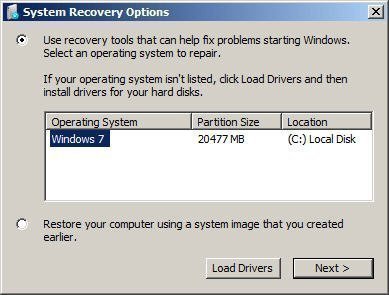
4. Select a username with administrator rights and type the appropriate password as prompted.
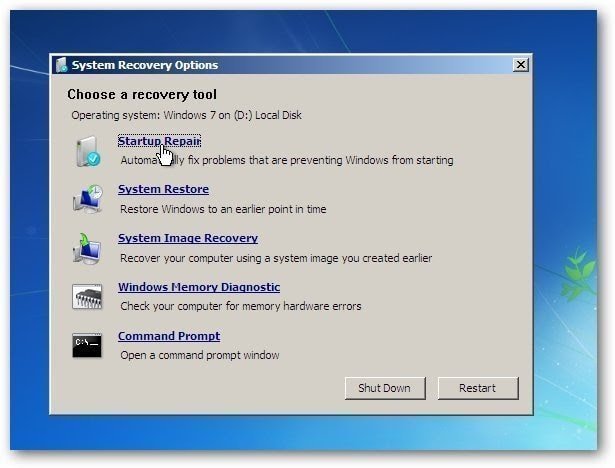
5. In the Choose a recovery tool window, click to select the appropriate option below:
- Startup Repair will automatically resolve certain issues that are preventing the operating system from starting.
- System Restore will return your computer to a previous date when it was working properly.
- System Image Recovery will restore your entire computer using a backup you created earlier using the Windows Backup and Restore tool.
- Windows Memory Diagnostic will check your computer for memory hardware errors.
- Command Prompt will open a command prompt window that can be used by advanced users and technical support personnel to perform troubleshooting on the hard drive or the operating system.
- VAIO Recovery Center will launch the VAIO Recovery Center application.
Way 3: Run Sony VAIO laptop recovery using third-party tool
As you see, it contains many steps to use VAIO Care and inbuilt System Recovery Options fail sometimes. If you want a more reliable way to restore your system, AOMEI Backupper Standard comes to help.

-
Full system backup & restore: Recover your entire system, including installed programs and settings.
-
Incremental Backups: Save time by backing up only changed files.
-
Bootable Media: Recover Windows 7 even if your system won’t start.
Download AOMEI Backupper and install it on your PC now. As long as you have created a system backup before, you can easily restore your Sony VAIO laptop with the following steps:
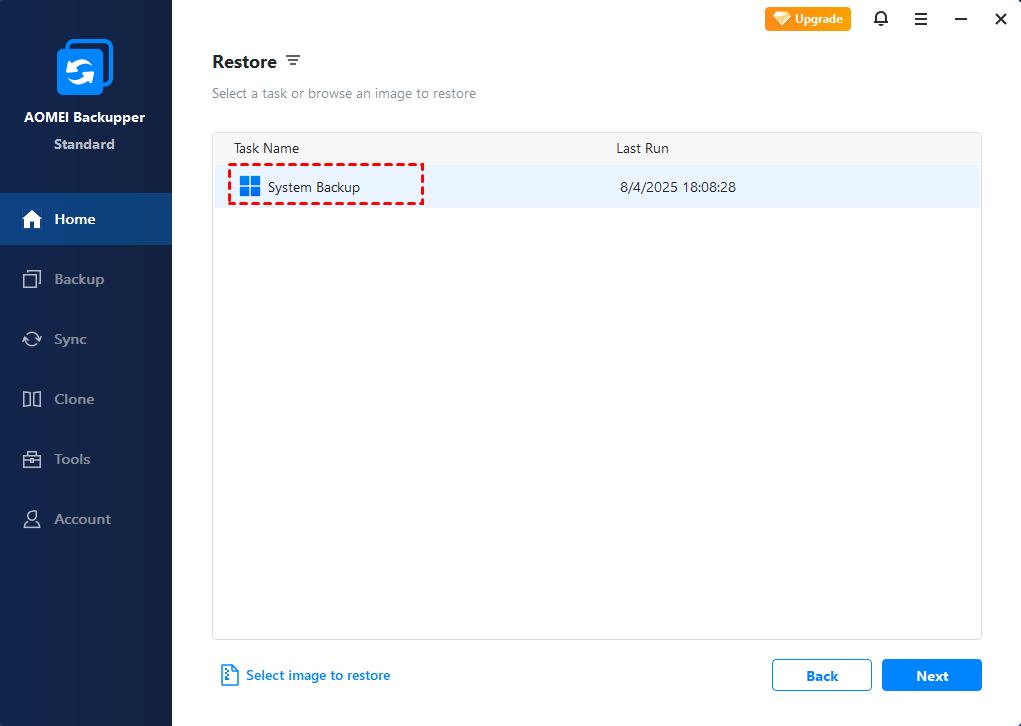
1. Run AOMEI Backupper. In the left tab, select Restore and then click Select Task.

2. Select the system backup task from the list and click Next.
3. Choose to restore the entire image or part and click Next.
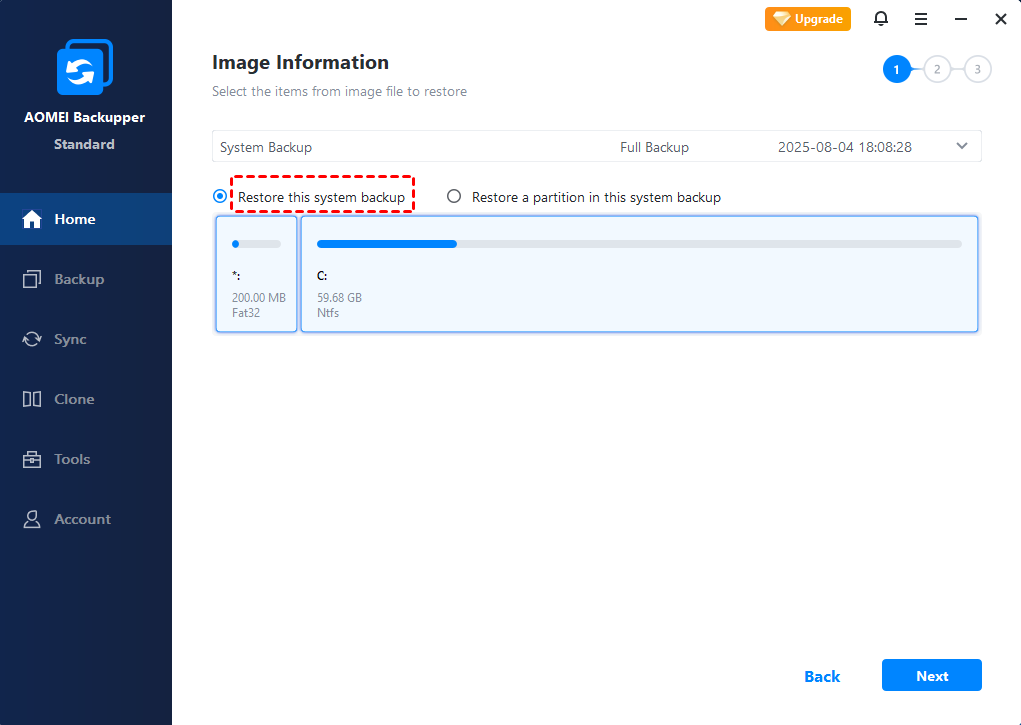
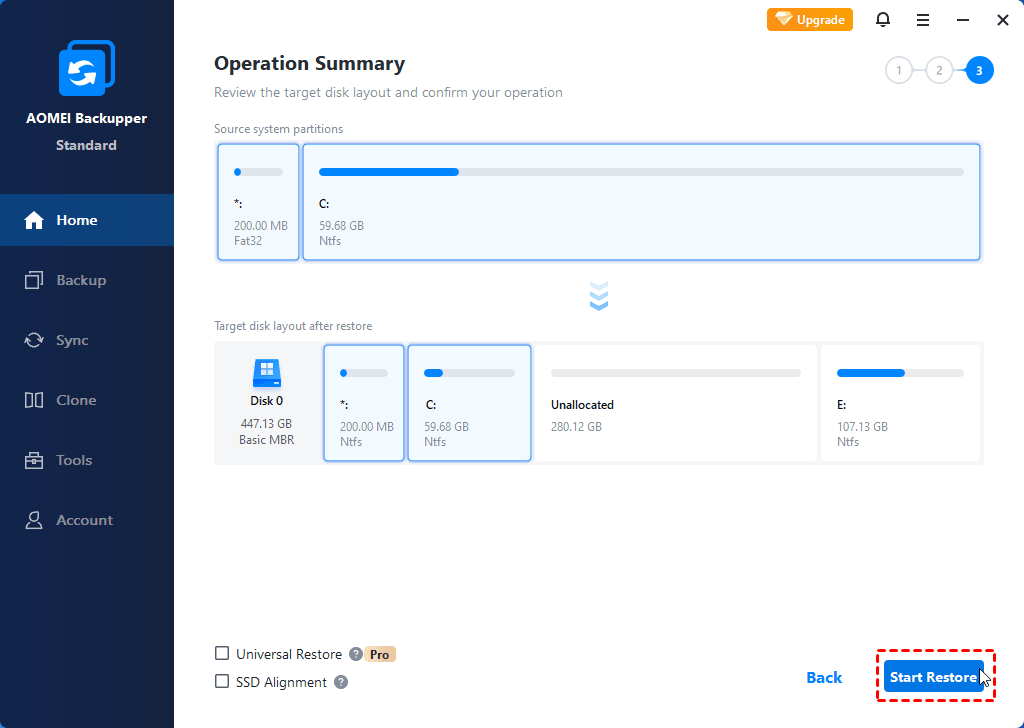
4. In the Operation Summary page, preview the operation that will be executed. Then, click Start Restore.
Note: If the operating system cannot boot now, you can start your computer with the bootable media you created before. AOMEI Backupper will load up automatically after booting.
Summary
Running Sony VAIO laptop recovery on Windows 7 is essential for restoring performance, fixing system errors, and eliminating malware. Whether you use the built-in VAIO Care, Windows 7 System Recovery Options, or AOMEI Backupper, each method provides a way to get your system back on track.
In addition, AOMEI Backupper offers the clone feature. You can use it to clone HDD to SSD or clone SSD to larger SSD. Try it now to explore more!