How to Create Windows 8/8.1 System Backup? [2 Free Ways]
Backing up OS regularly is a good way to protect Windows 8/8.1. Thus when system crashes, you can easily restore it to a normal state. Follow this guide to perform Windows 8 system backup securely.
Quick Navigation:
Why Perform Windows 8 System Backup?
Windows is a complicated and error-prone operating system. Any improper updating, installation, configuration, etc. could lead to serious problems and even data loss. The best idea to avoid these tragedies in Windows 8/8.1 is to create system backups in advance. Thus when problem occurs, you can easily restore your PC to a normal state.
In addition to this, a system image can also help you perform bare metal recovery on a new hard drive or even another computer, which means you don’t need to worry about unexpected hard drive failures. To sum up, even if your desktop or laptop runs smoothly for now, it’s always a smart choice to back up the system regularly.
Now the problem is, how to do system backup in Windows 8/8.1 quickly and securely?
How to Do System Image Backup in Windows 8/8.1?
If you’ve ever performed backup in Windows 7, you probably know the Backup and Restore utility which enables you to back up folders, libraries or even drives. Within it, you can also create a system image.
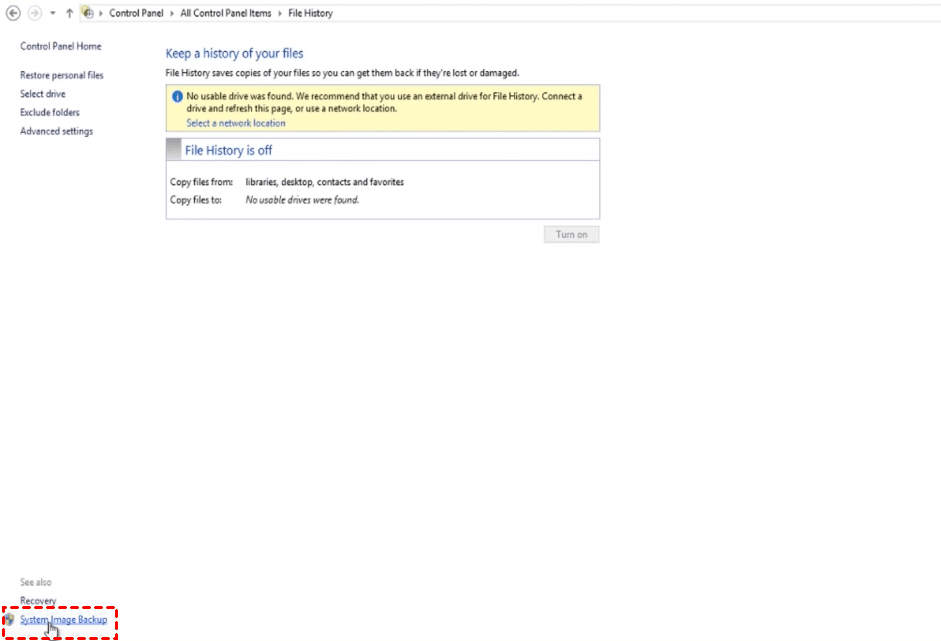
Windows 8/8.1 inherits this feature but with a slightly different approach, you can find the System Image Backup option in File History page, and use it to back up Windows 8/8.1 system completely.
But please note the system image backup may take a rather long time, and you can hardly do other things during the process. Also, it’s not allowed to set up a schedule to backup system automatically. In this case, you could also try an easier and faster alternative to perform Windows 7/8/10 system backup with more flexibility.
Anyway, I will introduce Windows 8 and Windows 8.1 System Image Backup here for your reference.
What’s the difference between a system image and file backup?
A system image is a copy of the drives required for Windows to run, additional drives could also be included. That is to say, you can create a Windows 8 system backup or even a hard drive backup to an image file, and use it to restore the computer if it ever stops working.
Meanwhile, a regular file or directory backup usually copies your files from libraries and personal folders, which is designed more for data recovery and cannot be used for system recovery.
Can I backup my entire computer with system image?
As mentioned above, you can include additional data drives to the system image, so as to back up the entire hard drive by selecting all the drives on it. That is, basically the complete PC backup.
How to create system image in Windows 8/8.1?
Windows 8 or Windows 8.1 system backup recommends you to store the image file on external drives rather than local drive, because when disk fails, you may lose everything on it. Therefore you could prepare an external hard drive or network location as the backup destination.
Then, following these steps to do System Image Backup in Windows 8/8.1:
Step 1. Click Start > Control Panel > System and Security > File History > System Image Backup. If you want to back it to a removable device, connect the device to your computer first.
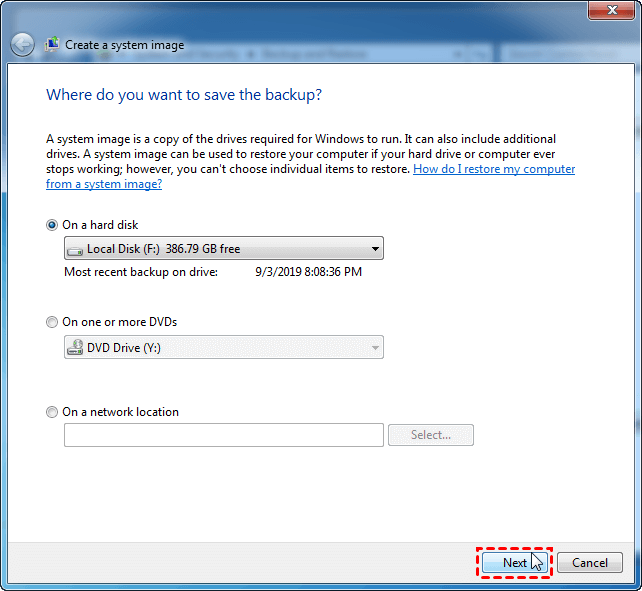
Step 2. Choose a destination to store the Windows 8 system image backup and click Next. If you want to save it in a network location, Select the 3rd choice and enter the required information.
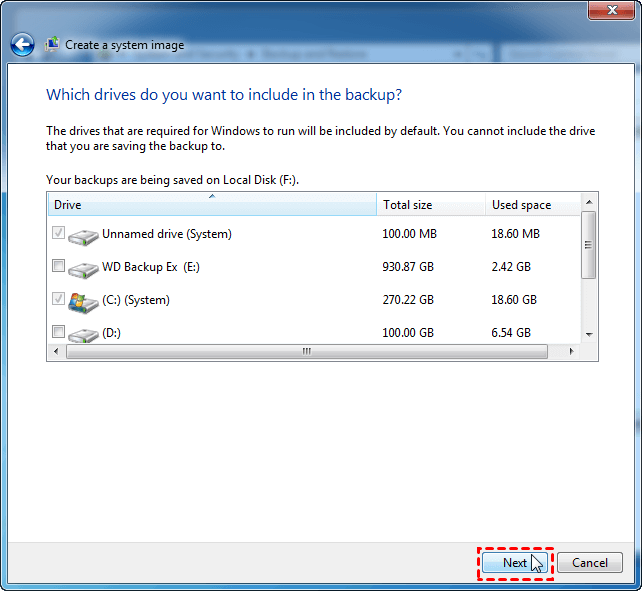
Step 3. Select the additional drives you want to include in the system image and click Next.
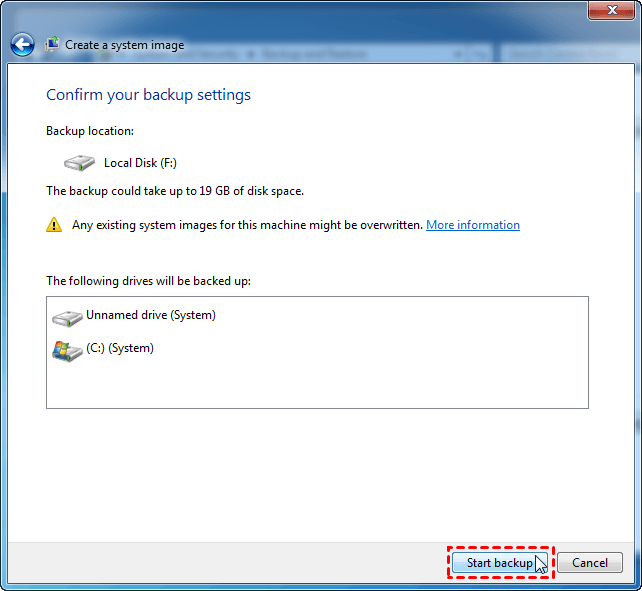
Step 4. Confirm the information and click Start Backup.
It may take a while to create the Windows 8/8.1 system image, depending on the performance of your computer and the size of the image file.
If you want to use the Windows 8 backup image to restore the computer, you can refer to detailed steps along with screenshots in this system image backup and restore guide.
What if Windows 8/8.1 System Image Backup fails?
There are more than one possible errors might occur during System Image Backup, like “The specified backup storage location has the shadow copy storage on another volume (0x80780038)”, “There is not enough disk space to create the volume shadow copy(0x80780119)”, etc.
If similar cases happen to you, you can run SFC scan, configure system protection or try some other solutions as stated in the troubleshooting for System Image Backup failed in Windows 10/8/7.
But if you find it’s troublesome to figure out the problem and solve it, then the following alternative may be a better choice to get rid of these errors.
Free and Easy Alternative to Create Windows 8/8.1 System Backup
To make up for the deficiency of Windows built-in backup utility, you can also choose a powerful system backup program for Windows 8/8.1. AOMEI Backupper Standard, the complete data protection and disaster recovery solution works on all Windows PCs and provides multiple backup modes for different backup needs.
★ You can choose System Backup to create Windows 10/8.1/8/7/XP/Vista system image, or use File Backup, Partition Backup, Disk Backup to protect other important data.
★ It includes several Schedule options to set up automatic backup, like daily, weekly, monthly. etc. Full backup, incremental and differential backup are also supported.
★ The whole backup & restore process runs quickly and smoothly in a concise interface. You can let it run on the background without interfering your current work.
★ If you upgrade to Professional or higher editions, you can tick Universal Restore option in system recovery process to restore system image to different computer.
★ In addition to backup, it can also clone OS and data for hard drive replacement, e.g. clone HDD to SSD.
How to create Windows 8 system backup with AOMEI Backupper:
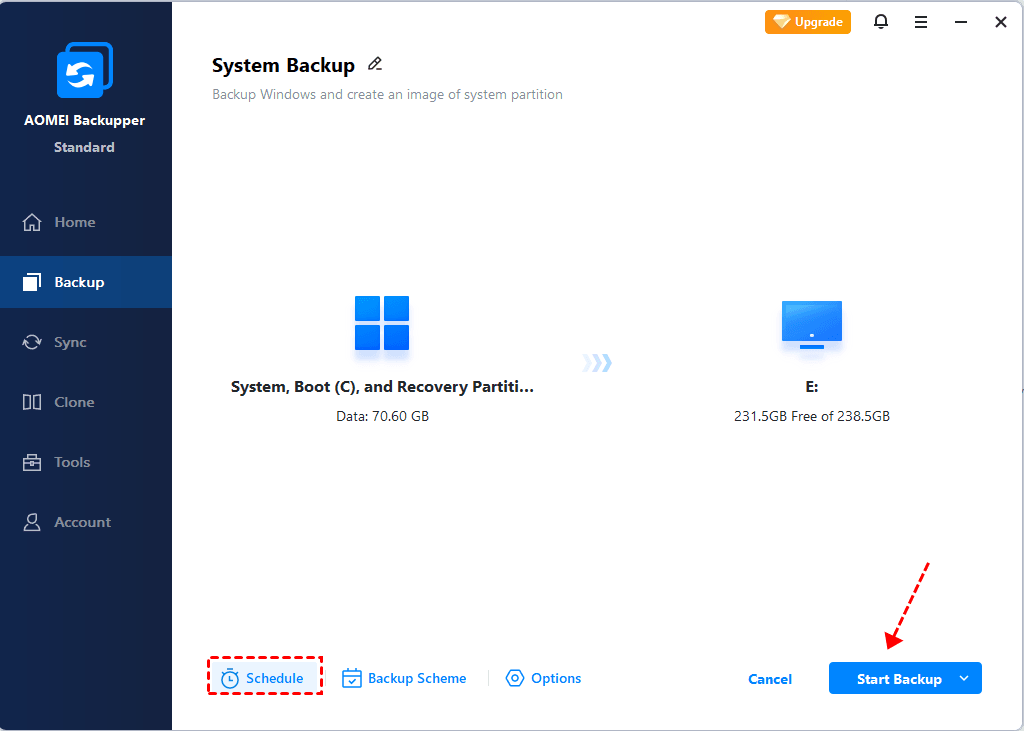
Step 1. Click Backup on the left pane, choose System Backup. If you want to back up other data, make the choice accordingly.
Step 2. System related partitions will be auto specified, so the only thing you need to do is selecting a destination. It’s recommend to store the system image on external hard drive, cloud drive, NAS, etc.
◆ Select cloud service: Please click the small down arrow beside the select box, and choose Select a cloud drive.
◆ Select network location: Click on the destination select box and click Share/NAS > Add Network Location.
Step 3. Manage backup settings in Options, Schedule or Scheme, click Start Backup to execute the task.
◆ Options: configure backup modes, image compression and splitting, comments, email notification, etc.
◆ Schedule Backup: set up a schedule to auto back up system on basis of Daily/Weekly/Monthly/Event triggers/USB plug in. The last two are available in advanced editions.
◆ Backup Scheme: create a backup scheme to delete older backups automatically and therefore save your storage space. Available in advanced editions.
With the Windows 8 backup image, you can easily restore your computer to a normal state when something goes wrong. If you are worried that your computer may fail to boot due to system errors, you can also use AOMEI Backupper to create a bootable disc or USB, which can boot faulty computer into Windows PE and restore a previous system backup.
Conclusion
Windows 8 system backup can be done with the built-in System Image Backup utility, but if you want to run the system backup faster and easier, AOMEI Backupper would be a better choice.
It can not only perform system backup with a schedule, but also provides a wealth of functional options to clone files, partitions, and even system or disk. Thus you can transfer Windows 7/8/10 to new hard drive even without CD.
Even if you are a Server user, you can download AOMEI Backupper Server to create image backup for Windows Server.
