[Top 2] Ways to Backup Files in Windows Server 2016
You will learn how to backup files in Windows Server 2016 easily and quickly, here are two ways, namely, using Windows Server Backup and AOMEI Backupper Server.
The Importance of Windows Server File Backup
Why back up files? The answer is self-evident. All the computer users care about data security, but data loss or corruption is irreversible in many cases, such as device breakdown, virus, power fail, software upgrades, software malfunction and huge human errors.
If a disaster has already happened, you may have to pay an expensive price for file recovery, and there is usually no guarantee. Therefore, backup in advance is always the most secure way to protect your important data from all the dilemmas - this is especially true for Windows Server, which is more often used in enterprise settings.
Then, how to perform the backup exactly? Please continue to see below and learn how to backup files in Windows Server 2016, as well as in Windows Server 2012, 2019, 2022, etc.
Way 1: Backup Windows Server 2016 Files Step by Step with Windows Server Backup
Windows Server Backup is a built-in backup tool introduced in early version, Windows Server 2008, to help users backup a full server (all volumes), selected volumes, or the system state. There is no separate file or folder backup option, but you can choose to backup specific volumes with the files or folders you want or backup entire server computer. Also, the built-in tool isn't installed by default, so you need to install it manually.
Then, follow the steps below to backup files with Windows Server Backup step by step.
Step 1. Install Windows Server Backup and configure it. Open Server Manager -> Manage -> Add Roles and Features, then a backup wizard will pop up. Click Next until the Select features window, tick "Windows Server Backup" and click "Next" and "Install".
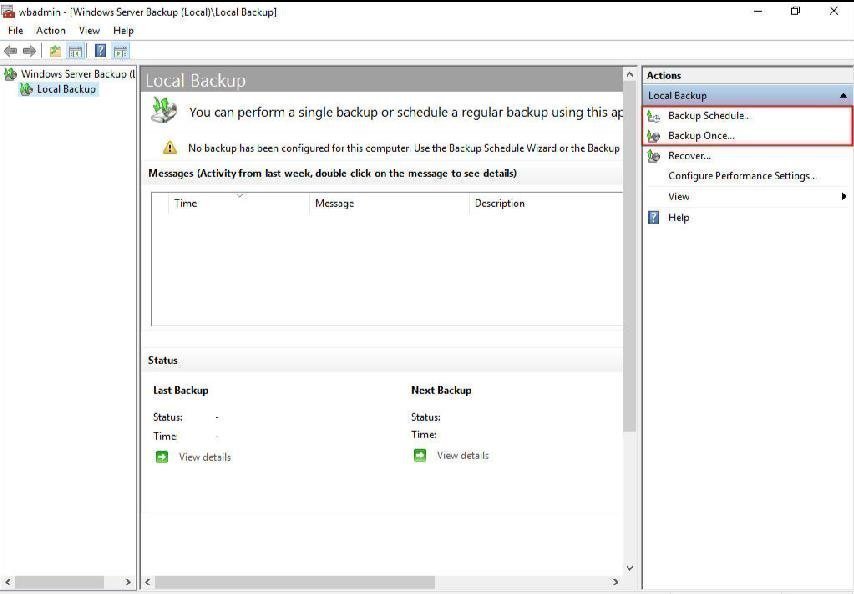
Step 2. Type "Windows Server Backup" in the search box and select it. Then, click "Backup Once" under the Actions. Also, you can click "Backup Schedule" to perform Windows Server 2016 backup schedule weekly or other backup interval.
Step 3. Tick "Different options", it's for one-time backup task.
Step 4. Select "Custom" to select specific volume containing files you want to backup. Also, you can select "Full server" to backup entire server including all files on the server computer.
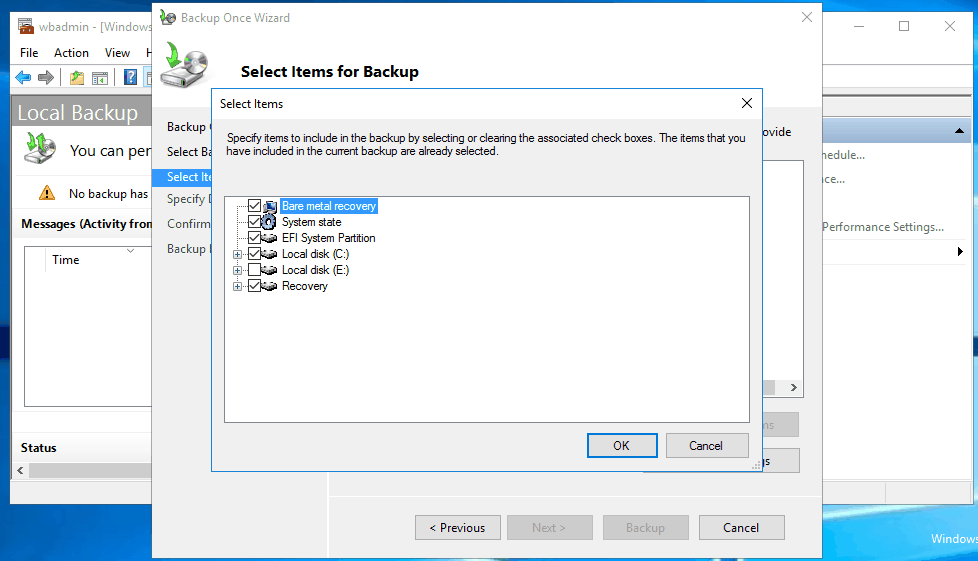
Step 5. Click "Add Items" on the Select Items for backup page, you can select any volume in the list.
Note: At the lower location of Select Items for Backup, you can see an "Advanced Settings" option, which allows you exclude files you don't want to backup and set "VSS Settings".
Step 6. Select "Local drives" and "Next" to summon the next window. Here you can see all the detected drive, whether it's internal hard drive, external hard drive, USB drive or CD/DVD, select the one you want to save backup image.
Note: USB drive is only supported when you just want to create a one-time backup, and it has to be an NTFS file system. Thus, if you want to create Windows Server 2016 incremental backup with "Backup Schedule", it's suggested to backup Windows Server 2016 to external hard drive.
Step 7. Click "Backup" on the confirmation page, and wait for the operations ends.
That's all for how to backup files in Windows Server 2016 with Windows Server Backup. It does not support directly backing up files, which is time-consuming and wastes disk space, because you need to backup all the items on the selected volumes. To get rid of this restriction, you could consider using another server backup software AOMEI Backupper Server to backup files and folders without adding extra items.
Way 2: Directly Backup Files in Windows Server 2016 with AOMEI Backupper Server🔥
AOMEI Backupper Server is a professional Windows Server 2016 backup software.
- It allows you to backup disk, system partition, data partition, and individual files easily and quickly.
- It offers full/incremental/differential backup method to meet your different needs.
- It enables you to do daily/weekly/monthly backup or schedule backup based on event triggers or USB plug in.
- It has more advanced features to make this backup task simple and efficient, such as image compression and encryption.
- It's applicable to other server computers, such as Windows Server 2003/2008/2011/2012/2019/2022 and its R2 version.
To backup files in Windows Server 2016, you can use "File Backup" to add specific files or folders you want to backup, saving much time and disk space. To get started, please download this software and install it on the Windows Server 2016 computer. For IT Technicians or small and medium-size companies, you could consider using AOMEI Backupper TechPlus.
Step 1. Launch AOMEI Backupper Server, then click "File Backup" under the "Backup" tab. To backup files to AOMEI Cloud, select "Cloud Backup" as instead.
Step 2. Click "Add File" or "Add Folder" based on your personal requirements. Let’s take Add Folder for an example.
Step 3. After adding files or folder, you can choose any detected storage device as destination, a local disk, network share, NAS, or even backup files to a cloud.
Step 4. After you finish all the operations according to your needs, you can click “Start Backup” to start the process.
Tips:
Options: You can write a comment for your current operation to distinguish it from others conveniently when you need it in the future. You can also compress backup image with normal or high compressional level according to your needs, split a large image file into several smaller image files, etc.
Schedule Backup: You can choose a certain time of a day/week/month for an automatic backup; the event triggered backup could start at system shutdown or startup, user log-in or log-off; the USB plug in is to automatically copy files to USB drive when it's plugged in; The "Advanced" option offers three different backup modes: Full backup, Incremental backup and Differential backup.
Backup Scheme: You can choose one backup method from full/incremental/differential backup and enable automatic backup cleanup to delete old backup automatically. It ensures your backup disk always has enough space to store backup files.
Bonus Tip: Best Enterprise Data Backup Solution👍
If you are an enterprise user who has multiple Windows Server devices that need to be backed up, you can try the best enterprise backup software - AOMEI Cyber Backup. It offers you all-around enterprise data backup solutions:
- It enables you to create system/disk/partition backup for a bunch of Windows PCs and Servers, supporting Windows 11/10/8.1/8/7 and Windows Server 2022/2019/2016/2012 (R2)/2008 (R2).
- You are allowed to save backup images on a local disk, external hard drive, network share or NAS device, etc.
- You can schedule a backup task to run every day/week/month using the full/incremental/differential backup method.
Download this powerful enterprise backup software now to have a try!
To make backups for client computers, just log in AOMEI Cyber Backup, and add the Windows device that you want to backup. Then click Backup Task on the left menu bar and select Backup Task > Create New Task.
Conclusion
Windows Server Backup is a priority backup software for many server computer users, but it makes things complicated. You can only backup files or folders by backing up entire volumes or server, it's a waste of time and disk space, especially when you want to create a scheduled incremental backup with this software.
Therefore, it's suggested to use 3rd party server backup software to directly backup files you need. Also, with its useful backup features, you can create Windows Server 2016 incremental backup, compress the backup image with normal or high compression level, delete backup files with backup scheme, etc.
In one word, it is of great importance to back up all the vital files periodically, AOMEI Backupper Server can be one of the best software to keep your data safe. Anything can happen unpredictably and you may lose all your data in a second. Please download this software to have a try.


