Don’t Miss: What Is Clonezilla Server and How to Use It
This article describes in detail what Clonezilla Server is, provides a graphic tutorial and recommends a beginner-friendly approach.
By Miya Updated on July 5, 2024
👉How to Use Clonezilla Server Step by Step
👉An Easier Way to Clone Your Windows Server (Newbie-Friendly)
What Is Clonezilla Server?
Clonezilla Server, often referred to as Clonezilla SE (Server Edition), is a powerful, open-source disk cloning and imaging software designed for network-based deployment. It allows users to clone or image multiple computers simultaneously over a network, making it ideal for large-scale deployments and backups. Here’s a breakdown of its key features and uses:
Key Features:
- Network-Based Cloning and Imaging: Clonezilla Server allows disk cloning and imaging operations to be performed over a network, enabling the deployment of system images to multiple machines simultaneously.
- Multicast Support: Using multicast technology, Clonezilla Server can deploy images to multiple systems at once, significantly reducing the time required for large-scale cloning operations.
- Support for Various File Systems: Clonezilla Server supports a wide range of file systems, including ext2, ext3, ext4, reiserfs, xfs, jfs, FAT, NTFS, and more, making it versatile for different operating systems.
- Disk and Partition Cloning: It can clone entire disks or specific partitions, providing flexibility depending on the user’s needs.
- Compression Options: Clonezilla Server offers various compression options for the image files, helping to save storage space.
- Customizable Scripts: Users can create custom scripts to automate the cloning and imaging process, improving efficiency and consistency.
- Cross-Platform Compatibility: It supports multiple operating systems, including Linux, Windows, and macOS, making it a suitable tool for diverse IT environments.
How to Use Clonezilla Server Step-by-Step
Using Clonezilla Server involves several steps, from setting up the server to deploying images across the network. Here’s a detailed step-by-step Clonezilla Server tutorial:
Step 1: Prepare the Server
1. Download Clonezilla Server: Visit the Clonezilla website and download the latest Clonezilla Server edition(DRBL - Diskless Remote Boot in Linux).
2. Install DRBL: Install the DRBL package on your server. This can typically be done via the command line:
sudo apt-get update
sudo apt-get install drbl
3. Configure DRBL: Run the configuration script to set up DRBL:
sudo /usr/sbin/drblsrv -i
Follow the prompts to configure network settings, including the DHCP server and network interface.
4. Configure Clonezilla Server: Run the Clonezilla setup script:
sudo /opt/drbl/sbin/drblpush -i
Select "Clonezilla SE" and proceed through the setup prompts to configure Clonezilla for your network.
Step 2: Prepare the Client Machines
- Network Boot the Clients: Ensure the client machines are configured to boot from the network (PXE boot). This usually involves setting the network boot option in the BIOS/UEFI settings.
- Connect to the Server: Once the client machines are set to network boot, they should connect to the Clonezilla Server and boot into Clonezilla.
Step 3: Create a Disk Image
- Select Disk to Clone: On the server, run the following command to start Clonezilla in server mode:
sudo drbl-ocs -b -q2 -p true -z1p -i 2000 -t -r -s
Follow the prompts to select the disk or partition you want to clone.
- Create the Image: Choose to save the disk or partition as an image. Specify the destination directory where the image will be stored.
Step 4: Deploy the Image to Clients
- Start the Deployment Process: On the server, run the following command to start the deployment:
udo drbl-ocs -g auto -e1 auto -e2 -x -j2 -p reboot -h [CLIENT_HOSTNAME]
Replace [CLIENT_HOSTNAME] with the appropriate hostname or use wildcards to target multiple clients.
- Monitor the Deployment: Monitor the progress of the image deployment. The server will distribute the image to the connected client machines over the network.
Step 5: Post-Deployment:
- Reboot Client Machines: After the deployment process is complete, the client machines will reboot. Ensure they boot from the newly deployed image.
- Verify Deployment: Check the client machines to ensure the image has been deployed correctly and the systems are operational.
- Tips for Efficient Use:✎...
- Use Compression: To save storage space and reduce network load, use compression options when creating images.
- Test Network Speed: Ensure your network infrastructure can handle the bandwidth required for large-scale deployments.
- Automate with Scripts: Use custom scripts to automate repetitive tasks, such as scheduled backups or mass deployments.
Using Clonezilla Server for network-based disk cloning and imaging can greatly simplify and speed up the process of deploying and backing up systems across multiple machines. By following the steps outlined above, you can efficiently set up and use Clonezilla Server to manage your networked systems.
An Easier Way to Clone Your Windows Server (Newbie-Friendly)
A common method to migrate Windows Server from one disk to another is through system image backup and recovery. While this method can be effective, it often involves complex scripts and code, making it more error-prone. An easier alternative is direct disk cloning. Although Microsoft does not offer this function, professional cloning software like AOMEI Backupper Server can fill this gap.
AOMEI Backupper Server provides a user-friendly interface and offers several benefits for disk cloning in Windows Server, You can download the free trial to explore the cloning features:

- Disk Clone, System Clone, and Partition Clone: Choose the feature that best suits your needs.
- Clone larger drive to smaller drive: As long as the target drive can hold all the used sectors, this is possible.
- Clone smaller drive to larger drive: Edit partitions to make full use of the disk capacity.
- Supports both MBR and GPT partition styles: You can convert partition styles or clone between different styles directly.
Additionally, this tool supports a wide range of Windows Server versions (2022, 2019, 2016, 2012, 2011, 2008, 2003, including R2) and Windows PC systems.
Tip: The Server edition is compatible with all Windows OS versions, but it is limited to use on a single server. If you need to manage multiple devices, consider upgrading to a higher edition. For more details, visit the edition comparison page.
How to Clone Windows Server 2019 Disk Step by Step
Disk cloning is the easiest way to migrate Windows Server 2019 to another HDD or SSD. Here are the detailed steps, along with descriptions and screenshots:
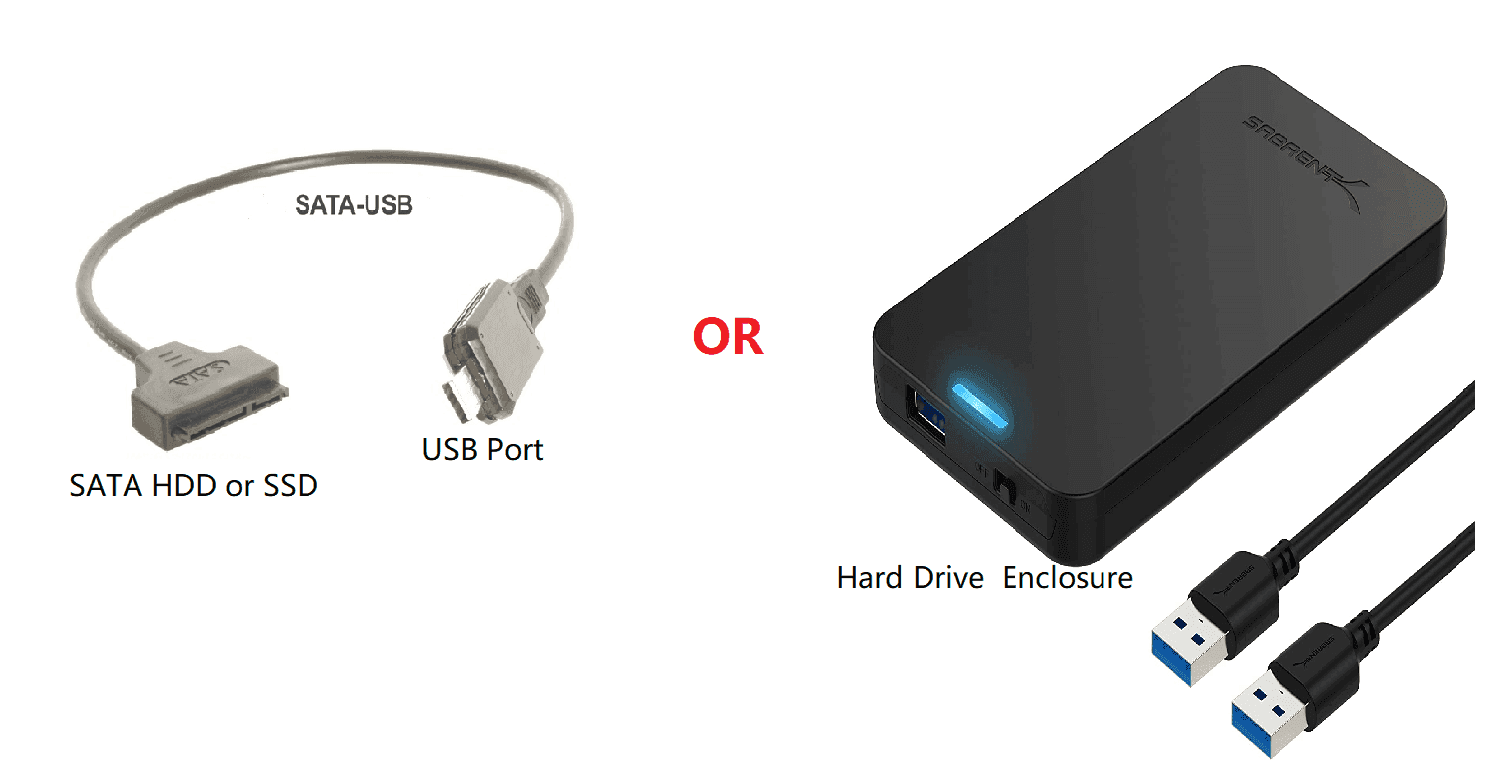
Step 1. Connect the Target HDD or SSD
Connect the new hard drive that you want to boot Windows Server 2019 from, and ensure it can be detected.
Tip: After cloning, the destination HDD or SSD will be overwritten. If you have important data on the destination drive, it's recommended to back up the disk in advance.
Step 2. Launch the Migration Tool for Disk Cloning
Install and launch the Windows Server disk cloning tool. Click on Disk Clone under the Clone tab.
Note: If you want to clone the system or specific partitions, click on System Clone or Partition Clone instead.

Step 3. Specify the Source and Target Drive
Select the original hard drive with Windows Server 2019 installed as the Source Disk (e.g., Disk 0). Then, click Next to continue.

Select the target HDD or SSD where you want to transfer Windows Server as the Destination Disk (e.g., Disk 1). Then, click Next.

Step 4. Finish Setup and Start Cloning Windows Server
Confirm the Operation Summary. You can optimize the cloning using additional features or click Back to make changes. If everything is correct, click Start Clone to initiate the migration of Windows Server.
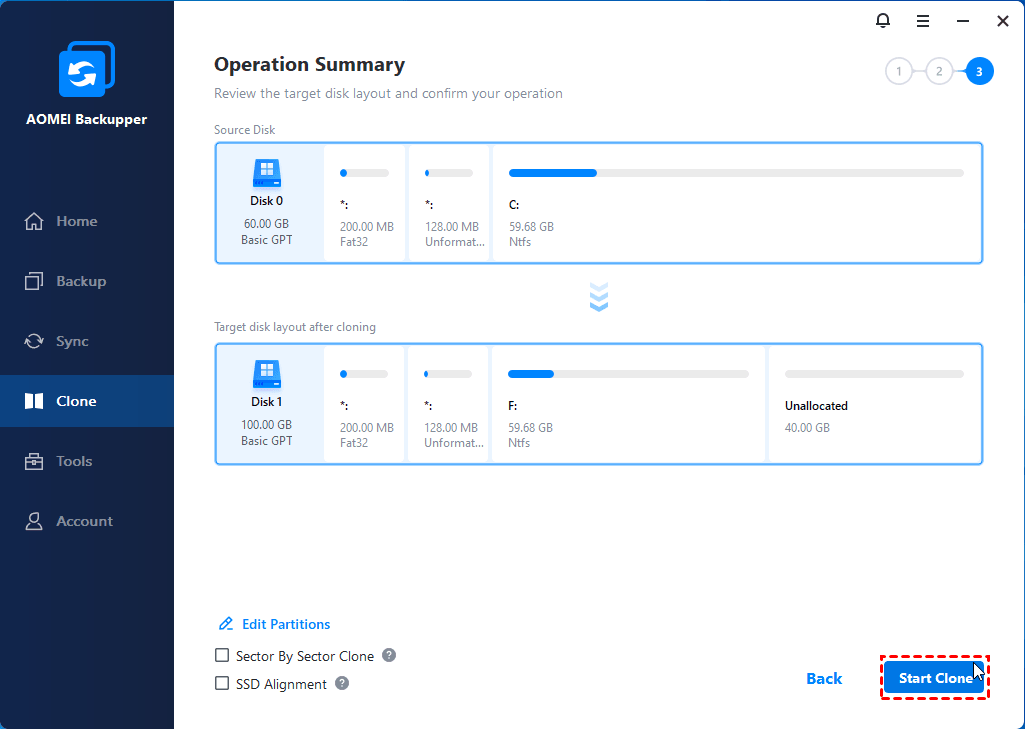
There are useful options to optimize the cloning process:
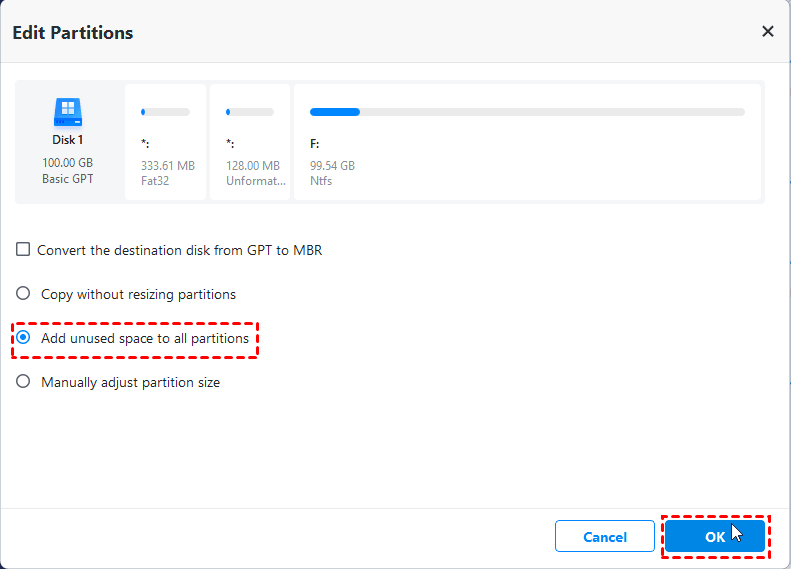
►Edit Partitions: Resize partitions to make full use of disk capacity.
- Copy without resizing partitions: Keeps the original partition size.
- Add unused space to all partitions: Redistributes unused space to each partition of the target disk.
- Manually adjust partition size: Allows you to extend unallocated space to any partition on the destination disk as needed.
►Sector By Sector Clone: Copies every sector, used or not. The destination disk must be equal to or larger than the source disk. If not selected, the default mode is intelligent clone, which copies only used sectors to save space.
►SSD Alignment: Improves the performance of the SSD. If the destination disk is an SSD, it is strongly recommended to choose this option.
►Partition Style (GPT or MBR): Helps Windows understand how to access the data on the disk. The partition style should be compatible with the boot mode (MBR for Legacy BIOS and GPT for UEFI) to ensure secure boot.
If you purchased an NVMe SSD, it should be partitioned with GPT to support UEFI boot. For a SATA SSD, there are no strict requirements about partition style and boot mode. AOMEI Backupper allows you to convert the partition style or keep the partition style of the target disk as needed.
FAQs About Clonezilla Server
Your Turn
Clonezilla Server can be complex for novices. In contrast, AOMEI Backupper Server simplifies the process, allowing you to clone hard drives in Windows Server quickly. In addition to disk cloning, it offers a System Clone feature to help you clone the C drive in Server 2019, 2016, 2012, and other versions.
Notice: If you’re an administrator for enterprises or companies, AOMEI Backupper Technician Plus is the ideal choice. This license supports unlimited activations and can create a recurring revenue stream by providing technical support services to your customers.