How to Create Windows Server 2022 Bootable USB with Rufus
This guide walks you through the process of creating a Windows Server 2022 bootable USB using Rufus. A bootable USB is a crucial asset that ensures smooth deployments and recovery operations. The article delves into multiple methods and offers practical tips to ensure your USB is created without errors.
By Sebastian Updated on December 12, 2024
What is Rufus
Rufus is a lightweight, open-source utility designed to create bootable USB drives quickly and efficiently. It is commonly used for creating installation media from ISO files for various operating systems, including Windows, Linux, and other operating system distributions. Rufus is widely appreciated for its simplicity, speed, and versatility in handling different file systems and partition schemes, making it a preferred choice among IT professionals and tech-savvy users.
Why Use Rufus for Windows Server 2022 Bootable USB Creation?
Using Rufus for creating a Windows Server 2022 bootable USB offers several advantages that make it a top choice for IT professionals and system administrators. Here's why:
🚩Speed and Efficiency: Rufus is known for its fast performance, significantly cutting down the time needed to create a bootable USB, especially for large files like the Windows Server 2022 ISO. This lets you start installations quicker.
🚩Ease of Use: With its simple, user-friendly interface, Rufus allows anyone to create a bootable USB in just a few steps. No advanced settings or technical knowledge are required.
🚩Wide Compatibility: Rufus works with both BIOS and UEFI systems, making it compatible with a variety of devices for smooth Windows Server 2022 installations.
🚩Customizable Options: You can select options like partition scheme (MBR/GPT), file system, and cluster size, ensuring the USB drive is optimized for your system.
How to Create Windows Server 2022 Bootable USB with Rufus
Preparing the necessary tools
1. Download Rufus:
Visit the official Rufus website and download the latest version.
Rufus is a portable tool, so no installation is required—just run the executable file.

2. Prepare the USB Drive:
Insert a USB drive with at least 8 GB of free space.
Ensure to back up any important data, as this process will format the drive.
3. Download Windows Server 2022 ISO:
Head to the official Microsoft site or an authorized distributor to download the Windows Server 2022 ISO file.
Use Rufus to Burn Windows Server 2022 ISO to USB
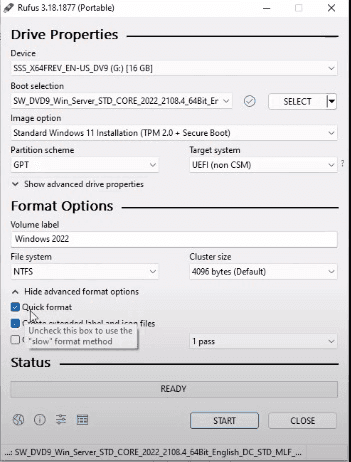
We use Rufus to burn a Windows Server 2022 ISO to a flash drive. This free tool simplifies creating a bootable disk. In Rufus, select your USB drive, load the ISO, and click "Start." Make sure to choose "DD" for the image recording mode. Once the process finishes, Rufus will notify you that the USB is ready. You can now safely eject it and use the drive to install Windows Server 2022 on your device.
Alternative Tool to Create a Windows Server 2022 Bootable USB
The previous method explained how to create a bootable Windows Server 2022 USB using Rufus, which can be tricky for some users. If you're looking for a simpler option, try using the AOMEI Backupper Server. This tool makes it easy to create a bootable USB for both 32-bit and 64-bit servers, supporting versions like 2003, 2008 (R2), 2011, 2012 (R2), 2016, 2019, and 2022. Unlike other tools, you don't need an ISO file in advance—it manages the entire process for you.
To successfully recover your system, you'll need a system image backup created by AOMEI Backupper. If your current system is down, you can create a system image backup on another working computer and use it to restore the system on a new machine with different hardware.
Steps to Create Windows Server Bootable USB
Step 1: Plug a blank USB drive into a working computer and download the AOMEI Backupper Server.
Step 2: Install and launch the software, then go to "Tools" and select "Create Bootable Media".

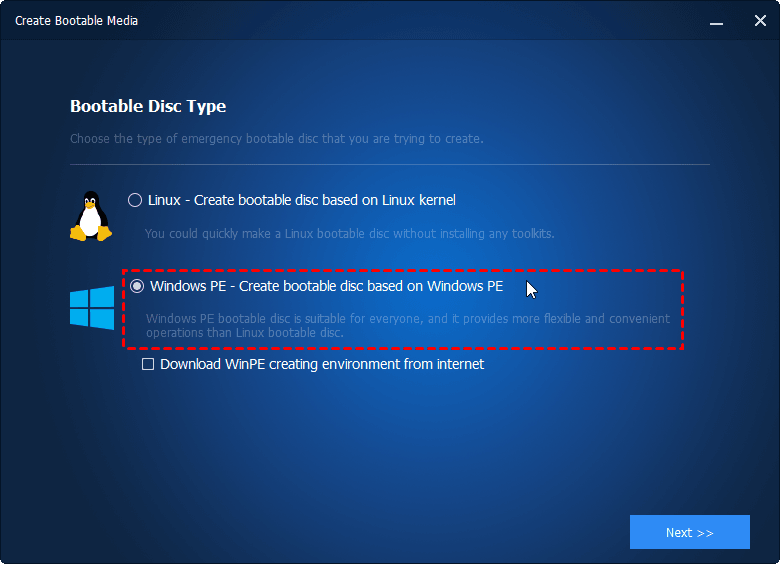
Step 3: Choose "Windows PE" as the bootable disc type for your USB.
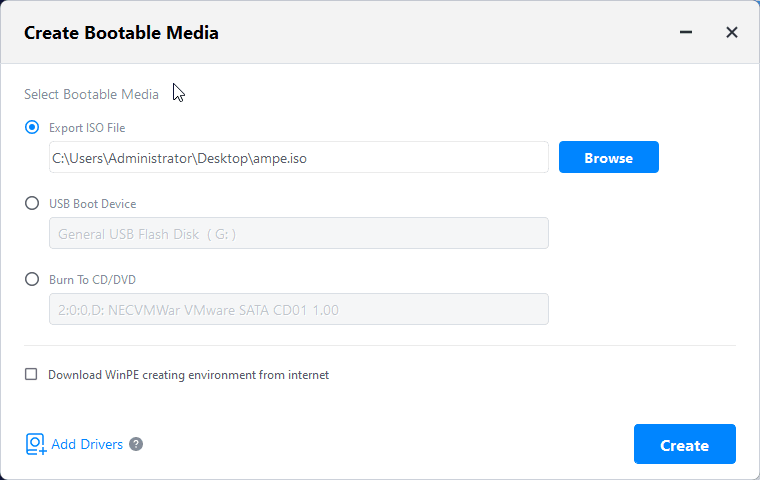
Step 4: Select your USB drive as the bootable media, then click "Next" to proceed.
Notes:
If you’re using an ISO file, select “Export ISO File.” You can burn it to a CD/DVD later.
For deploying on multiple computers, try AOMEI Image Deploy.
Once the bootable recovery USB is ready, insert it into the non-working computer, boot from it, and connect the drive with the system backup for restoration.
Frequently Asked Questions (FAQ)
Q 1: What is the minimum size required for a bootable Windows Server 2022 USB?
A 1: The USB drive should have at least 8 GB of free space. A larger drive, like 16 GB or more, is recommended for faster and error-free processing.
Q 2: Why does Rufus offer different partition schemes?
A 2: Rufus allows users to choose between MBR (Master Boot Record) and GPT (GUID Partition Table) partition schemes depending on their system’s BIOS or UEFI configuration. GPT is recommended for modern systems with UEFI.
Q 3: What should I do if Rufus fails to create a bootable USB?
A 3: Double-check your ISO file for corruption and ensure your USB drive is properly formatted. You can also try another USB drive or disable any antivirus software that might interfere with the process.
Tips for Creating a Bootable USB
-
Use a High-Speed USB 3.0 Drive: This can significantly reduce the time required for both creating the bootable drive and installing the operating system.
-
Verify ISO Integrity: Always ensure that the ISO file is intact and downloaded from a reliable source to avoid errors during the process.
-
Backup Important Data: Before using a USB drive for bootable purposes, backup all important data stored on it, as the process will erase all existing files.
Conclusion
Creating a Windows Server 2022 bootable USB with Rufus or other methods is an essential skill for system administrators and users seeking to install or recover their servers efficiently. By following these detailed steps, you can ensure a smooth and error-free process, readying your system for installation or troubleshooting in minutes.