Windows Server 2019 Recovery Mode: How to Access and Use It
Windows Server 2019 Recovery Mode is essential for troubleshooting boot failures and system corruption. Get your complete guide to Windows Server 2019 Recovery Mode here.
Overview of Windows Server 2019 Recovery Mode
Windows Server 2019 Recovery Mode is a built-in troubleshooting environment designed to help administrators resolve system issues, restore configurations, and repair critical failures. It allows administrators to:
- Fix boot issues preventing the server from starting.
- Restore system files and configurations.
- Repair disk errors and recover lost partitions.
- Reset or recover forgotten administrator passwords.
- Remove faulty updates or drivers that cause system instability.
Whether your server encounters startup failures, system corruption, or security breaches, you can make use of Recovery Mode to get your server back to work.
👉 How to access Windows Server 2019 Recovery Mode
👉 How to repair Windows Server 2019 in Recovery Mode
👉 Best backup and restore software for all Windows Servers🔥
How to access Windows Server 2019 Recovery Mode
When Windows Server 2019 fails to boot properly, it automatically enters the Windows Recovery Environment (WinRE). If you’d like to enter Recovery Mode manually, try the following methods:
Method 1: Using Advanced Startup Options
1. Open Settings and go to Update & Security.
2. Click Recovery on the left panel. Under Advanced Startup, click Restart now.
3. The system will restart into the Windows Recovery Environment (WinRE).
Method 2: Using Shift + Restart
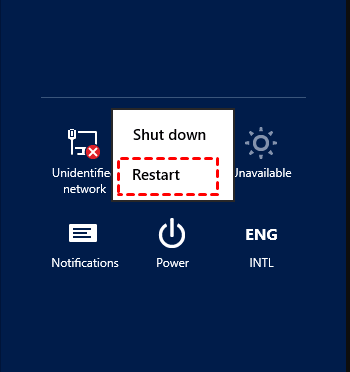
1. Click the Power button on the login screen. Hold down the Shift key and select Restart.
2. The server will reboot into Advanced Startup Options.
Method 3: Booting from Windows Server 2019 Installation Media
1. Insert the Windows Server 2019 installation USB or DVD.
2. Restart the server and enter the BIOS/UEFI (usually by pressing F2, F12, Del, or Esc during boot).
3. Set the boot order to prioritize the installation media. Save changes and exit BIOS/UEFI. The server will boot from the installation media.
4. On the Windows Setup screen, click Next, then select Repair your computer at the bottom-left corner.
5. This opens the Windows Recovery Environment (WinRE), where you can troubleshoot issues.
How to repair Windows Server 2019 in Recovery Mode
Windows Server 2019 Recovery Mode provides a set of powerful tools to diagnose and fix system issues, restore configurations, and recover from failures. Here I’ll show you three commonly used recovery options.
Option 1: Startup Repair
If your server fails to boot, use these steps to run Windows Server 2019 Startup Repair:
1. Boot into Windows Recovery Mode using one of the above methods.
2. Navigate to Troubleshoot > Advanced options > Startup Repair.
3. Select the operating system and follow the on-screen instructions. Windows will attempt to fix any boot-related issues and restart the system.
Option 2: System Restore
If recent changes, such as software installations or updates, have caused issues, System Restore allows you to revert your server to a previous working state. Here’s how to use it:
1. After entering WinRE, go to Troubleshoot > Advanced options > System Restore.
2. Select your Windows Server 2019 installation.
3. Choose a restore point from before the issue occurred and follow the prompts to complete the restoration process.
Option 3: Command Prompt
For experienced administrators, Command Prompt (CMD) provides direct access to powerful recovery commands. Follow the guidance below to run Windows Server 2019 repair from Command Prompt:
1. After entering WinRE, go to Troubleshoot > Advanced options > Command Prompt.
2. In the Command Prompt window, type the corresponding commands based on your needs:
👉To repair corrupted system files, type sfc /scannow and press Enter.
👉To repair Windows image issues, type dism /online /cleanup-image /restorehealth and press Enter.
👉To fix boot errors, type the following commands and press Enter.
- bootrec /fixmbr
- bootrec /fixboot
- bootrec /scanos
- bootrec /rebuildbcd
Best backup and restore software for all Windows Servers
A reliable backup and restore solution is essential for maintaining system stability and preventing data loss on Windows Servers. While there are many options available, AOMEI Backupper Server stands out as one of the best choices for comprehensive backup and disaster recovery.

-
Multiple Backup Types: It offers System/Disk/Partition/File/Email Backup. You are able to backup the entire system, hard drives or specific files and folders.
-
Incremental & Differential Backup: Save time and storage space by backing up only changed data.
-
Bare Metal Recovery: Restore your system to new hardware with ease.
-
PXE Boot Recovery: Restore multiple machines over a network.
-
Automated Backups: Set backups to run at fixed intervals for worry-free data protection.
Download AOMEI Backupper now! To create a system state backup in Windows Server 2019, click Backup > System Backup, select a destination path and click Start Backup.
To restore Windows Server 2019 to a previous working state, click Restore > Select Task or Select Image File. Then follow the wizard to complete the restoration process.
To sum up
Windows Server 2019 Recovery Mode is an essential tool for troubleshooting and restoring system functionality when issues arise. This article covers the different ways to access Recovery Mode and introduces three commonly used recovery options.
Additionally, it is recommended to pick the best backup and restore solution for all Windows Servers - AOMEI Backupper Server to ensure system protection and quick recovery. What’s more, it offers the clone feature to help you clone C drive to SSD. Try it now to discover more!


